Tamiya 1/48 P-51D Mustang
|
DECALS: |
Arrow Graphics D26/27/28/29/34-48 |
|
PRICE: |
$3.29 for the decals, more for the kit. |
|
REVIEWER: |
|
|
NOTES: |
Decals have a solid carrier film |
|
HISTORY |
The P-51 Mustang must rank as one
of the most popular subjects for modelers—if not the most popular
subject. I am almost certain that everyone who models has built at least one. In
many cases for most American modelers it might actually be the first aircraft
they ever build (British youngsters would probably have gravitated towards the
equally attractive Spitfire) but needless to say, everyone on both sides of the
pond is familiar with the P-51. The history of service of this aircraft with the
USAAF is so well documented that there are hundreds upon hundreds of color
schemes that are available to the modeler. One could literally spend an entire
lifetime working on all of these exciting and colorful schemes—yellow tails,
checkerboards and blue noses and what not. What I find often gets overlooked is
the interesting schemes that were
 used by smaller airforces that purchased
surplus Mustangs post war. I have seen some interesting desert camouflage
schemes applied to Israeli mustangs and some very striking looking Australian
and South African mustangs that served alongside the USAF during the Korean War.
used by smaller airforces that purchased
surplus Mustangs post war. I have seen some interesting desert camouflage
schemes applied to Israeli mustangs and some very striking looking Australian
and South African mustangs that served alongside the USAF during the Korean War.
So here my intention is to stir the pot a bit to present some options for Royal Canadian Air Force P-51D’s (or Mustangs IV’s as they were designated) . In 1947, the RCAF purchased 130 surplus P-51Ds for use by auxiliary squadrons where they served until the mid 50’s. Being a Canuck, the RCAF in general has a particular interest for me. Plus, growing up in British Columbia or “the west”, the fact that all four of these sheets represent aircraft from Western Canada makes them even more interesting (to me at least). The maker of these sheets is Arrow graphics and as they were originally issued in 1992 and 1993 which makes them a little hard to find these days, but if you have the interest, I venture that they are well worth seeking out. One “feature” that may turn some off is the fact that the carrier film is all one piece, which necessitates that you cut around each image very closely with a hobby knife. This can be tricky and it is for this reason I might not recommend them to the most novice of modelers, but for those with a ken for the different, fly at it!
|
THE DECALS |
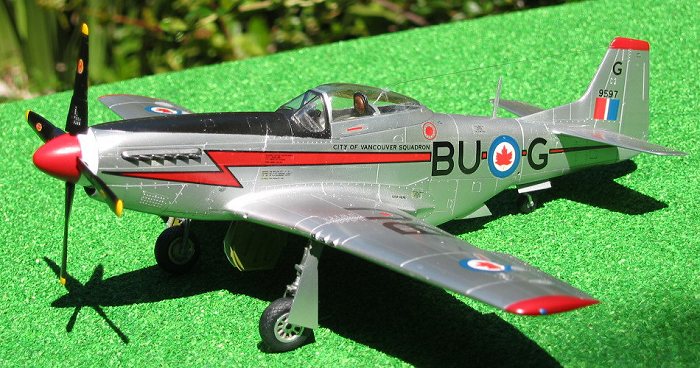
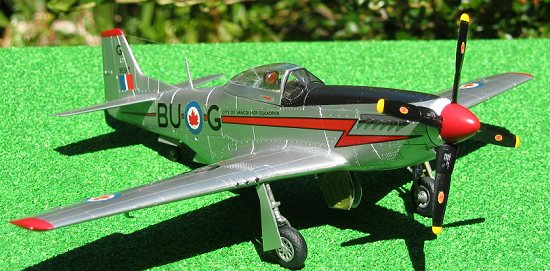
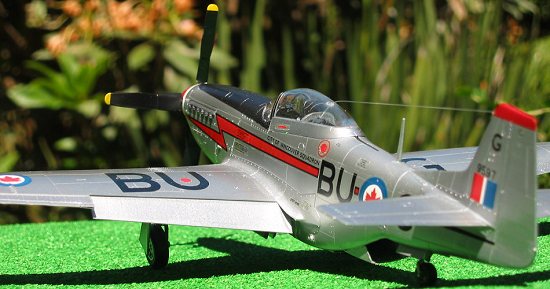
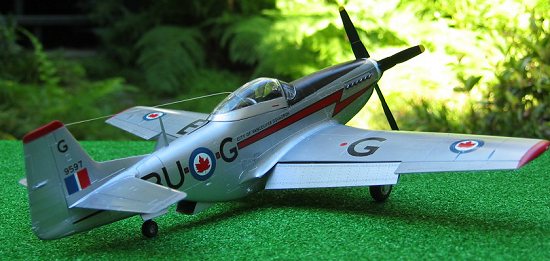
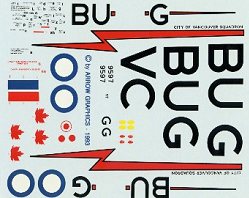 Heading from west to east …The
first sheet is the “442 Squadron, City of Vancouver” and is the aircraft I
modeled here. This sheet was kindly supplied to me by Mike Dougherty in Toronto
and I am very thankful as he sent it out, gratis.
Heading from west to east …The
first sheet is the “442 Squadron, City of Vancouver” and is the aircraft I
modeled here. This sheet was kindly supplied to me by Mike Dougherty in Toronto
and I am very thankful as he sent it out, gratis.
The 442 Squadron was based at Sea Island airport (which is now Vancouver International) and their aircraft sported the attractive red lightning bolt, a red and white spinner, and red wing and tail tips. One note on the red is that the color on the decal sheet is considerably more orange than one might think. I started out with ModelMaster “Guards Red” and found that I had to add quite a lot of yellow before I got a good match. My recommendation for a better starting point might be Modelmaster “Italian red.”
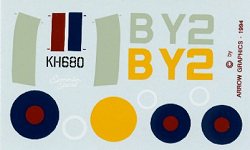 The next sheet also covers a 442
Squadron aircraft, however this is a wartime Mustang. 442 Squadron was the only
RCAF squadron to be equipped the P-51 . At wars end the Squadron was disbanded
and reconstituted two years later as the previously mentioned “Vancouver
Squadron”. Why this might all seems so confused is because this particular
Mustang is nicknamed “Edmonton Special”—which is why it is next in order, but
that would appear to be the naming choice of the pilot, A.J. Mallandaine. This
is not only an interesting bird because it is painted in the standard British
style camoflauge—(most P-51D’s (or Mustang IV’s) were natural metal), but
because of the offset positions of the codes and the odd color of antiglare
panel and canopy frame—painted in bright yellow
The next sheet also covers a 442
Squadron aircraft, however this is a wartime Mustang. 442 Squadron was the only
RCAF squadron to be equipped the P-51 . At wars end the Squadron was disbanded
and reconstituted two years later as the previously mentioned “Vancouver
Squadron”. Why this might all seems so confused is because this particular
Mustang is nicknamed “Edmonton Special”—which is why it is next in order, but
that would appear to be the naming choice of the pilot, A.J. Mallandaine. This
is not only an interesting bird because it is painted in the standard British
style camoflauge—(most P-51D’s (or Mustang IV’s) were natural metal), but
because of the offset positions of the codes and the odd color of antiglare
panel and canopy frame—painted in bright yellow
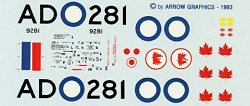 instead of the usual Olive Drab
or Flat Black. These yellow trimmed birds were typical of 442 squadron. For a
great look at how this aircraft looks built up and a very nice write-up, follow
this link;
http://www.ipmscanada.com/442.html. For a nice webpage of RCAF Mustang
profiles go to:
http://members.aol.com/k5083/mustang.htm
instead of the usual Olive Drab
or Flat Black. These yellow trimmed birds were typical of 442 squadron. For a
great look at how this aircraft looks built up and a very nice write-up, follow
this link;
http://www.ipmscanada.com/442.html. For a nice webpage of RCAF Mustang
profiles go to:
http://members.aol.com/k5083/mustang.htm
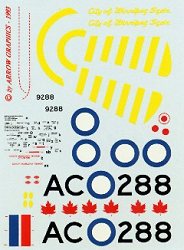
Moving along, we have the “City of Calgary, 403 Squadron”. This is another natural metal Mustang that features a white rudder, wing tips and spinner. There is also an attractive griffon insignia that goes just ahead of the cockpit.
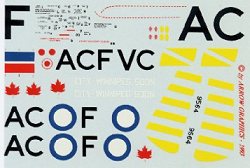
 Finally we have the two “City of
Winnipeg, 402 Squadron” options in the natural metal, blue, and yellow schemes.
The main difference between the “early” and “late” styles of painting is in the
arrangement of the code numbers, in the style and color of script on the cowl,
and the direction of the yellow striping on the spinner.
Finally we have the two “City of
Winnipeg, 402 Squadron” options in the natural metal, blue, and yellow schemes.
The main difference between the “early” and “late” styles of painting is in the
arrangement of the code numbers, in the style and color of script on the cowl,
and the direction of the yellow striping on the spinner.
All in all, these make up into elegant looking models. Despite the hassles of trimming I mentioned before, if you cut the images out close enough what is left of the film is nice and transparent and with a shot of sealer the film pretty much disappears. I would highly recommend these sheets to RCAF fans or any one that seeks a ‘stang of a slightly different color. One thing I would recommend is seeking out an alternate source for the stencils as Arrow’s printing process does not quite seem up to the task of printing these tiny letters. A good source for Arrow Graphics decal sheets is FlightDecs http://www.tbaytel.net/fldecs/
|
THE KIT |
When I first proposed this to Scott and told him it was just going be a decal review “because there are millions of reviews of the Tamiya P-51D already”. He told me that he prefers as many opinions as possible and I relented because of course-- this is a review site after all. At first I wasn’t sure my view would really add anything to a debate that seems to have been decided long ago. Now, having actually finished up the Tamiya --and quickly following on the Hasegawa version of the same aircraft—I feel I could offer some sort of view on the two kits. There *are* some pretty dramatic differences.
 Whenever I had seen a discussion
on the relative merits of the Tamiya Mustang versus the Hasegawa Mustang on RMS
or some other discussion group. It always seems like the general view is “The
best is Tamiya, Hands down!”. Having now built each of them I actually feel the
decision is somewhat grayer. Both kits go together extremely well, so if that is
your prime determiner for kit “greatness” then either are excellent options. The
Tamiya kit features dropped flaps, this I think is the main reason for its large
fan club. It also has separate wheel hubs which make things a little easier. One
could also make a case for its nice deep wheel wells. But for me, here are the
advantages of the Hasegawa kit:
Whenever I had seen a discussion
on the relative merits of the Tamiya Mustang versus the Hasegawa Mustang on RMS
or some other discussion group. It always seems like the general view is “The
best is Tamiya, Hands down!”. Having now built each of them I actually feel the
decision is somewhat grayer. Both kits go together extremely well, so if that is
your prime determiner for kit “greatness” then either are excellent options. The
Tamiya kit features dropped flaps, this I think is the main reason for its large
fan club. It also has separate wheel hubs which make things a little easier. One
could also make a case for its nice deep wheel wells. But for me, here are the
advantages of the Hasegawa kit:
1. Includes Aeroproducts propeller so one can build a “K” version.
2. The keyed propeller is so much easier to align
3. Better cockpit detail “out of the Box”
4. Includes two different types of drop tank.
5. The formation lights have lenses.
6. Nicely detailed gunsight.
7. Canopy configuration is easier for painting.
8. Lately at least it goes for about five dollars cheaper…
(In Tamiya's defense, if one gets the Korean War boxing, you not only get the Aeroproducts prop, but also the shorter spinner, two canopies, and under wing rockets as well as a nice pair of bombs. Ed)
In my view, if I were to build the ultimate Mustang, ie with an aftermarket cockpit and lots of extra detail bits, I would probably opt for the Tamiya. However, I am an out of the box kind of guy and so if there is a Hasegawa kit on the shelf I will very happily snap it up. I don’t think that ends the story but just puts a twist on it for those that are willing to walk by the Hasegawa kits and all of the nice decal options they offer.
|
CONCLUSIONS |
Mike’s Modeling tip: Superglues and clear parts don’t mix! Even if you are very eager to finish your model and get it photographed, don’t be tempted to glue in that aerial wire with the speed of that CA glue. Even with the tiniest amount you will wind up with a nice “bloom”—just like you see on this canopy. Always use white glue or clearfix or practically anything else… (Editor's Note: There is a 'non-fogging' superglue that is often sold as 'odorless'. This generally does not fog windscreens. Your editor has been using it on his models for several years. You can also coat your clear bits with clear gloss acrylic (Future) to prevent this as well.)
July 2002
Copyright ModelingMadness.com
If you would like your product reviewed fairly and fairly quickly, please contact the editor or see other details in the Note to Contributors.
Back to Reviews Page 2016