Heller 1/72 J.32 Lansen
|
KIT # |
|
|
PRICE: |
110 Swedish Kr |
|
DECALS: |
2 aircraft |
|
REVIEWER: |
|
|
NOTES: |
Currently (2002) OOP |
|
HISTORY |
The A 32 "Lansen" ("The Lance") was developed to replace aging Saab B 18/S 18 , J 21R/A 21R and DeHavilland Mosquito (J 30)attack, reconnaissance and night-fighter aircraft in the Flygvapnets (Royal Swedish Air Force). Requirements were demanding: the aircraft had to be able to be able to strike anywhere along Sweden's 2000+ km (1245 miles) coastlines within one hour of sortieing from a central location, in any weather, day or night It was to be armed with 4 20mm cannon, rockets, bombs and/or a new anti-ship missile being developed, the Rb04. Special attention was to be paid to integrating the electronics and weapons systems.
The result was the first two-seat Swedish jet and the first equipped with built-in search radar. Clean lines and a license-built Rolls-Royce Avon Series 100 engine enable the prototype to break the sound barrier on 25 October 1953; later variants could attain a max speed of 1125 kph/ 669 mph. The aircraft was popular with both pilots and maintenance personnel, being easy to fly, maneuverable, and reliable.
Five versions were built/converted. The original A 32A was built from 1955-1957 and equipped all five Attack Wings (F6, F7, F14, F15 and F17). A dedicated reconnaissance variant, the S 32C, was developed in 1955. The cannon were replaced by a larger radar and a battery of cameras installed, along with provisions to carry up to 12 photo-flash bombs. A total of 44 of these types served with F 11 Wing.
The all-weather/ day/night fighter J 32B made it's first flight in 1957. It sported a more powerful engine, which necessitated redesigning the intakes and afterburner. 4 Aden 30mm cannon replaced the original 20mm, and provision was made to carry up to 4 Rb 24 anti-air missiles (license-built Sidewinders). New electronics made the aircraft capable of engaging targets beyond visual range independent of weather or visibility considerations, a first in Europe at the time. A total of 120 J 32B aircraft were delivered between 1958 - 1960, and served with F1, F12, F 4 and F 21 Wings.
In the 1970s, several J 32D target tugs and J 32E ECCM trainers were converted, some of which served into the 1990s.
|
THE KIT |
I received this kit partially built (long story: a friend
was building a series of SAAB jets for another friend and needed help meeting
the deadline). I was told it was an Airfix boxing, but the parts were
identical to the Heller boxing I bought in Stockholm. Parts are included for
the J 32B or S 32C variants, along with two fins that _appear_ to be of the type
used on the A 32 (set on the underside flanking the nose gear doors - they are
not referred to in the instructions). Overall outline accuracy is good; detail
accuracy is only OK (the tailpipe is J 32B, intakes appear to be the smaller A
32A type, as do the gunports -- the A 32 had electrically-operated doors
covering the guns, which is what appears to be represented on the model).
Detailing is a combination of finely raised panel lines, engraved control
surface lines and some raised rivets/fasteners that appear too large for the
scale. Landing gear struts are overly thick, as are the gear doors, wing fences
and antenna blades. Clear parts for the landing lights, canopy and back seater's wind screen are provided; they
 are coke-bottle thick .... but since
there are no aftermarket replacements, you gotta use them. No underwing stores
or pylons are provided.
are coke-bottle thick .... but since
there are no aftermarket replacements, you gotta use them. No underwing stores
or pylons are provided.
I'm not sure about the instructions - none came with the kit I was sent, so I had to use the Heller. Those are the typical Heller, with exploded diagrams in a series of assembly steps. They're adequate, if you have some references to help sort out the differences between variants. Decals are typical Heller -- utter crap, in other words. They're dead flat, thick as typing paper and abysmally registered - the same as every other Heller sheet I've ever seen (get a clue Heller: farm that job out to some firm that knows what it's doing). The numbers were salvageable, but I had to buy an Airfix Draken to get useable roundrels.
Also included in the box I received was an aftermarket weapons set - two vacuform Rb04 missiles. These were also already partially assembled - a problem, since my buddy hadn't thinned the planks masquerading as wings.
|
CONSTRUCTION |
When I got the kit, the fuselage was assembled and wings affixed. The cockpit was painted and in place, using a decals for the instrument clusters. The cockpit, as kitted, is rudimentary -- some shapeless ejection seats, a stick, and those instrument panels. I added the back seater's windscreen after a dip in Future and a quick painting of the frames.
 Next, I had to address seams, of which there were more
than enough. Fit was marginal at best; my buddy had done as well as could be
expected, but there was no way to fix the step behind the cockpit or the loose
fitting intakes without a lot of putty. I had to fill, sand, spray a light coat
of paint to find any flaws I missed - and repeat three times before I was
satisfied I had fixed everything. I then affixed the horizontal stabilizers and
briefly considered adding detail to the otherwise blank wheel wells (I lay down
until the urge passed, however). I added the wing fences and the blade antennas
on the upper wing, though I should probably have held off on these. I broke
one of each off repeatedly throughout the course of painting and weathering, and
never did get the starboard wing fence to sit right after that.
Next, I had to address seams, of which there were more
than enough. Fit was marginal at best; my buddy had done as well as could be
expected, but there was no way to fix the step behind the cockpit or the loose
fitting intakes without a lot of putty. I had to fill, sand, spray a light coat
of paint to find any flaws I missed - and repeat three times before I was
satisfied I had fixed everything. I then affixed the horizontal stabilizers and
briefly considered adding detail to the otherwise blank wheel wells (I lay down
until the urge passed, however). I added the wing fences and the blade antennas
on the upper wing, though I should probably have held off on these. I broke
one of each off repeatedly throughout the course of painting and weathering, and
never did get the starboard wing fence to sit right after that.
Now it was time to put the canopy on. This was the most frustrating thing I've done on a model in ... well, in quite a while. It just didn't fit, no matter how I trimmed, sanded, puttied, etc. More than once I had to break it off, sand down a portion, polish out scratches and re-Future. Good thing I used thinned white glue to affix it or the model would have never been finished. Finally, in disgust and with a deadline for delivery looming, I decided it was close enough for government work and masked it off for painting.
|
PAINTING AND MARKINGS |
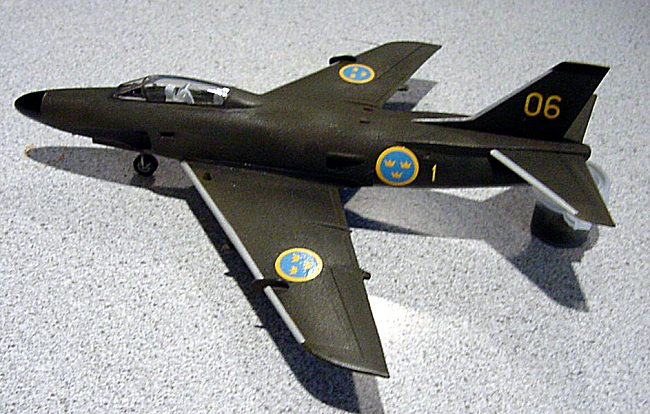
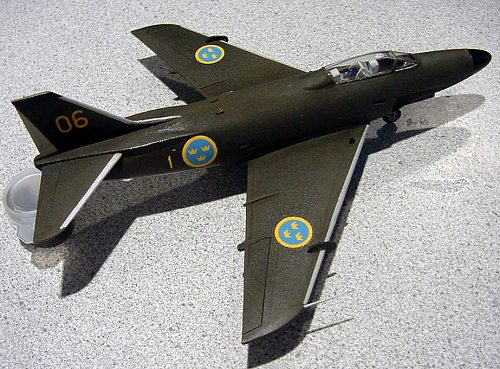
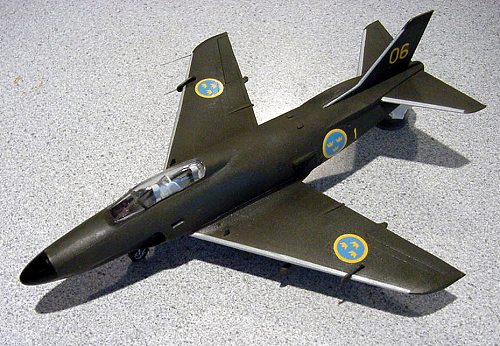
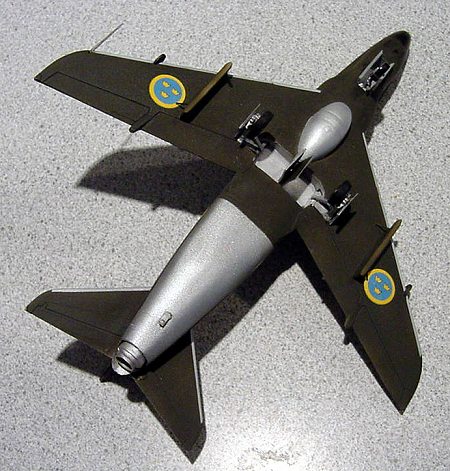
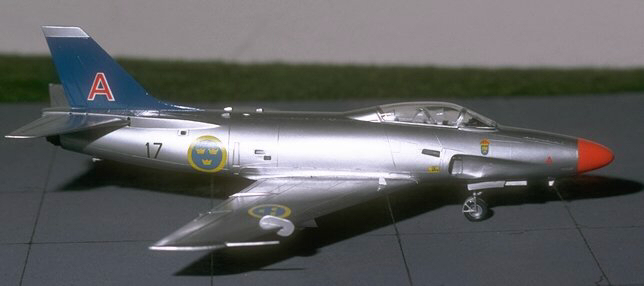
Lansen carried a variety of paint schemes over the years. Almost all were a dark green on upper surfaces. Lower surfaces could be the same green with some bare metal, all bare metal or a light blue. I decided to go with an early 60's scheme of all green, with bare metal sections under the engine and along the leading edges of the tail and wings.
 I primed the entire aircraft with a light grey enamel
(whatever was handy at the moment). When that had thoroughly cured, I
over-sprayed the bare metal areas (to include the extra fuel tank , wheel wells
and inside surfaces of the gear doors) with Tamiya Flat Aluminum. This revealed
flaws under the engine that needed filling and smoothing. When that was done, I
masked off the aluminum areas and sprayed the rest of the model with Tamiya
XF-61 dark green. That turned out to be the absolute most dead flat paint I
have ever sprayed - including Humbrol's matte clear enamel! When that was dry,
I masked off the aluminum areas that needed to be retouched and sprayed more
Tamiya Aluminum ... then retouched the overspray that leaked around my masks
with more XF-61. Arrgggggh! When that had all dried, I masked off the nose and
tail fin tip for Tamiya Flat Black.
I primed the entire aircraft with a light grey enamel
(whatever was handy at the moment). When that had thoroughly cured, I
over-sprayed the bare metal areas (to include the extra fuel tank , wheel wells
and inside surfaces of the gear doors) with Tamiya Flat Aluminum. This revealed
flaws under the engine that needed filling and smoothing. When that was done, I
masked off the aluminum areas and sprayed the rest of the model with Tamiya
XF-61 dark green. That turned out to be the absolute most dead flat paint I
have ever sprayed - including Humbrol's matte clear enamel! When that was dry,
I masked off the aluminum areas that needed to be retouched and sprayed more
Tamiya Aluminum ... then retouched the overspray that leaked around my masks
with more XF-61. Arrgggggh! When that had all dried, I masked off the nose and
tail fin tip for Tamiya Flat Black.
Now it was time to prepare for decals, so I gave the entire model a healthy coat of Tamiya Clear gloss -- I have abandoned spraying Future because it just doesn't work for me. When that had dried, I sprayed another coat - and another - and a fourth; no matter how much I sprayed, the surface was still rough and matte! Important safety tip: mix a clear gloss with the XF-61 before spraying next time!
Finally, the surface was as gloss as it was going to get. I applied decals from the Heller & extra Airfix sheets for a ship from F1 based at Västerås. All were impervious to setting solutions and refused to melt down - it's a good thing there wasn't any detail for them to conform to. Silvering, and there was a lot of it, was fixed by poking holes in the air bubbles and attacking the decal with more setting solution.
When that had all dried, I wiped the model down with a mild detergent solution followed by distilled water to get rid of any finger oils and solvent residue. This was followed by Humbrol matte clear, which for the first time ever failed to completely kill the gloss coat beneath. Ah, well. I was running out of time.
|
CONSTRUCTION CONTINUES |
Painting complete (or as complete as it was going to get - not how I like to model, but there you go), it was back to the bench for the final bits. Undercarriage were cleaned up and painted using more Tamiya acrylics, and affixed in place. The antenna blade under the nose and wing tip pitot tube were also mounted. I ran a dark oil wash in the gear wells and inside the burner can, as well as around the various intakes and scoops. RSAF machines are meticulously maintained, so I did no further weathering.
 The last step was to assemble the Rb04 anti-ship
missiles. The bodies had been already assembled and the fins cut from the
vacuform sheet, so all I had to do was putty, sand, putty some more, sand some
more ..... you get the picture. Then I added the fins and puttied and sanded
some more, before priming the missiles and pylons. The missiles were painted
overall white using a Gunze acrylic; pylons were XF-61. The instructions showed
very clearly where to mount the pylons, as well as the braces I had to make from
thin strip.
The last step was to assemble the Rb04 anti-ship
missiles. The bodies had been already assembled and the fins cut from the
vacuform sheet, so all I had to do was putty, sand, putty some more, sand some
more ..... you get the picture. Then I added the fins and puttied and sanded
some more, before priming the missiles and pylons. The missiles were painted
overall white using a Gunze acrylic; pylons were XF-61. The instructions showed
very clearly where to mount the pylons, as well as the braces I had to make from
thin strip.
And that was it - alldeles färdig. A day later, the white on the missiles was still not completely cured, so they were left separate when I boxed the model up for the trip to Ohio and it's new home.
|
CONCLUSIONS |
This is the first 1/72 jet I've ever built ... and may well be the last. Fit problems aside (those I can deal with, and were really no more difficult than on a limited run kit), the scale is just too small for my taste. My fat fingers and failing eyesight much prefer 1/48. Still, the kit does build up into a decent representation of a lovely aircraft --- and it's the only game in town if you want one (unless you can find a copy of that elusive 1/48 vacuform the guy in Nyköping supposedly produced ...). And it makes a fine study model for those interested in scratchbuilding a larger version.
|
REFERENCES |
Flygplansritningar 2: Svenska Flygvapnets Jaktflygplan by Björn Karlström. Line drawings (1:72 and 1:50 scale) and photos of Swedish fighters from J 1 to JAS 39 Gripen. Out of print and hard as hen's teeth to find - you can get the rest of the series from the publisher, http://www.hobby.se/
SAAB Aircraft Since 1937 by Hans G. Andersson. Putnam, 1997 ISBN 0 851770866 0. 199 pages, b&w photos and line drawings - I wish I'd had found this BEFORE I completed the project!
For those interested in seeing what your
editor built about 20 years ago, here is a pic.
2002
Copyright ModelingMadness.com
If you would like your product reviewed fairly and fairly quickly where it will be seen by well over 150,000 visitors a month, please contact the editor or see other details in the Note to Contributors.
Back to Reviews Page 2017