Hasegawa 1/72 TF-102A (Conversion)
|
KIT # |
JS-047 |
|
PRICE: |
£8.99 MSRP |
|
DECALS: |
Three Aircraft |
|
REVIEWER: |
|
|
NOTES: |
XtraParts XP003
TF-102 Conversion Aeroclub AVB 202 Closed Missile Bay Door |
|
HISTORY |
The Convair F-102 is a first generation supersonic interceptor of the Century Series of fighters.
Influenced by the captured wartime work of Dr. Alexander Lippisch, Convair engineers became convinced that delta wings were the way forward for supersonic aircraft.
Their first attempt was the XF-92A demonstrator, a barrel fuselage with mid mounted 60-degree delta wings, and an Allison J-33 engine of 5,900 lbs thrust or 7,500 lbs afterburner, it came close to breaking the sound barrier. This ‘success’ was the green light for continued development of the YF-102. The YF-102 was about 70% size of the service aircraft which we are familiar with, and had a pointed nose, air intakes just below the cockpit, delta wings, and a Pratt & Whitney J-57 of 9,200 lbs thrust or 14,800 lbs afterburner. More than enough power to go supersonic with. However flight-testing revealed a VERY different story, as the YF-102 stubbornly refused to go supersonic under any conditions! At this time the USAF was not interested in a fighter incapable of going supersonic, and was very close to canceling the F-102 project.
 However at this time a NACA aerodynamics specialist called Richard Witcombe
discovered the area rule, and it was suggested that this be applied to the
YF-102. Put simply – an aircraft’s cross section, when plotted from nose to
tail would be as smooth a curve as possible.
However at this time a NACA aerodynamics specialist called Richard Witcombe
discovered the area rule, and it was suggested that this be applied to the
YF-102. Put simply – an aircraft’s cross section, when plotted from nose to
tail would be as smooth a curve as possible.
In practical terms for the YF-102, it was modified to have a longer and more tapered nose, slimmer fuselage where the wings were attached, and a lengthened tail section widened with the addition of two large bulges. Re-engined with a J-57-P-11 of 10,200 lbs thrust or 16,000 lbs afterburner, the aircraft was redesignated YF-102A and easily broke the sound barrier on its second flight.
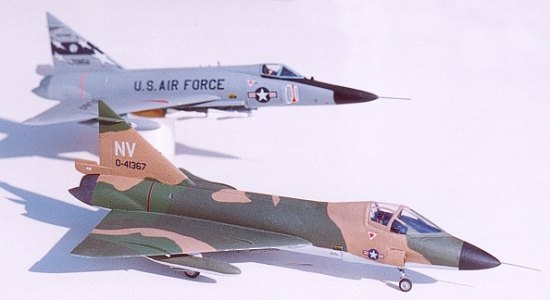
The service F-102 was powered by a similar or slightly more powerful J57, giving it a maximum speed of 825mph at 36,000 feet. It was armed with 6 Hughes Falcon missiles carried internally in the weapons bay, 3 being infra-red and 3 being radar guided. The F-102 served with the USAF from April 1956 until 1978 with the ANG. 875 single seaters were built.
The TF-102 was a side-by-side trainer version with full combat equipment, 63 being built. The bulbous front end compromised the newly discovered area-rule, and restricted the TF-102 to subsonic flight only. Most served with the 4780 Air Defense Wing, providing training for F-102 pilots. However all operational units had a trainer version for pilot evaluation purposes.
As an aside, the F-106 Dart is a continuous development of the Dagger, designed from the outset with knowledge of the area-rule. With a J75 of 17,200lbs thrust or 24,500 lbs afterburner, it achieved a maximum speed of 1,525mph at 40,000 feet. The fastest single engined aircraft ever!
|
THE KIT & CONSTRUCTION |
The Hasegawa kit has been with us for some years now (I don’t know it’s precise vintage), and is frequently re-issued. I built my first Dagger (and Dart) in 1987, in ADC overall gray, so knew exactly what I was getting. As I remembered, it went together well, required no filler, and looks every inch as an F-102 should. Superbly moulded in Hasegawa's hard grey plastic, this kit is free of flash, and a pleasure to build. The only shortcoming being that this kit is not up to modern standards of interior detail and the surface detail is raised, but that should be reflected in a lower cost! It represents a superb example of first generation Hasegawa at their finest, and is an excellent start point for any F-102 Dagger project.
Although I think the Hasegawa kit shapes out well as an F-102, I never measured my kit until this project, but am very impressed with the results.
My second Hasegawa F-102 came courtesy of the Esoteric Models sale at the 1998 IPMS Nationals.
The Hasegawa instructions are clear and concise, making construction fairly straightforward, so I'll just concentrate on the areas where I diverged from the standard kit instructions.
Cockpit
 Unsurprisingly, this bears no relation to the original, the only shared
component being the front undercarriage bay, and this had to be modified by
removal of the single seater’s side consoles.
Unsurprisingly, this bears no relation to the original, the only shared
component being the front undercarriage bay, and this had to be modified by
removal of the single seater’s side consoles.
Cockpit starts with the floor, vac-formed as a single part, I painted it Ash light grey from the Inscribe range of acrylic paints, with black side consoles and installed control columns made from sections of paperclip. Next came the metal seats, which needed a little work to remove the pouring points. Seats were painted black with green cushions and red head and armrests. I installed harnesses from thinly sliced Tamiya masking tape, and then installed the seats.
Front Fuselage
This is continuously dry fitted with the cockpit, as these parts are nothing like as well fitting as the original Hasegawa parts. The first task that can be completed is the installation of the modified undercarriage bay. This gives a base for the cockpit floor, such that the opening can be trimmed to the correct shape and size. I painted the cockpit walls light grey prior to cementing the cockpit floor to the top of the undercarriage bay, such that the seats backed upto the bulkhead. I installed a little nose ballast prior to joining the front fuselage halves, fortunately it all lined up ok, with the cockpit well centred.
With the front fuselage halves joined I was able to smooth the seam, and install the instrument panel and coaming. These were painted black.
Completing the Airframe
I mated the Hasegawa fuselage halves, and then began checking to see where I should sever the original front. Unfortunately the Xtraparts instructions are not very clear, and the cut does not follow a panel-line, but the diagram shows a line 6mm aft of the wing root. It was impossible to check by dry fitting, so I took a deep breath and wielded my hacksaw.
Now that I
could check by dry fitting, I was horrified to find that the weapons bay
aperture was about 6mm short for the cover! The line was in the WRONG place!
Undeterred, I smoothed the cut marks, and rejoined the severed fuselage parts
using tabs. After cooling down for a few days I cut the fuselage again at a
point coinciding with the leading edge of the wing. This time the dry fitting
indicated success, so I joined the new nose, and began filing the join lines.
The wings were installed 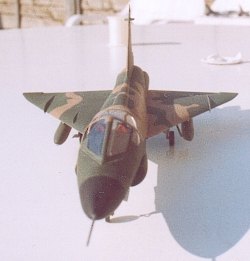 unmodified, followed by the weapons bay doors. This
is a single piece resin replacement part by Aeroclub, which would fit the
single-seat Hasegawa kit perfectly. Mine required minimal trimming to
compensate for the new nose. Final touch was the metal air intakes, which
required a little cleaning up before fitting, but fitted very well. At this
point I primed the entire airframe, to check that all my joins and seams were
smooth enough.
unmodified, followed by the weapons bay doors. This
is a single piece resin replacement part by Aeroclub, which would fit the
single-seat Hasegawa kit perfectly. Mine required minimal trimming to
compensate for the new nose. Final touch was the metal air intakes, which
required a little cleaning up before fitting, but fitted very well. At this
point I primed the entire airframe, to check that all my joins and seams were
smooth enough.
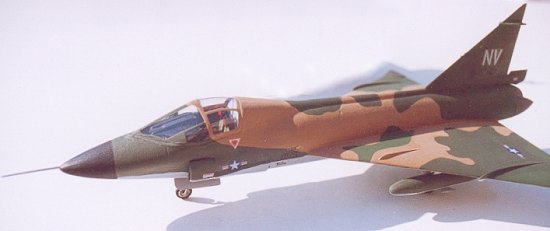
Canopy
I trimmed the canopy from its backing sheet, and was horrified to find that it was undersize! In desperation I trimmed the coaming, and installed raised cockpit side sills to spread the rear section of the canopy a bit. This achieved an adequate match for the rear section, but left horrendous gaps around the windscreen. The canopy was fitted using Humbrol Clearfix all round, several applications being applied to fill the gaps at the front. Finally I used PVA wood glue to smooth the front to an aerodynamic section. At this point I noticed that the seats are very small, and a pilot with head on the headrest wouldn’t be able to see over the instrument panel. However after all that filling, the cockpit was going to have to stay as it was.
Hasegawa suggest that Vietnam scheme F-102s should have an infra-red sensor just ahead of the canopy, and this was moulded on my original F-102. However, photographic evidence suggests that this item is retractable, so I omitted it from the TF-102.
Painting and Markings
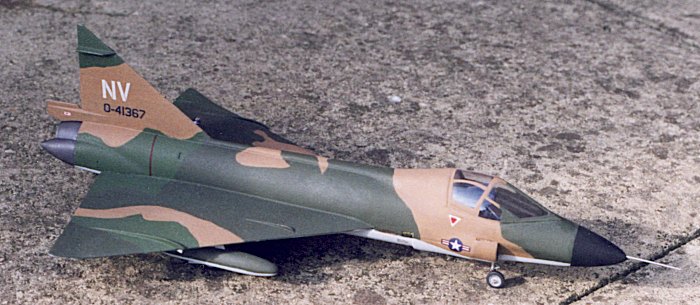
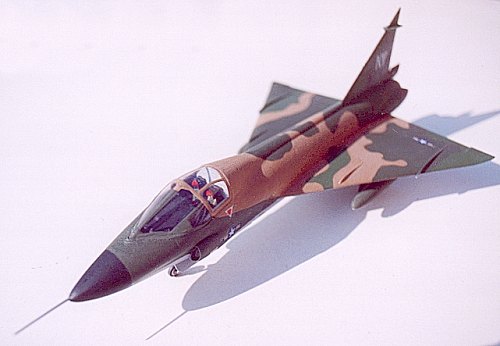
I masked the clear sections of the canopy very carefully with bare metal foil, leaving the frames exposed. Then I handpainted the upper fuselage in Vietnam 3 tone camouflage using Humbrol numbers 116, 117 and 118, following the Hasegawa painting instructions. Underside was painted with Inscribe Ash Grey with Inscribe Avocado as interior green for the undercarriage bays. Nose radome is Humbrol 33 Black. This was followed by several coats of Johnsons Klear prior to application of decals. I apply my decals over a wet patch of Klear as this gives no space for any air, and eliminates the risk of silvering. The Xtra parts conversion includes an appropriate serial number, and the instructions suggest using kit decals and simply replacing the serial. This is exactly what I did, and just hope that 0-41367 served with the 62nd Fighter Squadron in Vietnam colour scheme at some time.
After completion of decalling I coated the entire aircraft with Humbrol Matt Cote to dull it down, prior to removing the canopy masks. On this occasion the masks came off cleanly without tearing any framing or cracking those joints around the canopy.
Finishing Off
 Nearly
there, the rest is straight forward, with no more hidden traps. Jetpipe and
arrestor were painted gunmetal and installed after completion of painting.
Undercarriage was painted with Humbrol Aluminium with silver oleos prior to
installation. Wheels are Aluminum with Aeromaster Tire Grey tyres. The air
data probe was again Aluminium, and required the drilling of a very straight
hole into the tip of the radome.
Nearly
there, the rest is straight forward, with no more hidden traps. Jetpipe and
arrestor were painted gunmetal and installed after completion of painting.
Undercarriage was painted with Humbrol Aluminium with silver oleos prior to
installation. Wheels are Aluminum with Aeromaster Tire Grey tyres. The air
data probe was again Aluminium, and required the drilling of a very straight
hole into the tip of the radome.
Voila! the TF-102 project is complete, and a very different Dagger joins my miniature air force.
Accuracy
For the purposes of completeness (and for only the second time ever), I have measured the models, multiplied the measurements by 72 to see how large the model would expand to. Then I obtained dimensions from my reference books, and calculated the difference - to explain it away.
Height. Model built without undercarriage, so use TF-102 figures.
Span 162mm, x72= 11664mm, 11.60M, Diff = 64mm
Length 284mm with probe, x72= 20448mm, 20.82M, Diff= 372mm
Height 90mm, x72= 6480mm, 6.45M, Diff = 30mm
Span 162mm, x72= 11664mm, 11.60M, Diff = 64mm
Length 282mm in probe, x72= 20304mm, No Figures
As you can see, the model is extremely accurate, with discrepancies probably down to my crude measuring techniques, or inaccurate length of the probe. They certainly look the part!
|
CONCLUSIONS |
Overall I am delighted with the outcome of my TF-102 Dagger Trainer, despite any shortcomings that I have mentioned. The difficulties with the fuselage length, and the canopy all added to the satisfaction of the project, and completion has the added reward that I have NEVER seen another completed example at any model show.
Although I never had the pleasure of meeting Jim Wood, I hope he would approve of what I did with one of his kits.
April 2003
If you would like your product reviewed fairly and quickly, please contact me or see other details in the Note to Contributors.
Back to the Reviews Index Page