Tamiya 1/48 AD-4 Skyraider
|
KIT # |
61058 |
|
PRICE: |
$34.00 |
|
DECALS: |
See Review |
|
REVIEW & |
Terry Miesle |
|
NOTES: |
Kit backdated to an earlier version |
|
HISTORY |
You can title it "Flying Dump Truck" or "Able
Dog" I prefer Flying Dump
Truck myself. I should have done the plane that dropped a kitchen sink on
the Koreans - maybe that was an AD-2, and I can still do it.
------------------------------------------------------------------
Today we view the Skyraider with the same nostalgia as we see the Spitfire
or Mustang. I think we forget that the Skyraider was a very
different
aircraft, born a generation later and with a much different purpose. When
the Korean War broke out the United States, Great Britain, China and the
other participants were flying primarily older aircraft designs leftover
from World War Two, and some newer jets. This would change, a great many
newer jet designs would be introduced. Alongside these jet aircraft was
one
major new piston-engined aircraft, the Skyraider. As what might be
considered an anachronism, the AD proved the most capable attack aircraft in
the theater.
 When most jobs were completed with a variety of designs, the Skyraider
proved itself infinitely malleable. The AD-4 was the newest variant of the
aircraft, but was not drastically different from the AD-2. Variants from
AD-1 through AD-4 were used by the Navy and Marines in roles as diverse as
dive bomber, electronic warfare, night fighter, airborne early warning and
When most jobs were completed with a variety of designs, the Skyraider
proved itself infinitely malleable. The AD-4 was the newest variant of the
aircraft, but was not drastically different from the AD-2. Variants from
AD-1 through AD-4 were used by the Navy and Marines in roles as diverse as
dive bomber, electronic warfare, night fighter, airborne early warning and
liaison. This led to a variety of nicknames for the Skyraider over its
service life (1946-1975 in frontline U.S. service) including Able Dog,
Flying Dump Truck, Spad, Sandy, and Hobo among others.
The AD Skyraider was one of the most capable aircraft ever fielded by the
U.S. military. It was big, with a 50-foot wingspan and a Pratt &
Whitney R3380 engine that developed nearly 3000 horsepower. These combined to
allow
the AD to launch from an aircraft carrier carrying over 8000lbs payload,
more than doubling the aircraft’s empty weight. This gave the AD more
combat effectiveness than a WWII B-17. The plane had legs, too, allowing
it
to strike any target over Korea, and allow important loiter time to support
Marines or Army soldiers in the field.
|
CONSTRUCTION |
 This model started out as a Tamiya A1-H (AD-6) kit. I wanted to backdate
it
to a Korean War vintage aircraft for an upcoming show. I also had been
planning to make a few other Skyraider variants, so this one would merely
get the ball rolling. I had detailed a Monogram A1-H kit some years ago,
aside from removing and re-engraving panel lines that project for the most
part involved adding items like antennae, engine parts and corrected landing
gear. This project mostly involves removing things like antennae and
armor.
This model started out as a Tamiya A1-H (AD-6) kit. I wanted to backdate
it
to a Korean War vintage aircraft for an upcoming show. I also had been
planning to make a few other Skyraider variants, so this one would merely
get the ball rolling. I had detailed a Monogram A1-H kit some years ago,
aside from removing and re-engraving panel lines that project for the most
part involved adding items like antennae, engine parts and corrected landing
gear. This project mostly involves removing things like antennae and
armor.
Be careful when removing the armor, I was a bit overzealous in my sanding
and had to fill an area with putty. The panel lines on the fuselage sides
will change with the earlier version, consult the Squadron Skyraider in
Action book for profile drawings.
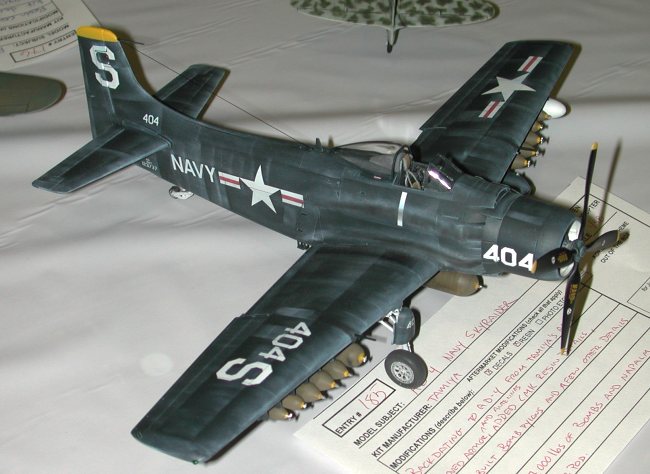
The AD-4 I will depict here is an early version with only two 20mm cannon.
The AD-4 lacks the armor of the AD-6 in the Tamiya kit, so that was sanded
off. After the fuselage halves were glued together I would also need to
remove the large antenna on the spine and the tail beacon, filling the area
with putty. After the wings were assembled, I closed off the outboard gun and filled the gun discharge chutes with superglue – Scotch tape was applied
inside before assembly.
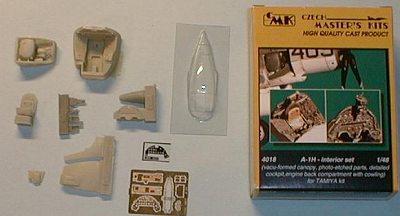
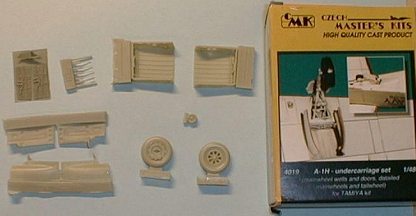
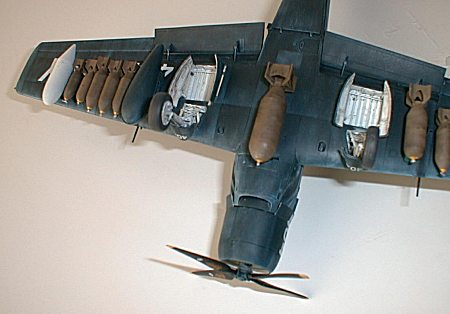
I obtained CMK’s Skyraider detail sets, which include a new cockpit tub,
which is more similar to the AD-4’s layout, and even includes the bank of
circuit breakers. The landing gear set includes new main gear tubs and new
tail gear. The main gear bays are very nice indeed, with new sidewalls and
top, though the thin resin replacement gear doors are hard to work with, and
I wound up using the kit parts after trimming the hinges to fit the CMK
parts.
 |
 |
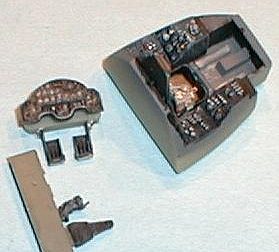
The cockpit set includes very nice parts, and assembles without incident. The seat is very pretty indeed, with a seat cushion you’ll have to see to
believe. A vacuformed canopy is also included, though I didn’t use it.
It
also includes an opened access hatch to the oil cooler in the engine bay – I
didn’t install this, but I kept the parts and may well use it at a later
date in another Skyraider.
 Aside from the resin bits the construction is exactly as the instructions
dictate. There are a couple of areas you’ll want to keep an eye on,
however. First is the installation of the resin main gear bays. You
will
need to remove the raised detail inside, and the trailing bulkhead. Once
this is done, the resin base fits in very well. I also glued in the
sidewalls at this time. Those sidewalls needed some cleanup, some of the
cutouts had been filled with resin. Care is needed in the cockpit interior,
particularly with the instrument panel and rudder pedals. I broke one of
the rudder pedals and had to replace part of it with styrene. Not a major
problem, but worth watching.
Aside from the resin bits the construction is exactly as the instructions
dictate. There are a couple of areas you’ll want to keep an eye on,
however. First is the installation of the resin main gear bays. You
will
need to remove the raised detail inside, and the trailing bulkhead. Once
this is done, the resin base fits in very well. I also glued in the
sidewalls at this time. Those sidewalls needed some cleanup, some of the
cutouts had been filled with resin. Care is needed in the cockpit interior,
particularly with the instrument panel and rudder pedals. I broke one of
the rudder pedals and had to replace part of it with styrene. Not a major
problem, but worth watching.
The kit itself goes together like a dream, many parts like the engine not
needing glue at all. The wing engineering provides an outstanding glue
joint, and the tail surfaces are as you’ve come to expect from a Tamiya kit.
My modifications did not change any aspect of the kit’s primary
construction.
|
PAINT & WEATHERING |
Painting.
The interior was painted Testor’s Acryl (TA) Euro 1 Grey, with flat black
and color highlights where needed. The seat cover was painted to depict
leather. No great insights here, it is all standard cockpit fare, though
without the familiar Zinc Chromate green.
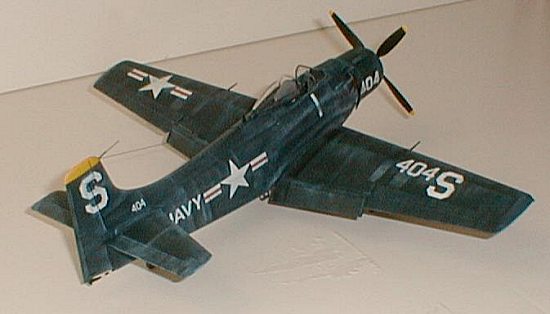
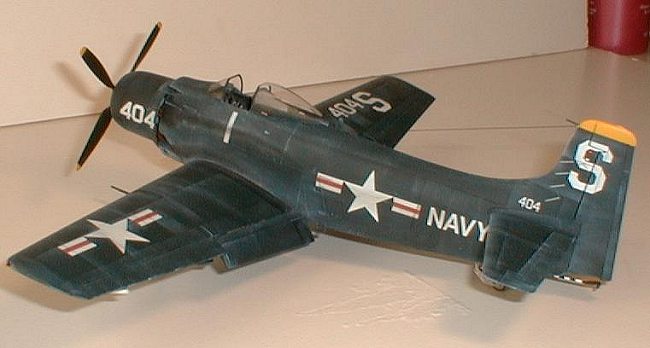
 The gear bay and landing gear is flat white. That was all painted when I
primed the model using Gunze-Sangyo (GS) Flat White. I then airbrushed TA
Dark Sea Blue over the exterior, and sealed it with Future. Very simple, I
think I like these Navy aircraft.
The gear bay and landing gear is flat white. That was all painted when I
primed the model using Gunze-Sangyo (GS) Flat White. I then airbrushed TA
Dark Sea Blue over the exterior, and sealed it with Future. Very simple, I
think I like these Navy aircraft.
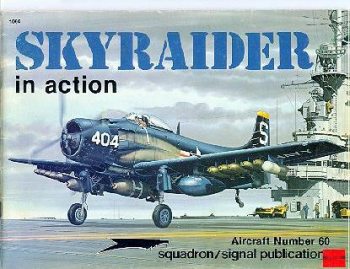
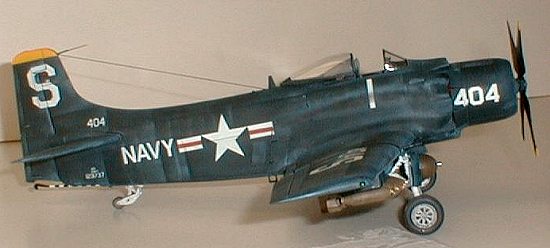
I wanted to depict the aircraft shown on the cover of Squadron’s Skyraider
in Action book, so I had to find appropriate decals. The Navy used 45deg
white letters and numbers then, so the search began for appropriate decal
sheets. I found a Marines Bearcat sheet with plenty of 0s and 4s and used
the Aeromaster Skyraider AD-6 sheet for the rest of the markings. I
couldn’t find a large S anywhere. I wound up borrowing John Lester’s
scanner and Alps printer to print reversed-image letters from a MicroScale
bomber codes sheet onto white decal film. I cut out each S and applied it
to the tail and wing. A long way to go for some codes, but now I have
spare
Skyraider and Bearcat decal sheets, plus bomber codes.
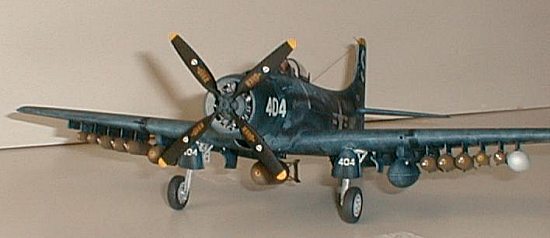
 The engine is Testor’s Enamel (TE) Steel, with Tamiya Smoke as a wash and
various details. The gearbox is painted with TA Euro 1 Grey, and washed
and
drybrushed. The prop is Tamiya gloss black and GS Yellow H239, as is the
tail ID color. The entire model was dullcoated with GS Clear Flat.
The
tires are painted PolyScale Grimy Black.
The engine is Testor’s Enamel (TE) Steel, with Tamiya Smoke as a wash and
various details. The gearbox is painted with TA Euro 1 Grey, and washed
and
drybrushed. The prop is Tamiya gloss black and GS Yellow H239, as is the
tail ID color. The entire model was dullcoated with GS Clear Flat.
The
tires are painted PolyScale Grimy Black.
Weathering.
As this was the newest Skyraider available in the Korean War, I didn’t want
to over-weather the plane. That I’ll do when I do more Vietnam War era
planes, including a great one whose Navy markings are showing through the
faded USAF camouflage…
Anyway – I used TE Medium Grey as a wash for the white areas, with some flat
black for contrast.
 After that, I used a black Micron disposable drafting pen to blacken the
panel lines. These pens are very nice, the ink is permanent, but doesn’t
dry too fast, allowing easy removal of excess. Spit and a finger will do
the job, or alcohol on a swab if you really screw up. Another application
of GS Flat Clear sealed the work.
After that, I used a black Micron disposable drafting pen to blacken the
panel lines. These pens are very nice, the ink is permanent, but doesn’t
dry too fast, allowing easy removal of excess. Spit and a finger will do
the job, or alcohol on a swab if you really screw up. Another application
of GS Flat Clear sealed the work.
I drybrushed along panel lines with post-it tape using TE Blue Angel Blue-tinted TE Flat white. As the AD-4 was the newest version of the Skyraider, I didn’t want this to overdo this, just enough to show some fading from saltwater and sunlight. A bit of pastel work, grinding together blue and white and applying this to highlight fuselage stringers and a few other details. The exhaust stains are also pastels, light grey and black.
At the very end, I installed the canopy, guns, pitot tube and I added a monofilament antenna painted black to finish off the model.
|
CONCLUSIONS |
This is such an easy conversion I’d recommend any Skyraider fan try it.
You
know you’ve wanted a big blue lady on your shelf, admit it. The Tamiya
kit
doesn’t really need any added details, but the CMK parts do bring some
benefits, particularly the seat and tailwheel. I’m pretty satisfied with
my
work on this model, and will continue to convert the Tamiya, Monogram, AMT
and Matchbox Skyraider kits to more interesting and unusual variants.
Perhaps an AD-3Q would be in order next…
Terry Miesle
If you would like your product reviewed fairly and fairly quickly, please contact the editor or see other details in the Note to
Contributors.