KIT: Hobbycraft 1/48 Grumman F8F-1B “French Indochina” Bearcat
PRICE: $16.98
KIT NUMBER: HC1441
DECALS: Markings for four aircraft, all French Armee de l’Air, all in overall Sea Blue, all from Groupe de Chasse 1/22 “Saintonge”, and all shown as they appeared during the Battle of Dien Bien Phu, January-May, 1954--Each exhibits a different call letter--”F”, “N”, “D”, and “P”.
OVERALL IMPRESSION: Excellent!
DATE OF REVIEW: November 17, 1998
REVIEWED BY: Drew Nix
The Grumman F8F “Bearcat” was the last piston-engined member of the “Cat” family. Developed during W.W.II, it combined the smallest airframe possible with the largest radial engine in existence, making the Bearcat a worthy successor to the “Hellcat”. It was extremely fast and was expected to be able to maneuver with the most nimble of its projected Japanese opponents. The early models even had wingtips that would break off during high-G maneuvering, supposedly to keep from overstressing the wings. This feature was never very popular with pilots due to the fact that if only one wingtip separated during flight, the handling of the aircraft could become “dicey”. This feature was soon removed from later production models For many years the Bearcat was the fastest American aircraft able to reach 10,000 feet from a standing start. Bearcats arrived too late to fight the Japanese; however, in the hands of the French and the South Vietnamese, they saw action as fighter-bombers during the post-war Indochina conflicts. Many of the French aircraft were sent to the Royal Thai Air Force after the fall of Dien Bien Phu. Today, highly modified versions of the Bearcat can be seen at air races. In fact, one such modified Bearcat set the world speed record for propeller-driven aircraft a few years ago.
Ever since the Hawk/Testors F8F-2 released many years ago began showing its age, modelers have looked for an updated model of this popular aircraft. About two years ago, Hobbycraft announced that they would be releasing several versions of the Bearcat. After endless delays, they came through earlier this year. In my opinion, the wait has been well rewarded! Despite the fact that the cowling appears to be too blunt, it still looks every bit the Bearcat when completed. The box art shows a French F8F-1, even though the kit is supposed to be a -1B! Not to worry, you can build either version with the kit parts. The -1B had the shorter tail of the -1 but had the 20mm cannon armament of the later -2.
The kit consists of several trees of light gray plastic and a sprue of crystal clear parts. A separate sprue contains the cowl and tail section particular to that aircraft. Since Hobbycraft wanted the modeler to be able to do every version of the Bearcat, some compromises had to be made. The differences between the -1, the -1B, and the -2 are minor but noticeable. Before, if you wanted to do a -1 or -1B, you had to do some major surgery to the Testors kit. Now that is not necessary. Even though the kit can be built as a -1B, it can also be built as the earlier -1 with the original four .50 caliber machine guns. The short tail included with the kit and the fact that the bumps on the wings for the larger 20mm cannon breeches are separate pieces allow the -1 to be built. Also the earlier exhaust stubs of the -1 are included in this kit. The only negative aspect that I could find was that the instruction sheet left a lot to be desired, a common problem with Hobbycraft kits I’ve been told.
As is usual with most aircraft models construction begins with the cockpit. This area is very complete, although the positioning of the seat pan and control stick cannot be defined using the instructions! The drawings of the various parts range from crisp to crude. Once you figure out where the cockpit parts go, the fit is excellent. Make sure the notch in the seat pan, not shown in the instructions, is toward the front. I added Reheat seatbelts and shoulder harnesses. Suitably painted, they make up into nice representations of American W.W.II-era belts. The cockpit was painted Interior Green with black consoles, instrument panel, and gunsight. The seatbelts and harnesses were painted Dirty White with buckles done in silver. The instrument panel is very nice and compares favorably with pictures and drawings of the real thing. I used a white artist’s pencil to highlight the raised details in the instrument dials. Then 5-minute epoxy was put into the dials to represent the glass. Be careful when you glue the instrument panel to the fuselage sides. Glue it securely, or you’ll be fishing it out of the fuselage when it breaks off! I speak from experience here! The problem is that the gunsight sticks out above the top of the fuselage, ready to be bumped when you least expect it. Once thewindscreen was added later on after painting, this problem was solved.
In step 2, holes are drilled in the wings to accept the wing pylons, the belly drop tank, and the cannon breech bumps (if you’re building the -1B). In step 3, the wheel well inserts are added to the bottom wing. The main insert has a rudimentary representation of the rear of the engine and the supercharger. Two ducts for the oil coolers are represented here as well. Depending on which Bearcat you are doing, paint the wheel wells the appropriate colors. Mine were painted in Interior Green, the engine and supercharger representations were painted with Poly S Metalline “Oxidized Aluminum”, and the oil cooler ducting was painted with gray, FS 36081.
 In step
4, the top wing halves are added to the bottom wing assembly. The fit here
was unexpectedly excellent! Only some work with a medium grit sandpaper was
needed to seal the seams. In step 5, you are supposed to add the bumps on
top of the wing for the 20 mm cannon breeches (leave these off if you are
doing the -1), the top formation lights, and the wing tip formation lights.
I suggest waiting until all painting is done to add these clear parts.
In step
4, the top wing halves are added to the bottom wing assembly. The fit here
was unexpectedly excellent! Only some work with a medium grit sandpaper was
needed to seal the seams. In step 5, you are supposed to add the bumps on
top of the wing for the 20 mm cannon breeches (leave these off if you are
doing the -1), the top formation lights, and the wing tip formation lights.
I suggest waiting until all painting is done to add these clear parts.
In step 6, the R-2800 engine is assembled. The kit’s engine is nicely done, but there is room for improvement for the superdetailer. The engine could use an ignition harness and other “bits”. Since the Bearcat was so closely cowled, it remains up to you as to how much detail you wish to add.
In step 7, the two fuselage halves are cemented together, trapping the completed cockpit tub, the instrument panel (Careful!), and the shelf behind the seat between them. The tailwheel and tail hook can be added now or later at your discretion (I chose later, after they had been painted).
Step 8 is where the fuselage mates to the wing assembly and the engine assembly is added. The rollover bar is added here, as well as the tail. In order to differentiate between the -1 and -2, Hobbycraft makes the vertical tails as separate pieces. The -2 models had a one-foot taller tail than the -1’s had. Since this scales down to a quarter of an inch in 1/48 scale, the difference is noticeable. On the plus side, Hobbycraft did their research well enough to make allowances for this difference in the various versions. On the negative side, it gives the modeler a seam that has to be filled. This is made more difficult by the subtle curve of the tail in this area.
In step 9, the bombs and drop tanks are assembled. Since my Bearcat was to be shown unencumbered, I added these parts to the spares box. Step 10, has the modeler assemble the main gear struts, the wheels (flattened on the bottom), and the gear covers.
In step 11, everything comes together. Even if you are building an unencumbered aircraft, many still had the wing pylons in place. Check your references. A nice feature of this kit is that Hobbycraft included a separate decal sheet to do the canopy framing. You get three choices--Sea Blue, Black, and Natural Metal. Also included is a decal strip for the rear canopy framing. Not all Bearcats had this extra frame, so again check references before adding. These decals fit fairly well, but need some setting solution in various areas.
After assembly, but before adding the gear and clear parts, the whole aircraft was painted Natural Metal using my own formula for this. When dry, frisket paper was put over various areas to be given different tonal variations. Individual panels were exposed and various shades of Testors Metallizer was used to create the different tones. The good thing about my Natural Metal formula, which uses Floquil Old Silver as its basis, is that it can be taped over without fear of pulling up the paint. A thin black anti-glare panel was masked off and painted in front of the windscreen.
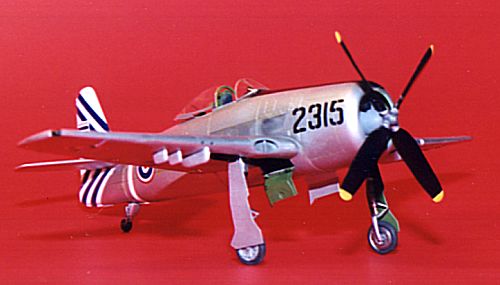
The decals that come with the kit look nice and useable, a far cry from earlier Hobbycraft decals. I saved these though for some later project(s), as I had another scheme in mind. Ever since the release of the Squadron/Signal book F8F Bearcat in Action, I have wanted to do the striking bare metal example used by the Royal Thai Air Force as shown in the center color profiles section. The rampaging bull emblem of the 1st Fighter Bomber Wing, with its Blue and White chevron tail markings I thought looked particularly attractive on the Bearcat, and was a break from the Overall Sea Blue finish of most examples. In 1993, long before the announced release of the Hobbycraft kits, Aeromaster had produced these markings on their sheet number 48-030, F8F Bearcat Collection. Unfortunately, these marking were made to fit the old Hawk/Testors kit.
There is no problem with 90% of the decals, they fit the Hobbycraft Bearcat well. The trouble starts with the tail flashes. I immediately ruined one set of markings trying the get them to fit. Luckily the local hobby emporium had other sets of this now out of production decal sheet. After much thinking and planning, I got a second set of tail flashes to fit like a glove. Any tears or bare areas in the decals were touched up with Testors Pla Gloss White and Gloss Dark Blue. A wash of Raw Umber and Payne’s Gray artist oils, a little weathering with pastel chalks, and the Bearcat was done!
This has got to be one of the best fitting kits I have ever had the pleasure to have built. I only had to use a little putty on the tail and a tiny spot of super glue on one of the wing roots, the fit was that good. Other than the instrument panel problem (my fault), the engineering of the kit was superb. I am normally a slow builder, but this one was completed in one month, fast for me. Well done, Hobbycraft! This is a worthy addition to my collection of the Grumman ‘Cats in 1/48 scale.