Dynavector 1/48 Wyvern S.4
|
KIT # |
- |
|
PRICE: |
@$55.00 |
|
DECALS: |
See review |
|
REVIEWER: |
|
|
NOTES: |
Vacuform and metal parts. |
Vacforms for Dummies
|
HISTORY |
Born from a specification issued for a fast, single seat torpedo carrierborne fighter, the had a 2700 hp flat 24 cylinder engine. As this mechanical monster wasn’t exactly successful, and as Rolls Royce didn’t want to go on with turboprops and prefered going on with turbojets, the Wyvern was given a 3700 hp Armstrong Siddeley Python turboprop, driving two contrarotating Rotol propellers. This engine wasn’t that successful either, as it suffered from abysmal throttle response time, which isn’t quite what a carrier pilot wishes for. Anyway, the Wyvern came into fleet service in 1954, and knew a short career, which culminated in Operation Musketeer in, Suez in 1956, it was phased out in 1958. Around sixty Wyverns were built.
The Wyvern had four 20mm cannons, and could carry a torpedo, two 1000lb bombs or 16 60lb rockets, and flew at approximatively 400 mph.
The only surviving Wyvern can be seen at Yeovilton. It is the first prototype with the Rolls Royce Eagle engine.
The Wyvern has a typical British look, and a friend of mine told me that it looked like a crossbreed between a Mustang and a cockroach. When I heard that, I had no other choice than liking it.
|
THE KIT |
 Dynavector is a company specialized in high
quality hi fi system components. But its CEO seems to like aircraft and
modeling, and he decided to release models of planes you cannot really hope to
find made by mainstream companies. His interests seem to lie in Fleet Air Arm
(and a bit RAF) planes from the 50’s and the 60’s.
Dynavector is a company specialized in high
quality hi fi system components. But its CEO seems to like aircraft and
modeling, and he decided to release models of planes you cannot really hope to
find made by mainstream companies. His interests seem to lie in Fleet Air Arm
(and a bit RAF) planes from the 50’s and the 60’s.
So far, so good. Just a little problem there : the models are vacformed.
What do you find in the sturdy cardboard box ? Two styrene sheets where you can find the fuselage, wings, wing tanks, wheel wells, tailplanes and cockpit, a bag full of white metal parts (armament, gear legs, wheels, cockpit details, fences and prop blades), a bag full of resin parts (the monstruous spinner), two different vacformed canopies and a decal sheet for three aircraft.
The decals are in register, thick, and the stencils are a bit fuzzy. The panel lines are very nice, and the metal parts will just need a little cleaning before use. But this is a vacform. Usually, people start running away at that point. I know, I used to !
|
VACUFORM vs MODELER |
I’m the dummy in the title of this article, as this is my first vac. I have been advised by modelers with lots of vacs under their belt, and I want to share what I learned. If you know the tips, please skip to the next section…
I first painted the parts and surrounding styrene Neutral Grey. This helps in seeing what you have to keep and what you’re going to throw away. This is a mere primer coat, not airbrushing a Luftwaffe camo !
Now for the artistic part (you’ll need a pencil for that one). With a pencil, you mark the contour of the parts you want to remove. You’ll have a mark on the sheet, one on the part and some grey between them.
Then, you cut with a new blade the plate, two or three millimeters away from the part. You just have to score and remove the part by bending the sheet.
And now, let the fun begin. You’ll need a mirror (or something strictly flat), adhesive, coarse wet sandpaper, water (very important thing, water), and elbow grease (a bucket or two should be enough).
You put the sandpaper sheet on the mirror with the adhesive, and you pour some water on it. Want to know why ? Well, once you have started sanding, you’ll be generating enormous quantities of white dust. The water on the sandpaper will have it turn into a paste and avoid your room to look like a blizzard just went through it.
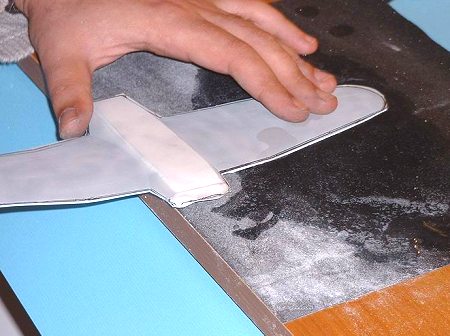 Once everything is in place, you take the
part you’ve just prepared and sand it delicately until you can see the pencil
mark through the plastic. The excess plastic band will detach itself when you’re
done. For the parts you can’t sand on such a flat surface (the bottom part of
the Wyvern wing is that way, as it has a flat W shape), you make a sanding block
out of a piece of wood, attach some sandpaper to it and happily sand the excess
plastic away (with care, though !).
Once everything is in place, you take the
part you’ve just prepared and sand it delicately until you can see the pencil
mark through the plastic. The excess plastic band will detach itself when you’re
done. For the parts you can’t sand on such a flat surface (the bottom part of
the Wyvern wing is that way, as it has a flat W shape), you make a sanding block
out of a piece of wood, attach some sandpaper to it and happily sand the excess
plastic away (with care, though !).
The main virtues you need are patience, prudence, and some more patience. You need to have uniform sanding, which is rarely the case, so you’ll have to touch up some places without touching some others.
You must not hope getting a fuselage ready in two minutes ! Well, you can, of course, but I want to see pictures of the completed model. It would be an interesting sight.
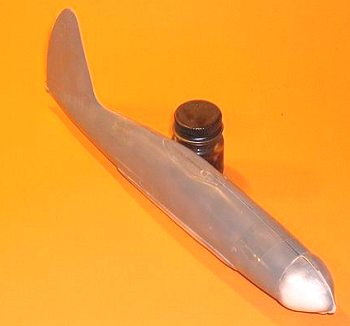
Back to our Wyvern : the fuselage halves join perfectly without putty, and the wing trailing edges are razor thin. The few glitches will easily be corrected with some putty or CA glue.
To have a strong fuselage joint, I’ll insert some plastic sheet tabs.
|
CONSTRUCTION |
I began working on the wings. I removed the outer gear doors from the underside, as the inner doors remain closed when the Wyvern is on th ground. I drilled holes inside the line marking the door, and removed grossly the door berfore filing the edges to have them shaped correctly.
I painted the wheel wells aluminum before glueing them inside the wings. I then made spars out of thick Evergreen before assembling the wing and correcting the problems I had created preparing the wings.
I removed the blobs on the leading edge side and opened the intakes. The flaps rails were glued in place at that time.
I made holes for the finlets on the tailplanes and assembled them, then went on to the fuselage.
The cockpit, as made by Dynavector, is quite nice, but needs some work. As I’m both lazy and lucky, Roy Sutherland made a fabulous resin and photoetch detail set. Parts are exquisite, so thin you’d fear breaking them just by looking at them. But once you’ve separated the parts from the resin stubs, they assemble quite easily and give a stunning result (which will be almost invisible, as the cockpit is black). One other reason for thanking Roy and Compass Rose : you get a color pic of a real Martin Baker Mk 2.
 I removed the plastic blobs on the nose,
drilled the hole for the tailplane spar, and glued the fuselage halves together.
They went nicely, but the resin part that goes in front was a bit more
difficult. Well, putty and sandpaper cured that quite rapidly.
I removed the plastic blobs on the nose,
drilled the hole for the tailplane spar, and glued the fuselage halves together.
They went nicely, but the resin part that goes in front was a bit more
difficult. Well, putty and sandpaper cured that quite rapidly.
The hole for the cockpit needed to be bigger since I had decided to use Compass Rose’s set. I just had to check regularly if it fitted. I painted the interior and the turtle deck behind the cockpit tire black, then started working on the resin set. I just followed the instructions, and had a very nice cockpit assembly ready to be inserted inside the fuselage.
Once the cockpit was in place, I mated the wings to the fuselage. I needed patience and putty on that step. I installed the exhausts at that time. Mating the exhausts to the fuselage was quite painful.
The windscreen was masked, glued then puttied and the beast was ready for the paintshop.
|
PAINTING |
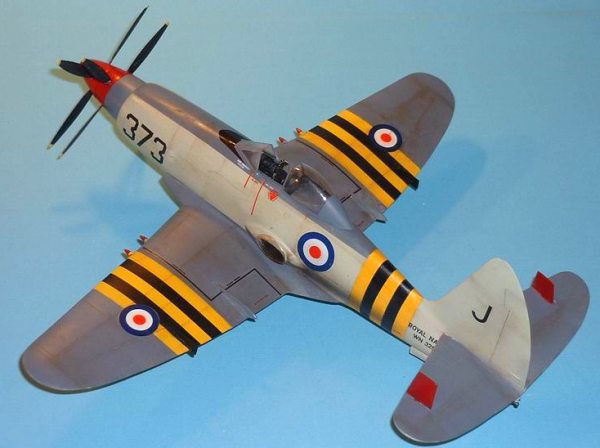
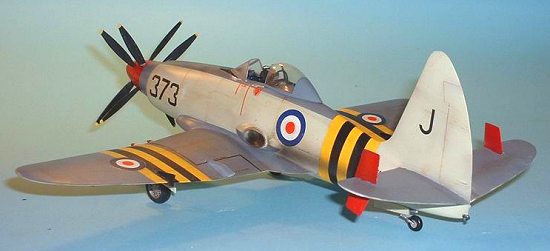
I chose the 830 Squadron aircraft on HMS Eagle during the Suez campaign.
I first painted the wings and fuselage white, then sprayed some yellow at identification stripe level. I then masked the yellow before painting the black stripes. A tip here : avoid Tamiya masking tape. As it is yellow, it’s pretty hard to see it on the yellow surface.
The bands are masked, then first the Sky, then the Extra Dark Sea Grey are sprayed. The exhaust area is very entertaining to mask and paint !
The tailplanes are masked, and the finlets get a white undercoat before their final red color.
It is now time for a gloss coat.
|
FINISHING & DECALS |
The cannon stubs are painted and their tip is red. They are glued to the wings.
I painted the gear legs aluminum and glued them. Beware of their alignement ! They must not be perpendicular to the wing, but they have to angle forward quite a bit. The gear doors are painted skty outside and aluminum inside, and glued in place.
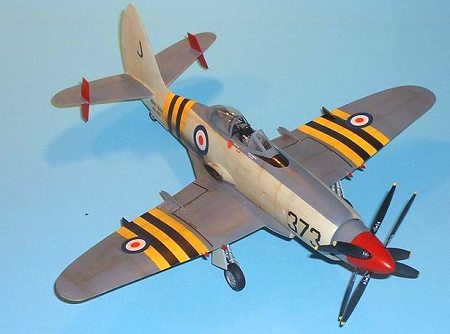
Now, it’s time to work on the monster spinner and propeller. The spinner base is painted extra dark sea grey and glued to the fuselage.
The various components of the spinner assembly are cleaned and sanded for them to align correctly. They get a white priming coat and are painted Gunze gloss red. The blades are painted black with yellow tips and are glued. Beware of their pitch ! The blade base helps in installing them in the right holes. The spinner is assembled, and very very very delicately stored. The blades are exceedingly fragile and rather difficult to repair.
 I went on with the decals. They are very
thick and transparent ! I had a spare set of roundels (from a Wyvern I don’t
want to be asked about, thank you) and that saved my day. If you haven’t spare
decals from a model that you finished with a sledgehammer, you can paint white
circles where the decals are supposed to go. The problem is accute only for the
roundels that go on the Suez stripes.
I went on with the decals. They are very
thick and transparent ! I had a spare set of roundels (from a Wyvern I don’t
want to be asked about, thank you) and that saved my day. If you haven’t spare
decals from a model that you finished with a sledgehammer, you can paint white
circles where the decals are supposed to go. The problem is accute only for the
roundels that go on the Suez stripes.
Another gloss coat, some highlighting with burnt umber heavily diluted in lighter fluid, and I painted the exhausts with Alclad Jet Exhaust. Be light on the weathering, as the Wyverns were very well maintained.
I installed the seat and the stick at the end, then put the safety arch behind the seat. I then gave the model a satin coat before glueing the hood with Clearfix.
|
CONCLUSIONS |
My first vac ! I survived ! The model survived too !
Okay, now I know : vacform (well, de luxe vacform anyway) is not much more complicated than the rest. Be cautious, be patient, and everything will go smooth. The result doesn’t differ from an injected model, and as no mainstream manufacturer will ever do it in injected , I’m more than glad I decided to try. And this model, with its size, looks and the colors it wears, is really a head turner.
Now, I’ve been bitten by the vac bug....... the Scimitar !
If you would like your product reviewed fairly and fairly quickly, please contact the editor or see other details in the Note to Contributors.