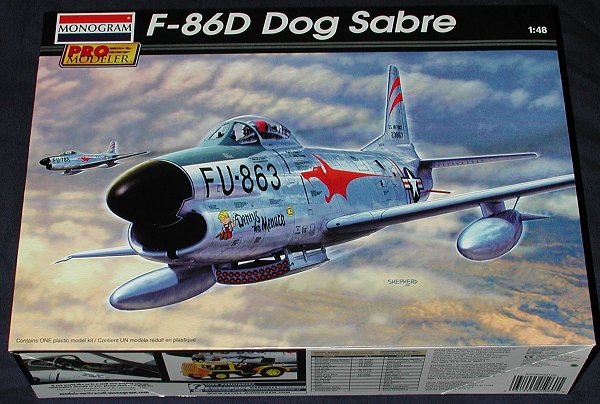
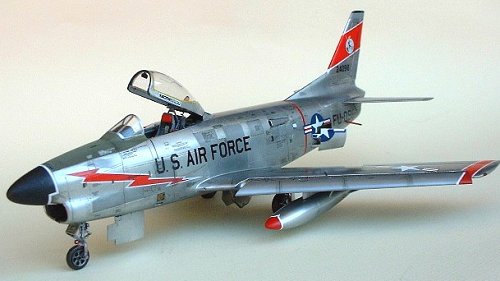
ProModeler 1/48 F-86D-35 Sabre
|
KIT # |
5960 |
|
PRICE: |
$22.00 |
|
DECALS: |
See review |
|
REVIEWER: |
|
|
NOTES: |
Superscale decals and Black Box cockpit used |
|
HISTORY |

Yea, yea, I know, this has been covered by all modelers and their brothers, sisters, experts, non-experts, and by all the ACES, people with terminal AMS, (like me), Rivet counters, and just plain ole Kit builders. So, I will try not to bore with all the repeated history in super great detail. Just the facts as to what I dug up with the information I have on hand and on the Internet and friends like Roger Jackson etal and even some friends that actually worked around these Aircraft and some of my dimmed memories of the ones I seen as a young flight line prowler.
 The F-86 was just one of the
superb designs to come from North American Aviation during the 1940s and ‘50s. “Sabrejet”,
instantly brings to mind the thoughts of silver wings locked in mortal combat
over the North Korean skies with the Soviet made MIG-15.The first flight of the
F-86, was 1 Oct. 1947 after the prototype was designed and built after only 18
months with little resemblance to it’s contemporaries such as the P-80, P-84,
and the F9F Panther.
The F-86 was just one of the
superb designs to come from North American Aviation during the 1940s and ‘50s. “Sabrejet”,
instantly brings to mind the thoughts of silver wings locked in mortal combat
over the North Korean skies with the Soviet made MIG-15.The first flight of the
F-86, was 1 Oct. 1947 after the prototype was designed and built after only 18
months with little resemblance to it’s contemporaries such as the P-80, P-84,
and the F9F Panther.
Now for the F-86D: In 1949, the Air Force issued requirements for an all weather interceptor with North American getting the nod over other 2 seat designs and the concept of a “one man interceptor” was born with a flight computer to “fly” the airplane while pilot flew the Hughes E-3 Fire control System to complete the intercept. When it worked correctly, it was a good workable system. The F-86D was re-designed different than the F-86A, E, F, versions and actually was so different that it was to be called a F-95 because it was longer, bigger and a heaver fuselage and the newer J47-GE-17 afterburning Engine with 7,500lbs of thrust and upward lifting clam shell canopy instead of the rear sliding type and a different ejection Seat. But after budget terminology and political wrangling between the Air Force and the Defense Department and Senate it was changed to the F-86D as a logical extension of the on- going early F-86 program.
 There were major changes
throughout the service life of this great looking fighter which was armed with
only 24 Air-to-Air 2.75 inch folding fin rockets in place of machine guns and
was located in a retractable tray under the fuselage just behind the nose
landing gear door. The major changes made of the life of this Aircraft were; the
F-86D-5 introduced the Hughes E-4 Fire control system. The D-25 had the
provision for use of combat drop tanks that could be used more than just for
ferrying. The D-35 (this Model type), had the omni-directional ranging Radar
system. The D-45 introduced the Drag Chute to aid in stopping the F-86D on short
runways. (lots of retrofitting for this feature) and the D-60 was an Engine
upgrade to a J47-GE-33 with 7,950 lbs of thrust. The final upgrade was the most
radical and resulted in the new designation of the F-86L with a new longer wing
and the SAGE (ground support. Radar) system., One other Major development was
the Fiat of Italy license built F-86K which was an F-86d equipped with 4 M24A
20MM cannon in place of the rockets and used an MG-4 fire control system with an
optical gun sight and went into service in 1955. These were operated by the
Italian, French, West Germany, Dutch, and Turkish Air Forces for NATO.
There were major changes
throughout the service life of this great looking fighter which was armed with
only 24 Air-to-Air 2.75 inch folding fin rockets in place of machine guns and
was located in a retractable tray under the fuselage just behind the nose
landing gear door. The major changes made of the life of this Aircraft were; the
F-86D-5 introduced the Hughes E-4 Fire control system. The D-25 had the
provision for use of combat drop tanks that could be used more than just for
ferrying. The D-35 (this Model type), had the omni-directional ranging Radar
system. The D-45 introduced the Drag Chute to aid in stopping the F-86D on short
runways. (lots of retrofitting for this feature) and the D-60 was an Engine
upgrade to a J47-GE-33 with 7,950 lbs of thrust. The final upgrade was the most
radical and resulted in the new designation of the F-86L with a new longer wing
and the SAGE (ground support. Radar) system., One other Major development was
the Fiat of Italy license built F-86K which was an F-86d equipped with 4 M24A
20MM cannon in place of the rockets and used an MG-4 fire control system with an
optical gun sight and went into service in 1955. These were operated by the
Italian, French, West Germany, Dutch, and Turkish Air Forces for NATO.
|
THE KIT |
The release of the Monogram Pro-Modeler 1/48 scale kit of the NAAC F-86D “SABREDOG” was a kit long wanted by the 1/48 scale builders for many years. We have been rewarded with very nice renditions with actually two different types. The first release was by the Revell of Germany company with their F-86D –45 drag chute version which is the most preferred type by most model builders now but is harder to get. (Actually, they were released at about the same time. A build review was leaked by a German modeler, much to the displeasure of Revell. Ed) I don’t know why Monogram chose to just have the basic earlier versions. We would have thought the molds would have been very much alike but then again, if we had only got the one version, there would be a hue and cry for the other, so there you are.
 This version is very nice and
is very detailed with very nice recessed lines, a nicely detailed cockpit with
the “incorrect” instrument panel and with a very nice seat. The subassemblies of
engines, nose gear/ intake, and wings with separate flaps and slats is great and
a choice to either have the rocket pod lowered or raised should satisfy most
modelers (kit builders). The fuel tanks and landing gear are molded nice and
will suit most versions. As usual, the Promodeler instruction booklet is very
nice and gives some nice actual pictures of the real aircraft in different parts
of interest.
This version is very nice and
is very detailed with very nice recessed lines, a nicely detailed cockpit with
the “incorrect” instrument panel and with a very nice seat. The subassemblies of
engines, nose gear/ intake, and wings with separate flaps and slats is great and
a choice to either have the rocket pod lowered or raised should satisfy most
modelers (kit builders). The fuel tanks and landing gear are molded nice and
will suit most versions. As usual, the Promodeler instruction booklet is very
nice and gives some nice actual pictures of the real aircraft in different parts
of interest.
This kit has a nice aircraft flight line tug included that is not provided with the Revell of Germany model. Although, most actual tugs that I seen used on the flight line during that time was tugs very similar but with dual wheels on the rear and the kit only provides a single wheel version. The decal sheet is nice with lots of stencil markings which all NMF aircraft had, but it is for two different Squadron Markings that were not too pleasing to me and most other folks by all the building accounts that I have seen.
Regardless of all the nit picks out there of this kit, and I have seen several, this really is a nice kit of a very nice looking Air plane and looks good on completion.
|
CONSTRUCTION |
As usual, to start a kit
like this, you have to decide if you are up to doing a Bare Metal Finish, weapon
type display, or not, markings, (if available) etc. after that you need to
decide if you want some after market help and locating needed
 information to sort of help
keep some of the ACES off your back when you get finished.
information to sort of help
keep some of the ACES off your back when you get finished.
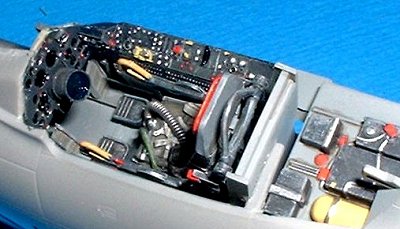
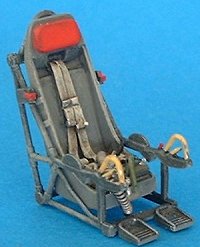
The instruction sheet is very good with this kit and would be good for the beginners on every phase and they would be happy. I decided I did not like the cockpit tub even though it is very nice but I got the Blackbox cockpit and the seat and a more “correct instrument panel” and I liked it better. But, you still have to use the kit seat frame which is very nice. (For those of you who do not know, R-M used an F-86D at the Air Force Museum as a pattern for this kit. Unfortunately, that aircraft was a very early F-86D-1 which has a different instrument panel than all the other F-86Ds built. It was also a test bird so had a larger rudder trim tab. Removing the trim tab isn't a problem, but you are stuck with the early instrument panel unless you go with an aftermarket set. Ed)
 After fitting and painting the
cockpit and seat, I decided to cut the blank piece at the inter end of the
intake trunk and replace it with a turbine front from the spares box and
besides, it is easier to sand / fill the glue seam on the inside trunk by
passing rolled up sand paper all the way through. All the sub- assemblies were
put together and fitted and seams filled/ re-scribed and set aside. All the main
parts fit very well and no filler needed at the wing roots and be sure to add
enough weight to the nose because it is a tail setter.. and, don’t forget to
drill the wing holes for the pylons for the tanks. The kit gives you a choice
for the small engine area intakes and the larger “sugar scoop” type that was
retrofitted on some of the sub types in later life. I used the larger ones
because I did not know which markings I would end up with since most after
market decal sheets are for the –45 Revell version. This feature can not be
added after the kit is put together.
After fitting and painting the
cockpit and seat, I decided to cut the blank piece at the inter end of the
intake trunk and replace it with a turbine front from the spares box and
besides, it is easier to sand / fill the glue seam on the inside trunk by
passing rolled up sand paper all the way through. All the sub- assemblies were
put together and fitted and seams filled/ re-scribed and set aside. All the main
parts fit very well and no filler needed at the wing roots and be sure to add
enough weight to the nose because it is a tail setter.. and, don’t forget to
drill the wing holes for the pylons for the tanks. The kit gives you a choice
for the small engine area intakes and the larger “sugar scoop” type that was
retrofitted on some of the sub types in later life. I used the larger ones
because I did not know which markings I would end up with since most after
market decal sheets are for the –45 Revell version. This feature can not be
added after the kit is put together.
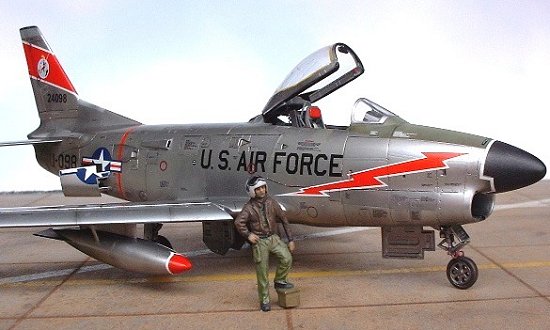
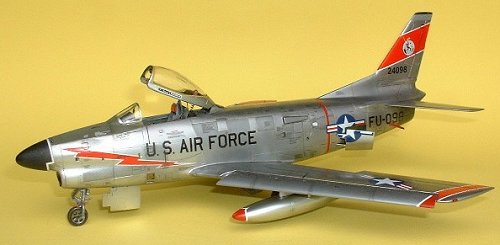
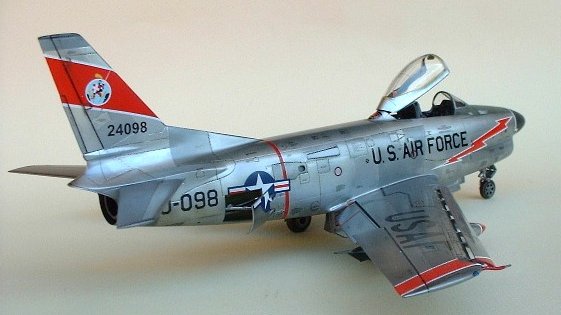
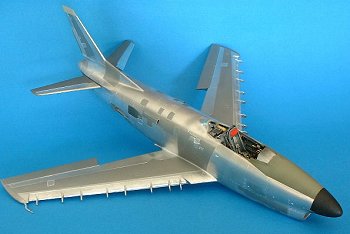
After all the parts of the main aircraft were put together and all the seams were filled and primed with light gray. It was now ready for the thing we dread most and that is to start prep, and hope for, a natural metal finish used on all the US Air Force type F-86Ds.
|
CAMOUFLAGE & MARKINGS |
Well there are as many ways to do bare metal looking finishes as Carter has pills and everybody’s way is a “Right” way, I.E., if it suits you it just tickles me to death. I have done it several different ways myself over the years and have never been completely satisfied, even with this one, but, that is why we keep trying.
 This model was painted using
the Alcad II product and I like this product better than all the other types I
have used but I still used some of the other fine Metalizers with this project.
This model was painted using
the Alcad II product and I like this product better than all the other types I
have used but I still used some of the other fine Metalizers with this project.
First, the Alcad II product is a hot lacquer and will probably ruin your model if you spray it straight on your model. So, most everyone, (and the Alcad instructions), will tell you to use a primer of some sort and that is very wise. The only trouble is, most don’t agree on what type(s) to use so I just decided to first paint (prime) my F-86D a solid color of gloss Black Testors BOYD model automotive type paint that I thinned more than usual. I gives a real high gloss finish if you select a low humidity day to do your painting.
Second , I let the Black dry
and cure for about two weeks or more. After rechecking all the scribed panel
lines and a super light wet sanding with 2000 grit ,(just enough to clear any
small dust doodies that might have got on it), I mixed about half and half Alcad
II White Aluminum and Chrome and low pressure (about 12psi) “misted” the model
to just barely cover everything.
 After it set for an hour or
so, I misted it again only on the spots not covered very well. The Alcad dries
hard in just a few minutes but let it set another few days anyway. Third, I then
used plain old scotch tape (super sharp lines) and got my reference and started
masking off the panels I wanted a different metal color, ( that is what the real
NM Air Planes looked like). This process took the most time but is well worth
the effort.
After it set for an hour or
so, I misted it again only on the spots not covered very well. The Alcad dries
hard in just a few minutes but let it set another few days anyway. Third, I then
used plain old scotch tape (super sharp lines) and got my reference and started
masking off the panels I wanted a different metal color, ( that is what the real
NM Air Planes looked like). This process took the most time but is well worth
the effort.
These panels were painted with Model Master Metalizers, mainly, magnesium color, after that was dry, I very lightly sprayed with the Testors metalizer sealer and rubbed lightly with a soft rag (old tee shirt works great) and a little SNJ aluminum powder to blend it all in and then, lightly seal again and then it was ready for the Decals.
To begin with, the kit decals
are really not to bad and I used most of the stenciling and all the other
markings were gotten from SuperScale Sheet # 48-795 for a North American
F-86D-35 but it was an aircraft with the smaller flush mount NACA scoops but I
had already put the larger 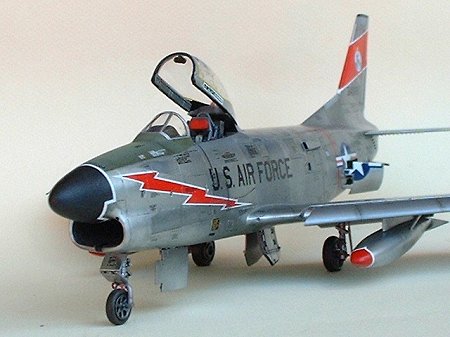 ones
on so there you go with an alibi but a lot of earlier Sabredogs had a retro fit
for this feature as well as the parachute housing. The markings are for an AIR
DEFENSE COMMAND, 86FIS which is one of many ADC Squadrons in operation during
early and late 1950s until replacement with the Supersonic F-101B, F-102 and
later F-106s.
ones
on so there you go with an alibi but a lot of earlier Sabredogs had a retro fit
for this feature as well as the parachute housing. The markings are for an AIR
DEFENSE COMMAND, 86FIS which is one of many ADC Squadrons in operation during
early and late 1950s until replacement with the Supersonic F-101B, F-102 and
later F-106s.
I liked all the color but there are several nice sheets out there for the “Doggie but most are for the “later” versions. It turned out a little “glossy” for some taste perhaps, but it is a model and a metal finished model that is “dull” like most natural metal airplanes in the real world, will only look like painted aluminum.
Actually, most natural metal planes were sort of dull looking but you could still tell it was metal with a lot of light reflection and not paint. But sometimes for an open house show, the aircraft were polished and there was one F-86F squadron Commander that I knew, that made his pilots and crew, actually keep waxed and polished all the Squadron aircraft, needless to say, not many tears were shed when he was picked up in small pieces after he flew his Plane into the ground. But he got an AF base named after him anyway. Oh well
|
FINAL CONSTRUCTION |
 After all the decals were on,
I sprayed a very light mist of Testors Metal sealer just on the decals so they
would adhere better . Then the wind screen was faired in and the canopy was
finished by polishing and dipping in “Future” about three different times and
the kit landing gears were finished with the kit nose wheel, (the True Detail
nose wheel will not fit the nose gear, too big), but, I did use the TD main
wheels but they look a little too flat to me, and the tanks were installed and
then the canopy was CA’ed on and I was ready to set it aside and pick another
semi-finished whatever and go again.
After all the decals were on,
I sprayed a very light mist of Testors Metal sealer just on the decals so they
would adhere better . Then the wind screen was faired in and the canopy was
finished by polishing and dipping in “Future” about three different times and
the kit landing gears were finished with the kit nose wheel, (the True Detail
nose wheel will not fit the nose gear, too big), but, I did use the TD main
wheels but they look a little too flat to me, and the tanks were installed and
then the canopy was CA’ed on and I was ready to set it aside and pick another
semi-finished whatever and go again.
|
CONCLUSIONS |
This Model brought back old memories of all the nice colorful “Metal” U.S. Air Force during the late 1940s, 1950s and about the middle of the 1060s when most got painted up with all the Green and Tan Camo scheme and turned into the “drab” Air Force. This kit was nice and a joy to build and to experiment with the metal finish again and I liked it so much that I think I will continue with some old metal birds until all the Paint is used or the dog eats it, which ever comes first.. Enjoy the Hobby, it is still cheaper than Golf Bats.
|
REFERENCES |
There were quite a few but these were the most used for this project with a lot of “how to” pictures from Roger Jackson who is a “go to” guy to solve many nagging problems and who sacrificed a boarding ladder after a Black Widow Spider stole mine. The others are:
F-86 Sabre In Action by Squadron/ Signal – number 126
North American F-86D Sabre; site-
home.att.net/~jbaugher1/p86_6.html. 11 pages of real good stuff.
F-86 Sabre WALK AROUND – Squadron/ Signal – Number 21
If you would like your product reviewed fairly and fairly quickly, please contact the editor or see other details in the Note to Contributors.