Airmodel 1/72 T-39 Sabreliner
| KIT #: | ? |
| PRICE: | $? |
| DECALS: | None |
| REVIEWER: | Carmel J. Attard |
| NOTES: | Vacuform kit |
| HISTORY |
The prototype was designed and flown as a private venture NA264 that was part of a utility experimental requirement in August 1956. At the time no guarantee of a military production order was given, however, the small jet transport under study at the time could meet the USAF specification. The original prototype had the engines buried in the wing root. These were eventually changed to a new design with new rear fuselage mounted pods. In this new format the prototype flew on the 16th September 1958 bearing the civil registration N4060. It was a six-seat transport that was powered by 2500 Lb St. General Electric J85 turbojets. The USAF continued to evaluate the type and in 1958 a production order of seven T39A was placed. Later production aircraft were powered by 3000lb st Pratt & Whitney J60-P-3A. By the end of 1960, 94 Sabreliners were on order and 55 were added at the end of 1961.
 Early
production models were used by Air Training Command at Randolph AFB by the USAF headquarters for command flying with the Strategic Air Command and
Systems Command. Six T-39Bs were used for the F-105 D Thunderchief
training, which had all-weather search and range radar. The T-39As were
converted to T-39F as trainers for pilots and electronic warfare. the USAF.
Early
production models were used by Air Training Command at Randolph AFB by the USAF headquarters for command flying with the Strategic Air Command and
Systems Command. Six T-39Bs were used for the F-105 D Thunderchief
training, which had all-weather search and range radar. The T-39As were
converted to T-39F as trainers for pilots and electronic warfare. the USAF.
Other T-39s were operated by the US Navy. These were under the initial designation T3J-12 as maritime radar operator trainers, which were later known as T-39Ds. Deliveries to the Navy began in August 1963 to Naval Air Training Command HQ at NAS Pensacola. The Navy received a total of 42 T-39s. 143 T-39As and 6 T-39Bs were produced for the USAF. The T-39B & D variants had a maximum speed of 540 mph at 36,000 ft, a maximum cruising speed of 502 mph at 43,000 ft and a range of 1,725 miles.
During the 60s the T-39 Sabreliners were frequently spotted in the skies over Malta being so strategically positioned in the middle of the Mediterranean sea. Being an aircraft spotter myself I always regarded the T-39 as having a graceful design and definitely wanted to include a model of it in my collection in colour scheme and markings of one that landed at Luqa. I have spotted the Sabreliner some 40 times as they transit through Luqa airfield during the southbound direction or on their return journey on their way up north to their base in Europe. This meant that there were some 18 different aircraft with some of them making more than one visit. The following list indicates the date the T-39As were logged on the island between 1964 and 1966: -
Date Serial
No Details for stopping over at Luqa
5.6.64 10654 to Wiesbaden 6.6.64
12.6.64 24469 Bentwaters UK to Wheelus in Libya
18.7.64 10677 to Wiesbaden
16.7.64 10685 to Ramstein
17.7.64 24478 to Wiesbaden
1.8.64 10684 to Ramstein 17th AF HQ
22.8.64 10684 Ramstein to Athens
3.10.64 24479 86th Air Div. Depart to
Ramstein 4.10
21.10.64 24471 Wheelus to Bitburg
6.12.64 10680 To Wiesbaden
22.1.65 24478 from and to Wheelus
19.3.65 10654 7101 ABW Wiesbaden to Wheelus
 7.5.65 10684 7030CSW Ramstein
8.5.65 24469 81 TFW Bentwaters
17.5.65 10653 7101 ABW Wiesbaden
31.5.65 24477 Wheelus to Spangdalhem
13.7.65 10685 17th AF HQ
4.9.65
10677 ----
22.9.65 10678 HQ3 A/F
10.11.65 24471 36 TFW
15.11.65 24470 Rome to Sigonella
21.11.65 24470 to Ramstein
3.12.65 10684 from Ramstein
24.12.65 10684 17th AF HQ Ramstein
29.12.65 24469 81st TFW
Bentwaters
21.1.66 10653 Wiesbaden to Wheelus
13.2.66 24461 81st TFW
Bentwaters
16.2.66 10664 ----
1.3.66 10665 7101st ABW
23.4.66 24479 17th AF HQ
17.6.66 10678 3rd AF HQ
20.7.66 24471 36TFW Wheelus to Bitburg
26.9.66 24474 48TFW Lakenheath
29.9.66 10684 Ramstein to Wheelus
29.10.66 10664 7101st ABW
1.11.66 10685 17th AF Ramstein
| THE KIT |
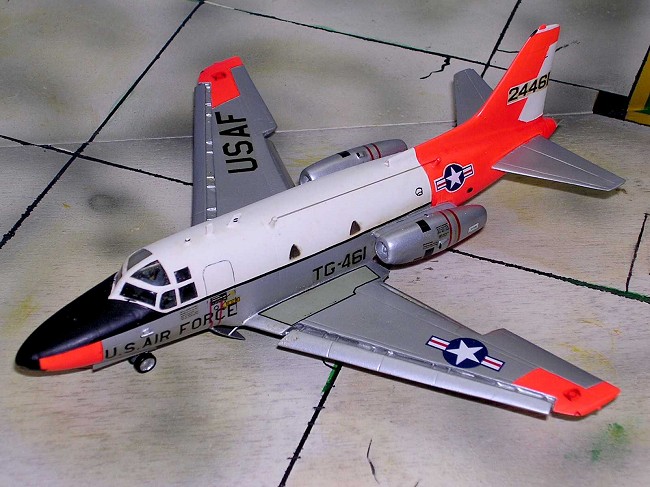
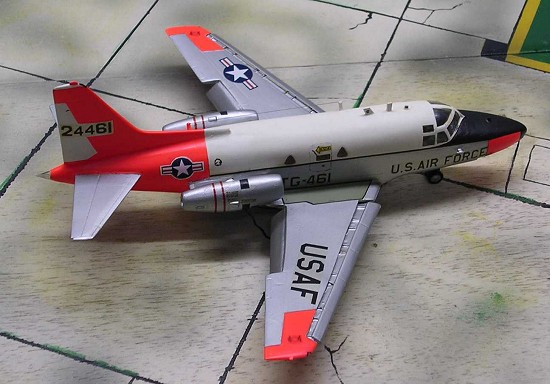
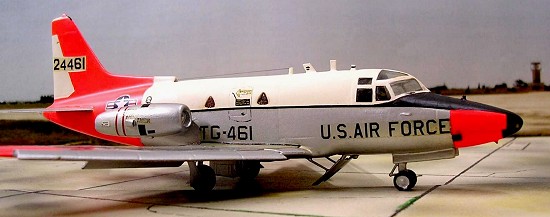
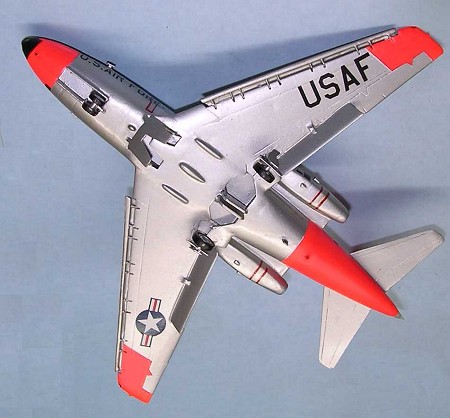
The T-39A was always an aircraft that appealed to me, being a trainer or a transport type besides being an aircraft of graceful design and I always wondered why kit manufacturers never bothered to issue a scale model of it. Airmodel of Germany came to the rescue and a number of years back released a vac-form kit at a scale of 1/72 Kit No 193 and is still on the market till this day. Of all the liveries of t-39s that I have seen the one that my fancy fell on was T-39A 24461 that I logged landing on runway 024 at Luqa one afternoon on the 13th of February 1966. This aircraft belonged to the 81st Tactical Fighter Wing based at Bentwaters in SE of UK. This carried a very attractive colour scheme having a white top and the rest is metal finish with a blue cheat line along the fuselage and carried Day-Glo, high visibility orange at nose, tail, and wing tips area
The Airmodel kit is very basic and comes in one sheet of white vac-form plastic which contained 14 kit parts consisting of main wing halves, tail planes, engine parts and fuselage halves. An accurate sheet contained scale plans as well as suggestions of colour scheme finishes in the form of side views. This happened to be the same copy of line drawings that appeared in a past issue of Aviation News. A separate sheet that comes as part of the instructions told the history and hints on the method to use to go about building the vacform kit.
| CONSTRUCTION |
Although very basic,
the kit of the T39 can be turned into a likeable detailed scale model, a
replica in miniature of the real thing. As with all vac form kits the first
stage is to mark in pencil or felt pen along the periphery of each of the
embossed vac form components. This is followed by the next step which is
scoring along the marked line with a sharp modelling knife. There is no
need to cut through the parts and once the items are scored these can be
bent backwards and forwards until the item
 breaks from the backing sheet.
Surface imperfections which are common on vac form kits released long ago
are attended to with wet and dry or scraped smooth or filled with putty and
faired over. The extremities of components like the trailing edges of main
wing parts and tail planes and rudder are scraped lengthwise with a
modelling knife so that the correct taper end section is obtained.
breaks from the backing sheet.
Surface imperfections which are common on vac form kits released long ago
are attended to with wet and dry or scraped smooth or filled with putty and
faired over. The extremities of components like the trailing edges of main
wing parts and tail planes and rudder are scraped lengthwise with a
modelling knife so that the correct taper end section is obtained.
The more detail in scale that one can add to the kit the closer one can get to the authenticity of the real aircraft. To achieve this adequate reference is essential to aviation books and in this case to a past issue of an old Flying Review which also contained a cutaway drawing showing the interior setup of the aircraft. This is made by reference to material related to the subject as well as close study of photos of the real aircraft. The next step is to open up the fuselage windows, the crew office, wheel wells, and engine intake and outlet orifice. In case of the engine pods I had to add the forward compressor stage and the rear engine inside detail. Detailing to the crew compartment, wheel wells were also added during the process of assembly. I also elected to modify the existing kit by lowering the inner flaps and opening the leading edge slots and adding a few panel lines that disappeared during the scraping of the kit surface or were incorrectly represented.
The interiors
were finished in light grey while the crew seat, instrument panel, central
console, control columns and cockpit interior were finished in shades of
grey and black. The cockpit canopy, one of which is supplied in acetate was
carefully cut with scissors and gently trimmed with a modelling knife to
obtain the best fit. I acquired the undercarriage from an old kit of the
Super Sabre F-100 which is apparently the same make and size since no
undercarriage gear comes with the kit. The backing vac form sheet provided
enough material to produ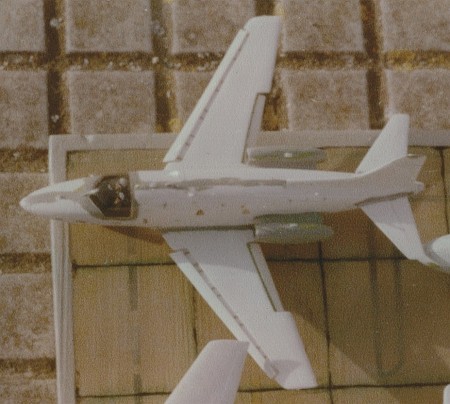 ce
the undercarriage doors, and other essential plastic pieces as strips that
are attached along the inner edge of the fuselage top and bottom to align
the fuselage halves when these are brought together to form the whole
fuselage. During this process I also added cabin partitions and rear
bulkheads of a circular shape, cut flat at the bottom where it meets the
cabin floor.
ce
the undercarriage doors, and other essential plastic pieces as strips that
are attached along the inner edge of the fuselage top and bottom to align
the fuselage halves when these are brought together to form the whole
fuselage. During this process I also added cabin partitions and rear
bulkheads of a circular shape, cut flat at the bottom where it meets the
cabin floor.
To avoid a tail sitter, a nose weight was added which is accommodated at the nose cavity between the box like nose wheel well and the cockpit coaming. The weight is secured in place using scrap paper and white glue. As for the leading edge slots these can either be scratch built or as with my case, a careful cutting of the slats will save building them from scratch. The wing halves are glued together but placing in between a plastic sprue distance piece to give wing its thickness. Locating pegs are then added to the end section of the wing parts. These will slot into drilled holes at the wing root area on the fuselage sides which are in the way of the wing pegs.
The wing parts were then joined to the fuselage and checked for the correct angle viewing the assembled kit from the front. I also cardboard jigs to hold the parts together until the liquid glue has set, allowing 24 hours to dry completely. The wing roots were then treated with putty which was later faired smooth using wet and dry sanding. The same areas were then treated with a coat of light matt grey that showed any imperfections that needed to attend to. The undercarriage detail and well doors were the last items added to the kit. Other exterior detail as wireless was also added.
| COLORS & MARKINGS |
 The colour scheme
that I have chosen for the kit that has always appealed to me was one that
I have spotted at Luqa airfield in Malta on 13.2.66 which was a Bentwater
based one. In my opinion this was the most impressive colour scheme that
ever existed on Sabreliners of the USAF. These have left so much impression
on me and likewise minded modellers that even to this day decal
manufacturers seem to give a promotion to the high visibility markings on
new aircraft decals.
The colour scheme
that I have chosen for the kit that has always appealed to me was one that
I have spotted at Luqa airfield in Malta on 13.2.66 which was a Bentwater
based one. In my opinion this was the most impressive colour scheme that
ever existed on Sabreliners of the USAF. These have left so much impression
on me and likewise minded modellers that even to this day decal
manufacturers seem to give a promotion to the high visibility markings on
new aircraft decals.
My T-39A model serial No 24461 had semi matt white top and the remaining metal finish except the tail, nose and wing tip areas that carried the high visibility Day-Glo orange/red areas. The kit was first given several coats of semi matt white to the upper deck and to the areas that were to be in day-glow. These were then carefully masked with Tamiya masking tape and the rest of the model were airbrushed with a two coats of silver mixed with a few drops of white some 15% gloss varnish and thinner. These were all mixed in cup before spraying.
After allowing 24 hours to dry the white and dayglo areas had the masking uncovered bringing an impressive looking T-39 contrast finish. Finally the wireless of the radio aerial that runs along the fuselage was added using a length of invisible thread.No particular floor polish liquid coat was applied to the model as I would normally do with camouflaged aircraft and I then applied the USAF wording and numerals as well the dark blue cheat line which separates the white top from the silver lower that were on the aircraft using Micro Scale brand of decals and insignias.
| CONCLUSIONS |
The final result was quite pleasing and the kit was placed inside the show case next to other models carrying the vivid colours of the mid 60s. The kit is still available on the market under the brand of Airmodel and although basic it is worth the effort needed by those who are keen on models of trainer and transport aircraft of the world armed forces.
December 2005
Copyright ModelingMadness.com. All rights reserved. No reproduction in any part without express permission from the editor.
If you would like your product reviewed fairly and fairly quickly, please contact the editor or see other details in the Note to Contributors.