| KIT #: | FN 6012 |
| PRICE: | $40.46 |
| DECALS: | Three options |
| REVIEWER: | Tom Berto |
| NOTES: | A satisfying, not-too-difficult build of a neat subject. |
| HISTORY |
I had the great honor and distinct pleasure to build this model for veteran pilot Grant Bird, who flew in both WWII and the Korean War. Grant has a sparkling wit, excellent recall, and a deep sense of patriotism. Grant and millions of others answered the call to military service and fought to free other nations. Their sense of duty to nation and quiet responsibility stand in sharp contrast to today’s indulgent, me-first culture.
Grant flew Martin B-26 Marauders out of England during WWII. On his very first mission on September 19, 1943, the tail of his aircraft was very nearly blown off by 20mm cannon shells from a yellow-nosed FW-190 flown by one of the "Abbeville Boys". The tail gunner was gravely wounded and never flew again.
On February 6, 1944, on a bombing mission near Paris his right engine was lost. The crew managed to climb on one engine from about 5,000 feet back up to over 9,000 feet and in one hour fifteen minutes made it back over the channel to just inside the English coast before the last engine quit. In that hilly terrain there was no place to try a deadstick landing so the crew bailed out. Grant saved his parachute and took it back to his base for repacking, except for the rip cord which he sent home as a memento and has at home now.
 On April 30, 1944, on his 33rd
mission, near St. Omer, France his aircraft was struck by an 88mm flak shell.
It blew in the left side of the fuselage at the left wing root and burning fuel
poured into the radio/nav compartment. The crew hustled through the flames to
bail out. Grant used the same parachute he had used a few weeks before. He was
captured and spent the last year of the war in various prisoner-of-war camps.
He was returned to US Military Control on April 29, 1945 after a battle by the
14th Armored Division of the Third Army commanded by General George Patton at
Stalag Luft VII, Moosburg, about 30 kilometers northeast of Munich, Germany.
After eating welcome army chow for several days he found a scale at Camp Lucky
Strike at La Havre, France, where he discovered his weight had climbed back up
to 95 pounds. He weighed about 150 when he was first captured.
On April 30, 1944, on his 33rd
mission, near St. Omer, France his aircraft was struck by an 88mm flak shell.
It blew in the left side of the fuselage at the left wing root and burning fuel
poured into the radio/nav compartment. The crew hustled through the flames to
bail out. Grant used the same parachute he had used a few weeks before. He was
captured and spent the last year of the war in various prisoner-of-war camps.
He was returned to US Military Control on April 29, 1945 after a battle by the
14th Armored Division of the Third Army commanded by General George Patton at
Stalag Luft VII, Moosburg, about 30 kilometers northeast of Munich, Germany.
After eating welcome army chow for several days he found a scale at Camp Lucky
Strike at La Havre, France, where he discovered his weight had climbed back up
to 95 pounds. He weighed about 150 when he was first captured.
After a few months back in the states, he decided to leave the service to attend college. On May 12, 1946 he was separated from the Army Air Forces.
In October, 1946, he enrolled at the University of Missouri. The following June 1, 1947, he married Jean Stratton, whom he had known since she was 7 and he was 11. Jean's older brother, Eldon Stratton, was a friend of Grant's from school. Eldon was a fighter pilot in the Pacific Theatre and had been at Wheeler Field, Hawaii, on December 7, 1941. He was also one of the 16 P-38 pilots that intercepted the flight of two Betty bombers carrying Admiral Isoroku Yamamoto and his staff on April 18, 1943, shooting them down and killing them. Eldon was killed four and one half months later flying a P-39 while escorting B-24's on a bombing mission near Vella Lavella.
These were flying families. Jean's older sister was married to Leo Cook, a B-24 Squadron Commander flying out of England. Grant's younger brother, Robert, was a pilot in the Strategic Air Command in the Pacific later on.
Grant finished college in three years, in June
of 1949, and was happily teaching agriculture to veterans under the GI Bill in a
small town in southwest Missouri when he received orders recalling him back to
extended active duty with the Kansas City Reserve Wing on February 10, 1951. He
flew C-82's in South Carolina for a time, then transferred to helicopters in
Detachment 1 based at K-2, Seoul, Korea, with the 3rd Air Rescue Squadron based
in Japan, and attached to the 5th Air Force from the Military Air Transport
Service (MATS). The chopper pilots spent very little time at Detachment 1,
Seoul. They were farmed out in about two
 week intervals to various bases
all over Korea, such as the AF Bomber Base at K-8, Kunsan on the west coast and
the Marine jet fighter base at K-9 over on the east coast, to provide strip
rescue alert. Both Sikorski H-5 and H19 Helicopters were used for these duties.
week intervals to various bases
all over Korea, such as the AF Bomber Base at K-8, Kunsan on the west coast and
the Marine jet fighter base at K-9 over on the east coast, to provide strip
rescue alert. Both Sikorski H-5 and H19 Helicopters were used for these duties.
An important role was operating out of the 43 MASH Hospital up the Chorwon Valley near the Main Line of Resistance (MLR). Wounded soldiers were picked up at forward positions on the MLR and transported quickly to the 43rd MASH (Torso Wounds) and the 44th MASH (Head Wounds) located further east near the MLR. Marine and Army helicopter units furnished the same service to other MASH locations further along the line of the MLR. At times choppers transported patients to a hospital ship in Inchon Harbor.
Grant served on Cho-Do Island, about 40 miles north of the MLR on the west coast and just six miles off the North Korean mainland out in the Yellow Sea. H-19's were used for this duty. A radar station sat at the peak of the island, just 6 miles off the coast of the enemy mainland. Down the steep slope on the west side, the chopper site had a couple of large tents and a level spot large enough for a landing pad. The island was seized by Marines in 1950 because of its tactical value as a base. The North Koreans during bad weather would run their guns out in an attempt to drop shells on the site. They could never elevate their guns sufficiently to drop shells on our positions in defilade attempts. The crews would just sit and watch as the shells flew over to explode in the fields in the valley below.
At this base the crews could intercept damaged jet fighters coming down from the Yalu River and rescue the pilots. The medic would use the "horse collar" on the winch to snatch a pilot out of the water. Jet pilots were encouraged to punch out and be plucked from the water as opposed to trying to ditch. Jets don't ditch well.
On land, the harness would be lowered to about five feet above the ground and moved over the person to be picked up, who would run an arm through the harness, then grab his wrist with a death grip and take an interesting, exciting ride. The chopper never stopped moving, and the rescued pilot was either winched up to the chopper or taken to a place out of ground fire to land. The chopper pilots would practice and take turns rescuing and being rescued.
The Sikorsky H-5, originally designated the R-5 (Rotorcraft vs Helicopter), first flew in August 1943. It used a 450 HP P&W R-985 laid flat amidships, and improved on the range, load, speed, endurance, and service ceiling of the R-4. On the H-5, wounded were carried in enclosed litters on either side of the fuselage. Eventually, about 350 of all variants were built, serving with the USAF, US Navy, US Coast Guard, French Navy and in the Royal Navy as the license-built Westland Dragonfly. Several examples exist.
 The US Navy used 98 H-5's,
designated HO3S-1, on the carrier-based equivalent of strip alert. This made
for a starring role in "The Bridges at Toko-Ri", released in 1954. (When I was
a boy, I watched this movie for the airplanes. A few years later, I watched it
for Grace Kelly. Now I'm happily married and back to watching it for the
airplanes – more specifically, for the helicopters. The shots of the interior
and exterior were useful references during the construction.)
The US Navy used 98 H-5's,
designated HO3S-1, on the carrier-based equivalent of strip alert. This made
for a starring role in "The Bridges at Toko-Ri", released in 1954. (When I was
a boy, I watched this movie for the airplanes. A few years later, I watched it
for Grace Kelly. Now I'm happily married and back to watching it for the
airplanes – more specifically, for the helicopters. The shots of the interior
and exterior were useful references during the construction.)
The fuselage of the H-5 was of mixed construction. The forward section had an aluminum, monocoque floor, with the upper part built up from aluminum channel and glazed with Plexiglas windows. The center section was welded steel tubing, cowled with plastic-impregnated molded plywood, while the boom was a wooden tube, with the drive shaft for the tail rotor running along the top.
Grant noted that the position of the H-5's center of gravity had to be within a 3 1/2" wide zone, fore and aft, in order for the helicopter to fly. Since the loaded weight of the helicopter was less than 5,000 lbs, the addition of two wounded men in litters well forward would often require correction of the CG location. This was typically accomplished by putting one or two 5-gallon gas cans full of sand in the luggage compartment in the tail boom. Grant would lift off for a moment and immediately assess the balance of the H-5. Excessive load imbalance would cause the cyclic to "hit the stops", with violent pounding and shaking. If the ballast cans weren't enough to balance the H-5, Grant had to (and often did) resort to putting rocks in the luggage compartment.
The
H-5's rotor blades were framed into multiple compartments, which were originally
fabric covered. The helicopter could still fly with the fabric burst on a few
compartments, but the noise was tremendous. Later models had aluminum blades
with a honeycomb core. Moisture would condense inside the compartments, then
freeze at night and refuse to drain out. The variation in ice weight between
blades would cause the rotor to not "track" (all blades following the same
path). The tracking adjustment, which had to be done under power, was
laborious. First the blade tips were marked with three different colors of
grease paint. 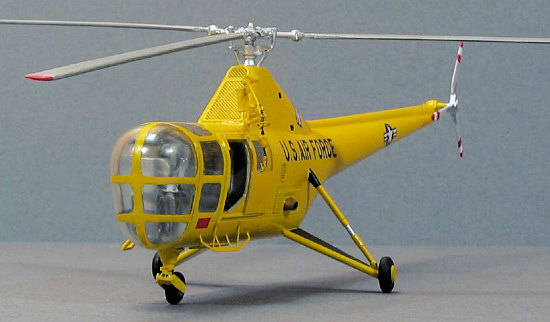 Then a crew
member would very carefully approach the spinning rotor, holding a pole with a
1x3 foot vertical fabric flag attached to it, stopping only after the blade tips
had touched and marked the flag! The engine was clutched out and the blades
individually adjusted at their roots, based on the heights of the marks on the
flag. Then Grant would engage the blades and "join the needles" (match engine
and blade RPM), and the marking and adjustment process would be repeated until
the blades tracked.
Then a crew
member would very carefully approach the spinning rotor, holding a pole with a
1x3 foot vertical fabric flag attached to it, stopping only after the blade tips
had touched and marked the flag! The engine was clutched out and the blades
individually adjusted at their roots, based on the heights of the marks on the
flag. Then Grant would engage the blades and "join the needles" (match engine
and blade RPM), and the marking and adjustment process would be repeated until
the blades tracked.
Ice in the blades could be compensated for, but when the ice melted and drained out, the blades would be out of adjustment again. In order to melt the ice, the crews took to driving out the taper pins, removing the blades, and bringing them into their squad tents huts with both stoves going full blast. (I've slept with my camera on cold backpacking trips, but never with an entire helicopter blade.)
After the Korean War Grant was assigned to Research and Development for five years at Holloman AFB, New Mexico, where he and Jean had a son. He flew a number of different models of helicopters, some jets and a variety of propeller aircraft. He went to Dhahran, Saudi Arabia as an Operations Officer, then after 13 months transferred to Germany as a helicopter pilot, CO of the detachment at Spang/Dahlem. He did a lot of traveling to detachments in France and Spain as a check pilot for proficiency checks, instrument checks, and maintenance tests. In July, 1963 he was assigned to the Western Air Rescue Center, Hamilton AFB, Novato, CA, and retired from the Air Force on August 1, 1966.
| THE KIT |
The fuselage halves, door, and canopy nose are molded in clear polystyrene. Clear polystyrene is always brittle, but these parts were the worst I've encountered. One door cracked halfway across as I snipped it off the sprue, then one fuselage half started to crack while still on the sprue! I patched that crack with an Evergreen splice internally, then resorted to cutting the nose and fuselages off the sprue using a red-hot X-acto knife, to minimize stress. The panel lines are moderate and recessed. That allowed them to survive being sanded. The surfaces (inside and out) of all the clear parts were a pebble grain finish, enough to completely diffuse any view of the interior. It's as if someone sandblasted the mold, instead of polishing it. More about that later.
The rest
of the injection molded parts were in gray, short run polystyrene, about as
carvable as a bar of Ivory Soap that's been left out for two months. These
parts included some of the interior pieces, the main landing gear, blades, some
rotor hub parts, intake louver, exhaust manifold, floor, and rear cockpit
wall. Ever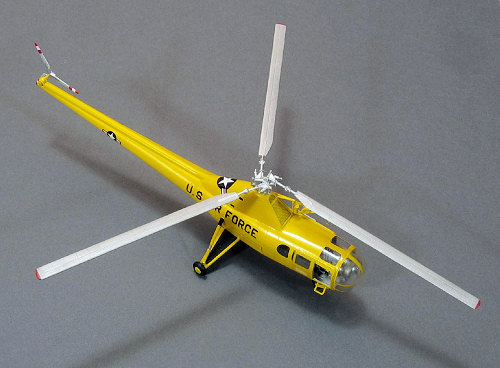 y piece had
significant flash, up to 1/2 mm thick. It seems as though the molds are warped
and not enough clamping pressure was used to close them properly. The flash was
time-consuming, but not difficult to clean up. In small doses, I actually enjoy
cleaning up flash. But I enjoy washing dishes, too.
y piece had
significant flash, up to 1/2 mm thick. It seems as though the molds are warped
and not enough clamping pressure was used to close them properly. The flash was
time-consuming, but not difficult to clean up. In small doses, I actually enjoy
cleaning up flash. But I enjoy washing dishes, too.
The main rotor core and spindle, nose gear leg, rudder pedals, collective & cyclic, winch pieces, and tail rotor spindle are cast in white metal. The winch tubing and main rotor core were mangled and needed some careful straightening. In addition, almost all of the white metal parts needed significant clean up. There were no holes in the rotor core for the blade stubs, so these needed to be drilled out. Because of the unclampable shape of this part, it came down to hand holding and hand drilling of three 1/16" holes about 1/8" deep.
The small sheet of photo-etch had cockpit details, instrument panel dials, air intake screen, steps, door rails, louver panels, rotor pieces, winch hook, and instrument panel. The sheet was so small that it was sometimes hard to tell what was part and what was scrap. A larger sheet or a clear illustration would have helped.
The instrument console was very nicely cast in resin.
The instruction sheet showed illustrations for two different helicopters, but if the kit had decals, I lost them with such dispatch that I have no recollection of them at all. It didn't matter, as they didn't include the markings I needed.
| CONSTRUCTION |
I
started with the nose piece of the canopy. It seems that almost every model has
at least one part that *must* be done nearly perfectly in order for the model to
be an aesthetic success. The blown canopy of the P-51D is a good example, and
for most piston-engine aircraft, the propeller and spinner. For the H-5, the
focal point was the canopy nose. As noted earlier, all clear parts
 had a light pebble-grain finish
that left them about as transparent as a frosty beer mug. I scribed the
molded-in framing into the nose, then wet sanded it inside and out with 600,
then 1500 grit paper. I polished it with Novus #1 plastic polish and dipped it
in Future, but then immediately removed that with ammonia cleaner, because it
beaded up. I guessed that the anti-fogging ingredient in the polish had left
something on the surface, so I cleaned both sides with Mr Thinner and had much
better luck on the second dip. The nose piece ended up looking great. The
recovery was a complete success, and provided me with a tremendous lift right at
the beginning of the project. I painted the frames Testors steel on the inside,
Polly-scale RLM 04 Yellow on the outside, flowing the paint up to the scribed
framing lines. A priming coat of white would have been a good idea, as the
yellow took three coats.
had a light pebble-grain finish
that left them about as transparent as a frosty beer mug. I scribed the
molded-in framing into the nose, then wet sanded it inside and out with 600,
then 1500 grit paper. I polished it with Novus #1 plastic polish and dipped it
in Future, but then immediately removed that with ammonia cleaner, because it
beaded up. I guessed that the anti-fogging ingredient in the polish had left
something on the surface, so I cleaned both sides with Mr Thinner and had much
better luck on the second dip. The nose piece ended up looking great. The
recovery was a complete success, and provided me with a tremendous lift right at
the beginning of the project. I painted the frames Testors steel on the inside,
Polly-scale RLM 04 Yellow on the outside, flowing the paint up to the scribed
framing lines. A priming coat of white would have been a good idea, as the
yellow took three coats.
I repeated this treatment on the fuselage windows and the doors. I left off adding Future to the outside of the windows, as I knew I'd be spraying on coats of it before and after applying the decals.
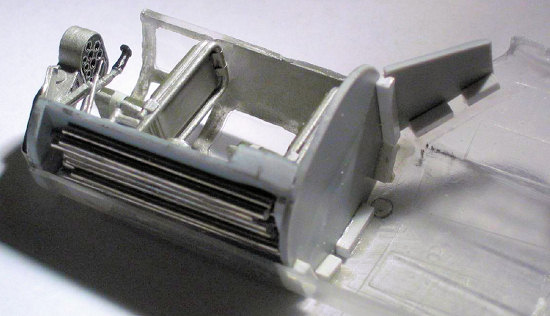
The
interior was nicely done, appropriately minimalist. It's easily visible through
the (now) clear nose and opened doors. I left off some insect parts made from
PE, but added seat harnesses from tape. Grant noted that H-5's had a variety
of interior colors, but were often gray with a greenish tinge – which sounds to
me like aluminum with a chromate conversion applied. I settled on Testors
Steel, again. The fit of the
 cockpit
assembly into the fuselage was good. I installed perhaps 1/2 oz of cut,
straightened lengths of solder under the floor. This may not have been
necessary, but I did not want a tail sitter. I also added joint strengthening
blocks of Evergreen square rod around the periphery of the rear bulkhead, to
really lock the assembly into the fuselage half.
cockpit
assembly into the fuselage was good. I installed perhaps 1/2 oz of cut,
straightened lengths of solder under the floor. This may not have been
necessary, but I did not want a tail sitter. I also added joint strengthening
blocks of Evergreen square rod around the periphery of the rear bulkhead, to
really lock the assembly into the fuselage half.
I installed the cooling air intake louver, then glued the halves together. I let this harden for a day, then in order to eliminate the pebble grain, I wet sanded the entire fuselage (600/1500) and rescribed the seam-crossing panel lines. Little filling was required.
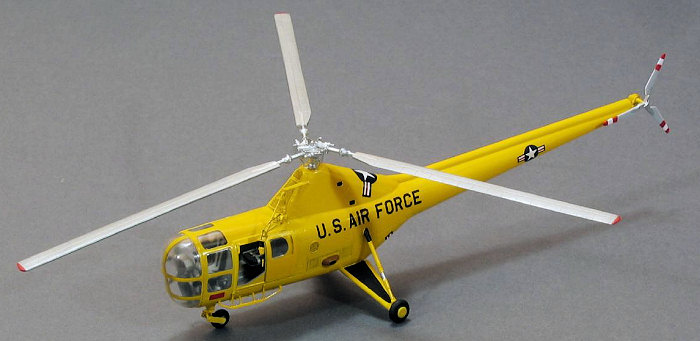
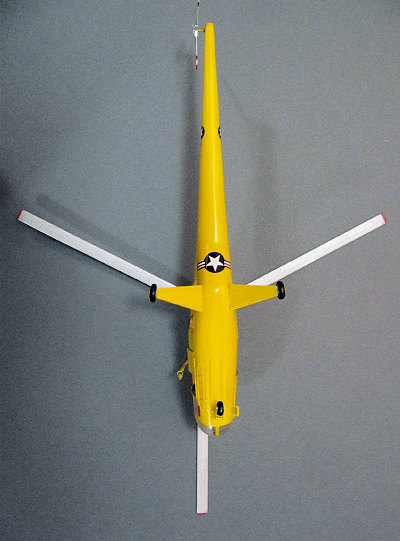
Look Mom! No wings! At this point, the build was complete, with just assembly, attachment, and alignment of details.
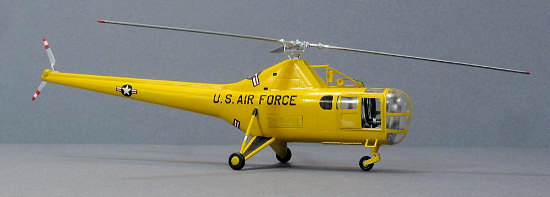
The location points for the medic's step were molded proud and I had obliterated them by wet-sanding. With them missing and no guidance from the instructions, I bent the struts incorrectly, but I still got the part attached. The pilot's step was too wide, so I scratchbuilt a replacement from small Evergreen rod. The PE cooling air screen and cooling exhaust vents were very nice. Being detailed and flat, these are the type of part at which PE excels.
I mistook one of the PE door rails for part of the scrap on the fret, and cut it in half. I replaced it with a scratch-built part. I attached the canopy nose, some ribs under the cabin, and the main and nose gear strut assemblies. With the sprightly raised boom, the model looked like one of those lizards that lifts its tail and runs on water.
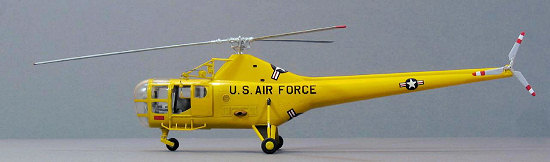
| COLORS & MARKINGS |
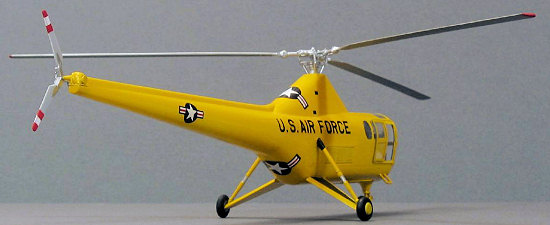
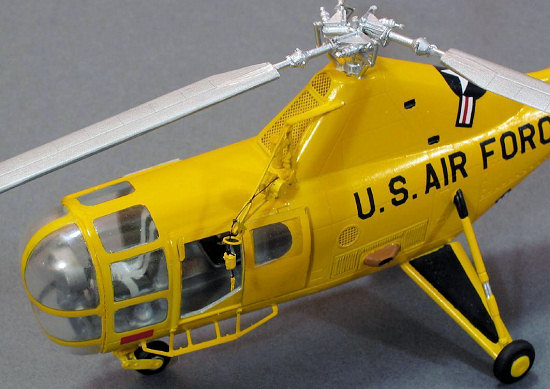
USAF H-5's were yellow, which is a great color for a model. Examples in museums are polished and shiny. I masked the windows with Bob Dively Liquid Masking Film (nice stuff!) and pushed enough Kleenex through the cabin door openings to make a Tokyo subway stuffer proud. I airbrushed on a white primer coat, then Polly Scale RLM 04 yellow. Because the fuselage is clear plastic, a strong light will shine right through both layers of paint on both sides of the fuselage. Although this is not an issue with normal lighting, I might prime the insides of the entire fuselage with black if I were to build this kit again. I peeled the masking film off the windows, then sprayed on the first coat of Future. I cannibalized and applied a set of decals given by a friend (thank you Rees!), then sprayed the second coat of Future. With two coats of Future, all of the canopy glazing looked great.
| FINAL CONSTRUCTION |
 With the finish applied and
hardened, I continued building and installing details:
With the finish applied and
hardened, I continued building and installing details:
The main wheels had comically deep sink marks, but on the inside where they were easy to fill. The flat bottom main gear struts were molded such that the wheels toed out. Somehow I talked myself into believing that this was correct. "Yeah dude, helicopters don't need runways, they, like, take off straight up!”. But, of course toe-out of the wheels would make ground handling rather hard. There had to be a reason for them to have used wheels, no? Grant spent a night at the front after the brakes failed on his H-5 and it rolled backwards off a road, damaging the tail rotor. The medic caught the next flight out, but Grant was left to fly out after the rotor was repaired.
The nose gear strut is white metal, for strength. The two plastic link plates that connect the nose wheel to the strut were short-shot and probably wouldn't have been strong enough anyway, so I fabricated a pair from 0.020" aluminum flashing.
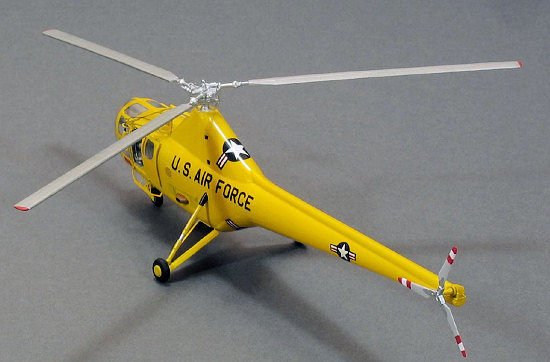
The tail rotor hub was broken as received, and would have required a butt joint between its three spokes and the shafts extending from the individually molded blades. Truly, I dislike having to build ANY propeller and wish every one were molded in one piece, but this tail rotor would have been ridiculously delicate, in addition to the customary issues with alignment of every blade in three directions. I replaced the kit hub with one that I made from aluminum hex stock on a milling machine and lathe. My "billet" part also had three deep holes that provided strength and alignment (in everything but pitch) of the blades. Lacking adequate documentation, I left the blades gray and painted the tips red/white/red. In retrospect, I think black blades with yellow tips would be correct.
Assembly
of the main rotor hub was covered in the instructions by one complex, yet still
inadequate exploded view drawing. "Thank you, but my parts came in the
exploded condition, what I really need is a view of the assembled rotor hub".
One good sharp photo of a real hub would have provided practical and
psychological support. Or, since the hub has triple-symmetry, just a drawing of
one-third of the hub, assembled. I studied the drawing using magnification, but
still installed some parts incorrectly. In addition, some of the PE parts fit
awkwardly. It appears that there was no adjustment of the photo-etch mask after
assembling the first kit. Even with all that, the end result was an
appropriately complex assembly that looked right. I installed the blades with
 sections of the shafts
showing. This was correct for the early models, but not later, where the flat
parts of the blades extended all the way to the knuckles where they could be
folded.
sections of the shafts
showing. This was correct for the early models, but not later, where the flat
parts of the blades extended all the way to the knuckles where they could be
folded.
The main rotor blades were painted steel, top and bottom, with red tips. Photos of some later examples show bottoms painted black. Reflected glare from the sun wouldn't be a problem unless the helicopter was already upside down, but black bottoms would eliminate the visual distraction of silvery blades.
I glued both doors on in the open position. The pilot's door has top and bottom windows, and I added a fat drop of Tenax an instant before predicting (correctly) that surface tension would wick the Tenax up between the fuselage and door. This was on the last night of the build and I did not have the energy or time to fix it, hence the discolored patch on the bottom of the pilot's door.. doh!
I built up the winch from its mangled white metal frame and bits, then attached it with Evergreen top struts and a copper wire cable. I painted it in place, thus completing the build.
| CONCLUSIONS |
This was an arduous, but never unpleasant build. Some scratch-building skills are required to complete it. The quality control in mold-making, molding, photo-etch, and white metal seems completely indifferent. The illustration of the main rotor assembly was inadequate, and the structure provided for the tail rotor was so bad that I wasn't inclined to even waste time on it. However, the kit is complete, the shape is good, and it's the only game in town for anyone wanting to build a really nifty looking helicopter. That enabled me to make a gift that Grant is very happy with.
| REFERENCES |
Personal recollections, Grant and Jean Bird
Janes All the World's Aircraft, 1945-46
http://www.airliners.net/ was useful during the build
July 2007
Copyright ModelingMadness.com. All rights reserved. No reproduction in part or in whole without express permission.
If you would like your product reviewed fairly and fairly quickly, please contact the editor or see other details in the Note to Contributors.