HobbyBoss 1/72 F4U-4 Corsair
| KIT #: | 80218 |
| PRICE: | £3.99 |
| DECALS: | Two options |
| REVIEWER: | Dave Drake |
| NOTES: |
| HISTORY |
The F4U-4 was one of the more important variants of the Corsair. Seven
prototypes were built, anticipating the many problems which would arise
from the proposed changes. Five F4U-1s were pulled from the production
line to be modified into the XF4U-4A, ‘4B, ‘4C, ‘4D and’4E. Two more
"FG-1" aircraft (identical to the Vought F4U-1) were pulled from
Goodyear’s production line. They were all fitted with the Pratt-Whitney
R-2800-18W engine which produced 2,100 hp (1,567 kW) and sported a new
four blade prop. The engine also had methanol-water injection which
boosted the war emergency power rating to 2,450 hp (1,828 kW) for about
five minutes. The 18W engine necessitated changes in the basic airframe
to handle the extra power and the turbo air intake was
 mounted on the
inside bottom of the engine cowling (it was called a "chin scoop") while
air for the intercooler and oil cooler continued to be drawn from the
wing slots. The F4U-4 was clocked at a top speed of 446 mph (717.75 kph)
at 26,200 ft (7,985.76 m).
mounted on the
inside bottom of the engine cowling (it was called a "chin scoop") while
air for the intercooler and oil cooler continued to be drawn from the
wing slots. The F4U-4 was clocked at a top speed of 446 mph (717.75 kph)
at 26,200 ft (7,985.76 m).
Although it wasn’t designated by the Navy as such, the dash four was a
fighter-bomber for all intents and purposes. It had 6 Colt-Browning .50
cal. (12.7 mm) wing mounted machine guns (the F4U-4C substituted four 20
mm cannon), plus it could carry two 1,000 lb (453.6 kg) bombs or eight 5
inch (127 mm) rockets. The first 300 of the production F4U-4Cs were
assigned to Marine Air Group 31 and were taken into the Battle for
Okinawa aboard the escort carriers Sitko Bay and Bereton. The Army and
Marine riflemen who fought that battle on the ground remember the F4U-4
as the "Sweetheart of Okinawa" and it undoubtedly saved many hundreds of
their lives. The -4 was also used in rather large numbers post-war
and saw extensive use during the Korean war as the mount of choice of
Marine fighter-bomber units. Its ability to haul heavy loads and absorb
battle damage were instrumental in helping to turn the tide of the war in
the early days, when things looked rather bleak. Eventually, they were
replaced by F9F Panther jets as even the Marines had to modernize!
Historical section courtesy of your editor.
| THE KIT |
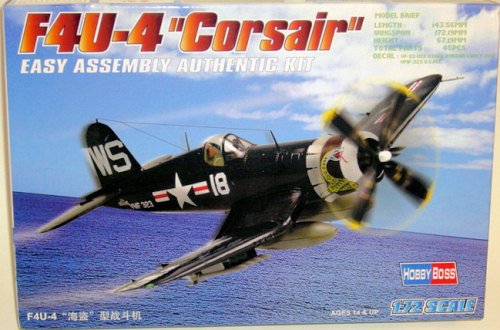 The
Hobby Boss range of 1/72 World War II fighters is easy-to-build, almost (but to
me not quite) snap together, and if these kits don’t attract newcomers to the
hobby then nothing will and our pastime will eventually die. So why build one?
The
Hobby Boss range of 1/72 World War II fighters is easy-to-build, almost (but to
me not quite) snap together, and if these kits don’t attract newcomers to the
hobby then nothing will and our pastime will eventually die. So why build one?
Well, why not? In the past I’d poured scorn on snap together kits (the poor relation, you know) but this was something different. A peep inside the box convinced me that it would be worth putting one to the test. After all, they are designed to fall together (-ish), they’re relatively inexpensive and a bit of quick and dirty modelling fun wouldn’t go amiss.
I’ve always had a soft spot for the Corsair, although I’m no Corsair expert. It’s one of those brutish-looking fighters the Americans tend to excel at and as I had a Heller Corsair made up as an RN Mk IV, the F4U-4 (Hobby Boss also produce an F4U-1A) was taken up.
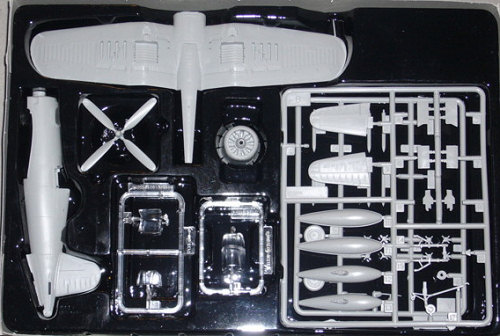 Looking
at the parts in the box I’d say dimensionally and proportionally the kit seemed
to hit all the right notes. Crisply-moulded in light grey plastic, the
detailing mostly consists of very fine engraved panel lines. Some of the
ribbing effect on the wing appeared a tad heavy, but as one with a life-long
phobia of air brushes I reckoned hand-brushed paint would sort that out. There
was no flash and only the very lightest of seam lines – almost imperceptible, in
fact. Optional open or shut canopies were crystal clear (more of which later)
and the 2-option decal sheet was well-printed. Instructions were clear and
well-printed also, and included a full-colour paint guide.
Looking
at the parts in the box I’d say dimensionally and proportionally the kit seemed
to hit all the right notes. Crisply-moulded in light grey plastic, the
detailing mostly consists of very fine engraved panel lines. Some of the
ribbing effect on the wing appeared a tad heavy, but as one with a life-long
phobia of air brushes I reckoned hand-brushed paint would sort that out. There
was no flash and only the very lightest of seam lines – almost imperceptible, in
fact. Optional open or shut canopies were crystal clear (more of which later)
and the 2-option decal sheet was well-printed. Instructions were clear and
well-printed also, and included a full-colour paint guide.
The kit shares surprisingly few of its parts with its F4U-1A stablemate. I did wonder whether this F4U-4 fell into the same trap as Matchbox kit by botching the armament. Many F4U-4s (from the -4B onwards) were armed with 4 x 20mm cannon rather than the earlier 6 .50 inch machine guns and Matchbox provides 4 cannon stubs but cartridge case ejector slots for 6 MGs!. Research indicated that Hobby Boss had done its homework and that both sets of markings actually did appear to be for -4As, and the wings were right.
| CONSTRUCTION |
Construction started by fitting the single piece wing and under fuselage
component to the one piece fuselage, followed by the one-piece cowling and
integrally-moulded engine and the tailplanes. Pre-painted main undercarriage
legs and doors were also 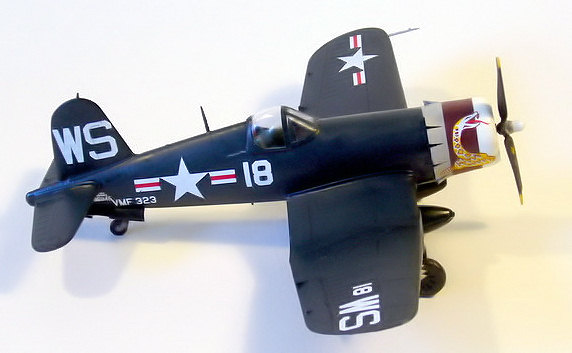 added.
A note of caution – this kit fits together very well indeed, with no alignment
problems, but you do still need to dry-run parts to ensure they fit properly –
the fit of some parts is extremely tight, and sanding is needed in
places. The only real shortcoming in the kit at this stage was the joint
between the upper wing roots and the fuselage, which needs a tiny amount of Mr
Surfacer to sort out the gap. The drop tanks were assembled, the fins attached
to the rockets and the gunsight fitted. This is a single opaque item, but can
be modified with clear plastic sheet if painting the sight itself is considered
a cop-out. I copped out, painting the gunsight mounting Matt Black, with the
sight itself picked out in silver (Humbrol 11). The cockpit interior was
painted interior green (Humbrol 78) apart from the instrument panel and control
column, which were both painted Matt Black (Humbrol 33), the engine (the least
satisfactory bit of the kit, detail-wise) a dark oily gunmetal, and the assembly
was left to dry overnight. 30 minutes so far!
added.
A note of caution – this kit fits together very well indeed, with no alignment
problems, but you do still need to dry-run parts to ensure they fit properly –
the fit of some parts is extremely tight, and sanding is needed in
places. The only real shortcoming in the kit at this stage was the joint
between the upper wing roots and the fuselage, which needs a tiny amount of Mr
Surfacer to sort out the gap. The drop tanks were assembled, the fins attached
to the rockets and the gunsight fitted. This is a single opaque item, but can
be modified with clear plastic sheet if painting the sight itself is considered
a cop-out. I copped out, painting the gunsight mounting Matt Black, with the
sight itself picked out in silver (Humbrol 11). The cockpit interior was
painted interior green (Humbrol 78) apart from the instrument panel and control
column, which were both painted Matt Black (Humbrol 33), the engine (the least
satisfactory bit of the kit, detail-wise) a dark oily gunmetal, and the assembly
was left to dry overnight. 30 minutes so far!
Next steps
Thin strips of masking tape were used to represent seat straps, while a spare
instrument panel (actually a photocopy of the Airwaves Corsair cockpit interior
etched brass set!) provided a little detail in the cockpit. There’s actually
some scope for rather 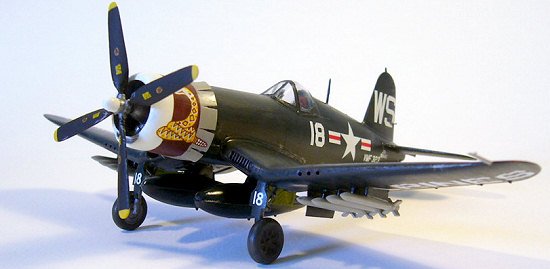 more,
but this was intended to be a fun build. Pre-painted undercarriage assemblies
(see below) and doors were fitted, as were the rockets, which were a very
tight fit. The cockpit canopy was attached with Krystal Klear and left to dry.
more,
but this was intended to be a fun build. Pre-painted undercarriage assemblies
(see below) and doors were fitted, as were the rockets, which were a very
tight fit. The cockpit canopy was attached with Krystal Klear and left to dry.
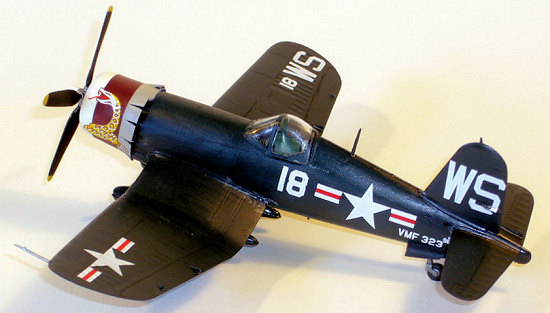
Drop tanks and rocket pylons were painted FS15042 Glossy Sea Blue (Xtracolor X121), while the rockets themselves were finished in a very light grey (Humbrol Matt 28). At this stage the underside of the wings were painted Glossy Sea Blue. The next day the appropriate decals were applied and when dry the drop tanks and rockets were fitted. The pylons are a very snug fit and need to be sanded before cementing. Newbie modellers beware – if you don’t pre-paint the stores and apply the decals first you will face a nightmare of a job of finishing off this area and may never buy another kit again!! I think the kit instructions should have made this clear to the inexperienced modeller.
| COLORS & MARKINGS |
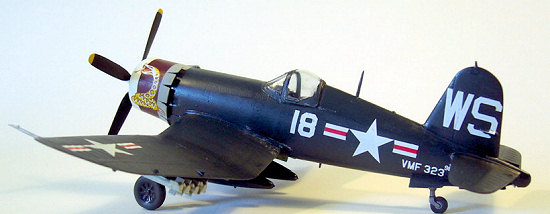
Two Gloss Sea Blue Korean War-era examples are catered for; a machine from US
Marine Corps VMF-323 and one from US Navy VF-53. The painting instructions are
adequate, but I suggest checking out the Aeromaster website for sheet 48-694 for
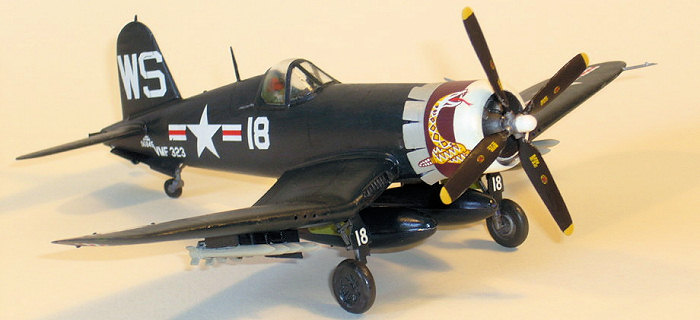
more on colour schemes – especially the VMF-323 machine and its glorious snake.
Humbrol Matt 34 was used for the propeller spinner
 and the white segment of the
cowling, a mix of Humbrol red and blue (Matt 60 and 25) for the maroon part,
and. Humbrol Matt Black was used for propeller blades and Matt Trainer Yellow
for the prop tips. The engine was painted Xtracolor X508 with a thin black
wash, with dry-brushed Humbrol Silver highlights.
and the white segment of the
cowling, a mix of Humbrol red and blue (Matt 60 and 25) for the maroon part,
and. Humbrol Matt Black was used for propeller blades and Matt Trainer Yellow
for the prop tips. The engine was painted Xtracolor X508 with a thin black
wash, with dry-brushed Humbrol Silver highlights.
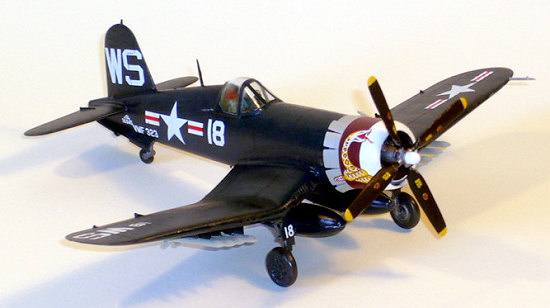
Aeromaster 48-694 paint instructions have undercarriage legs, wheels, wheel wells and the insides of the well doors Gloss Sea Blue. That may well be true, but I wanted a little relief from relentless Sea Blue so the legs and the inside faces of the wheel hubs were painted Xtracolor X508 (Burnt Iron) and wheel wells and doors Zinc Chromate (Xtracolor X408). The outer faces of the wheel hubs were painted Sea Blue followed by black wash. Tyres were painted with a bespoke mix of Matt Black and a random Matt Green. The various intakes were also painted X508, suitably washed and highlighted with black and silver.
Decal application was straightforward – well-printed, thickness spot on, no problems ‘bedding down’ with Johnson’s Klear. To me this appeared OK for a restored warbird, but way too shiny for a war-weary Corsair, so a coat of Humbrol 135 satin varnish was applied. Somewhat perversely this appeared a shade too matt but did make for abetter base for light touches of weathering and panel marking.
| CONCLUSIONS |
This was a good kit to play with, although not without its shortcomings. The
engine was lacking in basic detail and the main undercarriage legs are too
‘leggy’ by about 2 mm, just like the ancient Airfix F4U-1 (this may not sound
much but it does affect the sit of the completed model). In addition, the legs
lack the torque linkages fitted to the real thing. I fixed the former but not
the latter. The aerial fit is for an F4U-1A and needs to be sorted out. The
cockpit is very Spartan – an integrally-moulded control column and seat (the
former looks like a drainpipe, the latter is cleverly done), but the basics are
there and additional detail is
 crying out to be added –
especially given the clarity of the canopy. But let’s remember the target
market and not be too critical here. The one real ‘gotcha’ I experienced was
with the canopy. I fitted the ‘closed’ option, masked and painted it only to
discover upon removing the masking that a small amount of Sea Blue had seeped
through a tiny gap between the rear of the clear part and the fuselage. I
hadn’t seen the gap beforehand and a dab of Krystal Klear or Mr Surfacer would
have fixed it nicely there and then. As it was, I took off the canopy, repaired
the damage and refitted it.
crying out to be added –
especially given the clarity of the canopy. But let’s remember the target
market and not be too critical here. The one real ‘gotcha’ I experienced was
with the canopy. I fitted the ‘closed’ option, masked and painted it only to
discover upon removing the masking that a small amount of Sea Blue had seeped
through a tiny gap between the rear of the clear part and the fuselage. I
hadn’t seen the gap beforehand and a dab of Krystal Klear or Mr Surfacer would
have fixed it nicely there and then. As it was, I took off the canopy, repaired
the damage and refitted it.
On the basis of this build I’d say any experienced/long in the tooth modeller should be able to do a lot with this range of kits – even if only to try out new modelling techniques. I can’t say whether any of the other subjects in the range are as good as the Corsair (the Spitfire definitely looks iffy in places), but it sets a whole new standard in terms of ‘entry-level’ kits, and again let’s not forget the target audience. Accurate and (externally at least) well-detailed, but easy to build, assembling a couple of these should tempt newcomers to the hobby.
OK, they may be ‘McModels’ but they are a bit of fun AND have can result in an end product that would not look too out of place next to a Hasegawa/Tamiya product. Mr Hornby/Airfix please do note that recycling 40-year old Me262s, Zeros or Me109Gs and the like as snap-together kits will no longer do.
May 2007
Copyright ModelingMadness.com. All rights reserved. No reproduction in part or in whole without express permission.
If you would like your product reviewed fairly and fairly quickly, please contact the editor or see other details in the Note to Contributors.