Minicraft 1/144 VC-118 'Independence'
| KIT: | Minicraft 1/144 VC-118 'Independence' |
| KIT #: | 14447 |
| PRICE: | $19.00 MSRP |
| DECALS: | One option |
| REVIEWER: | John Kauck |
| NOTES: | Presidential aircraft |
| HISTORY |
President Truman inherited the VC-54C “Sacred Cow” when he assumed the Presidency in 1945 upon FDR’s death. He created the U.S. Air Force aboard her when he signed the National Security Act of 1947 in July of that year.
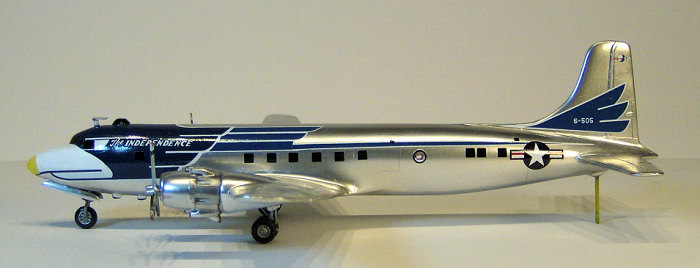
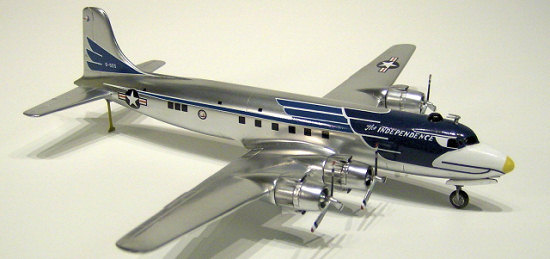
However, in that same month, President Truman began to use a brand new U.S. Air Force presidential airliner designated VC-118, based on the Douglas DC-6 Liftmaster, and named “The Independence,” after the President’s Missouri home town. With the war over and secrecy no longer an issue, its rather ostentatious eagle design was adapted from a rejected airline color scheme.
President Truman relished the plane as a symbol of American prestige, often using it as a backdrop for speeches and press conferences. Perhaps the plane's most historic flight was to Wake Island in October 1950, transporting President Truman to a conference with General Douglas MacArthur to discuss the Korean War.
Specifications:
Length: 100 ft. 7 in.
Wingspan: 117 ft. 6 in.
Tail Height: 28 ft 5 in
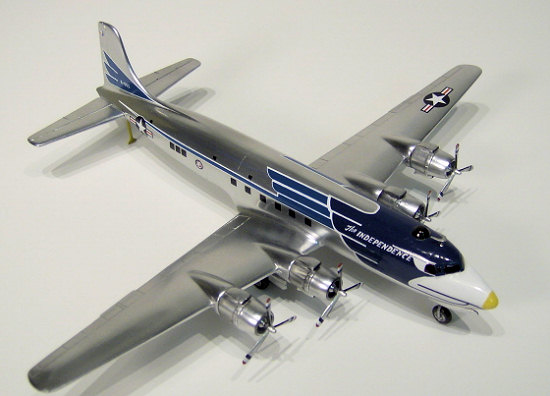
Engines: Four Pratt and Whitney R-2000 @ 2,400 hp each
Takeoff Weight: 93,200 lbs.
Maximum Range: 3,600 miles
Ceiling: 28,000 ft.
Speed: 308 mph Cruising
| THE KIT |
Overall, I like Minicraft kits. The parts generally have minimal flash and fit together well. The kits are generally good, albeit simple, renditions of their subject aircraft, with no interiors.
Best of all, Minicraft has excellent decals. The subjects are well rendered. They are thick, unquestionably opaque, and hold up very well under Micro Sol solution making it easy to get them to nestle down into and around complex curves. (A big plus on this kit.)
 I also like the fact that
Minicraft cabin windows are usually represented with black decals rather than
molded in. It’s just easier sliding decals than dealing with all those clear
parts and masking, etc. But I find it curious that the cockpit windows are
usually molded clear, as they are on this kit. This kit did not provide a black
cockpit window decal, as some Minicraft kits do, so I blacked out the cockpit
windows with back decal stock on my own to match the rest of the plane.
I also like the fact that
Minicraft cabin windows are usually represented with black decals rather than
molded in. It’s just easier sliding decals than dealing with all those clear
parts and masking, etc. But I find it curious that the cockpit windows are
usually molded clear, as they are on this kit. This kit did not provide a black
cockpit window decal, as some Minicraft kits do, so I blacked out the cockpit
windows with back decal stock on my own to match the rest of the plane.
The instructions are thorough – two pages containing nine diagrams, noting when and when not to glue, and indicating right next to the drawing what colors small parts or assemblies should be painted. There’s also a diagram of the parts sprues. The third page on the back has a very good painting/decal diagram for both sides and the top of the aircraft.
Its best to always check references for proper markings as painting/decal diagrams may have minor inaccuracies, as did this one. (There’s an additional window in the forward fuselage on the left side, black leading edges on the propellers, and a navigator’s observation bubble, not included in the kit. More on these later.) Most of the time simply typing in the designation, i.e., “C-118,” or nickname, i.e., “The Independence,” of the aircraft into Google Images will find plenty of reference pictures, as it did with this aircraft. (Be careful to use consistent pictures, as this plane’s paint scheme had minor changes over the years, particularly around the nose area.)
The kit has three silver plastic parts sprues and a single clear part, the cockpit windshield/roof. One plastic sprue contains the left and right fuselage halves and upper wing halves. The second contains the lower wing half. The third contains all the other smaller parts to construct the engines, landing gear, gear doors, and rear wings, etc. Some had minor flash to be lightly sanded, but nothing out of the ordinary.
| CONSTRUCTION |
As indicated on the back page of the instructions, the Independence was the only C-118 and is 60 inches shorter than a standard DC-6B (C-118A). The kit is of a standard DC-6B, so to be totally accurate .416 inches (10.56 cm) of forward fuselage needs to be removed.
I took the following approach. I constructed the fuselage first, including the clear cockpit window/roof section which was attached with thick super glue. Next I cut out the .416” section, about half-way between the back of the cockpit and the front of the wing root, using my razor saw and its miter box to get a perfect right angle on both cuts. With fingers crossed (figuratively) I reattached the two remaining sections with thick super glue, and…. whew! It worked! My first ever surgery of this type was a success!
 However, I must not have had
all my Karma balanced because after it was too late (when I put on the landing
gear), I realized I didn’t put enough weight in the nose. I tried packing the
landing gear openings with weight, but no luck. So, based on my references, I
scratch built and placed a parking stand under the tail. Learn from my mistake
and put more weight then you think you’ll need in the nose.
However, I must not have had
all my Karma balanced because after it was too late (when I put on the landing
gear), I realized I didn’t put enough weight in the nose. I tried packing the
landing gear openings with weight, but no luck. So, based on my references, I
scratch built and placed a parking stand under the tail. Learn from my mistake
and put more weight then you think you’ll need in the nose.
Anyway, the last thing to be done on the fuselage was to fill the factory scribed front and rear passenger doors and emergency exit doors on the model with thick super glue. They are not properly placed and a bit too thick at this scale. (During decaling I simulated the rear door outline with fine line decal.) I did leave the etched lower cargo doors as they looked to be accurately placed, but did sand them down a bit.
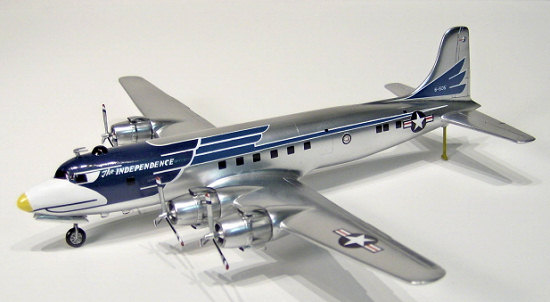
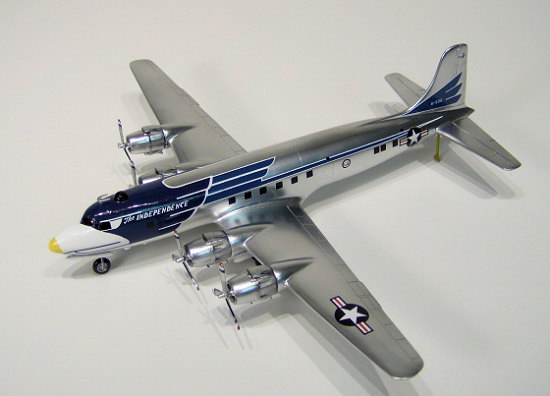
Next came the wings. After dry-fitting to check the fit, I decided to put the front wing bottom on the fuselage first. Then I attached the upper wing halves to the bottom of the wing and to the plane on each side where I used thick super glue to attach them to the wing roots and fill the minor gaps at the same time which I subsequently sanded smooth. The rear wings were molded as single pieces and required only very light sanding around the edges and were attached with a drop of thin super glue in the receiving holes. I then attached the air scoop on the belly as instructed and the smaller antennae, parts #’s 62 & 63, as per my references on the lower left forward fuselage. I left the delicate roof horseshoe antennae off until after painting.
Note: This plane has a bare metal exterior which means a silver or metallic paint finish. These finishes reveal any imperfections which are even more noticeable at small scales like 1/144. I used Flex.i.File sanding sticks, working down to and including the #3210 Polisher/Finisher to a very smooth finish. I then draw a Metallic Silver Sharpie marker along the seams to reveal any tiny gaps requiring extra attention with super glue and more sanding. After cleaning up all the seams, I re-scribed any sanded down panel lines across the top and bottom of the fuselage with my #11 blade.
Next, I
cut and cleaned up all the engine parts and propeller parts. The engine
cowlings are molded in two halves with the engine pistons molded as a third
piece to be set inside. I made sure to mate the correct engine halves
together. Each engine has exhaust
 ports on one side only, the
other side being smooth. When attached, the exhaust ports go on the outermost
sides of the plane respectively.
ports on one side only, the
other side being smooth. When attached, the exhaust ports go on the outermost
sides of the plane respectively.
To achieve smooth round seams where the two engine halves meet both inside and outside, I glued them together with thick super glue, then sanded the outside and twisted progressively finer grit small rolled sandpaper sheets back and forth inside the cowling until the seams disappeared under my silver pen. After dry-fitting, I then inserted the piston part from the back with thin super glue. Then I dry fit all the engines and propellers to each other and to the aircraft and left the engines and propellers off for painting separately and attachment later.
Next, I cut and cleaned the landing gear pieces, tire/hubs, and gear doors. Then I dry fit them to each other and to the aircraft and left these pieces off the aircraft for painting separately and attachment later.
Detailing:
My references showed a navigator’s observation bubble on the forward fuselage roof just behind the horseshoe antennae. I used a 3/16” hole-punch on .080” flat styrene stock and rounded this over into a dome and attached it with thin super glue.
| COLORS & MARKINGS |
For the bare metal finish I decided to use the Alclad ll metal painting system. For those not familiar, the Alclad system consists of a black primer coat, which dries as smooth as glass, over which the metallic carrier coats are sprayed. While the primer requires at least 24 hours to cure, the subsequent metallic carrier coat(s) dries within a half hour and then may be masked and painted over if needed.
 I made a makeshift handle out
of a coat hanger by cutting it on each side of the hook, then twisting masking
tape around each of the three “prongs” and bending them to fit into each of the
three landing gear openings. This allowed me to prime, paint and hang to dry
without ever having to touch or set the plane down. I then Alclad primed the
entire plane and the landing gear, engines, propellers, and antennae.
I made a makeshift handle out
of a coat hanger by cutting it on each side of the hook, then twisting masking
tape around each of the three “prongs” and bending them to fit into each of the
three landing gear openings. This allowed me to prime, paint and hang to dry
without ever having to touch or set the plane down. I then Alclad primed the
entire plane and the landing gear, engines, propellers, and antennae.
With the primer fully cured, I used Alclad #119 Airframe Aluminum on the entire plane, landing gear, engines, and antennae. I used #112 Steal on the engine cylinders and engine exhaust areas as per my references. I used #105 Polished Aluminum on the propellers. I also used Model Master FS# 16473 Aircraft Gray on the lower halves of the propeller blades and engine gear boxes. I used Testors enamel #1149 Flat Black on the tires and the navigator’s observation bubble.
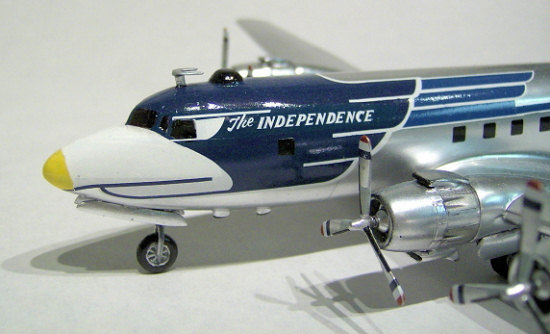
While the instructions called for “very light gray”, my references showed the paint scheme I was modeling had a yellowish “beak” on the “eagle” on the nose of the plane. I mixed 2/3rds Testors enamel #1184 Zinc Chromate Yellow and 1/3rd Testors #1145 Gloss White. (This was a total guess but it looks right.) I masked the nose and airbrushed this color on.
| FINAL CONSTRUCTION |
First, I attached the four engines to the plane, ensuring that the exhaust ports went on the outermost sides of the plane respectively.
Next, I assembled and attached the landing gear, struts, gear doors, and horseshoe antennae. Doing so with just a tiny drop of super glue is an extremely delicate task. Precise placement of these often tiny parts without unsightly gobs of glue is always difficult at the 1/144 and smaller scales. For this reason I find the use of a “third hand” indispensable. Available at most hobby shops and on-line, it is a small stand with a heavy iron base and one or more ball joint mounted arms with alligator-type spring clamps to hold a part in any angle required. I use them in combination with plastic hemostats (i.e., scissor clamps,) so as not to scratch the part, to position and then hold these small parts in place while the super glue dries, as using super glue accelerant may mare the finish and maybe even dissolve surrounding paint.
 Finally, having realized at
this point that I didn’t put enough weight in the nose earlier on, I referred to
my reference photos and scratch built a parking stand from a “T” section of
sprue which I cut and sanded to the right size determined by dry-fitting. I
painted it Testors enamel #1184 Zinc Chromate Yellow and scuffed it up a bit. I
pin-vise-drilled a small hole in the “dip” under the tail and attached the
stand.
Finally, having realized at
this point that I didn’t put enough weight in the nose earlier on, I referred to
my reference photos and scratch built a parking stand from a “T” section of
sprue which I cut and sanded to the right size determined by dry-fitting. I
painted it Testors enamel #1184 Zinc Chromate Yellow and scuffed it up a bit. I
pin-vise-drilled a small hole in the “dip” under the tail and attached the
stand.
Markings/Decals:
Before I did anything else, I made several actual size (1/1) copies of the decal sheet to use as decal placement templates. This is one of my rules of thumb and I highly recommend it, especially on this kit.
Next, since I removed the .416” section of fuselage, I also needed to remove .416” from the fuselage decals. The instructions are pretty clear on how to do so. Basically, you remove the “eagle head” from the rest of the fuselage decals and trim a section of the light blue stripe. Actually I removed only .410” to give me some extra to slightly overlap at the reconnection point.
The kit provided black decals for the windows which are connected by clear carrier film to each other and to the fuselage stripe. Similar to minor gaps and scratches, the carrier film would be rather unsightly and stand out on the bare metal finish at this small scale. Therefore, with a sharp new #11 blade, I removed all the window decals from the carrier film and trimmed it from around the rest of the decals.
Decal placement is challenging. The key to proper alignment is to start at the front of the plane and get the “eagle head” over the cockpit placed properly and the rest of the decals going back down the fuselage will then align to it.
Note: my references showed that the paint scheme I was modeling did not have a black antiglare section in front of the cockpit windows, but this kit’s nose decals represent one. So I trimmed these black areas.
I took my
time and used plenty of the red Micro Sol “for highly irregular surfaces” as the
“eagle head” decals must conform completely around the cockpit and out around
the nose of the plane up to the yellow painted “beak”. I used the scribed
cockpit window frames on the model as a guide. After getting the decals to fit
properly around the cockpit windows, I had to use just a little white stripe
decal to get the white edges to meet properly on the roof. I also had to use my
#11 blade, first to make a few slits
 to allow them to conform
around the navigator’s observation bubble, and again after dry enough to trim
away the excess from around the bubble. I finished the nose with white stock
decal in the center section where I had trimmed away the black antiglare
section.
to allow them to conform
around the navigator’s observation bubble, and again after dry enough to trim
away the excess from around the bubble. I finished the nose with white stock
decal in the center section where I had trimmed away the black antiglare
section.
Next, I used black stock decal, my dividers, and my #11 blade to create black cockpit windows so as to match the cabin windows and navigators bubble. The decal sheet provides small matching dark blue strips to fill in the frames around the cockpit windows and again I used my dividers to measure and trimmed them to fit.
Now I began on the fuselage. I laid the rest of the lighter blue fuselage stripe/insignia decals down the sides of the plane, slightly overlapping at the reconnection points to the front decal, which also helps get the angle correct.
To get the placement of the cabin windows and MATS symbol decals correct, for each side respectively, I cut out the copy of the entire side decal from my 1/1 decal copy. Using the wing and the front decal as a guide to align it, I taped it above the fuselage to the tail on one end and at the bottom to the fuselage on the other. I then floated and placed each window individually onto the fuselage using my decal copy template above as a guide for the exact location of each window and MATS symbol. This yields a great looking result with little or no carrier film anywhere on the bare metal surface.
I also cut another square window from black stock decal and place it on the left forward fuselage under the “Independence” as per my references. And I finished the fuselage with a fine line of decal (poached from another 1/144 airliner kit) to simulate the rear passenger door around the porthole decal at the top of the blue stripe.
Next, I placed the tail fin decals and each of the insignias on the top and bottom of the appropriate wings as instructed.
I finished with the propellers. The red, white, & blue tip decals took a lot of red Micro Sol to get the front and back decals to join together and nestle down around the blade tips. Finally, my references showed that the leading edges of each propeller blade have a black leading edge. I imitated them with black stripe decal with lots of Micro Sol on each blade.
After letting the decals dry over night I gave the entire model a coat of Future to give it a gloss finish. I then set in the propellers.
| REFERENCES |
· Planes of the Presidents: An Illustrated History of Air Force One; Bill Holder; Schiffer Military History Books, Atglen, PA, 2000
· Air Classics Magazine, April 1973, Volume 9, Number 4
· Various web sites for reference photos, generated by search engine entries on the plane’s military designation, callsign, and/or nick name, i.e., “C-118” and/or “The Independence” into Google Images. Save the photos (right click on them and click “save photo as”) to your hard drive, then just zoom in on the area you want.
| CONCLUSIONS |
FYI, this was the third kit in a little theme build I’ve done of the history of presidential aircraft, of a total of eight planes and one helicopter. (See my other reviews of Presidential/VIP Aircraft.)
I enjoyed the kit. First, the historical subject matter makes it interesting. While it’s a fairy easy plane to build, the fuselage surgery, a flawlessly smooth bare metal finish, and especially the decals are very challenging. This might be a bit much for beginners to handle. As an intermediate modeler, I found it very challenging. And I think even experts would be challenged to get it just right. Certainly I wasn’t entirely successful! But, it taught me a lot for future endeavors.
December 2007
If you would like your product reviewed fairly and quickly, please contact me or see other details in the Note to Contributors.