Airmodel 1/72 X-4 Bantam
|
KIT #: |
? |
|
PRICE: |
$13.45 |
|
DECALS: |
None provided |
|
REVIEWER: |
Carmel J. Attard |
|
NOTES: |
Vacuformed plastic with injection
molded bits |
One aircraft type in the X-series
of experimental aircraft was the Northrop X-4. The X-4 Bantam made the maiden
flight on
16th December 1948
with company test pilot Charles Tucker at the controls. Designed and built
specif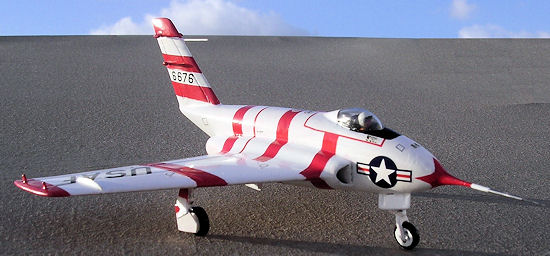 ically for NACA it was tasked with acquiring in-flight data on the
stability and controllability of semi-tailless aircraft at high subsonic speeds
and was powered by two Westinghouse XJ30 turbojet engines. Each of these was
rated at 1,600 lb s t giving a performance of up to 620 mph and 40,000 ft
altitude.
ically for NACA it was tasked with acquiring in-flight data on the
stability and controllability of semi-tailless aircraft at high subsonic speeds
and was powered by two Westinghouse XJ30 turbojet engines. Each of these was
rated at 1,600 lb s t giving a performance of up to 620 mph and 40,000 ft
altitude.
Two examples of the
X-4 were built and during the six-year programme these single-seat, low swept
wing semi-tailless aircraft helped to demonstrate that tail surfaces ware
important for proper control effectiveness in the transonic speed range. They
were also extremely used in the investigation of problems unique to tailless
aircraft at low speeds, such as longitudinal stability and control.
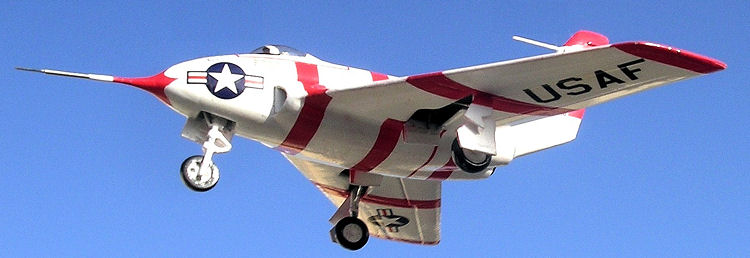
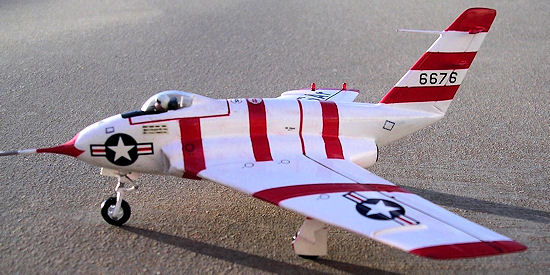
Both still survive,
the first (46-676) being at the USAF Academy in Colorado Springs whilst the
second (46-677) is owned by the USAF museum.
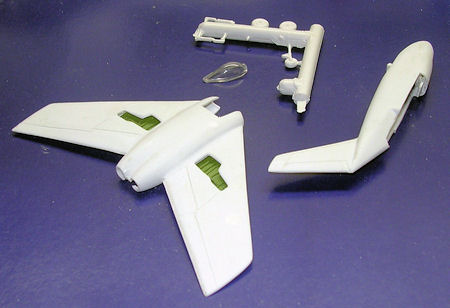
 Vac-form kit consisting of one white sheet of acetate with all the
vac form parts on it. A separate canopy comes in clear but thick acetate. There
are injection-moulded parts comprising of wheels, oleo legs and ejection seat.
The main parts are the fuselage halves and three-piece wing i.e. the lower part
moulded in one piece and two separate upper wing halves.
Vac-form kit consisting of one white sheet of acetate with all the
vac form parts on it. A separate canopy comes in clear but thick acetate. There
are injection-moulded parts comprising of wheels, oleo legs and ejection seat.
The main parts are the fuselage halves and three-piece wing i.e. the lower part
moulded in one piece and two separate upper wing halves.
A
4-view scale plan gives a clear indication of the shape of x-plane that the kit
will take when assembled. I noted that the kit wing parts had a slightly more
swept than the one shown on the drawing making it difficult to discern which was
the correct one. Finally I opted for the kit shape to be correct after
consulting several photos of the type. These also indicated that the nose wheel
and leg needed to be replaced with a slightly larger combination.
 The kit major parts
were first marked and cut from backing sheet by simple time-honoured method of
scoring around the edges with a modelling knife, then breaking the parts away.
The amount of rubbing-down required depended on the amount of edge or lip that
is left. Rubbing down is followed on wing halves and checked against each
opposing part for accurate match. I prefer dry rubbing but wet rubbing can also
be used in the rubbing down process.
The kit major parts
were first marked and cut from backing sheet by simple time-honoured method of
scoring around the edges with a modelling knife, then breaking the parts away.
The amount of rubbing-down required depended on the amount of edge or lip that
is left. Rubbing down is followed on wing halves and checked against each
opposing part for accurate match. I prefer dry rubbing but wet rubbing can also
be used in the rubbing down process.
The fuselage is also
cut and sanded. The wheel wells were then cut at all three places and also the
cockpit aperture was cut and shaped oval. The canopy itself, which is rather
thick in section, was brought to fit using a new blade trimming little by
little. The canopy was then placed aside to fit at a later stage. With the
fuselage and wing parts prepared the fuselage interior detail was added. Wheel
well detail was also added using channels shaped from stretch sprue. Cockpit was
painted light grey with a black ejection seat, instrument panel and control
column.
 The fuselage parts
were cemented together using liquid cement and held together with pegs. The wing
parts were also glued together. When these dried sufficiently the fuselage was
checked and inserted at the space or gap left between the upper wings and more
glue applied. These formed a complete fuselage and wings assembly. Checking the
assembly from front the tail should look exactly perpendicular to the wings and
not showing any tilt to the right or left. A small amount of filler is added at
joining areas particularly the aft jet exhaust area. Two jet pipe pieces were
added to the rear. These were cut to size from surplus ballpoint body. These
were inserted inside the empty outlet allowing these to protrude 1mm at the rear
before applying glue.
The fuselage parts
were cemented together using liquid cement and held together with pegs. The wing
parts were also glued together. When these dried sufficiently the fuselage was
checked and inserted at the space or gap left between the upper wings and more
glue applied. These formed a complete fuselage and wings assembly. Checking the
assembly from front the tail should look exactly perpendicular to the wings and
not showing any tilt to the right or left. A small amount of filler is added at
joining areas particularly the aft jet exhaust area. Two jet pipe pieces were
added to the rear. These were cut to size from surplus ballpoint body. These
were inserted inside the empty outlet allowing these to protrude 1mm at the rear
before applying glue.
Turning to the underside of the
model, the wheel wells are painted zinc chromate green and the undercarriage
legs are then fixed. The nose wheel leg was made from plastic card and sprue
glued together and filed to shape. The kit parts for the nose wheel well doors
were too thick and I fashioned new ones from a thin sheet of plastic card,
adding detail to the inner side of doors. The nose wheel itself was substituted
from one in my spares box. Wing undercarriage legs also fitted and finally small
details such as the nose and tail fin metal probes, rudder balance weights crew
figure were all added at this stage and the model was now ready for paintwork.
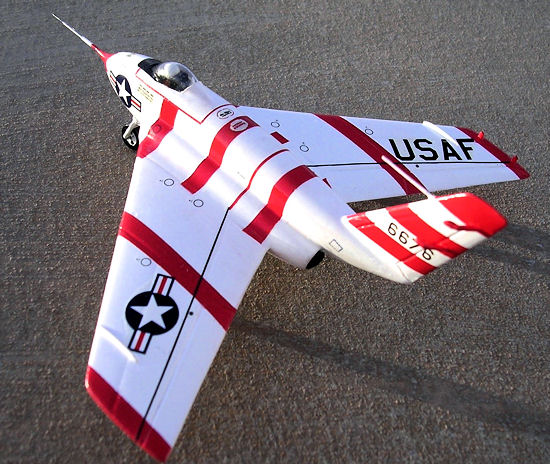
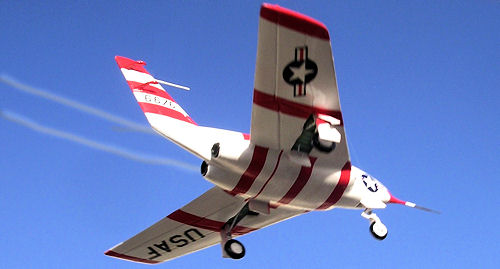 Only two aircraft of the type were
built however in spite of this the X-4 wore a variety of paint finishes. This
goes from an overall orange scheme to an overall white one, another in NASA
markings and there is also another interesting and colourful scheme worn by the
X-4 accommodated at the USAF Academy museum in Colorado Springs. This was white
finish with bright red stripes and USAF star and bars. I opted for this scheme
in spite that it involved a lot of preparation. Model was first painted overall
semi gloss white, allowed to dry overnight and then started the long process of
masking to bring out the positions of the red stripes. As for decals I had to
resort to Superscale sheet No 72-83, which had the star and bars; and Scale
Master decal sheet SM-32B that had the right size of USAF letters.
Only two aircraft of the type were
built however in spite of this the X-4 wore a variety of paint finishes. This
goes from an overall orange scheme to an overall white one, another in NASA
markings and there is also another interesting and colourful scheme worn by the
X-4 accommodated at the USAF Academy museum in Colorado Springs. This was white
finish with bright red stripes and USAF star and bars. I opted for this scheme
in spite that it involved a lot of preparation. Model was first painted overall
semi gloss white, allowed to dry overnight and then started the long process of
masking to bring out the positions of the red stripes. As for decals I had to
resort to Superscale sheet No 72-83, which had the star and bars; and Scale
Master decal sheet SM-32B that had the right size of USAF letters.
Not a simple quick
build as the small size of kit may implicate, but all in all I thoroughly
enjoyed making this model. It is not the type of kit for the impatient youngster
but it is definitely recommended for those with experience of building vac-form
kits.
Scale Aircraft Modelling
Carmel J. Attard
January 2013
If you would like your product reviewed fairly and fairly quickly, please
contact the editor
or see other details in the
Note to
Contributors.
Back to the Main Page
Back to the Review
Index Page