Monogram 1/48 F-84F Thunderstreak
| KIT #: | 85-5505 |
| PRICE: | Curently OOP but easily found |
| DECALS: | Two options |
| REVIEWER: | Stephen Young |
| NOTES: | Aeromaster 48-728 F-84F “Thunderstreaks in the Guard, Part II” |
| HISTORY |
After
World War II military aviation underwent dramatic and rapid advances as the
engineering of the German aircraft industry was uncovered and appropriated into
both Western and Soviet technology. Together with the jet turbine engine the
swept wing would revolutionize military aircraft performance in the coming
years. Republic Aviation began development of a swept wing fighter by replacing
the straight wing on the successful F-84E Thunderjet. Designated the YF-96A
Thunderstreak the aircraft flew on June 3, 1950. As a exercise in budgetary
subterfuge to secure funding the U.S. Air Force re-designated the aircraft F-84F
implying a variant of the Thunderjet although there was only about fifteen
percent parts commonality between the two aircraft. Design problems were
encountered through out the program due to the Curtis Wright J-65 engine,
shortage of aluminum wing structure forgings, and tail configuration performance
leading to control and stability problems. Due to inadequate engine power the
aircraft earned Republic the rep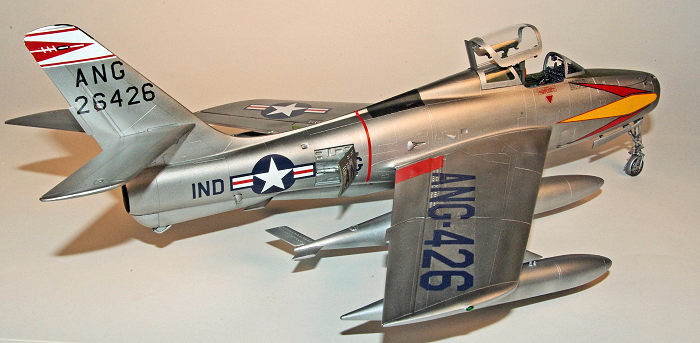 utation that no matter the length of a runway
Republic could build a plane that would use it all for take off. On a hot day
7,500 feet of runway was required for the takeoff roll at a liftoff speed of 185
mph. Although the first production aircraft flew on November 22, 1952, due to
ongoing performance and safety problems the F-84F could not be declared
operational until May 12, 1954.
utation that no matter the length of a runway
Republic could build a plane that would use it all for take off. On a hot day
7,500 feet of runway was required for the takeoff roll at a liftoff speed of 185
mph. Although the first production aircraft flew on November 22, 1952, due to
ongoing performance and safety problems the F-84F could not be declared
operational until May 12, 1954.
Although the aircraft excelled at cruise and had predictable handling characteristics within its performance envelope it suffered from accelerated stall pitch up and was practically unrecoverable in a spin. The performance and safety problems led to the Air Force initiating active duty phase out of the aircraft soon thereafter with all US inventory being assigned to the Air National Guard by 1958. A temporary reactivation of four wings of aircraft to active duty occurred from 1961 to 1964 due to the Berlin Crisis. The service life and financial savior for Republic Aviation regarding the F-84F came under the Mutual Defense Assistance Act of 1949 and the resultant Mutual Assistance Program which became a integral component of the U.S. government’s policy of Soviet containment during the Cold War. Under the program the F-84F was supplied to most North Atlantic Treaty Organization (NATO) countries including Belgium, France, Germany, Greece, Italy, Norway and Turkey accounting for 1,301 aircraft. Additional units were provided to the Republic of China (Taiwan). By 1957 the production run was completed at a total of 2,711 aircraft. Although the Thunderstreak did not see combat in US service French Thunderstreaks were involved in limited combat during the Suez Canal Crisis of 1956. Quietly the Thunderstreak soldiered on in the Air National Guard units until 1972 when signs of major structural stress corrosion were discovered leading to retirement of all the aircraft from Air Guard service. Nonetheless, the Thunderstreak remained in NATO service until 1984 when Greece finally retired its last aircraft.
| THE KIT |
Initially released in 1984 as kit number 5432, Monogram's 1/48th
scale F-84F Thunderstreak has appeared in three other re-issues with minor
changes in parts and different decals. The initial issue was molded in olive
drab plastic and the box top art showed a F-84F in Vietnam era camouflage
although no aircraft were actually used in theater during that war. The 1985
issue #5437 and 2000 issue #85-5437, molded in silver, are of natural metal
finis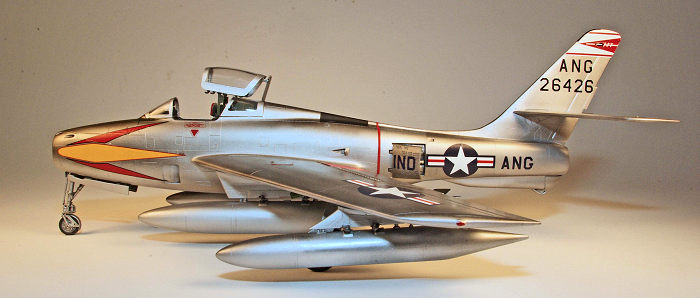 h aircraft and included a nuclear bomb/weapon as a armament option together
with a bomb dolly. Monogram also issued the kit 1992 as #74018 as a Dutch NATO
aircraft molded in silver with a second large drop tank added in place of the
nuclear weapon. The last issue was by Revell Germany #04526 in 2006 showing a
German aircraft. The various issues of the model continue to be available on
Ebay in the usual range of asking prices. Notable scale modeling authorities
have noted inaccuracy with shape and dimensions in this and several of the other
kits which I am not in a position to verify or refute.
h aircraft and included a nuclear bomb/weapon as a armament option together
with a bomb dolly. Monogram also issued the kit 1992 as #74018 as a Dutch NATO
aircraft molded in silver with a second large drop tank added in place of the
nuclear weapon. The last issue was by Revell Germany #04526 in 2006 showing a
German aircraft. The various issues of the model continue to be available on
Ebay in the usual range of asking prices. Notable scale modeling authorities
have noted inaccuracy with shape and dimensions in this and several of the other
kits which I am not in a position to verify or refute.
Other kits in 1/48 scale are a 1979 kit produced by Heller, a 2007 kit by Kinetic, a 2009 kit by Italeri, and a 2013 production by Hobbyboss. In 2016 Squadron.com issued a limited addition under the Encore Models label containing Monogram/Revell sprues, photoetch, resin parts and unique decals. I purchased my kit on Ebay several years ago having a soft spot for the Monogram kits of 1970s and 1980s vintage. Without the benefit of comparison to the more recent kits examination reveals excellent detail and good engineering and, in my opinion, is one of Monogram’s best efforts of the era. Molded in silver colored plastic the cockpit detail is fine and nicely reproduced. Raised and engraved panel lines are present and appear well done. The canopy is engineered to be posed open only. A nice pilot figure is included as well as optional under wing loads of either fuel tanks or a nuclear bomb. A JATO unit is provided as an option as well. My Ebay kit came without the kit decals but my intent was to use a aftermarket set by Aeromaster #48-728 “F-84F Thunderstreaks in the Guard”.
| CONSTRUCTION |
My intent was a recreational build of the model out of the box for my personal
display and to further develop my building and finishing techniques. The typical
Monogram style instructions are simple diagrams with part numbers and color call
outs from the supplied generic color legend. The parts were washed in warm water
with dishwashing detergent and air dried to remove mold release chemicals. Test
fitting of the main components such as the cockpit, fuselage halves and wings
was done and revealed good alignment. The cockpit areas of the fuselage were
airbrushed with Testors Model Master enamel Aircraft Gray FS16473. The cockpit
tub was also sprayed Aircraft Gray and the interior panel components painted by
hand with Testors Model Master Acrylic Interior Black FS37031. For hand painting
of flat surfaces I get the best results not using a traditional brush but rather
Microbrush Superfine tuft brushes that apply the paint by flowing it o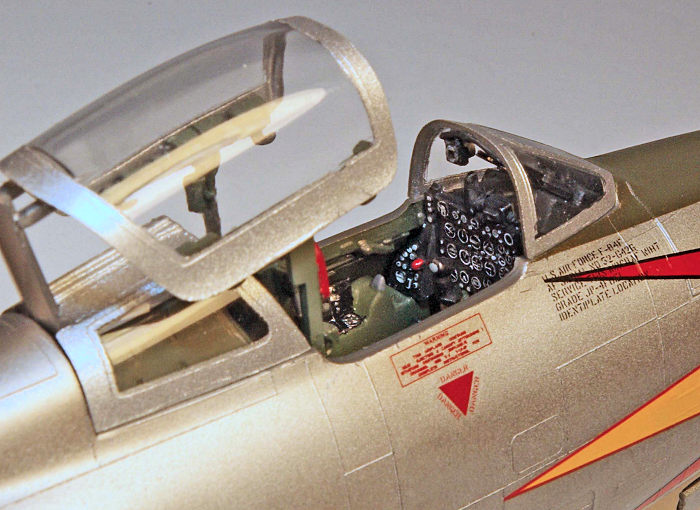 n to the
surface rather than brushing it on. In my experience Testors Model Master
Acrylic paints brush very well with this technique and level well provided one
does not make the paint coat too thin. As long as you keep the paint application
moving in one direction only there will be no brush marks or visible dry lines.
The instrument panel and consoles have molded relief instruments so the visible
surface was airbrushed with Rustoleum gloss white enamel and after the paint was
dry the panels were brush coated with Future. After at least 24 hours of drying
time Testors MM Flat black was then airbrushed over the dried Future. After
allowing to dry over night the dials and switches were picked out by wiping away
the black paint from the raised relief details using a enamel thinner dry brush
technique. Vallejo Acrylic Red was applied to a couple of instruments and knobs
for added visual color. Weathering was done using a wash of 1:1 water to Future
plus a small amount of plain vodka reduce surface tension plus Tamiya Acrylic
Black X-1 followed by light dry brushing with Testors chrome silver enamel over
wear areas. The kit ejection seat has nice detail and looks good when painted.
There is a horizontal bar behind the head rest and this was added using a small
piece of Evergreen strip stock. The cockpit needs to be glued to one side of the
fuselage before joining the two halves so it was glued into the right fuselage
side with Loctite 5 minute epoxy. The fit is a little loose so care is needed to
make certain the position is correct in advance of cementing both fuselage
halves together.
n to the
surface rather than brushing it on. In my experience Testors Model Master
Acrylic paints brush very well with this technique and level well provided one
does not make the paint coat too thin. As long as you keep the paint application
moving in one direction only there will be no brush marks or visible dry lines.
The instrument panel and consoles have molded relief instruments so the visible
surface was airbrushed with Rustoleum gloss white enamel and after the paint was
dry the panels were brush coated with Future. After at least 24 hours of drying
time Testors MM Flat black was then airbrushed over the dried Future. After
allowing to dry over night the dials and switches were picked out by wiping away
the black paint from the raised relief details using a enamel thinner dry brush
technique. Vallejo Acrylic Red was applied to a couple of instruments and knobs
for added visual color. Weathering was done using a wash of 1:1 water to Future
plus a small amount of plain vodka reduce surface tension plus Tamiya Acrylic
Black X-1 followed by light dry brushing with Testors chrome silver enamel over
wear areas. The kit ejection seat has nice detail and looks good when painted.
There is a horizontal bar behind the head rest and this was added using a small
piece of Evergreen strip stock. The cockpit needs to be glued to one side of the
fuselage before joining the two halves so it was glued into the right fuselage
side with Loctite 5 minute epoxy. The fit is a little loose so care is needed to
make certain the position is correct in advance of cementing both fuselage
halves together.
The nose gear/intake section must be assembled as well as the fuel dump pipe and
tail pipe assembly and attached before joining the fuselage halves. Prior to
assembly the nose intake and nose gear walls must be painted; I used Testors MM
enamel Aluminum. The nose gear well parts have noticeable sink marks along the
mid portion of the intake side which were filled with Bondo auto body putty and
finish sanded before painting. The landing gear well itself is best painted
before assembly as it contains molded in relief detail that cannot be easily
painted once assembled. Most color photos show that the landing gear wells were
painted in a color similar to Dull Dark Green that I approximated with Humbrol
HP5 U.S. Marine Corp Green enamel. Weight must be added to move the center of
gravity in front of the main landing gear wheels so I used Loctite 5 minute
epoxy to glue in a .38 caliber lead bullet (0.3 ounce) which is sufficient.
Moving on to joining the fuselage halves care must be taken to align the
surfaces; I glued a small section at a time using generic very fast setting
acrylic cement from Tap Plastics, Inc., a local commercial plastic and acrylic
supplier. This cement is very fast acting and evaporates very rapidly dissolving
and fusing the styrene with very little surface crazing. I apply it to a joint
about ½ to ¾ inch at a time using a 0 sable brush. Meticulous alignment of the
mating surfaces is the key to reducing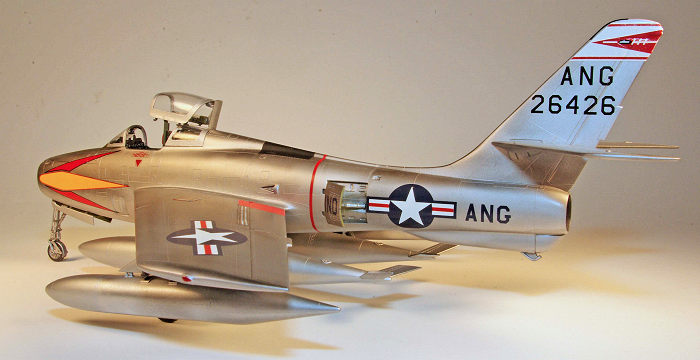 the need for joint filling and seam work
with putty and is well worth the time and effort. On other models that have
alignment issues I will cement small 3 to 5 mm 0.020 sheet styrene tabs that are
trimmed or shaved carefully to force the correct alignment.
the need for joint filling and seam work
with putty and is well worth the time and effort. On other models that have
alignment issues I will cement small 3 to 5 mm 0.020 sheet styrene tabs that are
trimmed or shaved carefully to force the correct alignment.
Following the fuselage the landing gear well areas of the wing was airbrushed with the Humbrol Marine Green, the relief detail painted by hand using Vallejo acrylic and the black wash applied. The wing halves were test assembled and as is often the case careful light filing of the mating surfaces using a 10 inch flat mill file ensures perfect alignment. I also will use a full sheet of 400 grit wet/dry 3M sandpaper taped to plate glass for the same purpose. Once these three large assemblies were completed it was time to do the seam work; due to good engineering and fit this the best I have encountered on a Monogram kit. I use Bondo Auto body putty heavily thinned with lacquer thinner to the consistency of a heavy cream and applied sparingly and if necessary in multiple applications with contour sanding using a Squadron fine sanding stick between layers. After finish sanding of the final application with a super fine sanding stick, Mr. Surfacer 500 is hand painted over the putty to act as a sealer and primer. Once the Mr. Surfacer is dry light polish sanding is done and the resulting surface accepts finish coats of paint in a manner indistinguishable from the plastic.
Fit in both the wing and stabilizer attachment to the fuselage was good and positive. A normal seam exists at the joint between the wings and the fuselage. To eliminate this I brushed the acrylic cement into the seam to lightly etch the plastic surface then filled the seam with Testors Clear Parts cement. This is a polyvinyl acetate type of water based glue similar to Elmers White Glue but in my experience works very well to fill small seams and gaps with no sanding. The only caution needed is that the seam cannot be masked as adhesion will be low. After wiping down the model with isopropyl alcohol to remove oil and residue the engine openings, landing gear openings and cockpit were masked off in preparation for painting. As a separate step all clear parts were carefully trimmed of flash and the sprue gates removed using a microsaw or sprue cutter followed by careful trimming with a sharp #15 scalpel blade before being dipped in Future and allowed to dry for at least two weeks.
| COLORS & MARKINGS |
 Natural metal finish is required so I decided to use some of my supply of old
Metalizer Aluminum. After a careful wiping of the surface with a tack cloth, the
model was airbrushed with Rustoleum gloss black enamel. This is the same product
available at Home Depot and most hardware stores in a large aerosol can. I
decant this from the can into small jars and airbrush this usually without any
thinning using a Badger Anthem 155 airbrush at about 20 psi. The finish is very
glossy and in my experience gives good coverage. I allow several days for this
coating to dry before applying the finish coats of Metalizer.
Natural metal finish is required so I decided to use some of my supply of old
Metalizer Aluminum. After a careful wiping of the surface with a tack cloth, the
model was airbrushed with Rustoleum gloss black enamel. This is the same product
available at Home Depot and most hardware stores in a large aerosol can. I
decant this from the can into small jars and airbrush this usually without any
thinning using a Badger Anthem 155 airbrush at about 20 psi. The finish is very
glossy and in my experience gives good coverage. I allow several days for this
coating to dry before applying the finish coats of Metalizer.
Being a lacquer based product the Metalizer was misted on in light coats until complete coverage was achieved. I tried to vary the density of the Metalizer application to allow the black undercoat to achieve variation in the finish around the model. I have never had a problem with the lacquer attacking the enamel during or after application. I airbrushed the top surface of the model first followed by the undersurface the next day. After the Metalizer finish was dry for several days the model was then given a coat of Future airbrushed un-thinned using a Badger 250 single action external mix airbrush using the heavy tip. After this was allowed to dry for several days the antiglare panel and the area on the spine covering the radio compass loop antenna were masked using Tamiya yellow masking tape and airbrushed with Testors MM Olive Drab and Flat Black respectively.
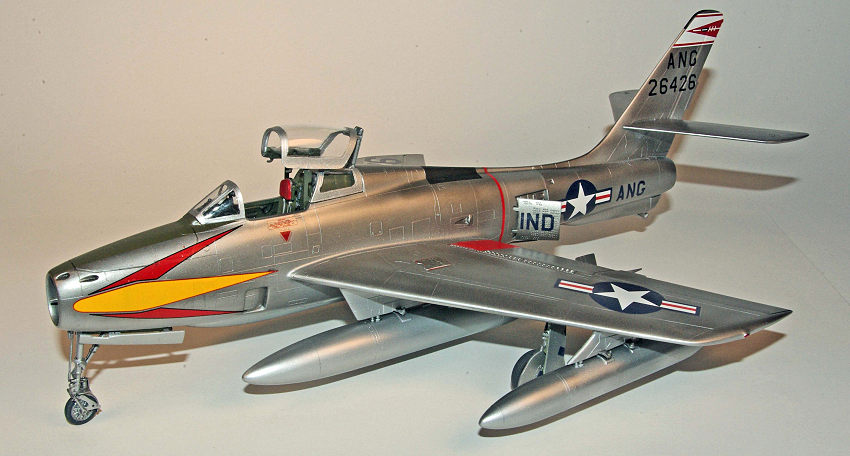
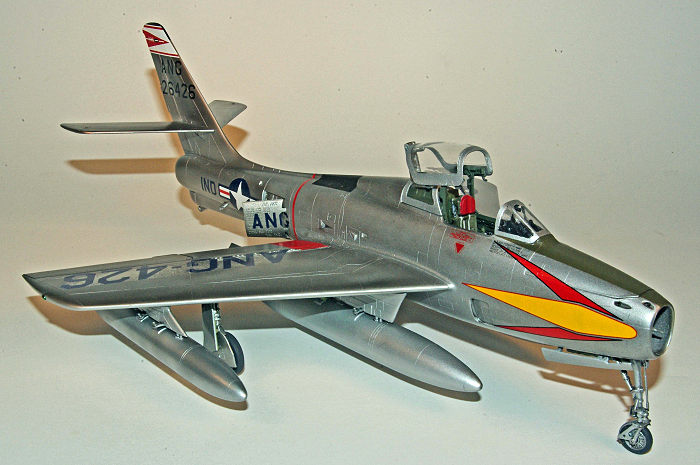
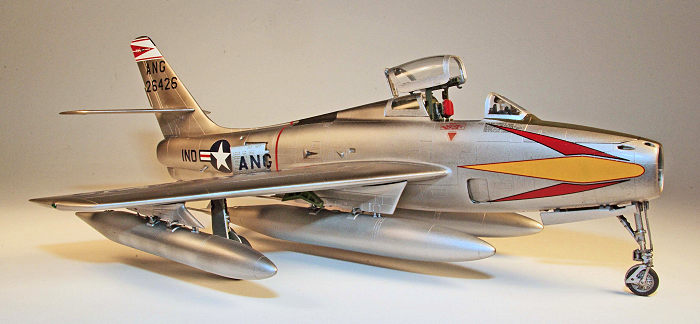
The Aeromaster decal set nominally provides markings for
two colorful natural metal finish Air Guard aircraft, one from the Indiana Air
Guard (F-84F-35 RE, S/N 52-6426 , 163rd
Fighter Bomber Squadron, 122 Fighter Bomber Group) and the second from the
Illinois Air Guard (F-84F-40 GK, S/N 519524, 169th Fighter
Interceptor Squadron, 182nd
Fighter Interceptor Group). Unfortunately the reality is there are only enough
stencil and national insignia to do one airc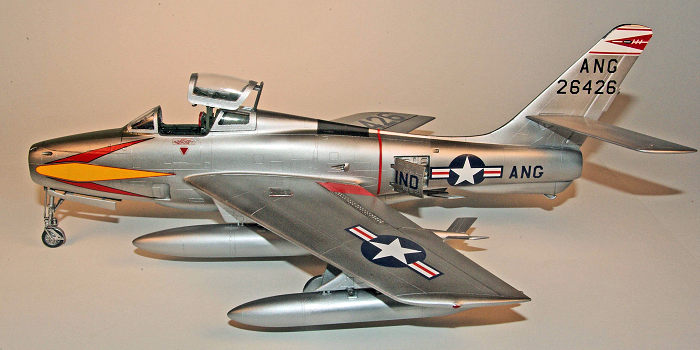 raft so if one wants to model a
second aircraft using the sheet most of the stencils will need to be sourced
else where. This seems to be a fairly common practice among the decal publishers
and in my opinion is a unfortunate product decision. In addition this particular
sheet is printed in Mexico by a unknown printer as contrasted with other Aeromaster sheets printed by Cartograph of Italy; the results show in the final
application of the lettering and buzz numbers where there is a significant
amount of clear film. Although the decals behaved fairly well the clear film
areas retained some small bubbles that I was not able to completely eliminate
using my usual technique of Microset followed by Microsol and a surgical needle
to prick the bubbles.
Fortunately, on the aluminum finish the result is not easily noticeable but be
aware.
raft so if one wants to model a
second aircraft using the sheet most of the stencils will need to be sourced
else where. This seems to be a fairly common practice among the decal publishers
and in my opinion is a unfortunate product decision. In addition this particular
sheet is printed in Mexico by a unknown printer as contrasted with other Aeromaster sheets printed by Cartograph of Italy; the results show in the final
application of the lettering and buzz numbers where there is a significant
amount of clear film. Although the decals behaved fairly well the clear film
areas retained some small bubbles that I was not able to completely eliminate
using my usual technique of Microset followed by Microsol and a surgical needle
to prick the bubbles.
Fortunately, on the aluminum finish the result is not easily noticeable but be
aware.
After several days of drying for the decals the entire model was airbrushed with a coat of 50/50 Dullcote and Glosscote for a satin/semi-matt finish followed by an application of Tamiya Black Panel Line wash to the control surface engraved lines. The small parts including the landing gear doors, canopy, wheels, and pylons and fuel tanks were attached. The pylons fit well to the undersurface of the wings provided some care is exercised in trimming the pylon at the join surface to match the wing surface contour and remove the small section of the raised panel lines on the wing crossing the pylon. The unique canopy lift mechanism of the Thunderstreak requires careful assembly of the supports to the canopy to allow alignment with the opening in the fuselage. I used Zap a Gap Medium for assembly and Testors clear parts cement to attach the windscreen.
| CONCLUSIONS |
 The
Republic F-84F was a aircraft that occupies a small foot note in aviation
history soldiering on without fame over the course of a lack luster career.
Manufactured in significant numbers but not well known in United States service
it served prominently in most of the NATO countries and the Republic of China
(Taiwan) for many years. Considering that Monogram first issued this kit
thirty-three years ago in 1984 it remains competitive against the much more
expensive recent kits and builds into a very nice display grade model. Having
built a number of the Monogram kits this one definitely is one of their best and
looks great in any U.S Air Force line up.
The
Republic F-84F was a aircraft that occupies a small foot note in aviation
history soldiering on without fame over the course of a lack luster career.
Manufactured in significant numbers but not well known in United States service
it served prominently in most of the NATO countries and the Republic of China
(Taiwan) for many years. Considering that Monogram first issued this kit
thirty-three years ago in 1984 it remains competitive against the much more
expensive recent kits and builds into a very nice display grade model. Having
built a number of the Monogram kits this one definitely is one of their best and
looks great in any U.S Air Force line up.
| REFERENCES |
F-84F Thunderstreak Walk Around, Ken Neubeck, Squadron/Signal Publications, 2008
Republic F-84F Thunderstreatk, Wikipedia
www.joebaugher.com (a eclectic website cataloging US aircraft serial numbers and a wide range of non-aviation subjects)
30 October 2017
Copyright ModelingMadness.com
If you would like your product reviewed fairly and fairly quickly, please contact the editor or see other details in the Note to Contributors.
Back to the Main Page Back to the Review Index Page Back to the Previews Index Page