Trumpeter 1/48 F-100C Super Sabre
| KIT #: | 2838 |
| PRICE: | $59.95 SRP |
| DECALS: | Two options |
| REVIEWER: | Dan Lee |
| NOTES: |
|
| HISTORY |
The “Hun”
was the
 The F-100C
was the first model of the F-100 designed to fit the fighter bomber role
as envisioned by
The F-100C
was the first model of the F-100 designed to fit the fighter bomber role
as envisioned by
For more a more detailed history of the F-100C and F-100 series, see previews build articles in the Review Archives.
Colonel
George Laven was one of the first pilots to get a kill in the P-38
Lightning and incidentally was the last man to become an ace with the
P-38 as he shot down an Emily Flying Boat near the end of WW2.
He is actually more well known for the colorful planes he flew as
the “Wing King” of the 479th Tactical Fighter Wing.
All the planes he flew were covered with brightly colored candy
stripes.
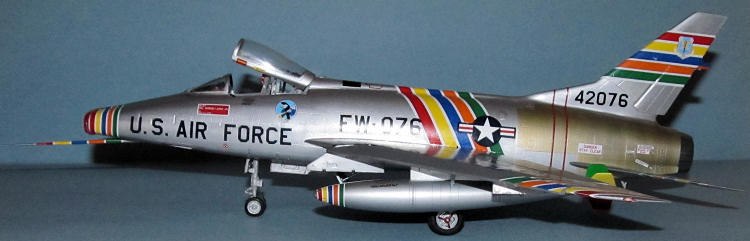
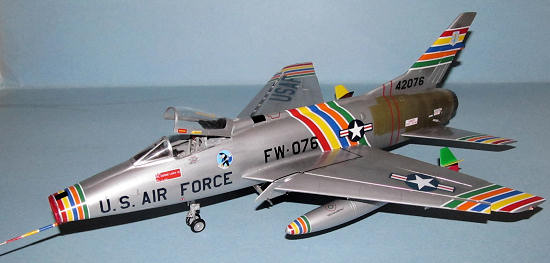
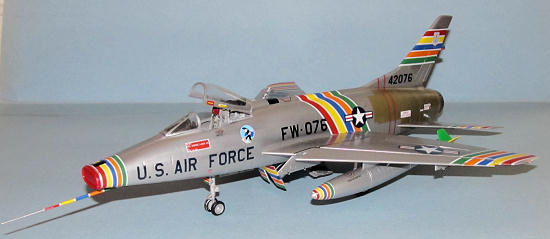
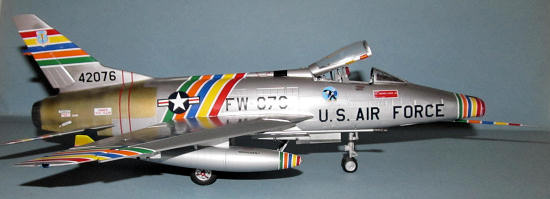
The most famous of
these was the F-100C Super Sabre 54-2076 (the last four numbers in its
serial were identical to a P-38 that Laven flew in 1942-43) in which he
alone flew as he logged some 2000 hours in this particular jet.
54-2076 later went to a training unit at George AFB then to the
| THE KIT |
Trumpeter’s
announcement of a new mold 1/48 F-100 was eagerly anticipated by Hun Fans.
Many folks suspected that it would be a mimeographed version of the
1/32 model and to no one’s surprise it was.
When it was released in late 2009, many of the same issues that
haunted the 1/32 version are found in the 1/48 version including the
misshapen intake.
See Lee
Kolonsa’s excellent
review of the 1/32 Hun for all the issues (similar to the 1/48 version.)
 The areas I
needed to deal with were:
The areas I
needed to deal with were:
1)
Intake is the
wrong shape and too narrow in profile
2)
The tail is too
big for a F-100C
3)
Wheel Well
detail is rather weak (compared to the RM F-100D)
4)
Cockpit detail
is weak
5)
Landing gear is
the wrong length and wheels are too big
6)
The area behind
the cockpit is too simplistic
I would have
been one of the many who would have been happy if Trumpeter’s 1/48 Hun was a
copy of Monogram’s older F-100D kit with engraved panel lines.
Normally I don’t care about raised panel lines except in this case as
I like the Hun in it’s 1950s bare metal markings which is much easier to do
with engraved panel lines than raised panel lines.
It turns out
that this build as I saw it needed quite a bit of aftermarket (
| CONSTRUCTION |
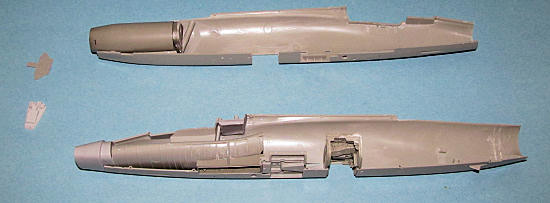
Thanks to the
number of aftermarket parts, I realized I had to make some mods to the
fuselage.
 First thing I
did was remove the oversized tail by scoring just above the tail panel lines
and then using cutting along the narrow spine and then removed the tail
along the scored line by gently bending it.
I left a bit extra of plastic so I could adjust to fit through
sanding.
The sanding and
adjustment took a couple of hours to do with fit, sand, refit, sand, rerefit,
sand, and so on.
First thing I
did was remove the oversized tail by scoring just above the tail panel lines
and then using cutting along the narrow spine and then removed the tail
along the scored line by gently bending it.
I left a bit extra of plastic so I could adjust to fit through
sanding.
The sanding and
adjustment took a couple of hours to do with fit, sand, refit, sand, rerefit,
sand, and so on.
One task I’ve
learned to hate is sanding filling exhaust tubes.
The cramped space and there is no way to replace lost detail make the
task an utter pain.
I bought an
Aires resin replacement exhaust tube to replace the multi-piece plastic
exhaust.
It was very easy to
assemble as it took several passes with a knife to remove the parts from the
the stubs and some gentle wet sanding to smooth down surfaces.
The parts were painted a combination of Tamiya Metallic Grey XF-56
and flat black.
The exhaust was
assembled quickly as the most difficult task was placing a couple of dabs of
CA glue in the interior to place the PE afterburner grid (?) into the
nozzle.
The resin exhaust did
not fit into the existing plastic support so I had to remove it and next I
found out the length where the exhaust had to stick out and marked it off
with indelible ink.
I cut some
sprue to provide some support and help in alignment of the exhaust.
It was glued in place with CA glue.
Next I tackled
the fuselage landing gear wheel well.
Normally I would not care because they’re a pain in the rear end to
work on and I do not display my planes upside down.
However, the Hun’s wheel wells are rather visible, have a near
impossible to fix (for me) seam and the detail of the Trumpeter Hun are
really weak which is why I purchased Aires’ wheel wells for the Hun.
After some careful thought, I decided against using the wing wheel
wells because I liked my sanity more.
I carefully hacked out the
 center wheel well for each fuselage half
then I took some 220 grit sand paper and thinned the walls to make sure I
got a tight fit.
It took
several passes with the 220 grit sand paper to thin the side walls down
enough that the wheel well would fit (barely) in the fuselage.
In my haste to jam this hunk of resin in, I unknowingly committed a
very boneheaded move by reversing the direction of the rear wheel well.
I did not catch this very stupid mistake this till I was about to put
on the first coat of Tamiya Old Silver Leaf where it was way way too late to
do anything about it.
center wheel well for each fuselage half
then I took some 220 grit sand paper and thinned the walls to make sure I
got a tight fit.
It took
several passes with the 220 grit sand paper to thin the side walls down
enough that the wheel well would fit (barely) in the fuselage.
In my haste to jam this hunk of resin in, I unknowingly committed a
very boneheaded move by reversing the direction of the rear wheel well.
I did not catch this very stupid mistake this till I was about to put
on the first coat of Tamiya Old Silver Leaf where it was way way too late to
do anything about it.
I worked on the
nose wheel well which is part of the intake assembly.
I hacked out the plastic and sanded down the remaining bits with 220
grit sandpaper (wet sanding.)
The plastic was thin when I was done with it.
I trimmed the plastic flange/support because the resin piece was a
bit larger than the original.
I
also had to sand the underside of the resin wheel well a little bit.
The front section of the Trumpeter air brake well needed to trimmed
as well so that the wheel well could fit snugly without issue.
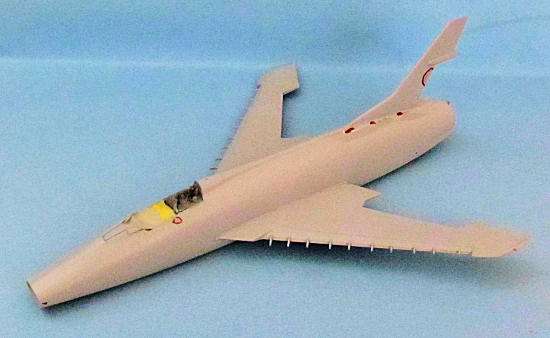
The nose of the
Trumpeter F-100 is the wrong shape and it is too narrow in profile.
Finally, I was
able to glue the fuselage with the resin intake and wheel wells together,
but thanks to the resin rear landing gear well it was not the best fit as
there were several very obvious gaps (approx 1mm) that would need sanding
and filling.
 I first filled
the large gaps with
I first filled
the large gaps with
The replacement
Next up were
the wings.
Unfortunately, the
resin rear wheel well caused the F-100C’s fuselage to bulge slightly and
added gaps to the rear section of the wing fuselage join.
I added 5 thou thick shims till the rear of the F-100C wings till it
lined up then added CA glue to fill in the steps and finally sanded them
smooth with various grades of sandpaper.
Once done, the wings were glued to the fuselage.
The final area
that needed fixing was the stabs.
Trumpeter used slots to mount the stabs which is fine if the stabs
were locked into neutral position on the Hun, but they are not as they drop
when the hydraulic pressure is gone.
I used some Tamiya Extra thin glue to secure 10 thou plastic card
into the fuselage mounting slots, trimmed and then filled the area with CA
glue.
When it was cured I
sanded the area down then took a 1/8” drill bit to drill out mounting holes
for the stabs.
The original
plan was to trim down the stab mounting tabs to 1/8” and then glue into
place but that didn’t work when the trimmed tabs broke during test fitting.
I went to Plan B which used cut lengths of 1/8” aluminum tubing.
Surprisingly Plan B worked.
The stabs were mounted to the fuselage after painting and the decals
added.
The model was wiped down with a wet towel in preparation for painting.
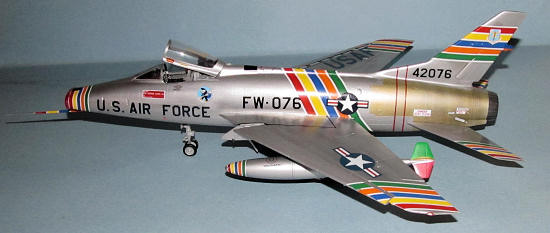
| COLORS & MARKINGS |
Near metal
finish... three words to strike fear into the heart of any modeler.
Added to this, George Laven’s F-100C was kept in near pristine
condition so polishing powder was necessary.
 I normally
don’t prime my models, but I did this time.
Oh boy did I.
Five or
six primer coats were needed as I had to fix areas I did not sand well
enough especially around the resin tail and the underside of the nose where
the resin intake met styrene.
I
used CA glue to fill in the indentation between the resin intake and
remaining plastic where I slightly over sanded away the plastic.
I normally
don’t prime my models, but I did this time.
Oh boy did I.
Five or
six primer coats were needed as I had to fix areas I did not sand well
enough especially around the resin tail and the underside of the nose where
the resin intake met styrene.
I
used CA glue to fill in the indentation between the resin intake and
remaining plastic where I slightly over sanded away the plastic.
The first coat
of Old Silver went on and exposed all the issues I thought I had sanded away
on the underside of the nose.
The obvious indent was still there plus those lumps caused when you let the
CA glue harden too much and doesn’t sand as well as the plastic.
I got wise this time, skipped the CA glue and filled the dent/covered
the lumps with Mr Surfacer 500, but it bubbled and I ended up having to use
a 2nd coat of thinner Tamiya Surface Primer to fill in all the bubbles.
I had to repeat this several times till it looked all right.
Very frustrating to say the least.
Once done I
sprayed on primer, redid all the lost detail (for the 5th or 6th time!) and
sprayed on another coat of Tamiya Old Silver.
The well sanded Hun was polished
with 3200, 3600, 6000, 8000 and 12000 grit cloths.
After the amazing success I had with a recent Tamiya P-51B/C gave me
the idea that I knew what I was doing and that I was skilled enough to avoid
all the headaches I had with NMF builds.
Yeah right.
My
overinflated ego popped and I was back to familiar territory; cursing and
whining “is there an easier way to build NMF planes?”
One final coat of Old Leaf Silver was sprayed on and polished with
3600, 6000, 8000 and 12000 grit cloths.
Once the paint
was polished to my satisfaction, I took some Hawkeye/SNJ Polishing Powder
dipped on Q-Tips and rubbed the Q-Tips on the model.
It took an hour to get it looking all gleaming.
I took a wet rag to wipe off all the excess powder from the model.
 The tail and
middle panels of both wings were masked off with Tamiya Tape.
I sprayed AS-12 Aircraft Aluminum straight from the spray can on the
wings to represent the anodized middle panels.
I let the paint dry for a few minutes before I removed the tape
masking the wings to prevent a hard edge from forming.
I goofed as I used some polishing powder when the paint wasn’t fully
cured.
I ended up with streaks
and all my hard work went for naught.
It was at this point when I pretty much gave up and the model sat in
the box collecting dust for over a year.
The tail and
middle panels of both wings were masked off with Tamiya Tape.
I sprayed AS-12 Aircraft Aluminum straight from the spray can on the
wings to represent the anodized middle panels.
I let the paint dry for a few minutes before I removed the tape
masking the wings to prevent a hard edge from forming.
I goofed as I used some polishing powder when the paint wasn’t fully
cured.
I ended up with streaks
and all my hard work went for naught.
It was at this point when I pretty much gave up and the model sat in
the box collecting dust for over a year.
Three panels
were masked off and painted with XF-56 Metallic Grey using period photos as
a guide.
The engine area was
painted with thin coats of Tamiya Platinum Gold and then I sprayed on
several thin faint lines XF-56 Metallic Grey to represent scoring on the
engine section as I wanted to portray the Hun as it was almost brand new so
I didn’t go crazy like I would if it were a Hun in Vietnam or a Hun late in
its career.
Lastly, I
primed and painted the resin intake cover as during construction I realized
that there was no way I could deal with the gaps inside the intake.
It was a decision I was happy to make.
I purchased a
rare set of Cutting Edge decals for Colonel Laven’s famous F-100C a couple
of years ago on eBay because I got real lucky as no one at the time wanted
this popular marking scheme.
It
was in pretty good shape with the exception of a crease in one decal.
It is originally sized for the Monogram kit so I knew there was going
to be some work.
One thing I did
not like right off the bat was the fact that the decals had to be cut by the
modeler for both the wing tips (all 1/48 Sabre kits do NOT have the leading
edge slats and wing as
The other was
finding out the white of the US insignia that rests on top of the candy
stripes was not opaque--the candy stripe showed right through.
I was fortunate to have a couple of Sabre Sets kicking around and had
to double up on the
 Quite frankly I
was not happy with all the work on the decals.
If I ever have to do a similar scheme (however unlikely) again, I
will mask and paint it.
I’m
quite serious about it and this coming from someone who likes to do the
least amount of work to get something done.
Quite frankly I
was not happy with all the work on the decals.
If I ever have to do a similar scheme (however unlikely) again, I
will mask and paint it.
I’m
quite serious about it and this coming from someone who likes to do the
least amount of work to get something done.
The stencils
came from the same Super Sabre set I stole the
Once the decals
were dry, I wiped the plane down with a wet rag to remove the excess decal
solution.
I ended up ruining
part of a decal and had to replace it with strips of extra color that were
supplied in the CE decal sheet.
Weathering and
Final Coat
Aside from the engine area, I did no weathering of plane and I did not spray on a gloss coat to seal in all the decals.
|
FINAL CONSTRUCTION |
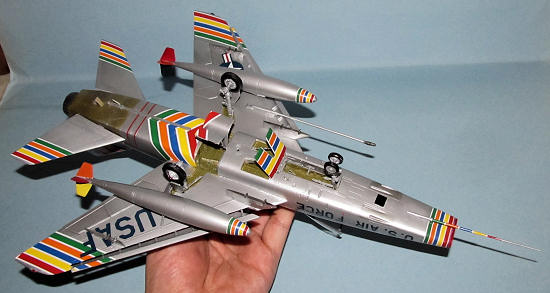
The details for
the wheel wells were added and painted.
I wish I could tell you it was less of a pain in the rear, but it was
not.
Lots of tiny resin parts
and tweezers meant that I spent a good amount of time on my hands and knees
looking for parts that flew out of my tweezers.
I ended up
using the SAC landing gear with the Monogram Wheels as I found that the
Trumpeter wheels were all messed up size and shape wise.
The major issue I had with this combo is that the main wheels didn’t
fit very well on the SAC landing gear
 (because it was designed for the
Trumpeter wheels) so the wheels don’t line up with the landing gear.
I did use bare metal foil for the oleos.
(because it was designed for the
Trumpeter wheels) so the wheels don’t line up with the landing gear.
I did use bare metal foil for the oleos.
Next I added
the painted pylons and fuel tanks.
The decals for the fuel tanks were sized for the RM fuel tanks and
they did not go on that well.
These were the worst part of the decals for me.
I am not happy with how they look, but lacking an alternative so I
was stuck with it.
I cut off the
thick plastic pitot tube and used the Master metal replacement.
The parts were primed and painted then the decal was added.
Other than the stencils, the pitot tube decal was the least
frustrating decal I used.
The excellent
| CONCLUSIONS |
I’m really
disappointed with the Trumpeter Hun.
It could have been better than the older and somewhat flawed RM F-100
kit, but all the mistakes that went into the kit just dampened my enthusiasm for
it.
I really want to like the
Trumpeter Hun, but there is just too much work to correct which makes NMF an
even bigger headache than it normally is.
 I have no
complaints about the
I have no
complaints about the
Overall, I am not
happy how my F-100C turned out (in relation to my original goal of a contest
model) as this model could have a lot better considering how much work and extra
parts that went into it due to a combination of my own mistakes and problems
with the kit.
Certain aspects
worked out better than I expected (the scorch marks on the engine section and
resin tailpipe) but most did not.
I’m resigned to the fact that any 1/48 F-100 Super Sabre model will require
maximum effort and patience to finish.
It looks nice on the shelf though and taught me a valuable lesson in that
I’m going to have to rethink any ideas of a “contest” model.
A paraphrased
Marlon Brando quote from On the Waterfront sums this kit up for me:
“I coulda been a
contender. I coulda been something, instead of a pain in the rear, which is what
I am, let's face it. It was you, Trumpeter.”
| REFERENCES |
Info from
the Cutting Edge Model Sheet and Osprey “P-38 Aces of Pacific And
August 2012
If you would like your product reviewed fairly and fairly quickly, please contact the editor or see other details in the Note to Contributors.