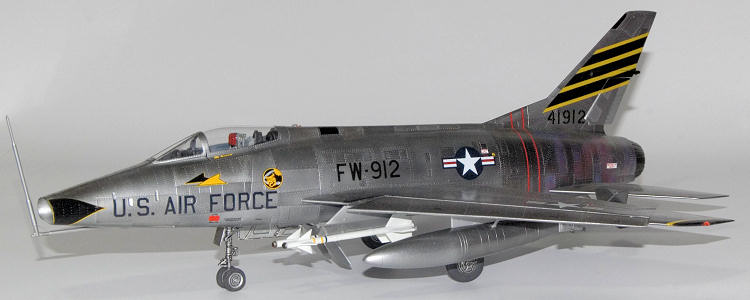
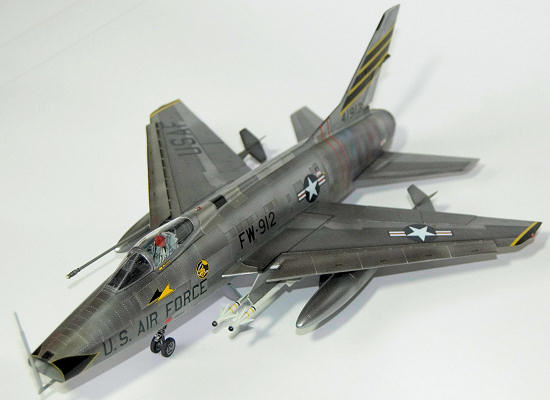
Trumpeter 1/48 F-100C
|
KIT #: |
02838 |
|
PRICE: |
£32.00 from
Hannants |
|
DECALS: |
Two options |
|
REVIEWER: |
Peter Marshall |
|
NOTES: |
Xtradecal X48-081 used |
F-100C: Seventy Model NA-214 and 381 Model NA-217.
Additional fuel tanks in the wings, fighter-bomber capability, probe-and-drogue
refueling capability, uprated J57-P-21 engine on late production aircraft. First
flight: March 1954; 476 built.
 The
F-100C entered service on 14 July 1955 with the 450th Fighter Wing, Foster AFB,
TX. Operational testing in 1955 revealed that the F-100C was at best an interim
solution, sharing all the vices of the F-100A. The uprated J57-P-21 engine
boosted performance but continued to suffer from compressor stalls. On a
positive note, the F-100C was considered an excellent platform for nuclear toss
bombing because of its high top speed. The inertia coupling problem was more or
less addressed with installation of a yaw damper in the 146th F-100C, later
retrofitted to earlier aircraft. A pitch damper was added starting with the
301st F-100C, at a cost of US$10,000 per aircraft.
The
F-100C entered service on 14 July 1955 with the 450th Fighter Wing, Foster AFB,
TX. Operational testing in 1955 revealed that the F-100C was at best an interim
solution, sharing all the vices of the F-100A. The uprated J57-P-21 engine
boosted performance but continued to suffer from compressor stalls. On a
positive note, the F-100C was considered an excellent platform for nuclear toss
bombing because of its high top speed. The inertia coupling problem was more or
less addressed with installation of a yaw damper in the 146th F-100C, later
retrofitted to earlier aircraft. A pitch damper was added starting with the
301st F-100C, at a cost of US$10,000 per aircraft.
The addition of "wet" hardpoints meant the F-100C could carry a pair
of 275 US gal (1,040 l) and a pair of 200 US gal (770 l) drop tanks. However,
the combination caused loss of directional stability at high speeds and the four
tanks were soon replaced by a pair of 450 US gal (1,730 l) drop tanks. The 450s
proved scarce and expensive and were often replaced by smaller 335 US gal
(1,290 l) tanks. Most troubling to TAC was the fact, that, as of 1965, only 125
F-100Cs were capable of utilizing all non-nuclear weapons in the Air Force
inventory, particularly cluster bombs and AIM-9 Sidewinder air-to-air missiles.
By the time the F-100C was phased out in June 1970, 85 had been lost in major
accidents.
http://en.wikipedia.org/wiki/F-100_Super_Sabre via
your editor
Well, I wasn't
expecting a -C, but it's very nice of Trumpeter to fill in a gap. Have they
filled it well though? Let's see. In the box there are seven sprues of grey
plastic and two clear, though one only has the main canopy on, which seems odd.
Until you notice the sprue numbering (A, E, F, G, H, J, K1, K3 (K being clear
parts) and L) and the fact there are two ejector seats and both styles of
exhausts, refuelling probes and speed brakes. The two seats would suggest an –F
is coming, which would be really nice, and the other parts cover most variants.
The -F would need a replacement Sprue A (main fuselage, intake trunk and cockpit
tub), main canopy, replacing K3 and new wings, replacing E and F. And having
done that you just need another fuselage sprue to make a –D, which would seem an
obvious choice. It seems a little odd that they chose to mold the tail as part
of the fuselage as having that separate would have made a –D even easier (and
made a short tailed –A pretty simple too) but I guess I shouldn’t complain and
maybe there are panel differences between the C and the D they want to cover.
I’m very hopeful of the other marks and I expect the aftermarket will
knock me up a short tail fairly soon if Trumpeter don't. And the plastic looks
very nice, fine engraved panel
 lines and while there are rivets, they’re
delicate and if you don’t make a feature of them I don’t think they’ll bother
many people. I don't have sufficiently detailed drawings or pictures to compare
the exact panel positions to the real thing and to be honest I'm not the kind of
modeller who goes in for that level of correction work, it looks pretty good to
me. The instructions are typical line drawing stages, well printed with no
glaringly obvious errors, the ones we come across we’ll mention at the time.
lines and while there are rivets, they’re
delicate and if you don’t make a feature of them I don’t think they’ll bother
many people. I don't have sufficiently detailed drawings or pictures to compare
the exact panel positions to the real thing and to be honest I'm not the kind of
modeller who goes in for that level of correction work, it looks pretty good to
me. The instructions are typical line drawing stages, well printed with no
glaringly obvious errors, the ones we come across we’ll mention at the time.
On the subject of
errors… The fairly small decal sheet has two options, a silver ANG example
numbered 41994 (which would be 54-1994, a F-100C-25-NA and by the time it was in
the ANG would probably be silver lacquer rather than bare metal I’m thinking)
and a
SEA
camo option AF54 737 which I’m thinking is wrong as if I’ve understood the
presentation that’s either 54-737 (Piper
L-18C-PI Super Cub), 54-1737 (De Havilland L-20A-DH Beaver) or 54-2737 (Cessna
T-37A-CE).
I’m open to correction on that but just in case I’m right we won’t be
doing that option.
And I’ve never
seen that sort of serial presented the way it’s shown on the instructions for
the port side, with the AF54 after the 737.
As far as I know it’s always the AFXX in front of the three digits.
Anyway, neither of these options have any information at all as to where
and when they’re supposed to be taken from, which is a bit unhelpful to be
honest as it makes any research you might want to do that much harder.
I also noted that there's only one data plate decal and the serial number
on it doesn't match either aircraft the decals are provided for (it's showing as
54-1753, which is apparently in the USAF museum at Wright-Patterson).
We’ll see how they behave later if we use any of them but clearly
Trumpeter still have a way to go with their decal research (if you saw the sheet
for their 32nd F-100D you know what I mean).
Unfortunately at this stage there aren't many aftermarket alternatives
for the –C that I'm aware of but I'm sure it won't be long before that changes.
Clearly this kit has a
lot in common with the 32nd scale release a while ago though with some details
left out, such as the engine and gun bays.
As with the larger kit the main undercarriage parts look good but it
suffers from the same shallow gear bays in the wing and the detail in the bays
compares quite poorly to the 20+ year old Monogram kit, as did Hobbyboss's F-105
last year.
So to build. Let's start with the
intake trunking, because the cockpit sits on it. This goes all the way to the
non-existant engine but I don't think you'll be seeing all the way through
anyway, the length and the bend see to that but it wouldn’t take much to blank
it off anyway, if you feel the need. Then to the cockpit itself where side panel
detail is acceptable, though I prefer more pronounced moldings as it helps my
painting but the main panel is quite nice though it doesn't really match the
references I have for a -C. That said I have pictures of instrument panels
supposedly from two sequential -Cs and they're quite different so it’s very hard
to know
 if there’s a “standard” panel they could have matched though the word on
the (internet) street is that it’s NOT a –C cockpit. I chose to use the supplied
decals anyway, however raised the detail I can't do such a neat job on the
dials.
In retrospect I wish I had
painted at least the side panels as the decals there are a bit toy like (think
Esci cockpits of 20 years ago) and because they’re the wrong size the detail on
the decals doesn’t match the detail on the kit.
What IS that about?
It’s
like when you get a resin cockpit and the seat doesn’t fit the tub, if you’re
making the kit and the decals at least make them the same size!
Talking of seats the kit examples are a bit basic so I dug out some
Legend resin seats which I appreciate aren’t right for the -C (neither are the
kit seats though) but look a lot better.
If I don’t glue it all down I might swap it when a decent –C seat
arrives, as it surely will. And with the cockpit ready to install we need the
fuselage.
if there’s a “standard” panel they could have matched though the word on
the (internet) street is that it’s NOT a –C cockpit. I chose to use the supplied
decals anyway, however raised the detail I can't do such a neat job on the
dials.
In retrospect I wish I had
painted at least the side panels as the decals there are a bit toy like (think
Esci cockpits of 20 years ago) and because they’re the wrong size the detail on
the decals doesn’t match the detail on the kit.
What IS that about?
It’s
like when you get a resin cockpit and the seat doesn’t fit the tub, if you’re
making the kit and the decals at least make them the same size!
Talking of seats the kit examples are a bit basic so I dug out some
Legend resin seats which I appreciate aren’t right for the -C (neither are the
kit seats though) but look a lot better.
If I don’t glue it all down I might swap it when a decent –C seat
arrives, as it surely will. And with the cockpit ready to install we need the
fuselage.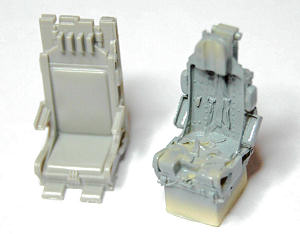
Removing the fuselage
halves from the sprue I'm surprised to find sprue gates on mating surfaces, as I
was with the Hasegawa Skyhawk. However when I actually think about it means
there’s less opportunity to damage detail when removing the parts from the sprue
but it’s not as easy as I think we've got used to and requires a bit more work.
Maybe it's just me being unobservant and lazy.
At this point I was
interested to compare the dimensions of the kit to the old Monogram –D… It’s a
little difficult for me to be to be sure of the proper dimensions of the full
sized aircraft as various references quote different figures and some have the
–D having a 26” bigger wingspan (Wikipedia and others), at least one quotes a 2’
fuselage extension (Detail and Scale Vol.33), but the most convincing (for me,
anyway) is the data on the F-100 site (http://www.f-100.org) which claims to be
from TO-1F-100D-1
Model
Length
Span
Height
F-100A
47’ 1”
38’ 9”
15’ 4”
F-100C
47’ 1”
38’ 9”
15’ 4”
F-100D
47’ 1”
38’ 9”
16’ 2”
F-100F
50’ 4”
38’ 9”
16’ 2”
And certainly the
length and the span of the Monogram –D and Trumpeters –C are virtually identical
and in close enough to the above for me.
 The fit of the
trunking into the fuselage, especially round the nose area, is considerably
better than that of the 32nd kit. The instructions have you use the speed brake
bay without the enlarged cutout, which is correct for a -C, the fit is again
fine but I left the brake itself off at this stage, seriously, who would fit it
sticking out at this stage? That's not going to make it to the end of the build,
silly instructions. But you do need to install the bay between the two fuselage
halves at this stage as it won’t drop in afterwards.
The exhaust nozzle fit and detail is a bit of a mixed bag, the depth of
the jet pipe and the original version of the exhaust are an improvement over the
old Monogram kit though the detail in the jet pipe is a bit crude and
unrepresentative. The instructions would have you decide which to use at this
stage but you can leave the final exhaust section off and just fit the internal
parts for the moment. As for which you’re going to use, the instructions just
show them as options, as they do for the two styles of refuelling probe, however
there’s no indication of why you would use either which I always find
irritating. The painting
The fit of the
trunking into the fuselage, especially round the nose area, is considerably
better than that of the 32nd kit. The instructions have you use the speed brake
bay without the enlarged cutout, which is correct for a -C, the fit is again
fine but I left the brake itself off at this stage, seriously, who would fit it
sticking out at this stage? That's not going to make it to the end of the build,
silly instructions. But you do need to install the bay between the two fuselage
halves at this stage as it won’t drop in afterwards.
The exhaust nozzle fit and detail is a bit of a mixed bag, the depth of
the jet pipe and the original version of the exhaust are an improvement over the
old Monogram kit though the detail in the jet pipe is a bit crude and
unrepresentative. The instructions would have you decide which to use at this
stage but you can leave the final exhaust section off and just fit the internal
parts for the moment. As for which you’re going to use, the instructions just
show them as options, as they do for the two styles of refuelling probe, however
there’s no indication of why you would use either which I always find
irritating. The painting
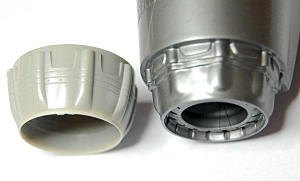 instructions would have you use the F-102 style nozzle
and the straight IFR probe for both schemes.
The -102 nozzle would probably be right for a -C later in its career with
the ANG but I don't know about the
SEA
scheme because, as I said, there’s nothing to tell you the time period it
relates too.
I’m pretty sure the
bent IFR probe would be fitted by the time the ANG got them, so it’s time to
check all those references again, if you can find any...
On the subject of the nozzle and references, and having looked at a lot
of pictures of the -102 nozzle, the Trumpeter representation is not as good as
the Monogram version, the bulges are too uniform and narrow while the Monogram
version captures the shapes pretty well.
Shame it’s not possible to cross kit it: at least not without more work
than I’m willing to put into it.
Again, I expect the aftermarket people will provide, sooner rather than later.
instructions would have you use the F-102 style nozzle
and the straight IFR probe for both schemes.
The -102 nozzle would probably be right for a -C later in its career with
the ANG but I don't know about the
SEA
scheme because, as I said, there’s nothing to tell you the time period it
relates too.
I’m pretty sure the
bent IFR probe would be fitted by the time the ANG got them, so it’s time to
check all those references again, if you can find any...
On the subject of the nozzle and references, and having looked at a lot
of pictures of the -102 nozzle, the Trumpeter representation is not as good as
the Monogram version, the bulges are too uniform and narrow while the Monogram
version captures the shapes pretty well.
Shame it’s not possible to cross kit it: at least not without more work
than I’m willing to put into it.
Again, I expect the aftermarket people will provide, sooner rather than later.
So the fuselage was
put to one side and it’s onto the wings.
These are pretty simple consisting of two parts, upper and lower, and
separate control surfaces and slats.
The separate slats are fine as they are often seen down, the control
surfaces are a bit unnecessary as they are, as far as I can see, always in the
neutral position.
So we left the
slats off for the moment and glued the c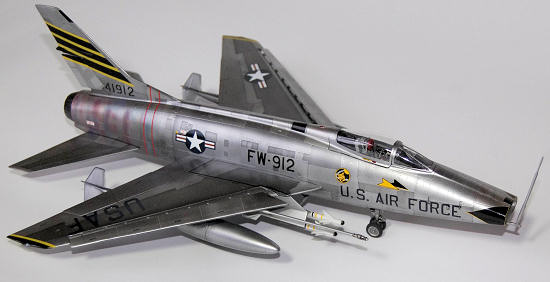 ontrol surfaces flat with the wing.
But what now?
As mentioned
earlier I wasn’t too keen on either of the decal options provided and while an
SEA
camo job would be easier I sort of fancied a bare metal, mid fifties, USAF
example (I understand the overall silver painted finish came in early 60s and
certainly there are lots of pictures of F-100s that look to be in bare metal).
But no decals for such a thing were available and I wasn’t sure I could
hack anything together from the stash.
Then Hannants announced some F-100C decals in the right timeframe so,
while not knowing when they would be available, I decided to do it and paint it
up in various metal shades and wait for decals to arrive.
Probably worth mentioning at this point that the tail hook was fitted
around 1960, so I didn’t need to bother with that.
So the tail hook guard, which is on the wrong side for an A or a C anyway
(it was on the left on the A and C and on the right on the D and F) was removed
and we started painting.
You may
have noticed I haven’t fitted the wings yet?
I’m hoping I can fit them without too much trouble after painting…
ontrol surfaces flat with the wing.
But what now?
As mentioned
earlier I wasn’t too keen on either of the decal options provided and while an
SEA
camo job would be easier I sort of fancied a bare metal, mid fifties, USAF
example (I understand the overall silver painted finish came in early 60s and
certainly there are lots of pictures of F-100s that look to be in bare metal).
But no decals for such a thing were available and I wasn’t sure I could
hack anything together from the stash.
Then Hannants announced some F-100C decals in the right timeframe so,
while not knowing when they would be available, I decided to do it and paint it
up in various metal shades and wait for decals to arrive.
Probably worth mentioning at this point that the tail hook was fitted
around 1960, so I didn’t need to bother with that.
So the tail hook guard, which is on the wrong side for an A or a C anyway
(it was on the left on the A and C and on the right on the D and F) was removed
and we started painting.
You may
have noticed I haven’t fitted the wings yet?
I’m hoping I can fit them without too much trouble after painting…
First off the canopy was masked
and fitted in place and then I looked at the main gear bay.
It’s not terribly detailed and the instructions would have you fit the
doors in the closed position anyway (despite the doors having nice internal
detail and the instructions showing actuator arms being fitted to them and the
gear well internal detail they do supply being fitted).
Many of the photos I did find supported this position and as they also
they appear to be the wrong doors for the –C, being (apparently) the later D
doors with the small panel molded shut I felt there was no loss doing them
closed, and it saves worrying about detailing and painting the bay.
So everything was painted using the Alclad gloss black base and then it
was just a matter of lots of masking and lots of different shades of Alclad.
And I finally found a use for the Frisket mask stuff I bought years ago,
the surface, specifically of the wing, was smooth enough to let me put it on,
cut bits away and spray; in the past it’s always lifted too much to let me do
what I wanted so that was a bonus because, as I’ve said before, I hate masking…
And with the fuselage and wings all painted up separately time to try
them together.
The locating slots
aren’t huge but they’re probably sufficient so careful
 application of superglue
got the wings in place with only a slight gap which real gluing and fitting
would have eliminated earlier but which I hid with some
PVA
and a bit more Alclad: the same for the horizontal tails.
It’s (again) a shame that they’ve done the tails as a slotted fit, I
could have filled the slot and attached them with pins to let me pose them at a
more representative angle, but I didn’t.
Maybe next time. So with the rudder fitted that’s the airframe more or
less done, I ran diluted
PVA
into any slight gaps, shot a light coat of Alclad over it when dry and fitted
the undercarriage legs and waited for decals.
I didn’t fit the pylons and the like at this stage as I figured they
would only interfere with decaling and possibly get knocked off.
application of superglue
got the wings in place with only a slight gap which real gluing and fitting
would have eliminated earlier but which I hid with some
PVA
and a bit more Alclad: the same for the horizontal tails.
It’s (again) a shame that they’ve done the tails as a slotted fit, I
could have filled the slot and attached them with pins to let me pose them at a
more representative angle, but I didn’t.
Maybe next time. So with the rudder fitted that’s the airframe more or
less done, I ran diluted
PVA
into any slight gaps, shot a light coat of Alclad over it when dry and fitted
the undercarriage legs and waited for decals.
I didn’t fit the pylons and the like at this stage as I figured they
would only interfere with decaling and possibly get knocked off.
And just about that
time Hannants Hot News said the F-100C sheet (X48-081) was in, I happened to be
in Collingdale so I popped in and bought it.
Now, from searching for and looking at pictures till my eyes have gone
funny it was clear that at least the first two examples on this sheet have
issues.
The first one has the
playing cards on the tail, super, but from what I can make out the cards always
fan the same way, left to right, right hand card on top.
Not, as the decal sheet would have, handed versions.
So that's unusable as it is so it doesn't really matter that the buzz
number has the wrong shape of numbers on it as well, the a/c looking to have the
more rounded style than the angled USAF numbering supplied (to be fair it’s very
hard to find when they changed, if indeed there was a specific point at which
they did!). The second one on the sheet looks better (though I don't have close
up pictures) but where's the buzz number?
There’s a reference quoted from "Colors and Markings 14" and if you look
at that picture, there it is with a buzz number, use of which was universal at
this time as far as I can make out.
I po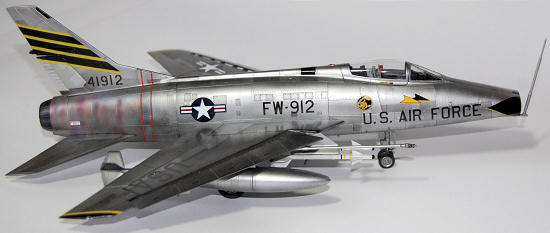 inted this out to Hannants and to their credit there was a correction sheet
prepared in a few days and David Hannant was kind enough to post me a lasered
copy of this so I could get on with my kit.
I decided at this point not to do the 452nd
DFS
aircraft with the playing cards as I wasn’t convinced the decals would go down
properly over the tail detail and so went with 461sr
TFS
example with the black and yellow tail stripes.
I still wasn’t convinced those would settle sufficiently either so I
painted the black areas and used yellow decal strips for the stripes.
And while doing that I did the wingtip markings the same way as well.
Again, looking at too many pictures, there is some variation in the
position and overall size of these tail markings but I couldn’t see any that sat
as far down as the decal sheet would have it, and the overall size of the decal
is too big.
That may be correctable
with some work but it does show that without the actual kit to size your decals
against (I assume that’s the issue anyway) it’s a bit difficult to get it right.
inted this out to Hannants and to their credit there was a correction sheet
prepared in a few days and David Hannant was kind enough to post me a lasered
copy of this so I could get on with my kit.
I decided at this point not to do the 452nd
DFS
aircraft with the playing cards as I wasn’t convinced the decals would go down
properly over the tail detail and so went with 461sr
TFS
example with the black and yellow tail stripes.
I still wasn’t convinced those would settle sufficiently either so I
painted the black areas and used yellow decal strips for the stripes.
And while doing that I did the wingtip markings the same way as well.
Again, looking at too many pictures, there is some variation in the
position and overall size of these tail markings but I couldn’t see any that sat
as far down as the decal sheet would have it, and the overall size of the decal
is too big.
That may be correctable
with some work but it does show that without the actual kit to size your decals
against (I assume that’s the issue anyway) it’s a bit difficult to get it right.
After a shot of Klear to seal the
decals in it was time to do the other bits and here I have to admit to a bit of
hypocrisy.
I’ve gone on about the
markings and the decals and accuracy and then I come to hang stuff under the
wings and what do I do?
I load it
up in a fashion I have absolutely no justification for.
From the pictures I’ve seen the IFR probe was rarely fitted, only certain
–Cs were
AIM-9
capable and I’ve no idea if the one represented here was and would the outer
pylon be carried on the sort of mission this is loaded up for?
I don’t know, but I did it anyway.
Like I said, hypocrite… So, wheels (I should point out that the main gear
wheels
 are too big, if they’re just changed for aftermarket this will affect the
sit but as it looks a bit tail high anyway that would be no bad thing. It would
also be nice to have some early nose wheels that had different hubs but I’m sure
they’ll come along with a new tail for a F-100A conversion.
And anyway it’s hard to know what a/c had what bits when so I’m not going
to fret too much) undercarriage doors, outer pylons, speed brake, slats, drop
tanks, straight IFR probe, tail bumper, inboard “Y” pylon with
AIM-9s
(which look OK though the pylon itself has a back end that doesn’t match the
pictures I have) and we’re nearly there…
But.
are too big, if they’re just changed for aftermarket this will affect the
sit but as it looks a bit tail high anyway that would be no bad thing. It would
also be nice to have some early nose wheels that had different hubs but I’m sure
they’ll come along with a new tail for a F-100A conversion.
And anyway it’s hard to know what a/c had what bits when so I’m not going
to fret too much) undercarriage doors, outer pylons, speed brake, slats, drop
tanks, straight IFR probe, tail bumper, inboard “Y” pylon with
AIM-9s
(which look OK though the pylon itself has a back end that doesn’t match the
pictures I have) and we’re nearly there…
But.
I wasn’t totally happy
with my yellow stripes.
While
they’re possibly a tiny bit too wide I could live with that, the colour was the
main problem.
Over the black they
had come out a little too dark and greenish.
Could I mask the black areas and just shoot a light yellow over the
appropriate areas without knocking everything I’d just fitted off?
Only one way to find out!
Turned out I could, and I was much happier with the result.
So just the last few bits, pitot, control stick, seat (as discussed,
still the wrong one, not glued down hard), some clear sheet for the gunsight,
canopy bits (in the closed position, Trumpeter haven’t supplied any way to pose
it open) and the transparencies for the lights (shame they didn’t do the wing
top ones as clear parts, as per the 32nd scale kit; again, if I had
been thinking I would have taken them off earlier and replaced with stock ones
at this point.
Next time) and we
are done!
 Overall it’s a nice
kit, fit is generally very good and the surface detail is restrained and on the
whole looks pretty accurate but certain areas are a bit of let down, some more
important to me than others.
There’s talk that the tail’s too broad but I’m not one for too much measuring.
The gun troughs could be deeper and there are no exposed gun muzzles:
while I’m not convinced that they should stick out as much as they do on the
Monogram kit some sort of gun tip detail would be nice.
Not too hard to add, if I’d thought of it earlier, I wasn’t going to
bother now.
The cockpit needs some
aftermarket to make it look good, or even to make it look like a –C (the coaming
and gunsight area is particularly poor compared to the Monogram kit of a long
time ago!), the wheel bays and wheels could do with some work, the decals need a
bit more research (though the quality is actually very good) and the loadout
provided isn’t bad, even if some parts are inappropriate for the –C. I’m sure
it’ll make more sense with a few additions for the –D and –F that are coming.
The tanks are a bit fat and there isn’t any option for the 335 gallon
ones, lets hope they stick them in with the –D/F.
But overall it’s a winner and I for one am looking forward to the –F and
hopefully an –A as well!
Overall it’s a nice
kit, fit is generally very good and the surface detail is restrained and on the
whole looks pretty accurate but certain areas are a bit of let down, some more
important to me than others.
There’s talk that the tail’s too broad but I’m not one for too much measuring.
The gun troughs could be deeper and there are no exposed gun muzzles:
while I’m not convinced that they should stick out as much as they do on the
Monogram kit some sort of gun tip detail would be nice.
Not too hard to add, if I’d thought of it earlier, I wasn’t going to
bother now.
The cockpit needs some
aftermarket to make it look good, or even to make it look like a –C (the coaming
and gunsight area is particularly poor compared to the Monogram kit of a long
time ago!), the wheel bays and wheels could do with some work, the decals need a
bit more research (though the quality is actually very good) and the loadout
provided isn’t bad, even if some parts are inappropriate for the –C. I’m sure
it’ll make more sense with a few additions for the –D and –F that are coming.
The tanks are a bit fat and there isn’t any option for the 335 gallon
ones, lets hope they stick them in with the –D/F.
But overall it’s a winner and I for one am looking forward to the –F and
hopefully an –A as well!
Colors and Markings
Vol.14
Detail and Scale Vol.33
Web searches till my fingers hurt.
Peter Marshall
January 2012
If you would like your product reviewed fairly and fairly quickly, please contact the editor or see other details in the
Note to
Contributors.
Back to the Main Page
Back to the Review Index Page