Minicraft 1/144 KC-97G Stratotanker
| KIT #: | 1441 |
| PRICE: | $12.99 MSRP |
| DECALS: | One option |
| REVIEWER: | Shawn Payne |
| NOTES: |
| HISTORY |
The
Boeing KC-97 Stratotanker was a
United States strategic
tanker aircraft based on the Boeing
C-97 Stratofreighter. For many years, it was the backbone of the
United States Air Force's tanker fleet until replaced by the Boeing
KC-135.
 The KC-97
Stratotanker was an
aerial refueling tanker variant of the C-97 Stratofreighter (which
was itself based on the
B-29 Superfortress), greatly modified with all the necessary tanks,
plumbing, and "flying boom." The cavernous upper deck was capable of
accommodating oversize cargo accessed through a very large left-side door, or
transferrable jet fuel was contained in tanks on the lower deck. Both decks were
heated and pressurized for high altitude operations.
The USAF began operating the KC-97 in 1950. It purchased a total of 816
KC-97s from Boeing, as opposed to only 74 of the C-97 cargo version. The KC-97
used
piston engines, fueled by
aviation gasoline, but it carried
jet fuel for its
refueling mission. It therefore used independent systems for both
types of fuel. In 1956,
SAC began phasing out the KC-97 in favor of the
KC-135.
The KC-97
Stratotanker was an
aerial refueling tanker variant of the C-97 Stratofreighter (which
was itself based on the
B-29 Superfortress), greatly modified with all the necessary tanks,
plumbing, and "flying boom." The cavernous upper deck was capable of
accommodating oversize cargo accessed through a very large left-side door, or
transferrable jet fuel was contained in tanks on the lower deck. Both decks were
heated and pressurized for high altitude operations.
The USAF began operating the KC-97 in 1950. It purchased a total of 816
KC-97s from Boeing, as opposed to only 74 of the C-97 cargo version. The KC-97
used
piston engines, fueled by
aviation gasoline, but it carried
jet fuel for its
refueling mission. It therefore used independent systems for both
types of fuel. In 1956,
SAC began phasing out the KC-97 in favor of the
KC-135.
KC-97s
continued operating with
History taken from Wikipedia.
| THE KIT |
 Being that this is 1:144 scale the kits looks rather basic in the number of
parts and amount of detail to them.
There is no engine face detail at all nor is there any detail to the wheel
wells. But being that these areas
are small this does not distract from the overall appearance of the completed
model.
Being that this is 1:144 scale the kits looks rather basic in the number of
parts and amount of detail to them.
There is no engine face detail at all nor is there any detail to the wheel
wells. But being that these areas
are small this does not distract from the overall appearance of the completed
model.
There are two clear parts, one for the cockpit windows and the other for the refueling boom operator enclosure. The kits decal sheet is printed crisp and no misalignment problems. The decals provide the rest of the windows and door outlines. If you want an idea of what the sprues look like, check out the B.377 preview.
| CONSTRUCTION |
For this
scale I choose to paint the inside of the windows black so I did not put in the
cockpit bulkhead and floor before gluing the two fuselage halves together.
I did add nose weight to the model but later it turned out that I had not
put in enough, so keep this in mind when building.
 I puttied
over the cargo and door hatches and sanded them smooth along with the upper and
lower seems. The decals door and
cargo hatches did not line up with the molded in lines for these areas and they
seemed to be a little heavy for the scale.
I found that the clear part for the cockpit windows did not fit flush and
sanding work was going to be needed here.
This is where I would have liked the kit to have been engineered
different. The area of the part
that needed the heavy sanding to get the right contours was right next to the
rear cockpit windows. So trying not
to scratch the window and sand the area right next to it proved to be a
challenge. This is where I would
have liked to have seen the kits clear part extend back to the next panel line
or not have a clear part at all as the windows are painted black anyways.
I puttied
over the cargo and door hatches and sanded them smooth along with the upper and
lower seems. The decals door and
cargo hatches did not line up with the molded in lines for these areas and they
seemed to be a little heavy for the scale.
I found that the clear part for the cockpit windows did not fit flush and
sanding work was going to be needed here.
This is where I would have liked the kit to have been engineered
different. The area of the part
that needed the heavy sanding to get the right contours was right next to the
rear cockpit windows. So trying not
to scratch the window and sand the area right next to it proved to be a
challenge. This is where I would
have liked to have seen the kits clear part extend back to the next panel line
or not have a clear part at all as the windows are painted black anyways.
Next are
the wings. Assembly is straight
forward here. Upper and lower wings
with lower engine cowlings parts.
The lower engine cowling parts do not line up all that well and will need some
filling attention.
On went the lower clear part for the boom operator’s station. The major sub assemblies completed I polished the model and got it ready for the NMF. I kept the model broken down for painting, not putting on the engine housings, wing tanks, wings, tail planes, landing gear and floating boom.
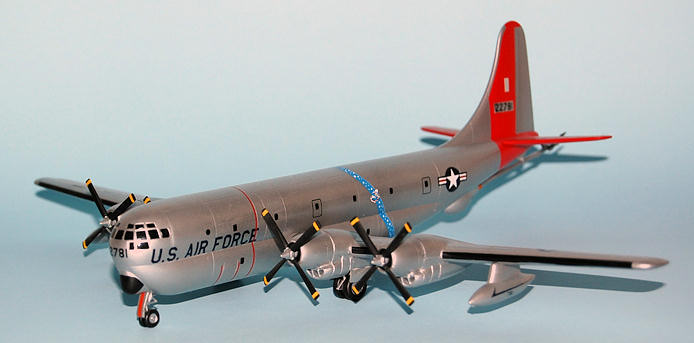
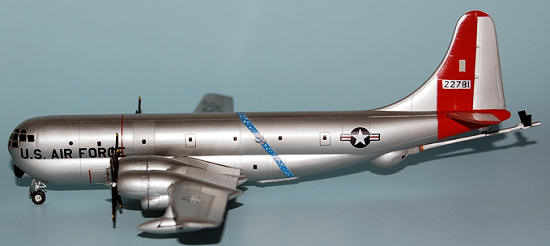
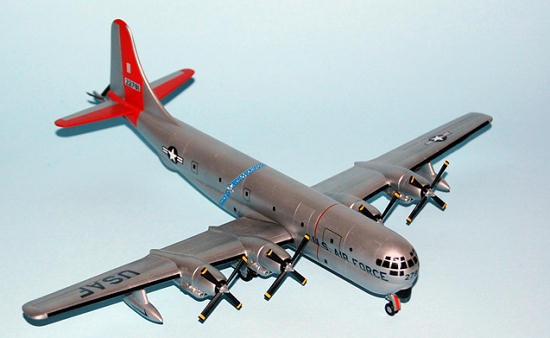
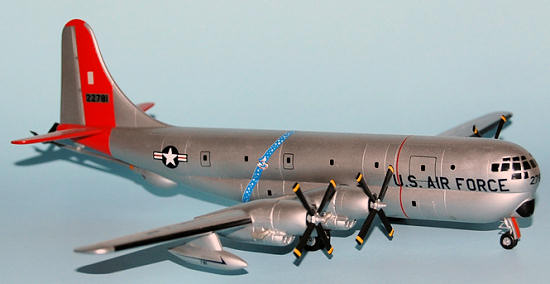
| COLORS & MARKINGS |
First thing I painted was the red
for the tail areas. Then I masked
off several different panels on the fuselage and wings and painted them flat
black. I do not have much
experience with NMF yet and thought
this would help bring out some contrast to the NMF.
I went with Testors Model Master non buffing aluminum for the overall
finish. I airbrushed on the NMF to
all parts of the
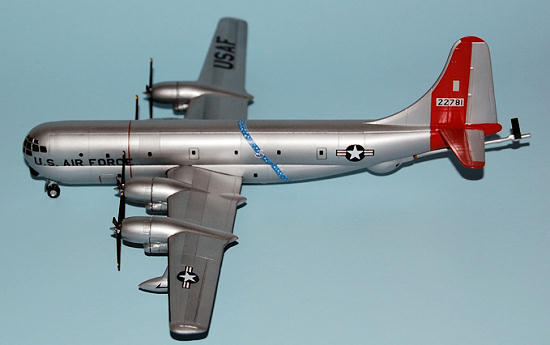 model,
including the wheel wells and gear doors.
The flat black under painted panels did give contrast to the overall
finish, however just not enough to really tell unless your right on top of it.
Once the paint was dry I removed the masking from the cockpit windows and
tail area. I now attached the
wings, tail planes and landing gear.
WOOPS! It is setting on its
tail and I haven’t even put on the floating tail boom.
To fix this I cut away as much of the propellers shafts as possible and
filled the space inside the engine cowlings with as much lead as I could.
This brought the nose back down to the ground; well it teeters but will
sit on the nose wheel. There does
need to be some reshaping of the wing part of the cowlings to get a good fit for
the engine cowlings. I just trimmed
this area with my X-acto knife until the parts met flush.
model,
including the wheel wells and gear doors.
The flat black under painted panels did give contrast to the overall
finish, however just not enough to really tell unless your right on top of it.
Once the paint was dry I removed the masking from the cockpit windows and
tail area. I now attached the
wings, tail planes and landing gear.
WOOPS! It is setting on its
tail and I haven’t even put on the floating tail boom.
To fix this I cut away as much of the propellers shafts as possible and
filled the space inside the engine cowlings with as much lead as I could.
This brought the nose back down to the ground; well it teeters but will
sit on the nose wheel. There does
need to be some reshaping of the wing part of the cowlings to get a good fit for
the engine cowlings. I just trimmed
this area with my X-acto knife until the parts met flush.
The
decals went on with no problems and worked well with the Micro sol setting
solution. Alignment of the
SAC star band needs a little care but it will join up and the fit at the bottom
comes out right. I used black decal
strip for the de-icing boots, but in later found reference photos I never saw
any of the KC-97’s with them. I
should have done more research prior to decaling.
I finished up with the detail painting on the floating boom and attached
it along with the wing tanks and it was complete.
| CONCLUSIONS |
 Not a real
easy build with some of the fit problems but nothing a novice can’t overcome.
I was pleased with the overall outcome and like this scale for these
larger planes.
Not a real
easy build with some of the fit problems but nothing a novice can’t overcome.
I was pleased with the overall outcome and like this scale for these
larger planes.
January 2010
If you would like your product reviewed fairly and quickly, please contact me or see other details in the Note to Contributors.