
Heller/Tamiya 1/72 F-84G Thunderjet
| KIT #: | 80246/60745 |
| PRICE: | $ |
| DECALS: | At least two options per kit |
| REVIEWER: | Nicolai Plesberg |
| NOTES: | Comparison article |
| HISTORY |
The Republic F-84 Thunderjet was probably one of the most important fighter bombers of the early 1950s and certainly the plane that brought the Royal Danish Air Force (RDAF) really into the jet age. Starting in August 1951 six F-84Es were delivered as MAP aircraft. In the following years no less than 238 F-84Gs (also MAP aircraft) of various blocks were delivered. Neither before nor ever since the RDAF has possessed so many aircraft of a single type as was the case with the Thunderjet. In the following I will, as good as possible, describe the history of each of the aircraft that I decided to model.
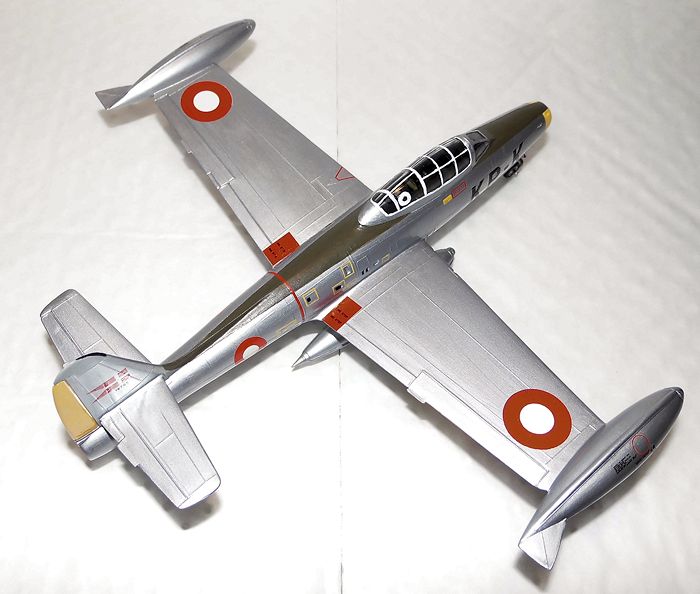
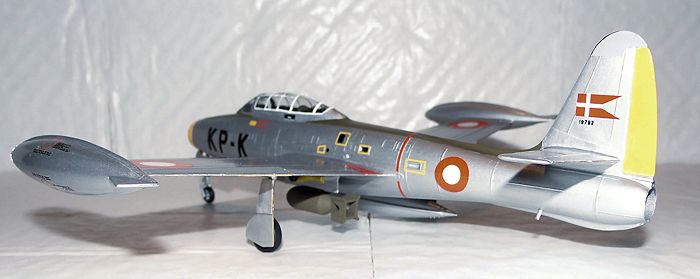
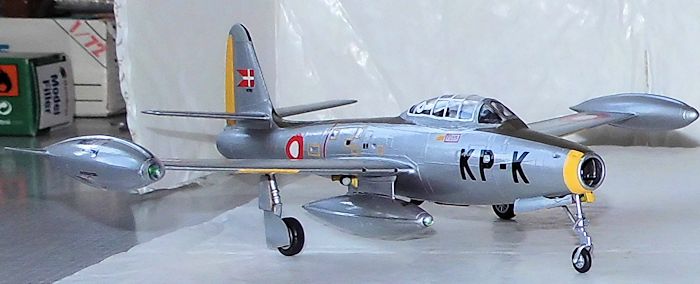
KP-K:
51-9792 F-84G-6-RE. Delivered by sea to Copenhagen aboard
the aircraft carrier Tripoli (CVE-64) on April 9th
1952, it was readied at the SAS (Scandinavian Airlines Systems) workshops at
Kastrup (now Copenhagen) Airport. It entered service in ESK 725 (SQN 725) as
FS-792-B at Karup Air Base on the 16th
of July 1952. Later the service registration changed to KP-K. The service
period of this aircraft, however, became rather short because it suffered a
nose gear collapse, by the way not an uncommon cause of crash, during
landing on 14th
of September 1954 and was written off. It was then transferred to the RDAF’s
mechanics school at Værløse Air Base where it was used to train mechanics.
Eventually the nose
 gear got fixed and it was exhibited for a number of
years at Egeskov Castle. The airframe is currently under restoration for
museum use.
gear got fixed and it was exhibited for a number of
years at Egeskov Castle. The airframe is currently under restoration for
museum use.
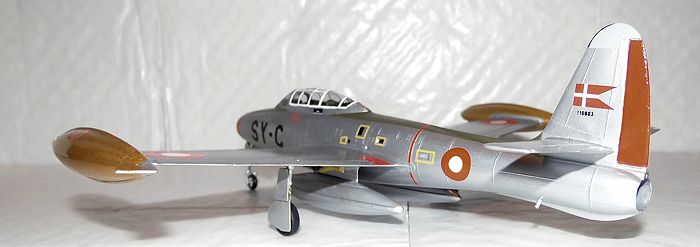
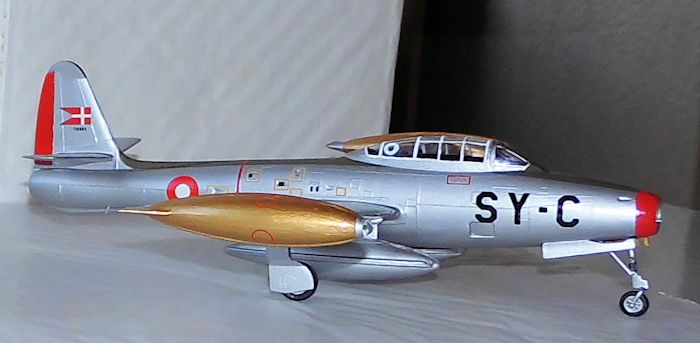
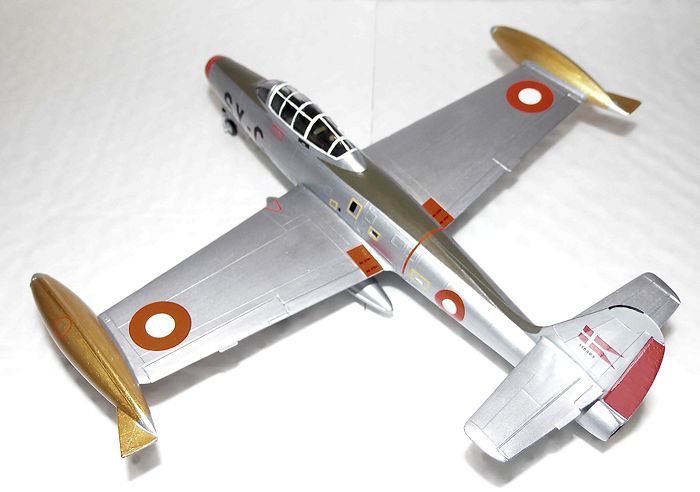
SY-C: 51-10603 F-84G-16-RE. Delivered by sea to Copenhagen aboard the S/S Mormacsaga on November 6th 1952, it was readied by the SAS workshops at Kastrup. It entered service as FS-603 in ESK 725 on 15th of December 1952. Later its nose code registration was changed to KP-H but still serving with ESK 725. As it entered service with ESK 729 its nose registration was once again changed, this time to SY-C and kept that until the aircraft crashed on October 1st 1959 following the nose gears failure to lock in position when it was extended. The airframe then functioned as gate guard at Skrydstrup Air Base, at first on its own gear (nose gear restored?) but was later mounted on a pole. During its service as gate guard its nose registration was once again changed to A-603, following the RDAF’s change of registration codes in 1960. But it never flew with it! The airframe is now under restoration for museum use.
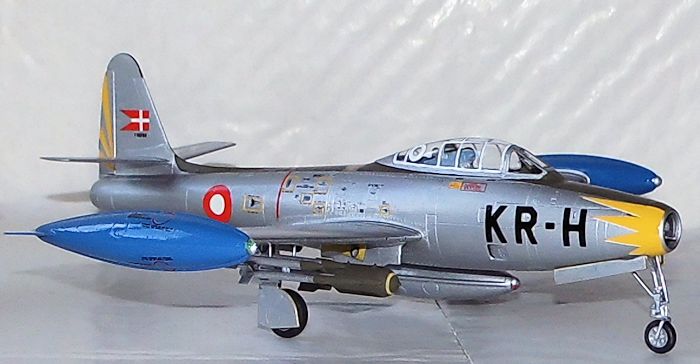
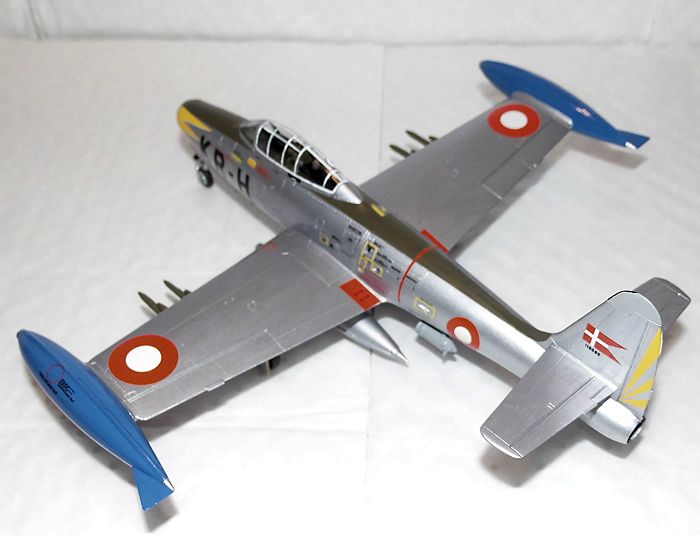
KR-H: Serial 51-10090 F-84G-11-RE. Delivered by sea to Copenhagen aboard the S/S Mormacelm on June 1st 1952, it was readied at the SAS workshops at Kastrup. It entered service on 20th of June as FS-090B with ESK 726 but later re-coded KR-H. Entered then service with ESK 730 as SE-Q until it was once again recoded A-090 after the Air Force’s change of registration codes in 1960. The aircraft served until the 13th of July 1961 when it was phased out and subsequently scrapped.
| THE KIT |
As I had two Heller kits and one Tamiya kit in my stash, I decided to see how close / far these kits are to each other. In general out line, which means fuselage, wings and tail planes they are indeed close; in fact so close that there was hardly any difference at all.
 The only significant
difference, apart from the surface detailing, I found, was that the gear door
outline in the lower wing parts was slightly bigger in the Heller parts than
Tamiya’s. As the Tamiya kit is far superior in the gear bays as well as the
detailed inner side of gear doors it’s a matter of taste which kit of those two
to prefer. Regarding surface detailing the Heller kit offers raised detail,
which were the days standard in the ‘70s while Tamiya offers to days standard
with engraved detail.
The only significant
difference, apart from the surface detailing, I found, was that the gear door
outline in the lower wing parts was slightly bigger in the Heller parts than
Tamiya’s. As the Tamiya kit is far superior in the gear bays as well as the
detailed inner side of gear doors it’s a matter of taste which kit of those two
to prefer. Regarding surface detailing the Heller kit offers raised detail,
which were the days standard in the ‘70s while Tamiya offers to days standard
with engraved detail.
The Heller gear is pretty nice though the nose gear support struts aren’t quite convincing, while the Tamiya ones looks like the real thing much closer. Regarding the pricing you could without doubt buy several Heller kits for the price of one Tamiya kit. Do remember that the Heller kit was tooled back in the ‘70s and the mold has by now been paying itself back many times, while the Tamiya one stems from 1999 so it has not yet had the time to repay itself – at least so it seems. It was actually by chance that I found the Tamiya kit at a good bargain price so if that’s the case then it is the kit to pick up. Now on to construction.
| CONSTRUCTION |
I began
construction by gluing wings, tip tanks, drop tanks, intake splitter / nose
gear bay (for the Tamiya kit some weight was inserted before the halves were
joined) and for the Tamiya kit also the bombs plus the RATO bottles. After
treating the seams I began with the interior and, by using the Tamiya parts
as model, I detailed the side consoles plus added the armrests to the seat
of the two Heller kits. Some
 ejector pin marks in the fuselage halves of all
three kits were dealt with next, but only in the Heller kits some filler was
used to do a proper elimination of them.
ejector pin marks in the fuselage halves of all
three kits were dealt with next, but only in the Heller kits some filler was
used to do a proper elimination of them.
Then it was time to break out some paint; the exhausts were painted some burned metal color (needed two coats) while the interior went green (Humbrol 226) – three coats were necessary. The instrument panels, side consoles and some other details went black while a few details were picked out in grey, silver and red as I found suitable. The intakes plus the inserts (intake / nose gear bay assembly) were painted silver (three coats necessary). The nose inserts were then glued into the nose of the right fuselage half; on the two Heller kits some sanding was necessary as these parts don’t fit so well. The Tamiya one fitted superbly. The exhaust pipe on the Tamiya kit was also glued in place at this stage. The interior of the two Heller kits were also glued in at this stage; however they also needed some adjustment as the fit here is not too well.
After the session to determine the need of nose weight was completed, the two Heller fuselages were glued together, while the Tamiya interior was prepared for decals, the instrument panel and seat (belt decal). As they had been applied and got the right sheen (the instrument panel got a satin sheen, while the seat cushions with the seat belt decal got a flat sheen) and the seat glued to the interior, the finished interior was glued to the right fuselage half. The next day the Tamiya fuselage was glued together. When gluing the fuselage together, I also included the gun deck cover. It was not glued in but attached with adhesive tape to ensure a good alignment of the nose section to minimize the use of filler afterwards. And as I wasn’t going to use the gun deck detail (the four nose machine guns) I figured the space could be used to additional nose weight, which in fact turned out to be the case!
About the same time I began
assembling the nose gears; as mentioned before the Tamiya one being much nicer
and easier to assemble than the Heller ones. The gear plus wheel hubs went
silver while the tires went Tire Black (Xtracolor X505). After dealing with the
fuselage seams, the remaining fuselage
 parts were glued: nose ring, ventral
airbrake, ventral air grilles (Tamiya kit only) and rear cockpit decks (Heller
kits only).
parts were glued: nose ring, ventral
airbrake, ventral air grilles (Tamiya kit only) and rear cockpit decks (Heller
kits only).
When all parts had been blended in and the last imperfections eliminated, I glued the wings and tail planes in place on all three kits. As the fit was pretty much nice (on the Tamiya kit excellent) only some small engraved lines were present, so I took my Faller Super Expert glue bottle, which is fitted with an applicator syringe and simply “glue filled” all the seams. I took several applications, especially on the Heller kits, but in the end it all levelled out and after the seams received a slight sanding the seam lines disappeared.
The next task was to paint the gear bays plus the inner side of the gear doors chromate yellow (Model Master 1584) demanding two coats to ensure a perfect coverage. The outer side of the gear doors went silver and some touch up on the gear legs were also necessary. About the same time I finished up in the cockpit area mounting the gun sights (adding the reflector plate on the Heller kits) doing the last painting / touch ups and finally gluing the canopy in place with Humbrol Gloss Cote. As the Tamiya kit offers the possibility to pose the canopy open it was here only the windscreen that was glued in place; the canopy is put on top – loose – so it just means extra caution when handling the model in the future! The remaining clear pieces – the position lights on drop tanks / wing tip tanks were also attached at this stage as they already had been painted their respective colors – clear red for the port ones and clear green for the starboard ones. The next thing I did was to clean up the models, glue the gear in place and it was off to the paint shop.
| COLORS & MARKINGS |
As most Danish Thunderjets were unpainted / not camouflaged, I settled for some nice natural metal paint schemes. So all three models got two coats of silver (with drying time in between of course) plus I painted the mainframes of canopy / windscreen flat black – twice.
 Then for some reason this
project got stalled as the models stood for some two months time before I got
around to them again. The waiting time did in fact serve a useful purpose, as
the real problem was that I had really not decided on, which aircraft exactly to
model. In the mean time the most comprehensive work on Danish Thunderjets was
published (please see reference section) and, after acquiring the book and
looking through the 5- view drawings in color, I had decided for three schemes.
Then for some reason this
project got stalled as the models stood for some two months time before I got
around to them again. The waiting time did in fact serve a useful purpose, as
the real problem was that I had really not decided on, which aircraft exactly to
model. In the mean time the most comprehensive work on Danish Thunderjets was
published (please see reference section) and, after acquiring the book and
looking through the 5- view drawings in color, I had decided for three schemes.
However, one of the schemes (KP-K) was troublesome, since it was an early block G model without auxiliary air intakes and it also had the slotted air brake instead of the perforated one. I, however, overcame these initial worries, broke out my knife, took one of the Heller models and carefully removed the air brake with the aid of the knife. Then the early slotted type airbrake was glued in place (the Heller kit offers both variants of air brake) and the auxiliary intakes were filled and, I must admit, some other imperfections around the nose section on both Heller kits! When dry and sanded down the forward fuselages were cleaned and all three models received a third coat of silver. Some extra silver was painted over the altered areas on the two Heller kits as soon as the third coat had dried to ensure a perfect coverage.
Now the remaining colors were
applied; flat white for the remaining canopy frames, grey (Humbrol 64) for the
fin top on all kits. The Tamiya kit, which I had chosen to be modeled as KR-H,
got the tip tanks painted blue (Humbrol 14) – two coats necessary, the first
Heller kit (modeled as SY-C) got the tip tanks painted gold (Humbrol 16) - also
two coats necessary. I chose here to do some masking with tape in order to
ensure straight demarcation lines for the remaining paintwork. The SY-C got the
rudder and the intake nose ring painted red (Humbrol 174) – three coats
necessary. The second Heller kit (modeled as
 KP-K) got the intake nose ring, the
rudder plus some masked areas on the underside of the wings painted yellow (Humbrol
69) – four coats necessary! The last main color applied was the all present
olive drab antiglare panel (Humbrol 155) which also needed a couple of coats to
be perfect.
KP-K) got the intake nose ring, the
rudder plus some masked areas on the underside of the wings painted yellow (Humbrol
69) – four coats necessary! The last main color applied was the all present
olive drab antiglare panel (Humbrol 155) which also needed a couple of coats to
be perfect.
Then followed a tedious session to smooth things out, i.e. to touch up over splashes (though not many nor especially big but nevertheless should be done), but in the end everything got as I wanted it to be and finalized painting by applying a coat of gloss to prepare for the decals.
KR-H: As this was the Tamiya kit I opted to use some of the stencilling from the kit sheet together with Stoppel sheet no 72-133, which in fact also was shown in the instructions to that decal sheet, but I used the 5-view color plate in the aforementioned book, as it was more clear in certain ways. The decals settled down nicely – only the yellow teeth on the nose gave a little trouble in conforming to the curves on the nose, but in the end I got them to sit as I wanted them to do.
KP-K: Here I only had Stoppel sheet no 72-132 at my disposal but it got as close to KR-H, but with a bit less stencils as only the most prominent of them was included on the Stoppel sheet. However, the Tamiya sheet donated some of the stencils on the tip tanks so it could look busier.
SY-C: The registration code SY-C plus a few remaining stencils from sheet no 72-132 plus a few markings from the 72-133 sheet (mostly digits for the serial number on the fin below the flag). The flags and roundels came from an old Stoppel sheet with Danish flags and roundels. Despite being more than 40 years old, they performed admirably even though they took a couple of minutes to get loose from the base paper.
 For all three models I omitted
the squadron badge, since squadron badges were not applied on the aircraft until
around 1956 and my models depict the individual aircraft as they looked in
1954-55.
For all three models I omitted
the squadron badge, since squadron badges were not applied on the aircraft until
around 1956 and my models depict the individual aircraft as they looked in
1954-55.
When decaling was finished I could look back at the efforts of a hard day, and looking forward to reach the finishing line soon. However, some imperfections were still around so I took the opportunity to eliminate them with touches of silver paint. When the paint had dried completely, I gave the models a coat of gloss to seal in the decals. When dry the anti glare panels plus the grey fin tips got a coat of Humbrol Matt Cote to get a realistic finish on these surfaces.
| FINAL CONSTRUCTION |
After a monstrous construction, painting and decaling all that remained of this gigantic project was the last bits such as the under wing stores, fuel dump vents, remaining gear doors (Tamiya kit only) and the final touch ups.
 During construction already had
assembled and painted the drop tanks, bombs and RATO units (Tamiya only), I was
really only lacking the HVAR rockets for the KR-H, as I had decided it to be
displayed with a full load. So I looked in my spares department; I found some
rockets that looked usable. Only their fins were a bit thick so I removed them
and replaced them with thin pieces of Evergreen bits. Also some of them had
their noses lengthened, because the HVAR rockets could be fitted with different
kinds of war heads depending on which kind of targets they were supposed to
engage. They got painted with olive drab tips and silver body and fins; later I
found out by looking in the instructions to my Tamiya Skyraider kit that a USAF
light grey was more appropriate, but there you go!
During construction already had
assembled and painted the drop tanks, bombs and RATO units (Tamiya only), I was
really only lacking the HVAR rockets for the KR-H, as I had decided it to be
displayed with a full load. So I looked in my spares department; I found some
rockets that looked usable. Only their fins were a bit thick so I removed them
and replaced them with thin pieces of Evergreen bits. Also some of them had
their noses lengthened, because the HVAR rockets could be fitted with different
kinds of war heads depending on which kind of targets they were supposed to
engage. They got painted with olive drab tips and silver body and fins; later I
found out by looking in the instructions to my Tamiya Skyraider kit that a USAF
light grey was more appropriate, but there you go!
The last real challenge was also to figure out how exactly to mount the HVARs to the under side of the wings. The pictures in the book of mounted HVARs under wing was, at least in my view, not very clear, but in the end I got cracked how to do it and after gluing some stretched sprue bits in place (silver painted of course), between the rockets. After adding the last bits and the final touches to the finish, the three Danish Thunderjets I had worked on for several months were finished.
| CONCLUSIONS |
When concluding on this build I must say that both kits build into very nice replicas even though there are decades between the two molds. The Tamiya kit being the newest tooling with engraved surface detail, an excellent fit and undoubtedly the best cockpit interior and landing gear / gear bays of the two, while when on a budget the Heller kit is absolutely fine for the job, as it has been so for the past three – four decades. Fit of the main parts is generally good, but the fit of the interior parts limped a bit. Also the nose gear could have been a bit better. The Heller kit has the advantage though that it easily can be build as an early block G model simply by using the slotted airbrake included in the kit and filling the auxiliary intakes, as I found out. Only if you stumble over the Tamiya kit on an exceptionally offer or some thing it would be the kit to pick up. Anyway, both kits should be a piece of cake even for a relative beginner.
| REFERENCES |
The F-84 “bible”: Republic F-84E & G Thunderjet in Royal Danish Air Force service 1951-1961 by Ole Rossel
Stoppel Forlag 2014 ISBN 978-87-91327-01-8
This is the work of the service of the Thunderjet in RDAF. It contains hundreds of photos (color as well as b& w), color 5- views, black and white drawings; in short all what the modeler needs to complete a model of the F-84, whether it’s going to be in Danish colors or not. And of course it also includes the complete list of all Thunderjets received by the Danish Air Force, fate of each airframe and more. Without this book, I would not really have been able to decide which planes to model, simply because the material I did come over wasn’t really useful or detailed as the book provided. For only 395 DKK it was a find, since I valued it to be its own weight worth in gold (the book weigh approx 1355 grams – you do the math!). Oh – and it’s written in English so it is destined for an international audience!
Copyright ModelingMadness.com