
| KIT #: | 9023 |
| PRICE: | $12.00 when new |
| DECALS: | Four options |
| REVIEWER: | Torben Plesberg |
| NOTES: |
| HISTORY |
For a general history of the C- 47, see my review on the Italaerei C- 47. Since the subject of the model is a Danish C- 47, the story of these aircraft will be given here:
In September 1953 Flyvevåbnet (Royal Danish Air Force) bought
2 DC-3 planes from SAS (Scandinavian Airlines system) and the aircraft got the
numbers K-681 and K-682. These aircraft were originally built as C-47A. They
were adapted VIP transport planes. When Norway in 1956 got eight surplus Belgium
C-119 G delivered to Luftforsvaret through the MDAP program, this meant that
there was no longer need for ten C-47s. Six of these aircraft were handed over
to Flyvevåbnet as MDAP aircraft. This meant that the aircraft remained American
property, but were at the disposal of Flyvevåbnet. The ex-Norwegian aircraft
were n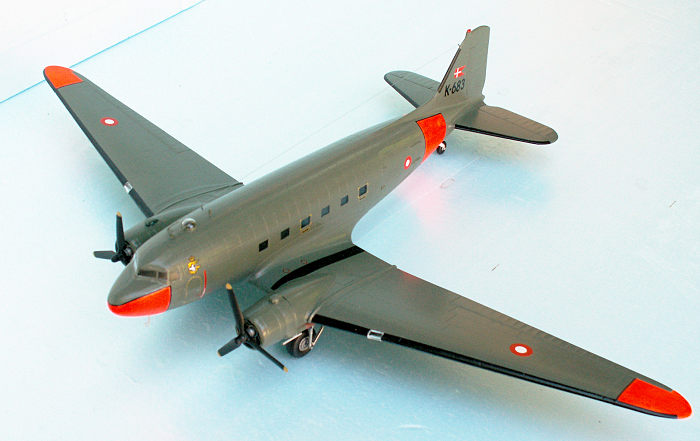 umbered K-683 to K-688. They became the first freighters of Flyvevåbnet,
and in 1959 they were supplied by three C-54.
umbered K-683 to K-688. They became the first freighters of Flyvevåbnet,
and in 1959 they were supplied by three C-54.
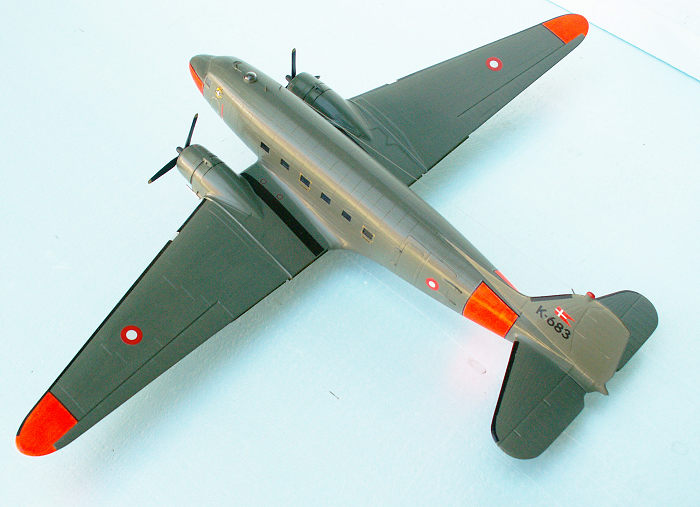
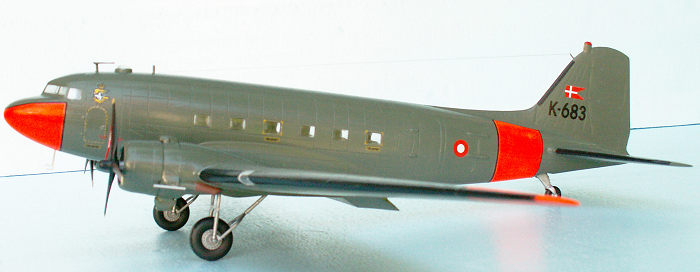
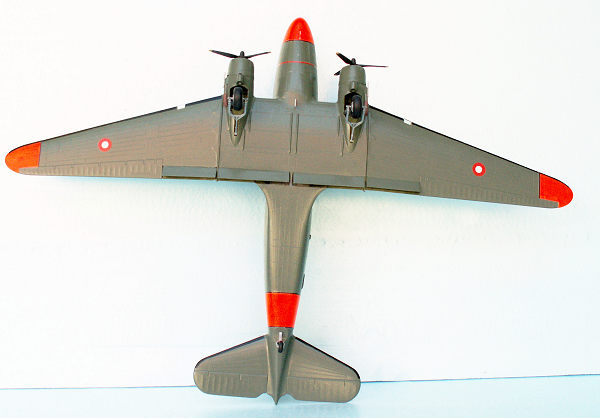
The first color scheme was overall natural aluminium with large national markings on fuselage and wings – and a large Danish split-flag on the fin and rudder. From 1955 they started getting a camouflage scheme with light gray-green and dark green on the top, and PRU blue on the underside. However, one or two aircraft also had the light gray green on the underside. Some aircraft flew with a bare metal underside for some time, until it was convenient to paint these, too. After a couple of years day-glow areas with black outlines were added on the nose, the rear fuselage, and the wing tips. They also got the badge of Squadron 721, the Danish Air Force transport squadron, in the day-glow area beneath the cockpit.
From 1969 the aircraft got the standard olive green of the Danish armed forces, with the exception of the two ex-SAS aircraft, which already in 1966 got a special VIP color scheme, white on the top of the fuselage and the fin and rudder, and natural metal elsewhere. All aircraft, however, kept the day-glow areas. Only the band on the rear fuselage was changed, not covering the fin fillet any more, but ending close to the top of the dorsal.
The standard Danish armed forces olive green is referred to as FS24079, and it may be correct, maybe not. Anyway the correct designation of the paint is Hempelin no 1048 olive-green. I know this for sure, because I got a gallon from the PT squadron. This paint for the full size aircraft, army vehicles and torpedo boats is not suited for a model.
The use of the C-47 was not only for transport. Some aircraft
were used for mapping jobs, especially in Greenland. They were also used for
surveillance, and for the training of paratroopers. One of my friends in th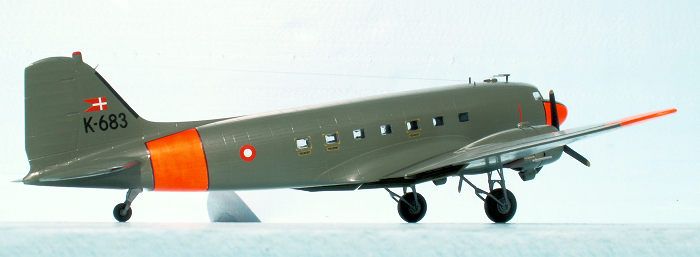 e
shooting association claims to have taken off a lot of times with the C-47. But
he never had the courage to make a landing with this type of aircraft. He always
jumped out with the parachute before, just as a precaution! My friend was a
member of the Danish Frogman Corps, one of the pioneers being the 6th
soldier to get this very special education.
e
shooting association claims to have taken off a lot of times with the C-47. But
he never had the courage to make a landing with this type of aircraft. He always
jumped out with the parachute before, just as a precaution! My friend was a
member of the Danish Frogman Corps, one of the pioneers being the 6th
soldier to get this very special education.
The VIP aircraft were only used as transports by high ranking officers, politicians in office and the Queen.
During the very cold winter 1955-56, when the Great Belt was frozen, the C-47 was used as transport plane between the air bases in Jutland and Værløse air base near Copenhagen. These transport flights were known as “ice-trains”. Later on when the C-47s were flying regular shuttle flights between the air bases, these flights were still called ice-trains. One of my colleges from my work made his national service in Flyvevåbnet at air base Karup in Jutland. And his job was among others to decide, who should have a seat in the ice-train to Værløse, and on Saturdays, he always managed to put himself on the list, and also on Monday morning, – in direction Karup. My collegue lived in Copenhagen.
The Danish C-47s have also acted as movie-stars. In the movie “A bridge too far” from 1977, three planes from Squadron 721 were disguised as Skytroopers of the USAAF flying over Holland in September 1976. The participating planes were K-685, K-687 and K-688. The K-687 is an option of the kit. Furthermore were C-47s from Luftwaffe, Flygvapnet and Ilmavoimat also participating in the phenomenal scenes of air dropping a lot of parachutists.
When the C-47 was phased out in 1982, none of the planes were scrapped. They were either preserved or went back to the owner: the USAF. The K-681 was repainted as OY-DDA Sven Viking in the color scheme of the DDL (the Danish Airline), before it merged with the SAS. The plane can be seen in the Technical Museum at Elsinore. The K-682 was kept in flying condition by different owners, now “DC-3 Vennerne” and is in the VIP color Scheme from Flyvevåbnet, however, with a civil registration: OY-BPB. Members of the “DC-3 Friends” arrange a lot of flights every year at fair prices, and these flights can be booked by members only.
 The MDAP planes went back to USA, with the exception of K-687
and K-688. The 87 was restored and is on permanent display in the Danish
Aviation Museum at Stauning in Jutland. It is painted in the standard olive
green with day-glow areas and is fitted with a ski undercarriage. This is very
appropriate, since K-687 was the only Danish C-47 ever using a ski undercarriage
- in Greenland.
The MDAP planes went back to USA, with the exception of K-687
and K-688. The 87 was restored and is on permanent display in the Danish
Aviation Museum at Stauning in Jutland. It is painted in the standard olive
green with day-glow areas and is fitted with a ski undercarriage. This is very
appropriate, since K-687 was the only Danish C-47 ever using a ski undercarriage
- in Greenland.
The K-688 went to the Dutch Military Aviation Museum at Soesterberg air base. The plane has been painted in the colors of the Royal Dutch Air Force ( Koninklijke Luchtmacht).
The K-686 crashed in Vermont during a ferry-flight in 1995.
The K-684 is operated by Valiant Air Command as “Tico Belle” in Titusville, Florida, and the K-683 is flying as N2239W.
The K-685 has been restored and painted with the D-day colors – black and white stripes added to the normal camouflage scheme by volunteers from the 19th Air Support Operations squadron in Fort Campbell in Kentucky, where it is exhibited outdoor at Campbell Army Airfield.
The C-47 aircraft in Flyvevåbnet were replaced by three Grumman Gulfstream III, and three C-130 H took over many of the transport tasks from the C-47 and the C-54, including parachute training.
| THE KIT |
Comes in a fairly large flat box with Monty’s Dakota on the lid. There are 2 large sprues in silver grey styrene and a small one with the clear parts. There are no rivets, in return a lot of recessed panel lines, obviously to show the complete plating of the aircraft. Maybe the panel lines are too dominating, as rivets were some 20 years earlier. The fashion has changed from rivets to panel lines! The kit looks very much like the similar kit from Italeri, but of course there are differences in the engineering of the kits. It looks to me, as if the ESCI kit might have been inspired by the Monogram 1/48 kit.
The most important difference from the Italeri kit is, that
the cabin windows have the correct size, and the ESCI kit has separate flaps,
which can be mounted in down position. These loose flaps mean that the fuselage
has a weak point on the underside, where the flaps are crossing perpendicular to
the centerline o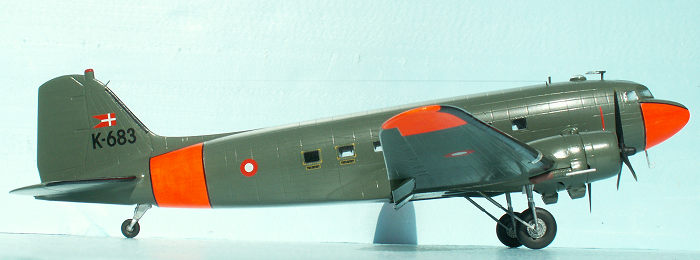 f the fuselage. This point needs some reinforcement!
The instructions is a non-standard sized fold out sheet with eight pages. Page one is a short history of Monty’s Dakota C-47 in five languages: Italian, English, French, German, and Spanish. Pages two to four show how to put the model together in 12 steps with sketches and numbers of the parts dealt with. Pages five to eight show how to paint and decal the four options offered by the very nice decal sheet printed by Cartograf. Paint is referred to the Humbrol enamel system in the instructions.
There are some alternative parts to consider: three different carburetor intakes, and special parts for Danish and South African version. The fact that the tail wheel also is movable might be dangerous for the finished model, which is able to taxi by itself, if the shelf is not exactly horizontal! The problem is solved if you cut 1.5 mm from the main tires to simulate contact point with the ground, or simply glue the wheels to the legs.
The parts fit very well together with the exception of the windscreen with side windows of the cockpit. The shape of the roof above the windscreen is too bulbous, and needs to be sanded down as much as the thickness of the plastic allows.
| CONSTRUCTION |
If you follow the instructions, you will end up with a nice model in the end. The interior detailing is not important in my opinion. If you can’t see the result of your detailing work on the finished model, your effort is a waste of time. I don’t understand why the kit producers don’t solve this problem by making the fuselage halves transparent. If this was the case, it would be very much worth the effort to detail the interior, and you can paint the fuselage in a way showing your work! I never forget a modeler who super detailed the entire interior of a Catalina, and when the fuselage was closed up, only the detailing behind the blisters were visible!
 Most important to do before the fuselage halves are glued
together is gluing the cabin windows in place with clear gloss varnish. For
strengthening it is a good idea to glue the floor and bulkheads in place. As
said the assembled fuselage has a weak spot, just behind the wing. The wing is
weak, too, because of the separate flaps. When the wing had been glued in place,
I made a strengthening piece of a 2 mm aluminium plate, about 1 cm wide and with
the ends cut in angles corresponding to the curvature between the fuselage and
the rear of the wing. This trapezoid was simply pressed in place, no glue
necessary. This piece of aluminium strengthen the fuselage very much and
eliminate the weak point completely. If the trapezoid does not disappear
completely behind the flaps, it might be cut narrower by one or two mm.
Most important to do before the fuselage halves are glued
together is gluing the cabin windows in place with clear gloss varnish. For
strengthening it is a good idea to glue the floor and bulkheads in place. As
said the assembled fuselage has a weak spot, just behind the wing. The wing is
weak, too, because of the separate flaps. When the wing had been glued in place,
I made a strengthening piece of a 2 mm aluminium plate, about 1 cm wide and with
the ends cut in angles corresponding to the curvature between the fuselage and
the rear of the wing. This trapezoid was simply pressed in place, no glue
necessary. This piece of aluminium strengthen the fuselage very much and
eliminate the weak point completely. If the trapezoid does not disappear
completely behind the flaps, it might be cut narrower by one or two mm.
For the Danish AF variant the smallest carburetor intakes should be chosen, parts no 33A. Blade antenna part no 10 B should be chosen, not the bulb antenna part no 24 A. If the aircraft is modeled as it looked in the last few years of service, there is a second blade antenna on the dorsal above the rear frame of window # four, starboard side. The beacon on top of the fin should be made from scratch as part no 6 C of the kit does not look like the real thing. The exhaust pipes need a small piece of one mm gauge brass tube protruding forward. Its purpose is probably to provide some extra air-cooling for the exhaust system.
 The only part with a bad fit is the combined windscreen and
side windows of the cockpit, part no 3 C. It was glued in place with clear gloss
varnish. When set, the side windows were sanded down to conform with the
fuselage sides, using a triangular needle file, one of the most useful tools for
plastic modeling!
The only part with a bad fit is the combined windscreen and
side windows of the cockpit, part no 3 C. It was glued in place with clear gloss
varnish. When set, the side windows were sanded down to conform with the
fuselage sides, using a triangular needle file, one of the most useful tools for
plastic modeling!
To finish off the windscreen I had to make a special sanding block 3.5 mm wide and 4 cm long and with rounded corners. A stripe of grain 1200 wet & dry was glued to the block, and with this tool it was possible to finish the windscreen and side windows by water sanding. Finally the block was used to support a cloth for polishing with toothpaste to regain transparency. A layer of clear gloss varnish finished off the windscreen.
Before painting all windows and the windscreen were covered by exactly cut pieces of Tamiya tape to secure the transparencies from being painted. However, some of the parts had to be painted before assembly: undercarriage, engines, inside of cowlings, wheel wells and propellers.
| COLORS & MARKINGS |
The color scheme of the Danish C-47 A is olive green overall with dayglow areas on the fuselage and wing tips. According to the instructions the olive green is HB 86. However, this color is not matching the Hempelin 1048 olive green. I have a lot of photos of Danish military aircraft painted with the standard green of the Danish armed forces – and they are all different! The color on the photo depends on season, time of the day, overcast, clouds or sun. However, when the sun is shining, the color seems more like dark earth, and when it is overcast or even raining, the color seems green.
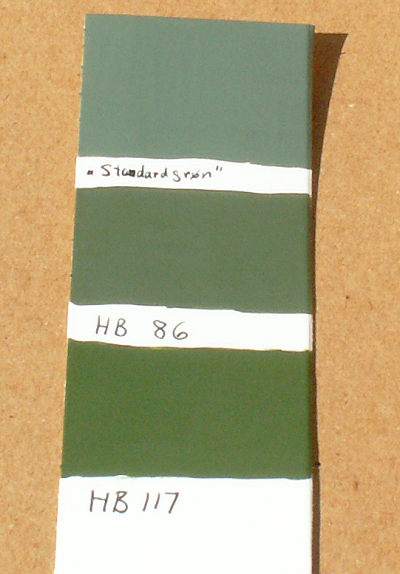 The original Hempelin color is not suited for models – unless
the scale is 1/1. At a paint shop I had mixed half a liter of a more suitable
model paint in the very special 1048 color. This was sufficient for my three PTs
of the Danish Navy, and for my aircraft models ranging from C-130 H Hercules to
the SAAB T 17 Supporter. The special mixed color was very easy to apply with a
brush and the drying time was about 8 hours. Model colors in small tins tend to
dry too quickly, especially the colors from Revell, and this fact makes them
less suitable for larger models.
The original Hempelin color is not suited for models – unless
the scale is 1/1. At a paint shop I had mixed half a liter of a more suitable
model paint in the very special 1048 color. This was sufficient for my three PTs
of the Danish Navy, and for my aircraft models ranging from C-130 H Hercules to
the SAAB T 17 Supporter. The special mixed color was very easy to apply with a
brush and the drying time was about 8 hours. Model colors in small tins tend to
dry too quickly, especially the colors from Revell, and this fact makes them
less suitable for larger models.
The C-47 got a second layer of olive green on the following day, and this was sufficient to get a perfect covering. The day-glow areas were masked and got three layers of gloss white, and five layers of orange day-glow “fire orange”. At last the anti-icing devices were masked and painted with a matt black, HB 33. A single layer was sufficient for a good coverage.
The decal sheet of the kit is supposed to be sufficient for the model, one would think. However, I wanted to do the K-683 and therefore I bought Jacob Stoppel’s sheet, which covers any of the olive green Danish C-47s. Besides, the national insignias of the ESCI decal sheet are not correct, because all six roundels are the same size. The roundels of the fuselage are smaller than the roundels of the wings, as they are on Stoppel’s sheet. The black stripes outlining the day-glow areas are 1 mm black decals. These stripes must be cut in smaller pieces to follow the curvature of the fuselage. Especially the black stripe above the nose was difficult to make, because it had to be cut in 10 smaller pieces.
The yellow dotted lines around five of the windows were taken from the Stoppel sheet, because there were openings for the windows in the middle. The squadron badge did not come with Stoppel’s sheet, because he also sells a sheet with squadron badges! However, the squadron badge of the ESCI sheet was OK and was applied to the model.
| FINAL CONSTRUCTION |
To finish the model only a couple of antennas, the pitot
tubes and the antenna wire were missing. I scratch built the “horseshoe”
antenna, the blade antenna (for the ventral only!) and the pitot tubes, finding
the items of the kit too poor – especially the pitot tubes, which were
defective: the lower one was missing. The wire antenna was made of a 0.1 mm wire
and the holders of two pieces of 0.5 mm brass t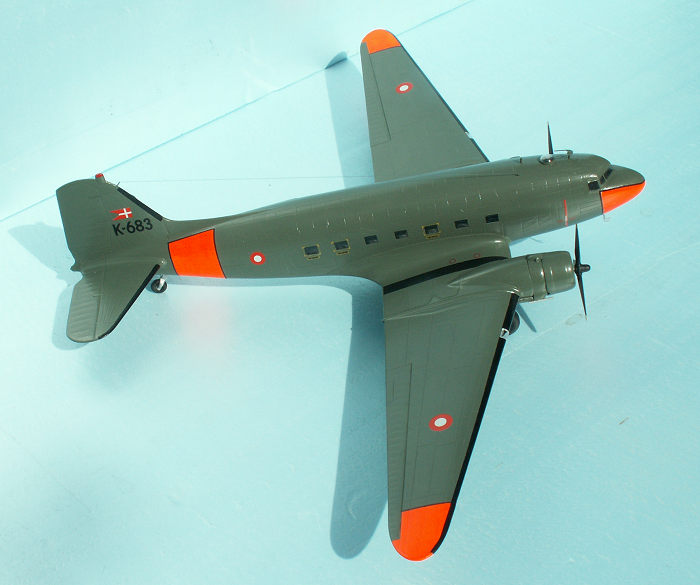 ube, 5 and 6 mm long. To cut a
0.5 mm tube is easy – with the right tool: a 0.1 mm thick circular saw blade 16
mm gauge in a mini drilling machine. If you use cutting pliers, you don’t have a
tube any more – unless you put a piece of 0.3 mm wire inside the tube before
cutting.
ube, 5 and 6 mm long. To cut a
0.5 mm tube is easy – with the right tool: a 0.1 mm thick circular saw blade 16
mm gauge in a mini drilling machine. If you use cutting pliers, you don’t have a
tube any more – unless you put a piece of 0.3 mm wire inside the tube before
cutting.
The hole in the brass tube is 0.3 mm as said, and a single knot on the wire will prevent it from slipping out. The art of making the wire antenna is reduced to a question of making two knots on either side of the brass tubes making the correct length.
The hole on the top of the fin is drilled first to a depth of 4 mm, using a 0.5 mm drill, and the 6 mm brass tube with the knot of the wire in the end is pushed about 2.5 mm into the hole with a small plier. Then you stretch the wire forward and find the exact spot to drill the hole for the second brass tube – when the wire is tense. It is elastic and can be stretched 4-5 mm. If your holes are drilled correctly, it is not necessary with glue. And this may be a very good thing some day in the future, for the wire may break, when you forget it is there – because it is almost invisible!
| CONCLUSIONS |
The ESCI C-47 Montgomery’s Dakota is a very nice kit and is warmly recommended for everybody, who fancies the Dakota, Skytrain or whatever the military DC-3 is called. The kit will produce a very accurate model of the most famous transport plane ever. There are plenty of decal sheets on the aftermarket, and it will be possible to make a C-47 having served with most of the air forces of the world. The best kit, is the kit that will produce the model you want with the smallest possible effort. The ESCI C-47 is such a kit!
| REFERENCES |
Photos and information of the Danish C-47 aircraft from the internet + my own photos of the aircraft.
24 July 2017
Copyright ModelingMadness.com
If you would like your product reviewed fairly and
fairly quickly, please
contact
the editor
or see other details in the
Note to
Contributors.
Back to the Main Page
Back to the Review
Index Page
Back to the Previews Index Page