Hasegawa 1/72 AD-4 Skyraider
| KIT #: | BP7 |
| PRICE: | 12 euros second hand |
| DECALS: | Two USAF options |
| REVIEWER: | Jeroen Koen |
| NOTES: | Kit backdated to an AD-4. Pavla and Hobbyboss Panther bombs, Eduard Zoom and EuroDecals #106 used. |
| HISTORY |
The Douglas Skyraider was originally designed to meet WWII requirements for a carrier-based, single-seat, long-range divebomber and torpedo-carrier. Hence it was called the XBT2D-1, and was ordered in 1944. By early 1945 its first flight had taken place and a large order was placed -only to be reduced because of the end of WWII. However, there was still a need, so now re-designated AD-1, in late 1946 the first aircraft, now called Skyraider, were delivered to operational units. Though too late to participate in WWII, it was the attack aircraft of choice in the Korean war, thanks to its large range, heavy payload, and ability to use all sorts of weaponry, as evidenced by the dam-busting mission VA-195 undertook. By then the main fleet versions were the AD-3 and 4. After the Korean war the Skyraider, now re-designated as the A-1, soldiered on well into the 1960s, subsequently serving in the Vietnam conflict in both Navy, Air Force, and Vietnamese service. The last Skyraider was retired in 1971, when they were replaced by the A-6 Intruder and A-7 Corsair II.
 Skyraiders
proved to be very adaptable, and quite a few modifications were done to the
basic airframe, resulting in a rather large portion of the alphabet letters
being used up! The AD-1 and 2 were also modified into the AD-1 and 2Q, for ECM
warfare, losing the speed brakes and introducing a new, rather cramped, crew
station in its place. The AD-3 came in four versions: the standard AD-3, the
AD-3N for night attack, the AD-3Q ECM, and the AD-3W, which was an
radar-carrying AEW version. The AD-4 and 5 were also built as N, Q and W
versions.
Skyraiders
proved to be very adaptable, and quite a few modifications were done to the
basic airframe, resulting in a rather large portion of the alphabet letters
being used up! The AD-1 and 2 were also modified into the AD-1 and 2Q, for ECM
warfare, losing the speed brakes and introducing a new, rather cramped, crew
station in its place. The AD-3 came in four versions: the standard AD-3, the
AD-3N for night attack, the AD-3Q ECM, and the AD-3W, which was an
radar-carrying AEW version. The AD-4 and 5 were also built as N, Q and W
versions.
The AD-4 proved to be the most modified version, as, in addition to the versions already mentioned, there were also the AD-4B, for carrying nuclear weapons, the AD-4L (winterized), the winterized N night-attack version called AD-4NL, and the modified version of the AD-4N for daylight attack, the AD-4NA. The French were a major operator of this model, buying U.S. surplus Skyraiders. The next model was the AD-5, with featured a radically modified fuselage with side-by-side seating and a taller tail fin amongst the more notable modifications. The last, and least modified versions, were the AD-6 and 7. The last of 3180 Skyraiders was built in 1957.
As the AD-5 (A-1E), AD-6 (A-1H) and AD-7 (A-1J) saw extensive use in the Vietnam war and were not produced in large numbers, not many airworthy examples remain. However, the French and African nations, like Gabon and Chad, used their inherited AD-4NAs, and while many were eventually rendered unserviceable, they were not scrapped. Consequently, many airworthy warbirds today are the relatively rare AD-4NAs, but they all came from the same source! Having seen one of those at the AJBS yearly airshow at Cerny-La Ferté Alais airshow I know I had to have a Skyraider model eventually!
| THE KIT |
The Hasegawa Skyraider has been
around for a few years, and as such has been re-issued a few times by Hasegawa.
Re-issues included the famous toilet bomber and MiG-killer, as well as some
Vietnamese and U.S. Air Force versions. My kit is one of those Air Force
versions. Upon opening my somewhat battered second-hand box 7 sprues greeted me,
one of which clear, and the
 polycaps
for the propeller. The panel lines are nicely recessed and look pretty crisp.
The cockpit is rather weak and uses decals for the instrument panels, pretty
much standard for Hasegawa on their 1/72 kits. Somewhat unique to this boxing is
sprue E, which contains the munitions dispensers that were used by the Air Force
in Vietnam. Not included are the often used Air Force style non-spoked wheels.
polycaps
for the propeller. The panel lines are nicely recessed and look pretty crisp.
The cockpit is rather weak and uses decals for the instrument panels, pretty
much standard for Hasegawa on their 1/72 kits. Somewhat unique to this boxing is
sprue E, which contains the munitions dispensers that were used by the Air Force
in Vietnam. Not included are the often used Air Force style non-spoked wheels.
The rest of the box is filled with a small decal sheet and the standard Hasegawa instructions. The decal sheets caters for 2 Air Force options, both of the 56th SOW. Both are in the SEA scheme and carry a small nose art; Stump Jumper for the box art version, and Bubbles 'n Bust for the second. One of the reasons for backdating my Skyraider is that the decals aren't very good; nose art was carried on both sides where only one is included, Bubbles 'n Bust is spelled as Bubblesh Bust and the Air Force style wheels are not included, too.
Apart from the munition dispensers and fuel tanks, no further weapons are included.
| CONSTRUCTION |
In this case, construction started by carefully
sanding off all the armour plating and rescribing the panel lines on the forward
fuselage and underside. Since the Hasegawa plastic is pretty hard, this has to
be done carefully to avoid oversanding, and is thus pretty tedious. Like
rescribing an entire kit, I tend to do this at meets and shows, or in between
other projects. When that was
 done, the
cockpit was assembled and the Eduard PE added. While Eduard provides a
sandwich-instrument panel, the side consoles get no love, so I used the decals
on this more visible part of the cockpit. In the end, apart from the canopy grab
handles and seat belts, the rest is pretty much invisible. The sidewalls are
curved and the instrument panel is hidden deep under the coaming. Lesson
learned!
done, the
cockpit was assembled and the Eduard PE added. While Eduard provides a
sandwich-instrument panel, the side consoles get no love, so I used the decals
on this more visible part of the cockpit. In the end, apart from the canopy grab
handles and seat belts, the rest is pretty much invisible. The sidewalls are
curved and the instrument panel is hidden deep under the coaming. Lesson
learned!
After assembling the fuselage halves and wings, a dry fit between these components revealed the sanding had pushed the side of the fuselage somewhat inwards, revealing a gap at the wing root. I installed two spreader bars made from some sprue to ensure a tight fit, without messing up the dihedral. The only gap left was at the bottom rear, and that was stuffed with Evergreen. After sanding all joints flush and a touch of filler here and there the airframe was polished to remove some of the sanding marks on the forward fuselage. The cannons were cut off to be replaced later with tubing, as was the pitot (bound to break anyway) and all of the antennae on the spine, except for the first blade antenna. The large beacon on the tail was also sanded off, and the exhausts drilled out.
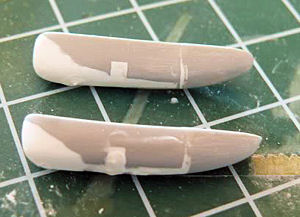 At this
stage I turned my attention to the inner wing pylons. On the versions prior to
the AD-5, these were a different shape. I used the In Action book to make my
own, using some left over Italeri Ju188 pylons as a base. These were cut in the
middle, a few millimetres were removed to shorten them, and the front end was
rebuilt and shaped using Milliput. A lot of sanding and a little more Milliput
ensured that they matched the drawings pretty well. The drawing was not 1/72 so
I had to adjust accordingly. Fortunately, nearly all surviving Skyraiders today
are former French AD-4NA's, so it was not hard to use Google for some reference
photo's. In the end I think they are a bit too large.... live and learn! Since
they were hand-made and did not fit as great as the rest of the kit, I added
them in this stage, and used some more Milliput to fair them into the wing. I
intended to use sway braces from the HobbyBoss F9F-3, which could not carry
external weapons, but comes with the sprue anyway -also a great source for 100lb
bombs!
At this
stage I turned my attention to the inner wing pylons. On the versions prior to
the AD-5, these were a different shape. I used the In Action book to make my
own, using some left over Italeri Ju188 pylons as a base. These were cut in the
middle, a few millimetres were removed to shorten them, and the front end was
rebuilt and shaped using Milliput. A lot of sanding and a little more Milliput
ensured that they matched the drawings pretty well. The drawing was not 1/72 so
I had to adjust accordingly. Fortunately, nearly all surviving Skyraiders today
are former French AD-4NA's, so it was not hard to use Google for some reference
photo's. In the end I think they are a bit too large.... live and learn! Since
they were hand-made and did not fit as great as the rest of the kit, I added
them in this stage, and used some more Milliput to fair them into the wing. I
intended to use sway braces from the HobbyBoss F9F-3, which could not carry
external weapons, but comes with the sprue anyway -also a great source for 100lb
bombs!
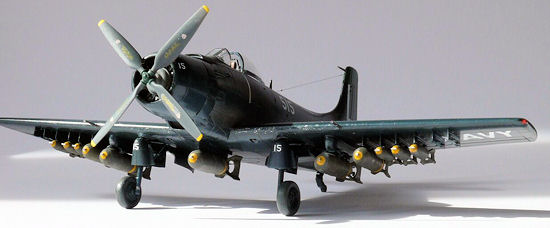
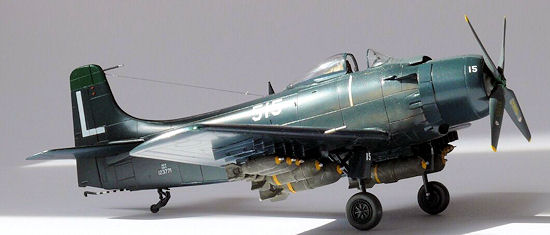
Speaking about bombs, try finding some proper bombs to arm your Korean War Skyraider... 1000 and 500lb bombs can be robbed from a few kits, but those 250 and 100lb bombs are rather rare and kits that do carry them (Monogram F8F and Hasegawa SBD for instance) have only two, meaning if you want a proper load for your Skyraider, you need to get more than a few! Fortunately the new HobbyBoss F9F comes with six 100lb bombs, so that took care of that. The rest is courtesy of two Pavla sets, each with 2x 1000, 2x500 and 4x 250lb bombs, as well as a Mark 13 torpedo. They are nicely cast, and the 1000lbs have some very nice thin fins. They do require a lot of clean-up, particularly where the fins attach to the bomb body. Eventually I got them all done and shot a coat of primer, revealing more work, so that was done and the primer re-shot. They were then put aside.
| COLORS & MARKINGS |
After stuffing the cockpit and masking the clear
parts, I shot a coat of a rather random Humbrol dark blue to act as a primer. A
few blemishes were fixed, but not too many, so I could quickly get that
Xtracolor Gloss Sea Blue on. My airbrush was acting up and the paint was not a
smooth as I would like, so it as polished with a cloth and toothpaste. Not
perfect either, but better. The gear parts and pylons were given a coat of this
at the same time. After a few days the green tail bit was masked off, as was the
anti-glare panel. Both were then airbrushed Humbrol green and Panzergrau
respectively. I then masked off the anti-glare panel again (to be kept matt
-should h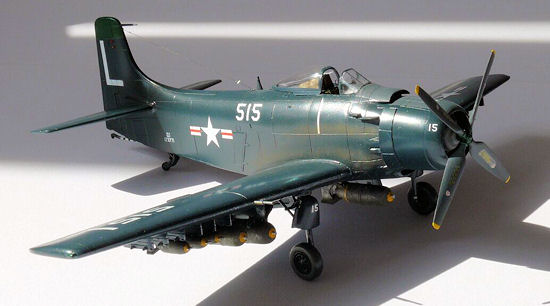 ave
sprayed that first!) and applied the decals, as the Xtracolor is gloss already.
The Eurodecals (reviewed by Scott
here)
I ordered directly from Fantasy Printshop performed well.
ave
sprayed that first!) and applied the decals, as the Xtracolor is gloss already.
The Eurodecals (reviewed by Scott
here)
I ordered directly from Fantasy Printshop performed well.
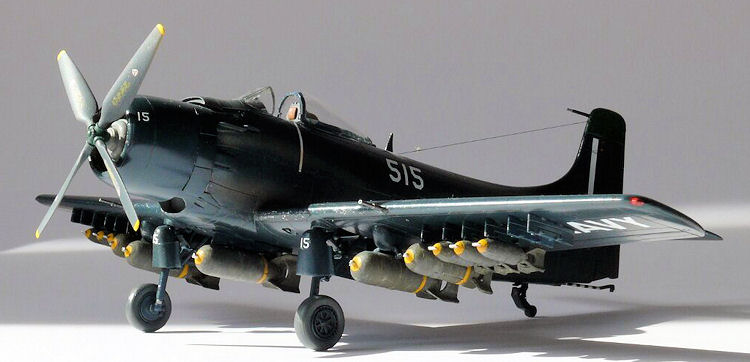
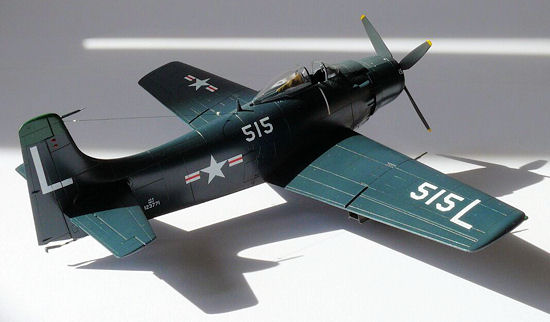
The decals themselves are good, and cover up over the white very well, but the profiles don't match the indicated versions in the text. The first, listed as an AD-4NL (so should have the extra crew compartment, door and window) is apparently, according to the serial number database, a standard AD-4. The second is no AD-4B (a standard AD-4 with a modified centreline pylon to allow nuclear weapons to be carried), but an AD-4Q (the side view has the extra doors and big air scoop, so that's correct insofar!). The other 2 options appear to match the database. I'm far from a Skyraider expert, so if building one of these you may want to check your own sources as it could very well be I am in error, too! Since I did not have the wing pylons for the AD-3, I let my girlfriend choose between numbers 1 and 4. She chose the VA-75 version, because it had the number on the fuselage, somewhat unusual for an AD-4. It had a larger green fin tip, so I had to fix that up, too. I tried washing the panel lines with black artist acrylic paint, but somehow could not get it to work. I then used a 2B lead pencil to accentuate the panel lines. After the decals were on, I shot a coat of Humbrol satin varnish to seal it all in and reduce the shine of the lead pencil lines. Finally the exhaust stains were airbrushed using leather brown, black, and grey. The lower ones could have been a bit higher, with hindsight, but I was pretty happy with them for a first time with the airbrush!
| FINAL CONSTRUCTION |
As I had kept most bits for the airframe close by
while airbrushing and weathering, all I had to do was assemble the remaining
bits: gear, wheels, wing pylons, tail hook and tail wheel. The wheels had to be
removed since the hubs could not be pushed in far enough. I could not get them
out, either, so all that was left was break off the wheels, drill the axle out,
and push the hubs out. I sanded them thinner and re-fitted them, then repaired
the paint damages -pretty much re-doing the entire wheel. I then used as brass
pin to set them in place for good. Thanks to David Hansen on Hyperscale for
pointing that little error out. :-) The remaining parts were assembled, but then
came the task of painting the bombs. I had to spray primer several times because
I was not happy
 with my
clean-up work, an finally satisfied I went to the final colours. After trying 5
times (did you count how many bombs are on the model!) to mask and spray the
bands and bombs, and failing 5 times, the Skyraider sat unloved on the shelf for
half a year... I refused to finish the last remaining bits on the aircraft
itself, knowing it would be put on display without the bombs forever!
with my
clean-up work, an finally satisfied I went to the final colours. After trying 5
times (did you count how many bombs are on the model!) to mask and spray the
bands and bombs, and failing 5 times, the Skyraider sat unloved on the shelf for
half a year... I refused to finish the last remaining bits on the aircraft
itself, knowing it would be put on display without the bombs forever!
Enter the kind folks on the ModelingMadness-forums -a thread ran on least-liked modelling jobs, and after the frustrating work done on the bombs, that ranked as my number one! However, I also felt I really needed to get those bombs done, so I could get the rest done, the airframe itself being pretty much finished. Gritting my teeth I sprayed the yellow again, cut some curved strips of tape, and masked off yellow lines. I then hand painted the rest Revell Olive Drab, carefully around the nose, and over the masking tape. Removing the masking, I was pretty happy; far from perfect but my best attempt so far. I drilled a hole in front, added some brass 1mm rod and snipped that off using cutters from my car toolbox. The resulting burr passes my muster for a fuse. I weathered the bombs using RLM79 and dinged them using a 2B lead pencil. Done at last!
Using my re-found motivation, the model was further
assembled. Exhausts were painted and cowl flaps added, not a very good fit and
kind of thick, bombs were attached and the tail hook and tail wheel well got
some PE, masking and airbrushing took care of the white/black stripes on the
hook. Another job I was not looking forward to was adding the grab handles on
the canopy. Using Clearfix, my fear turned unfounded, as I got them on in one
try... I then airbrushed the prop tips yellow, masked them, and shot the
 blades
Panzergrau. The boss was painted the same medium green as the tail fin tip, and
the whole thing glosscoated and the decals (from the kit) added. A thin wash was
flowed around the hub and the blades got a coat of flat varnish, and it was put
in the polycap that gets trapped between the engine halves earlier on. Then I
realized I still needed to add the sway braces! Of course that job would have
been much easier when the outer bombs and gear doors were not in place, but
eventually with some fiddling I got them all on.
blades
Panzergrau. The boss was painted the same medium green as the tail fin tip, and
the whole thing glosscoated and the decals (from the kit) added. A thin wash was
flowed around the hub and the blades got a coat of flat varnish, and it was put
in the polycap that gets trapped between the engine halves earlier on. Then I
realized I still needed to add the sway braces! Of course that job would have
been much easier when the outer bombs and gear doors were not in place, but
eventually with some fiddling I got them all on.
A bit of chipping on the wing leading edge and some high-traffic areas pretty much concluded the weathering -not much is showing up on GSB anyway! Final touches were the cannon barrels (only 2 cannons on early AD-4s, but later many got retrofitted with additional 20mms for a total of 4) from brass tubing and an injection needle and unmasking and attaching the canopy in the open position. The antenna wire and navigation lights were last. I took more than one beer, made pictures, and called her finally done!
| CONCLUSIONS |
Hasegawa's Skyraider builds well into a good looking replica of this iconic aircraft, even out of the box, or with a few minor tweaks like tape seatbelts or drilling out the exhausts. I have to admit I was somewhat disappointed by the lack of the proper style wheels and inaccurate decals for my particular boxing.
 With a bit
of extra work, it can also be turned into a somewhat different version, like I
did. I happen to like the Skyraider in blue, so the work was was worth the
effort. Of course early AD-6 models flew in blue as well, so that could have
been an easier way out!
With a bit
of extra work, it can also be turned into a somewhat different version, like I
did. I happen to like the Skyraider in blue, so the work was was worth the
effort. Of course early AD-6 models flew in blue as well, so that could have
been an easier way out!
I did notice that these kits are somewhat difficult to find, as I had to be patient before I found one! In the meantime I managed to scrounge up another, that will be the more common AD-6 in grey/white. Stay tuned later for that!
As far as the Pavla bombs go, they are useful since they are pretty much the only game in town, but I wasn't really impressed. Because it is so cheap, the Eduard Zoom set is still useful, even if you only pretty much only see the boarding step, canopy grab handles, and the seatbelts. For my next Skyraider I'll probably make these items from scratch, as they are not that hard to make. The Eurodecals are of excellent quality, but a bit let down by the inconsistencies in the instructions. Their pricing is also quite friendly, their shipping and handling quick and friendly, and at least they have versions that can relatively easy modified from the AD-6 base kit, unlike that Eagle Strike sheet, whose AD-1 and 2 versions require more modification than I was willing to do.
| REFERENCES |
Douglas Skyraider n Action
My own pictures taken at the AJBS airshow of the AD-4NA in France
Thanks
If you would like your product reviewed fairly and fairly quickly, please contact the editor or see other details in the Note to Contributors.