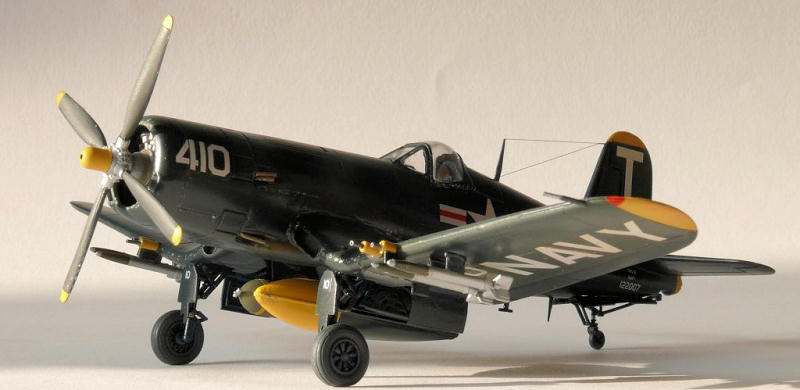
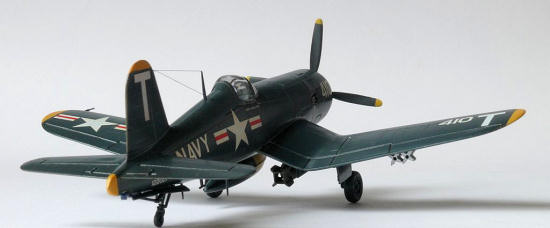
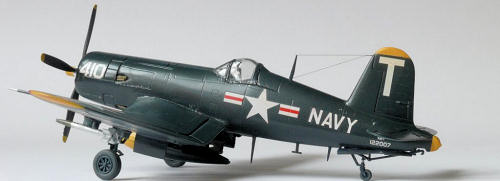
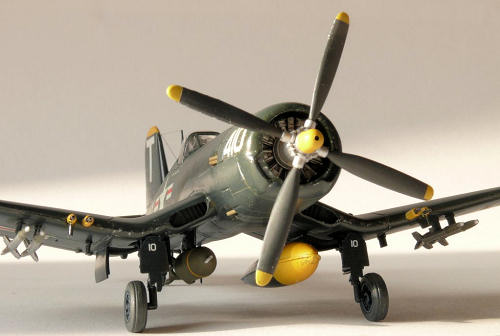
Revell 1/72 F4U-5N
| KIT #: | 04143 |
| PRICE: |
€7,99
at the local hobby shop |
| DECALS: | Two options |
| REVIEWER: | Jeroen Koen |
| NOTES: |
Revell |
| HISTORY |
Even though by 1945 it was clear that jet powered aircraft were the
future, the Navy still believed that they were too premature to be able to
safely operate in the hash conditions on an aircraft carrier. Towards that end,
the F8F Bearcat and F4U Corsair were still favoured. The F4U-5 was developed
from the F4U-4, as an high-altitude fighter powered by an 2300hp Pratt & Whitney
R2800-32W radial engine, that had an operating altitude of up to 45000 feet. The
-5 Corsair was not only faster in level flight than the preceding -4, but also
climbed better.
Three sub-versions were produced: the night fighting F4U-5N and its winterized
cousin, the F4U-5NL, the mount of the only
| THE KIT |
This kit is actually a rebox of the Italeri F4U-5N/NL Nightfighter as reviewed earlier by Drew Nix. You’ll find his review here: http://modelingmadness.com/reviews/korean/f4u5n.htm
In their boxing, in the familiar Revell side opening blue box, you'll find a
shrink wrapped bag with 3 sprues, one of which clear, a few sheets of warnings
in all possible languages, and a small assembly booklet that is printed in an A5
portrait format, with the fold at the top, annoyingly. All colours are (of
course) in Revell paints and a few require mixing, such as the 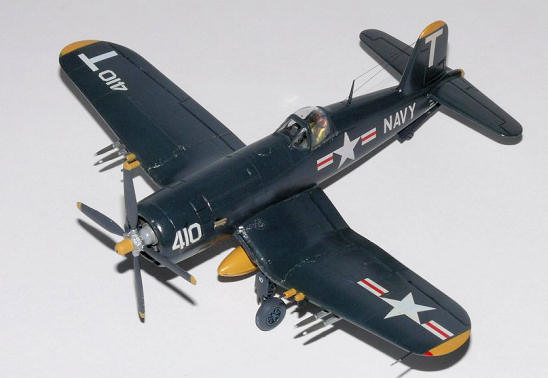
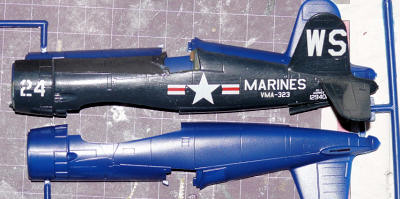
The kit itself comes on two sprues moulded in an ugly blue colour, that
came to haunt me later, and one clear sprue. It has recessed panel lines, a
rather nice interior with floor that is appropriate for the -5 Corsair, hardly
any flash, and a few ejector pin marks that are a bit unfortunate in their
placement, being in the detailed side of the gear doors and main gear struts.
Clear parts don't look really as nice as the rest, the windscreen has the frames
too wide apart which looks odd, and the main canopy is only bulged when viewed
from the side, and lacks the bulging when looked at from the front or rear.
As Drew noted, the nose is also too short. As I had a spare Italeri AU-1
in my spares box I just figured I’d use that fuselage. On the internet you can
find more details on the mix-and-mismatch of parts that unfortunately
characterizes the Italeri series of Corsairs, the -4 being the worst, the -5
better, and the AU-1/F4U-7 the best of the bunch.
Revell provides decals for 2 aircraft in overall Gloss Sea Blue, one US
Marines with VMA-232 with red trim on the tail, wingtips and spinner, the other
is the box art option, which is US Navy with VF-14, only slightly more colourful,
with yellow trim on the tail, wingtips, spinner, cannon housings and fuel tank.
The decals are printed in
Unfortunately, as the sprues are identical to the Italeri boxing, you
basically get an N/NL night fighter kit with standard -5 day fighter decals. It’s
not hard to do some modifications to correct this, the main drawback is that you
only get a fuel tank and empty wing stub pylons for things under the wings. No
centre wing pylons or other weaponry is provided, so if you want those you'll
need to raid your spares box or other kits that have unused spares.
| CONSTRUCTION |
 In this case, construction started by digging in the box-o-death to recover my
old Italeri AU-1. As I quickly ruled out using the Italeri AU-1 fuselage, due to
all the differences, mostly in the exhaust placement, construction started by
comparing both fuselages to see if the length difference is really that much to
make all the plastic surgery worthwhile. Well, there was about a 4mm difference
in length in the nose, the AU-1 being longer between the cowl flaps and wing
leading edge. That was enough to start cutting up the AU-1, freeing the
extension, and then cutting up the F4U-5 right after the cowl flaps. All parts
were then sanded straight, and a few strips of Evergreen were glued into the -5
fuselage for extra strength. I used the drawings in the Detail & Scale book as a
guide for that. I then turned my attention to the cockpit, which is pretty nice,
with raised details that are easy to paint. A bit of scratching with silver, a
wash with black+raw umber oil paints, tape seatbelts with thin UTP-strand copper
wire buckles, and a final flat coat finished up the interior bit of the kit. I
replaced the solid blue gunsight with something home-brewed from an old F/A-18
HUD. After glueing the interior to one half, and then both fuselage halves
tog
In this case, construction started by digging in the box-o-death to recover my
old Italeri AU-1. As I quickly ruled out using the Italeri AU-1 fuselage, due to
all the differences, mostly in the exhaust placement, construction started by
comparing both fuselages to see if the length difference is really that much to
make all the plastic surgery worthwhile. Well, there was about a 4mm difference
in length in the nose, the AU-1 being longer between the cowl flaps and wing
leading edge. That was enough to start cutting up the AU-1, freeing the
extension, and then cutting up the F4U-5 right after the cowl flaps. All parts
were then sanded straight, and a few strips of Evergreen were glued into the -5
fuselage for extra strength. I used the drawings in the Detail & Scale book as a
guide for that. I then turned my attention to the cockpit, which is pretty nice,
with raised details that are easy to paint. A bit of scratching with silver, a
wash with black+raw umber oil paints, tape seatbelts with thin UTP-strand copper
wire buckles, and a final flat coat finished up the interior bit of the kit. I
replaced the solid blue gunsight with something home-brewed from an old F/A-18
HUD. After glueing the interior to one half, and then both fuselage halves
tog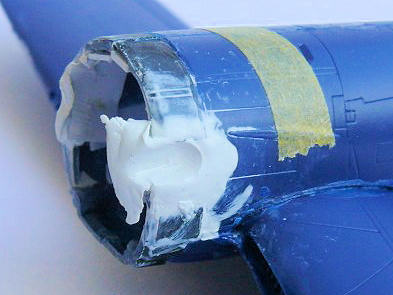 ether, I glued the oil coolers to the bottom wing and attached the upper
halves. But not before sanding the trailing edges, which are really way to
thick, a lot thinner. This would, however, have the undesirable consequence of
making the wings very hard to fit to the fuselage once that was settled. It
turned out that, after letting everything dry for a few days, the wing would not
settle square when viewed from the front. I had to glue a thin strip of
Evergreen in the fuselage, where the top of the wing fits into the recesses, and
sand the other side down, after which the wing would set properly and was glued
in place.
ether, I glued the oil coolers to the bottom wing and attached the upper
halves. But not before sanding the trailing edges, which are really way to
thick, a lot thinner. This would, however, have the undesirable consequence of
making the wings very hard to fit to the fuselage once that was settled. It
turned out that, after letting everything dry for a few days, the wing would not
settle square when viewed from the front. I had to glue a thin strip of
Evergreen in the fuselage, where the top of the wing fits into the recesses, and
sand the other side down, after which the wing would set properly and was glued
in place.
Then it was time to attach the lengthened cowling parts, but not before
I glued the clear parts on to prevent dust and dirt getting in, and masked those
off with Tamiya tape. The frames are pretty well marked, too, so after doing a
Ju88 and 188, this seemed like a breeze! The 2 frames for the windscreen are,
unfortunately too far apart, but other than replacing the windscreen, I couldn't
really figure out a solution for that, so left that as is.
I first glued the 2 original -5 cowling parts together and sanded the
mating edge straight, both when viewed from the side, and the top. Unfortunately
the parts moved a bit while drying, so I was left with a nice step on both the
top and bottom side. Since the cowling would need sanding anyway, I wasn't too
concerned, though had I been a bit more careful it would have saved me some
sanding time... After lining up and mating both the AU-1 extensions I glued it
all together with ample Humbrol tube glue, I let that settle down for a few
days, after which I tried sanding out the new exhaust cut-outs. The ones on the
-5 parts were to be too far forward, and the AU-1 parts had them too low. While
sanding I went through the plastic, and had to glue a strip of Evergreen behin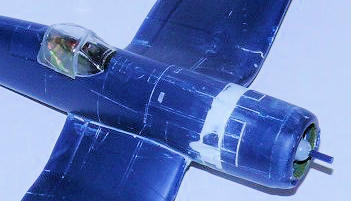 d
it. By then my Milliput had arrived, and I filled the original openings, and,
using a wetted back-end of an old brush, I sculpted the raw form of the new
cut-outs After that had all dried, I sanded the cut-outs in shape and added the
original -5 front end which I had fully done by then, including the painted up
engine, which doesn't really look like the R2800-32W it's supposed to be, and
forward cowling parts with it's 2 distinct -5 model scoops. After that had all
set up, it's just a matter of applying more Milliput and keep sanding until
everything looks OK. That kept me off the streets for a while! I also removed
the raised marks above the exhausts where the glare shields go for the
night fighter, and had to guess where all pylons and antennae would have to go
since I forgot to open up the appropriate holes for them. I also drilled the
holes for the antenna wires at this time.
d
it. By then my Milliput had arrived, and I filled the original openings, and,
using a wetted back-end of an old brush, I sculpted the raw form of the new
cut-outs After that had all dried, I sanded the cut-outs in shape and added the
original -5 front end which I had fully done by then, including the painted up
engine, which doesn't really look like the R2800-32W it's supposed to be, and
forward cowling parts with it's 2 distinct -5 model scoops. After that had all
set up, it's just a matter of applying more Milliput and keep sanding until
everything looks OK. That kept me off the streets for a while! I also removed
the raised marks above the exhausts where the glare shields go for the
night fighter, and had to guess where all pylons and antennae would have to go
since I forgot to open up the appropriate holes for them. I also drilled the
holes for the antenna wires at this time.
I
sanded the round access holes off the horizontal stabilizers, which, curiously,
are recessed on one half, and raised on the other part, so it was a matter of
sanding off the raised ones, and filling the recessed ones. These access panels
were only there up to the F4U-4. Filler was also used on all wing to fuselage
joints, the lower rear of which in particular took some heavy duty sanding.
Other than that, and the nose job, all parts fit well. Filler was also used on
numerous pin-marks in the gear struts, gear doors, and a host of oth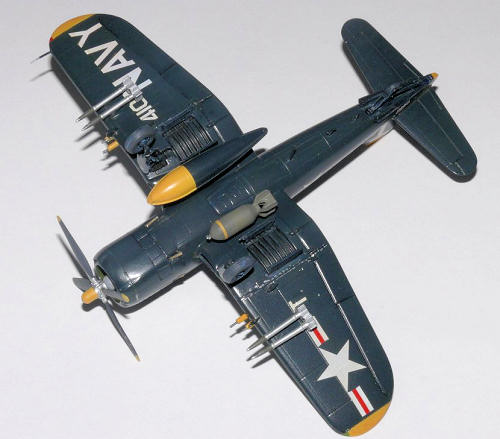 er small
parts. After filling those they were removed from the sprue and cleaned up,
along with everything else that needed primer or
er small
parts. After filling those they were removed from the sprue and cleaned up,
along with everything else that needed primer or
I also robbed the inner wing pylons and rockets off the now decapitated
AU-1; a 1000lb bomb was taken from a new unbuilt Hasegawa B-25 from the stash.
Like I said, other than I centreline drop tank no other weaponry is included.
Most pictures I found of Korea era Corsairs carried it not in the centre, but on
one of the other two pylons in the centre. I thought the asymmetric load out
looked cool, so I went with that. The cannons are also for a night fighter, with
flash suppressors, so I cut off the barrels, drilled out the holes, and made new
barrels from an 0,8mm hypodermic needle, courtesy of my girlfriend. I used a
bigger diameter for the exhaust pipes, as the kit supplied ones were now too
short after the nose job. I also attached all pylons at this time. After all
parts were removed from the sprues and cleaned up, and assembled (the main
landing gear is a 3 piece assembly that looks very good in particular), it was
time for primer.
Priming, with Humbrol #1, revealed that the nose job was pretty good, in fact, only a few scratches here and there had to be sanded. The bottom fuselage joint, and all wing joins needed further sanding, after which I re-primed the whole of it. Satisfied, I then re-scribed all lost panel lines and added new ones on my nose extension. After that, it was time for the paint shop!
| COLORS & MARKINGS |
I
first painted the areas that were to be yellow, white, then yellow, and after
they were thoroughly dry I masked them off and painted the 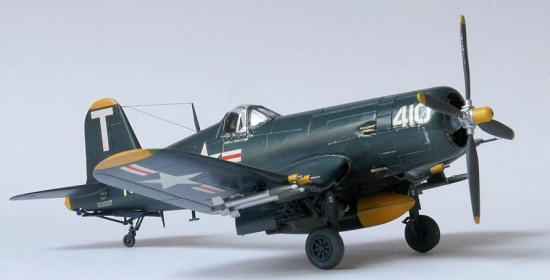 obs when building kits. De decals are quite matte and thick. They
also didn't respond to Daco Medium setting solution in any way. Pressing them
down in the rather wide panel lines made them settle down pretty good, and on
the positive side, the white covered very well over the
obs when building kits. De decals are quite matte and thick. They
also didn't respond to Daco Medium setting solution in any way. Pressing them
down in the rather wide panel lines made them settle down pretty good, and on
the positive side, the white covered very well over the
I'd read a few things about using dot filters with oil paints, so I tried that, too, after applying a satin coat first. Either I'm making a mess of things, or 1/72 is too small for it to work... I wasn't really happy so removed most of it. I then used a toothpick and some metallic paint to make subtle chips, in stippling motion, on a few areas likely to receive wear and tear, like the leading edges, cowling, propeller, and on the inner wings. I tried not to overdo it and mostly succeeded, I think! Generally these carrier based Navy Corsairs looked pretty good, unlike their heavily weathered land based Marine counterparts. I then added exhaust stains using black and light grey, masked off with knead-able eraser. I'm not really happy with them as they look too 'masked off', so I'll have too keep practising with my airbrush to free-hand them! I then painted the bomb, rockets, and a few other small parts. I also gave the landing gear, gear doors and gear bays a wash of black and raw umber oil paints, and a light drybrush with a lighter blue. The propeller, whose blades looks a bit skinny to my eyes, didn't receive the manufacturers logo's included, as a lot of -5 pictures showed them without. I then sealed it all in with a satin coat of Humbrol, and added a bit of flat clear as it was just a bit too shiny to my eye. I also added a drop or 2 of Sand to even out the finish and give it a hint of fading.
| FINAL CONSTRUCTION |
 As everything had been pre-painted and pre-finished mostly, it was just
a matter of attaching landing gear, wheels, gear doors, antennae, bomb, rockets,
and drop-tank. I gave the latter a light drybrush on it's nose, and the
toothpick-stipple-technique, but this time with blue, was also done on the ridge
of where upper and lower halves attach. The rockets had their ends drilled out,
but the fins are really thick and over-scale, and actually interfere with each
other when attaching them to their pylons. As a result, they're slightly
misaligned. Then I CA'ed the antenna wires, 0,08mm fishing wire pulled through a
black marker, then heated a bit with a soldering iron to remove the slack, and
removed the canopy masking. I then took a beer, made some pictures, wrote this
review, and called here all done!
As everything had been pre-painted and pre-finished mostly, it was just
a matter of attaching landing gear, wheels, gear doors, antennae, bomb, rockets,
and drop-tank. I gave the latter a light drybrush on it's nose, and the
toothpick-stipple-technique, but this time with blue, was also done on the ridge
of where upper and lower halves attach. The rockets had their ends drilled out,
but the fins are really thick and over-scale, and actually interfere with each
other when attaching them to their pylons. As a result, they're slightly
misaligned. Then I CA'ed the antenna wires, 0,08mm fishing wire pulled through a
black marker, then heated a bit with a soldering iron to remove the slack, and
removed the canopy masking. I then took a beer, made some pictures, wrote this
review, and called here all done!
| CONCLUSIONS |
 It's a bit of a mixed bag, this kit. On one hand it looks really good,
like the landing gear, has a decent cockpit, but on the other hand the nose is
really something that you'll see if you don't fix it. It's also odd that Revell
boxes night fighter sprues with normal day
fighter decals, resulting in a few
oddities. The lack of weaponry is also a disadvantage, but there are certain
manufacturers whose kits sell for a lot more cash... well you get the point. A
few bombs and rockets from the spares box will help out here.
It's a bit of a mixed bag, this kit. On one hand it looks really good,
like the landing gear, has a decent cockpit, but on the other hand the nose is
really something that you'll see if you don't fix it. It's also odd that Revell
boxes night fighter sprues with normal day
fighter decals, resulting in a few
oddities. The lack of weaponry is also a disadvantage, but there are certain
manufacturers whose kits sell for a lot more cash... well you get the point. A
few bombs and rockets from the spares box will help out here.
A friend of mine has the High Planes Corsair that is more accurate out
of the box, but also looks more daunting as far as fit and finesse goes, and is
more expensive as well. I guess it's up to personal preference for this one. If
I can get my hands on one of these second hand or so I might be tempted to do a
comparison in the future.
In the end, for the 8 Euro that this Italeri/Revell kit retails for, I had a lot of fun, and isn't that what this hobby is about?
| REFERENCES |
Google
Detail & Scale Corsair part 2, on late-mark Corsairs
January 2011
If you would like your product reviewed fairly and quickly, please contact me or see other details in the Note to Contributors.