| KIT #: | 87250 |
| PRICE: | 15 euros |
| DECALS: | Two options |
| REVIEWER: | Jeroen Koen |
| NOTES: | Same plastic as the F9F-2, only different box, instructions and decals. |
| HISTORY |
The Grumman Panther was the first truly competitive jet-powered fighter of the US Navy, and the first such aircraft for Grumman. The Navy was relatively late operating jet aircraft from carrier decks, since they were relatively underpowered and operating them safely with fuel and weapons proved to be somewhat challenging and also needed modification and advancement of carrier launching and recovery technology.
 Licensing the Rolls-Royce Nene, an engine that powered an
entire generation of jets, helped the Panther in this regard. Powered with the
licensed-built version of the Nene, the J-42, the F9F-2 was developed. However,
as a backup, a J-33 powered version was also put in production as the F9F-3.
Underpowered, this version could not carry external weapons, and was just in
time for the Korean War, deploying on board USS Valley Forge with VF-51, for the
-3s only combat cruise. As the F9F-2 proved to be such a success, the F9F-3 was
built in very limited quantities, and most were later re-engined with the J-42.
Licensing the Rolls-Royce Nene, an engine that powered an
entire generation of jets, helped the Panther in this regard. Powered with the
licensed-built version of the Nene, the J-42, the F9F-2 was developed. However,
as a backup, a J-33 powered version was also put in production as the F9F-3.
Underpowered, this version could not carry external weapons, and was just in
time for the Korean War, deploying on board USS Valley Forge with VF-51, for the
-3s only combat cruise. As the F9F-2 proved to be such a success, the F9F-3 was
built in very limited quantities, and most were later re-engined with the J-42.
Panthers proved very successful over Korea, but the MiG-15 was clearly a generation ahead, and air-to-air kills scored by Panthers over this aircraft were a primarily a tribute to the pilots skills. The first Navy Korean War air-to-air kill was scored when Lt(jg) Leonard H. Plog shot down a North Korean Yak-9P fighter while on a strafing mission over an airfield.
With it's four 20mm nose cannons and armed with bombs and rockets, Panthers also remained in action providing valuable ground support in both Navy and Marines service. The only export customer was Argentina, who operated them until 1965, when they were grounded due to a lack of spare parts.
Further refined into the F9F-4 and -5, post-war it was developed into the swept-wing F9F-8 Cougar, but both were quickly replaced in US Navy service by newer aircraft as the pace of aircraft development was racing forward -the Marines, on the other hand, tended to use what works, so it remained in service for a few more years in that service branch. Perhaps that is also the reason why there were no Demons, Tigers and Cutlasses in Marine service!
| THE KIT |
Unsurprisingly, given the relation between HobbyBoss and
Trumpeter, this little kit is a direct scaledown from the 1/48 F9F from that
manufacturer. As such it is moulded in a somewhat soft plastic on four sprues,
one of which clear, and also, unfortunately,
 carries over some of the mistakes
associated with the larger kit. These include the angle where the canopy meets
the windshield, the small intakes, and a few features that were on -4/5 Panthers
only. Most of this is easy to correct, though.
carries over some of the mistakes
associated with the larger kit. These include the angle where the canopy meets
the windshield, the small intakes, and a few features that were on -4/5 Panthers
only. Most of this is easy to correct, though.
All sprues, and the decal sheet, are bagged separately and the clear sliding part of the canopy has some foam taped over it to prevent damage -nice touch!
One of the things, fortunately, not carried over are the millions of divots that cover the 1/48th version, but, being a bit more simplistic in layout, it does not have the wing fold, engine, or speed brakes options of that kit either. In my case, except perhaps for the wing fold, neither is particularly regrettable. It does have nice recessed panel lines, slightly more pronounced than, say, Hasegawa, and a few lines of restrained rivets. The clear parts are nice and thin, and include the glazing for the F9F-2P photo reconnaissance version. The sprue attachment points of wings and fuselage are not on the side of the wings and fuselage, but on the mating surface, so be careful removing these from the sprues. Sink areas are visible near the internal ridges for installing the exhaust and apparently HobbyBoss uses an insert for the reconnaissance version as there are some sunken and raised areas near the nose that will require sanding and polishing. I have both the -2 and -3 kits and both have this so I presume it is not only my example?
Options include a sprue of very useful weapons, but not for
the -3! These include some very useful 100lb bombs (6x), 500lb bombs (2x) and 5
Rockets with stub pylons (6x). Since the rather underpowered -3 could not carry
external loads other than the fixed tip tanks, this sprue went straight to my
spares box to be used on my Hasegawa Skyraider. You could think of this kit as a
 Korean War weapons set with a free Panther tossed in!
The decals look like they'll cover over the dark blue well enough, though the printing looks not that sharp, and the red bars of the insignia were a bit off-register on my example. We'll see how they work. They cover 2 aircraft of VF-51, one of which is Lt(jg) Plog's Panther in which he shot down a North Korean Yak-9P. More on those markings later!
Final items to be found in the box are the instruction sheet in standard HobbyBoss pictorial layout and a full-colour A4 sheet with painting and decal instructions.
| CONSTRUCTION |
Well... what can I say? Just follow the instructions, ignore the painting indications (white wheel wells?) and make sure you glue the intake ducts on the proper side of the slot they're supposed to fit in. I started with the wing parts. Be careful with which holes you open up in the wings, as HobbyBoss will make you open up all of them, and even the better powered -2 could not carry all of that! For my -3, unable to carry external weapons, I left them alone. I did install blanking plates for the intakes, but since they are really dark, I could have saved myself the effort.
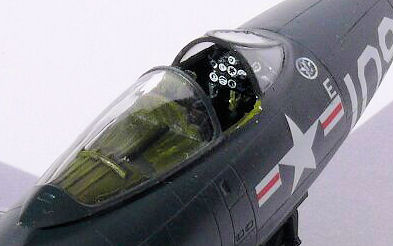 I painted most of the cockpit, including the ejection seat,
interior green, with the headrest and side consoles in black. I also made some
tape seatbelts with thin copper wire buckles, since the cockpit was to be posed
open. The consoles were dry-brushed with white to accentuate the details, and I
applied the instrument panel decal. After fitting the cockpit, nose wheel bay
(including the nose strut, destined to be broken later!), tail hook and exhaust
to the fuselage, the halves were joined and the bottom wing attached. Don't
forget nose weight (none is indicated) as it's a major tail sitter! I then
attached the upper wing parts and had to apply some filler at the root. This is
really the only place I used filler, apart from the aforementioned sink marks
and irregularities on the nose.
I painted most of the cockpit, including the ejection seat,
interior green, with the headrest and side consoles in black. I also made some
tape seatbelts with thin copper wire buckles, since the cockpit was to be posed
open. The consoles were dry-brushed with white to accentuate the details, and I
applied the instrument panel decal. After fitting the cockpit, nose wheel bay
(including the nose strut, destined to be broken later!), tail hook and exhaust
to the fuselage, the halves were joined and the bottom wing attached. Don't
forget nose weight (none is indicated) as it's a major tail sitter! I then
attached the upper wing parts and had to apply some filler at the root. This is
really the only place I used filler, apart from the aforementioned sink marks
and irregularities on the nose.
 I also filled the 2 scribed squares and the
scoops near the base of the tailfin, as these are -4/5 items. The blow doors
before it should also be rectangular, but I left these alone. When all was dry,
and seams and the bit of filler were sanded and polished, I removed the vertical
raised gun gas vents on the nose (a late addition to the Panther) and after
attaching the tailplanes, construction was basically done! I used a set of small
files to enlarge the intakes, as these are visually too small, and filled the
locating hole in the decking for the part that goes into the sliding part of the
canopy, as I wanted mine open, so it would be attached to the canopy, instead of
the decking where that hole is. I used some stretched sprue to make a simplified
canopy actuator. HobbyBoss also provides a small rod to prevent it from
tailsitting, which was installed, then cut off and sanded flush. Finally, I used
a file to modify the canopy angle. It should be 90 degrees to the sliding part,
but HobbyBoss moulded it 90 degrees to the flight angle, so it kind of eans
backwards when the Panther is on the ground. I then botched attaching the canopy
(extra thin cement drew around the edge and stained the part on both sides
-impossible to sand and polish) and had to get a second kit (the F9F-2 in this
case) and was fortunately able via my local hobby shop to obtain a new clear
sprue through the importer in the Netherlands -without cost! Thanks to both for
that, especially since I screwed up myself. Partly this is due to the way the
windshield attaches (a bit like the Tamiya Mustang clear parts), but had I been
more careful it could have been prevented. Sanding and Milliput was needed to
blend it in with the fuselage, and after that, polishing and a brushfull of
Future restored clarity. Finally I masked off those bits, painted the wheel
wells and intakes interior green, masked those, and after cleaning up the other
small parts it was ready for paint.
I also filled the 2 scribed squares and the
scoops near the base of the tailfin, as these are -4/5 items. The blow doors
before it should also be rectangular, but I left these alone. When all was dry,
and seams and the bit of filler were sanded and polished, I removed the vertical
raised gun gas vents on the nose (a late addition to the Panther) and after
attaching the tailplanes, construction was basically done! I used a set of small
files to enlarge the intakes, as these are visually too small, and filled the
locating hole in the decking for the part that goes into the sliding part of the
canopy, as I wanted mine open, so it would be attached to the canopy, instead of
the decking where that hole is. I used some stretched sprue to make a simplified
canopy actuator. HobbyBoss also provides a small rod to prevent it from
tailsitting, which was installed, then cut off and sanded flush. Finally, I used
a file to modify the canopy angle. It should be 90 degrees to the sliding part,
but HobbyBoss moulded it 90 degrees to the flight angle, so it kind of eans
backwards when the Panther is on the ground. I then botched attaching the canopy
(extra thin cement drew around the edge and stained the part on both sides
-impossible to sand and polish) and had to get a second kit (the F9F-2 in this
case) and was fortunately able via my local hobby shop to obtain a new clear
sprue through the importer in the Netherlands -without cost! Thanks to both for
that, especially since I screwed up myself. Partly this is due to the way the
windshield attaches (a bit like the Tamiya Mustang clear parts), but had I been
more careful it could have been prevented. Sanding and Milliput was needed to
blend it in with the fuselage, and after that, polishing and a brushfull of
Future restored clarity. Finally I masked off those bits, painted the wheel
wells and intakes interior green, masked those, and after cleaning up the other
small parts it was ready for paint.
| COLORS & MARKINGS |
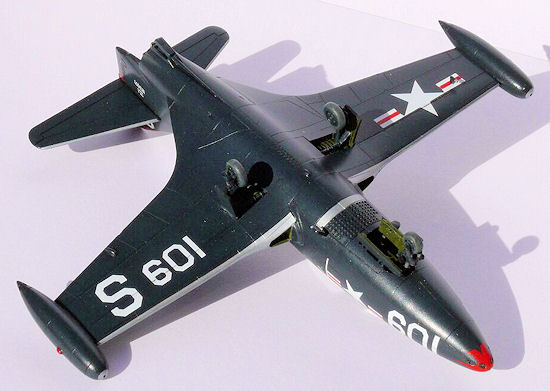 Well, easy, eh? Primer was first sprayed to
check for ill-treated seams, and as always some were found and corrected, and a
few panel lines and rivets were restored. A thin second coat of primer showed
much more promise, so I set about how to paint this thing. First the red and Corrogard bits, or the reverse? In the end I opted for the reverse, so the whole
thing was painted Gunze Midnight Blue. To break up the large blue expanse I
lightened some of the blue with Tamiya Sky Grey and post-shaded a bit on the
wing and fuselage around the wing root. Only under good lighting this shows up,
and that's exactly as I intended.
Well, easy, eh? Primer was first sprayed to
check for ill-treated seams, and as always some were found and corrected, and a
few panel lines and rivets were restored. A thin second coat of primer showed
much more promise, so I set about how to paint this thing. First the red and Corrogard bits, or the reverse? In the end I opted for the reverse, so the whole
thing was painted Gunze Midnight Blue. To break up the large blue expanse I
lightened some of the blue with Tamiya Sky Grey and post-shaded a bit on the
wing and fuselage around the wing root. Only under good lighting this shows up,
and that's exactly as I intended.
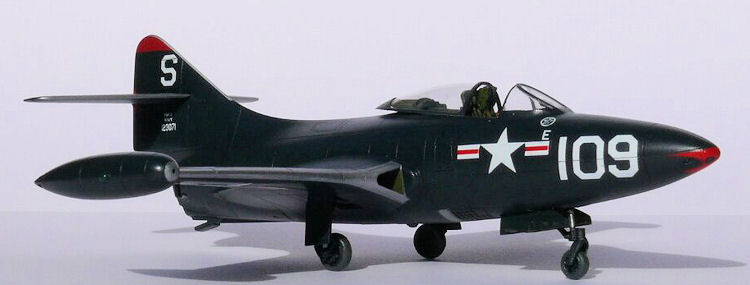
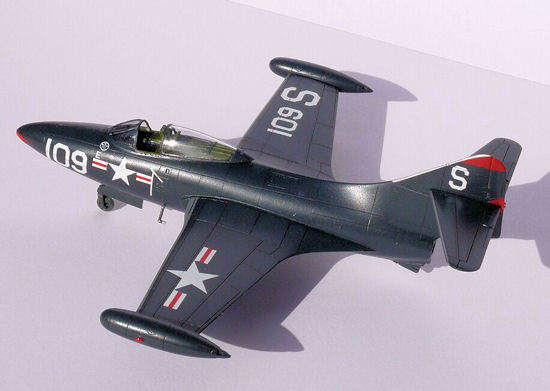
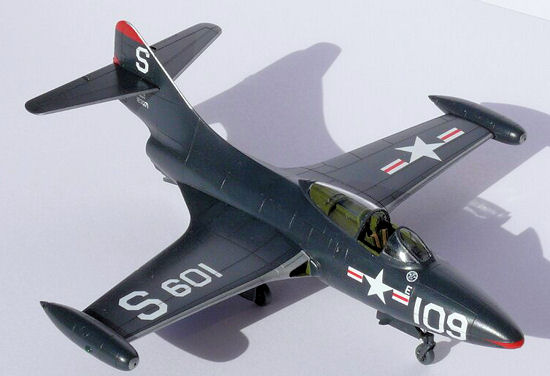
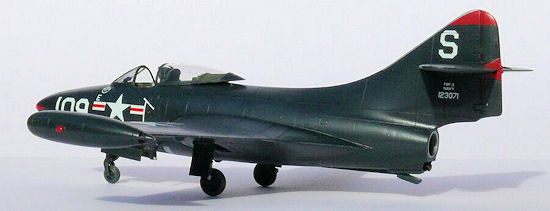
I then matched red paint to the nose flash decal and painted the tail fin tip and the triangular bit around the elevators. That bit was shown in the instructions of the Victory 1/48th decal sheet, and a bit of Google showed a PDF document on this particular Yak-killing jet, including a rather unclear, but very useful, photo. (A link is provided on the bottom of the article) A bit of juggling with numbers and some spares box decals would get me something close, but first I had some more painting to do. The photo showed that the Corrogard areas were much smaller on these early Panthers so I masked and painted those, and had to guesstimate a bit around the intakes, as the photo showed it with the wings folded. Looking at other early VF-51 Panthers, I think I could have made them even narrower, especially around the intakes. I painted these using Revell Aqua aluminium, which looks quite good for that.
After that I went to work on the decals, since the Gunze paint
is gloss. These are of good quality to work with, but like I wrote earlier, the
printing isn't really great, but they do cover very well over the blue. Using my
Google-found-photo, enlarged in Gimp, and printed, I applied the markings as
best as I could. I used the larger wing numbers for the oversized nose numbers,
discarded the victory markings, and used the included VF-51 unit badges near the
windshield instead. The small white came from decal remnants of my Revell 1/72 (Italeri
rebox) F4U-5 Corsair. The fuselage insignia should be higher than HobbyBoss
indicates. The Navy and VF-51 texts on the rear fuselage weren't there, so these
weren't used as well. The small 9 on the tail was also missing, and so it is on
my model. The S on the tailfin is too small, but I did not have another, so I
used what came with the kit, and kind of cheated by making the red fin tip a bit
larger. Turning to the wings, I cut up the 06 of the other option and reversed
the 6 to make a
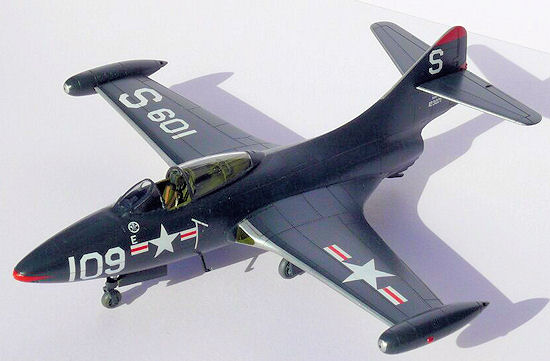 9. The S on the wings are too large (also too large for use on
the tailfin, by the way!), but, again, I had to make use of what I had. The
photo I had clearly showed that 109S was carried in the same style top and
bottom (so no Navy text there, either) so I followed that. The final decals
added were the 2 parts of the nose flash. I could not confirm this from the
rather poor photo, but thought it looked nice, so I added it. It turned out
brighter than I thought -forcing me to mask and re-paint the red bits on the
tail, on an already decalled model! Fortunately, Parafilm works really well for
this, and no harm to the decals was done. Finally, some that would not settle
properly (like the nose flash) were given a dose of Daco Medium, which they
resisted, but after reading a tip from Scott about Mr. Mark softer on HB decals,
I used that and got great results, even on the nose flash that has to follow
some really odd contours. After glosscoating in preparation for the panel line
wash, the markings blended in really well. I then used Payne's Grey artist
acrylic paint for a wash to accentuate the panel lines, and shot a coat of
Revell Aqua acrylic varnish, mixed flat/gloss in a ratio of 50/50 for a not
quite gloss final coat, but more dull than true satin varnish.
9. The S on the wings are too large (also too large for use on
the tailfin, by the way!), but, again, I had to make use of what I had. The
photo I had clearly showed that 109S was carried in the same style top and
bottom (so no Navy text there, either) so I followed that. The final decals
added were the 2 parts of the nose flash. I could not confirm this from the
rather poor photo, but thought it looked nice, so I added it. It turned out
brighter than I thought -forcing me to mask and re-paint the red bits on the
tail, on an already decalled model! Fortunately, Parafilm works really well for
this, and no harm to the decals was done. Finally, some that would not settle
properly (like the nose flash) were given a dose of Daco Medium, which they
resisted, but after reading a tip from Scott about Mr. Mark softer on HB decals,
I used that and got great results, even on the nose flash that has to follow
some really odd contours. After glosscoating in preparation for the panel line
wash, the markings blended in really well. I then used Payne's Grey artist
acrylic paint for a wash to accentuate the panel lines, and shot a coat of
Revell Aqua acrylic varnish, mixed flat/gloss in a ratio of 50/50 for a not
quite gloss final coat, but more dull than true satin varnish.
| FINAL CONSTRUCTION |
As the Aqua is an acrylic, it dries very quickly. I then added
the gear legs and wheels, gear doors (insides painted interior green and given a
wash with Payne's Gre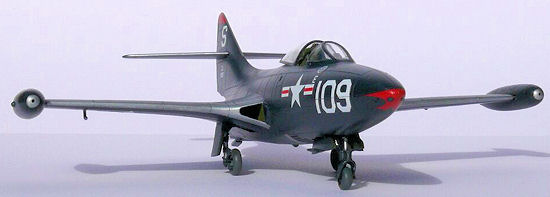 y as well, but not before sanding the main gear doors a bit
thinner on top to get them to fit between the wheel well and gear strut), and
while fitting the nose wheel I finally managed to break the nose gear leg,
which, amazingly, I had managed not to do throughout construction, painting, and
decaling! Repairing this, and adding the underwing pitot and boarding step,
removing canopy masking, cleaning up tape residue from that, and a few minor
touch-ups here and there took some time too. I painted the (oversized)
navigation lights with gloss paints, and that was about it as far as the little
Panther is concerned.
y as well, but not before sanding the main gear doors a bit
thinner on top to get them to fit between the wheel well and gear strut), and
while fitting the nose wheel I finally managed to break the nose gear leg,
which, amazingly, I had managed not to do throughout construction, painting, and
decaling! Repairing this, and adding the underwing pitot and boarding step,
removing canopy masking, cleaning up tape residue from that, and a few minor
touch-ups here and there took some time too. I painted the (oversized)
navigation lights with gloss paints, and that was about it as far as the little
Panther is concerned.
The last action was to add the interior part of the sliding canopy to the clear part, and attach the sliding part to the model using Clearfix. Satisfied, I took some pictures, had a beer, and called her done!
| CONCLUSIONS |
A nice, well fitting, little kit with nice panel details, well detailed cockpit, gear, wheels, and wheel bays. Unfortunately it inherited the same annoying little errors as it's larger brother. Most aren't really hard to fix, and especially the canopy and intake filing really makes a difference. The decal research is rather poor, they're based on some old profiles from books, and I'm surprised there are so few aftermarket decals for this neat little kit, and most of those are probably from when the Hasegawa kit was new.
| REFERENCES |
Mr. Thomasons blog: http://tailspintopics.blogspot.nl/2011/05/172nd-f9f-2-panther.html
Article on this particular Panther, with the aforementioned photo:
Jeroen Koen
October 2012 If you would like your product reviewed fairly and
fairly quickly, please
contact
the editor or see other details in the
Note to
Contributors.