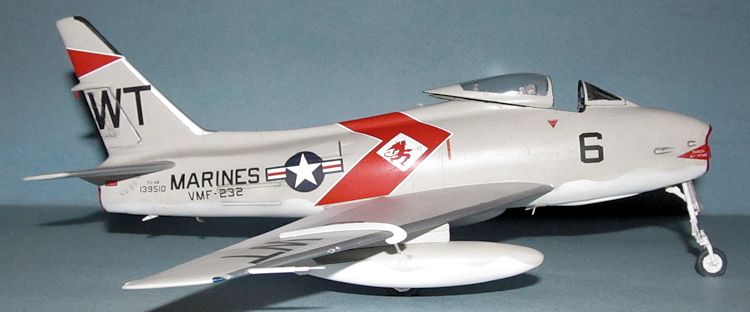
Grand Phoenix 1/48 FJ-4B Fury
| KIT #: | 003 |
| PRICE: | $49.95 SRP |
| DECALS: | Three options |
| REVIEWER: | Dan Lee |
| NOTES: |
Includes resin parts and photo etch
parts.
Also used Airwaves 48022 and SAC FJ-4B Fury landing gear (for Hobby
Boss) |
| HISTORY |
The FJ Fury
series was originally a straight winged naval fighter designed and built by
North American Aviation which was the basis for the F-86 Sabre.
The later marks of the Fury added swept wings (based on the F-86 wing),
more powerful engines and capability for nuclear weapons, Bullpup ASMs and
Sidewinder AAMs.
In 1955, the
FJ-4 Fury was exclusively delivered to USMC fighter squadrons.
It contained 50% more fuel than the FJ-3 series as well as four
hardpoints. The FJ-4B fighter
bomber variant with six hardpoints and nuclear weapons capability flew both with
the Navy and Marines until the early 60s when they were replaced by the F-8
Crusader or F-4 Phantom.
 The Squadron
VMF-232 “Red
Devils” started off life as VF-3M on Sept 1, 1925.
It would serve in San Diego, China with the Marine Corps Expeditionary
units as well as Guam and Hawaii while under many different designations
(VF-10M, VF-6M, VF-10M again, and VF-4M) until July 1, 1937 when it was
designated VMB-2 and converted into a light bomber squadron.
It was sent to Hawaii again in 1941 and then redesignated VMSB-232 on
July 1st assigned SBDs, and adopted the Red Devil Insignia at that time.
The Red
Devils would lose men and planes during the Pearl Harbor attack and as well as a
detachment that was stationed on Wake Island.
In July/Aug of 1942, the Red Devils along with VMF-223 were embarked on
the USS Long Island and sent as the first air component (as part of the 1st
Marine Air Wing and Marine Air Group 23) of Operation Watchtower, the Allied
invasion of Guadalcanal. On August
20, 1942, Major Richard Mangrum led VMSB-232 off the USS Long Island to its home
for the two or so months, Henderson Field.
VMSB-232 served during the early desperate days of the Guadalcanal
campaign under same miserable conditions as the infantry.
By the time VMSB-232 left Guadalcanal on Oct 14, 1942, Squadron CO Dick
Mangrum was the only pilot of VMSB-232 to leave Guadalcanal under his own power
as the rest were killed, wounded or evacuated for medical reasons.
VMSB-232
returned to the US, redesignated VMTB-232 and given Avenger TBFs.
They served in the Solomons, the island hopping battles and at Okinawa
performing close air support and long range strike missions till the end of the
war in Aug 1945. In Nov of 1945,
VMTB-232 was deactivated.
On June 3
1948, VMF-232 was activated as a Marine Reserve Fighter Squadron flying F-4U4
Corsairs and in 1953 were given F-9F Panthers.
The Red Devils were sent to Hawaii and assigned to fly the FJ Fury series
which they flew till 1959 when they were given F-8 Crusaders and redesignated
VMF(AW)-232. They were sent to
Vietnam and later assigned F-4 Phantoms.
In 1973, the Red Devils were the last USMC squadron to leave South
Vietnam and returned to Japan.
In 1989,
they transitioned to the F/A-18 Hornet which they have been flying ever since
surviving the various squadron drawdowns.
Info from
Wikipedia.
| THE KIT |
Here is Tom Cleaver’s preview of the kit.
| CONSTRUCTION |
 It was the
easiest kit ever and didn’t give me any problems whatsoever.
I don’t know what anyone is talking about.
The Grand Phoenix FJ-4B is up there with Tamiya’s best kits.
It was the
easiest kit ever and didn’t give me any problems whatsoever.
I don’t know what anyone is talking about.
The Grand Phoenix FJ-4B is up there with Tamiya’s best kits.
Of course,
I’m making that up.
I started by
cleaning and removing the resin parts from their casting blocks.
Aside from cutting my hand due to clumsy use of a hobby saw, there wasn’t
any issues. The cockpit parts were
painted (dark gull grey mostly) and glued together.
The PE parts were painted and added.
The GP Fury
is everything people have said it is.
Not many parts fit well and when they were glued together there were lots
of gaps. I test fit the fuselage
many many many times and discovered to my dismay that in my copy the port side
fuselage half was warped and slightly undersized.
I ended up having to add a lot of internal braces for the wings, the tail
hook piece, and the cockpit or things would shift/sink, etc.
My plan was
to seal everything up based on what I read and being the sort who wanted to take
the easy way out I did not add the intake (which I broke when I tried to adjust
it to fit the intake lip), the wing or mid fuselage wheel wells and the non
visible part of the nose wheel well.
This is why the wings went together for me without much fuss.
 The fuselage
took a lot of Tamiya Extra Thin glue and clamps to get it to fit together.
I decided that I would line everything up from the top of the fuselage
and tail which meant that I was going to butcher the underside.
I also discovered that the intake lip didn’t fit well either.
After that I threw the parts into a box to let the glue cure and reduce
the chance of getting phantom seams.
It sat in the box for at least two weeks.
The fuselage
took a lot of Tamiya Extra Thin glue and clamps to get it to fit together.
I decided that I would line everything up from the top of the fuselage
and tail which meant that I was going to butcher the underside.
I also discovered that the intake lip didn’t fit well either.
After that I threw the parts into a box to let the glue cure and reduce
the chance of getting phantom seams.
It sat in the box for at least two weeks.
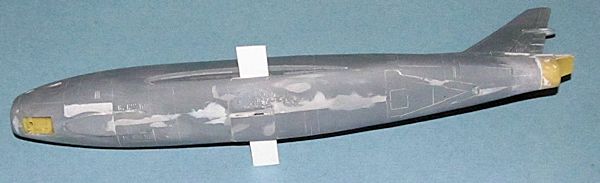
Once the
Tamiya Extra Thin glue cured, I had to deal with the ugly deep gaps everywhere.
Most of the underside was covered in CA glue thanks to the gaps.
It took several hour long sessions of sanding/filling with various
fillers (CA glue, Tamiya white fine primer from the bottle, Squadron Green
Putty, Mr Surfacer 500 & 1000 and Epoxy) to get everything smooth and relatively
flawless. My plan
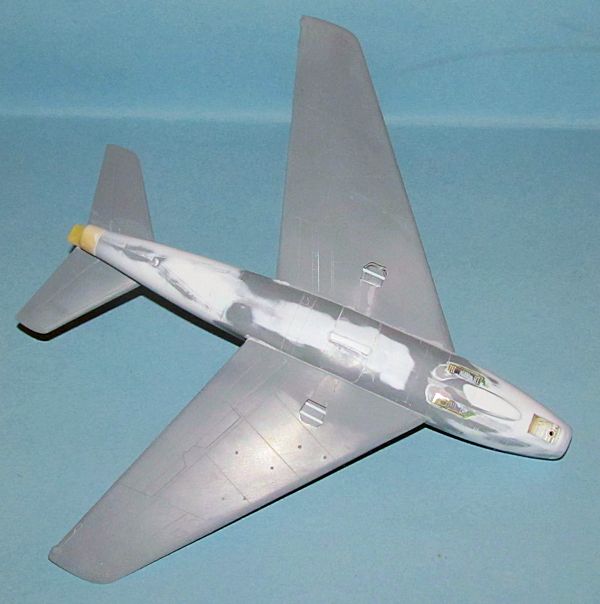 was to rescribe
the surface first and then put down a coat of Tamiya Fine White Primer from the
spray can. Winter had just started
so there was no way I was going to prime it (I do all my really toxic painting
in the unheated garage) and I threw everything in the box to wait for the
spring.
was to rescribe
the surface first and then put down a coat of Tamiya Fine White Primer from the
spray can. Winter had just started
so there was no way I was going to prime it (I do all my really toxic painting
in the unheated garage) and I threw everything in the box to wait for the
spring.
During the
break, I went back and re-read several reviews.
One thing that I missed the first time was someone made the point that
the main landing gear struts were a touch flimsy.
I did a review of the assembly and realized that the writer had a point.
I had build similar landing gear and had a lot of grief with it so I did
a quick search at Roll Models and found the SAC white metal landing gear for the
Hobbyboss kit and the Airwaves PE set for the GP Fury.
I ordered both.
In February,
there was a break in the cold winter and I was looking at clearing my shelf of
doom so I pulled out the GP Fury and started rescribing it.
Once that was done, I added the wings using Tamiya Extra Thin Glue and CA
glue.
There were
some seriously ugly gaps between the wings and fuselage that took two
applications of Mr Surfacer 500 and Vallejo Plastic Putty to fix (the excess
removed with Q-Tips dipped in lacquer thinner.)
I ended up having to sand the underside to remove any deep depressions.
It wasn’t till a little bit later that I realized that the starboard wing
was a one or two degrees off horizontal.
It’s not horrible but it is noticeable if you stare at it long enough
which I had done many times due to being seriously frustrated.
I rescribed all the detail that I rescribed the first time.
I added the
stabs and cut some 5 thou thin plastic card cut to size and glued them just
ahead of the exhaust to represent the vortex generators.
 I assembled
the fuel tanks and used the PE fins instead of the undersized kit ones.
There was a lot of sanding and filling done as the pieces had a fit even
worse that the plane.
I assembled
the fuel tanks and used the PE fins instead of the undersized kit ones.
There was a lot of sanding and filling done as the pieces had a fit even
worse that the plane.
Lastly, I noticed the PE grills in the Airwaves set that go next to the nose landing gear doors and thought it would be a good idea to add them instead of rescribing. That was a mistake. Even though I ground out enough of the plastic the PE grills wouldn’t sit down on the plastic well so I had to add a lot of filler to smooth them into the surface. It took several rounds of sanding/filling with various fillers to get them to look okay and then rescribing what I ground away. I did this between priming the model several times.
| COLORS & MARKINGS |
The model
was primed (as mentioned in the construction section) several times with Tamiya
Fine White Primer. Unfortunately,
this was due to the fact that each primer coat uncovered flaws that needed to be
fixed. When the primer coat was
done to my satisfaction, the leading edges were sprayed with Tamiya Old Leaf
Silver from the spray can.
Once dry,
the leading edges were masked off with Tamiya tape and the model was preshaded
using RLM66, and flat black (from leftover paint after painting other models.)
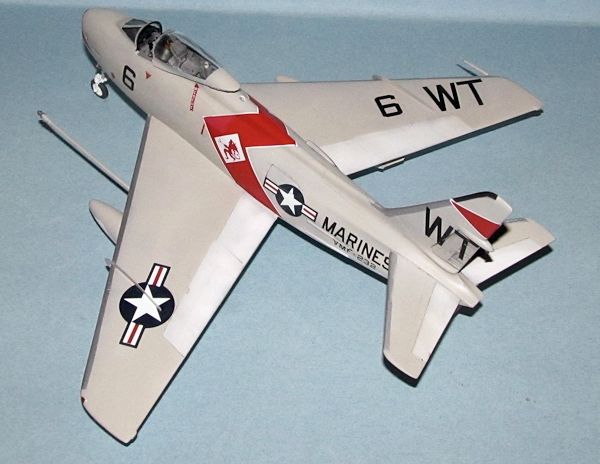
The underside was painted three thin coats of Tamiya flat white.
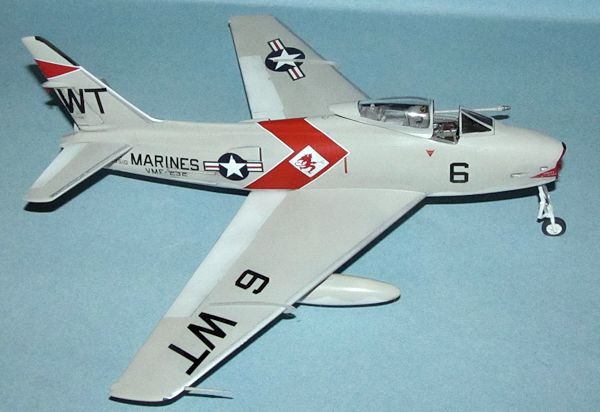
After the white was dry, the underside sections and topside flaps and
ailerons were masked off and then the topsides were sprayed Gunze Gloss Light
Gull Grey.
 The fuel
tanks and refueling probe were painted both colors so there was a bit of masking
involved. Some touch ups were
required for those parts but that was no big deal.
The fuel
tanks and refueling probe were painted both colors so there was a bit of masking
involved. Some touch ups were
required for those parts but that was no big deal.
The intake
lip was then masked off and sprayed Tamiya Gloss Red.
Grand Phoenix supplied the decals, but it has been my habit to prefer to
mask and paint on a complex curve than use a decal.
I normally would have used Insignia Red, but the warning decals were done
in red instead of the darker insignia red.
I had to do
some touch ups on the model because the paint lifted from the masking tape.
The plane
then got a final coat of Tamiya gloss to smooth the surface out for the decals.
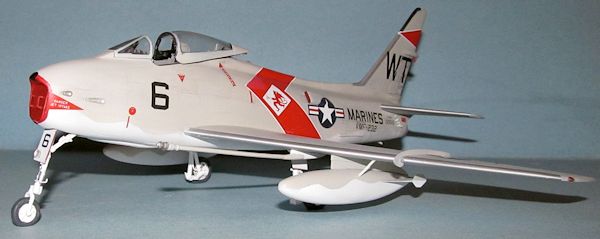
I selected
the VMF-232 markings from the kit decal sheet.
I know that this is wrong for a FJ-4B as I read Tom Cleaver’s review as
well as checked the serial numbers.
However, I wanted to do a Red Devil plane and I wasn’t going to do all the
modification to convert a FJ-4B into a FJ-4.
The decals went on the model and I only had one issue.
I tore the port red fuselage slash and thought I had lined it up, but the
decal shifted a little bit and I had a very visible tear.
I fixed it by masking that area with post-its and sprayed it with a thin
coat of Tamiya gloss red.
Weathering
and Final Coat
I did a
little bit of weathering using a dark watercolor wash mostly on the underside.
The excess wash was removed with Q-Tips.
When the plane was fully assembled, I sprayed on two light coats of
Vallejo Flat varnish.
| FINAL CONSTRUCTION |
I crammed
four 1/8 oz weights into the nose which turned out to be another good reason to
not use the intake parts. I would
have used a single 1/2 oz weight, but it was too large for the intake opening.
I glued them in place with some CA glue.
The landing
gear was added. I added 1/8” thick
plastic strip between the mounting pegs of the metal landing gear to provide a
stable base for the legs to sit on as I didn’t add the resin wing wheel wells.
I added brake lines made from 30 gauge wire as pe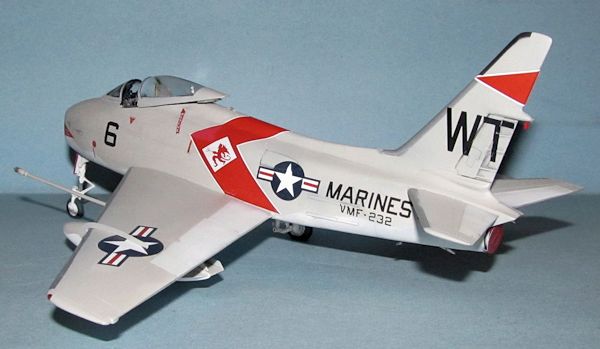 r the Scale and Detail
photos and glued it on with CA glue.
The three landing gear legs painted flat white, the nose oleo was covered
with aluminum foil using Micro Foil Glue and the landing gear was glued onto the
Fury with CA glue. The wheel hubs
were painted at the same time as the plane and the tires were hand painted using
RLM 66.
r the Scale and Detail
photos and glued it on with CA glue.
The three landing gear legs painted flat white, the nose oleo was covered
with aluminum foil using Micro Foil Glue and the landing gear was glued onto the
Fury with CA glue. The wheel hubs
were painted at the same time as the plane and the tires were hand painted using
RLM 66.
The kit
refueling probe doesn’t look like one used by the Fury so I cut off the old
probe and replaced it with one from a wrecked RM F-100 Super Sabre.
The probe was painted and then it was glued in place.
Next the
fuel tanks were glued on with CA glue.
The fuel tank supports were made from plastic rod and super glued to the
fuel tanks and wings.
I then
painted a piece of plastic rod red, cut it to length and glued it to the tail to
represent the fuel dump and a drop of white glue was used to represent the tail
light.
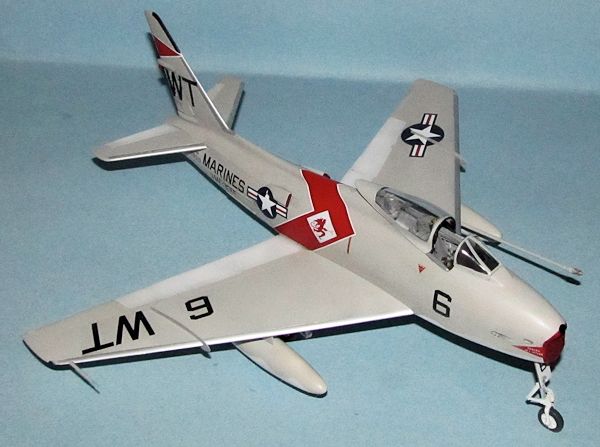
The canopy
parts were masked and painted at the same time as the plane.
I used the PE canopy rails and canopy frames from the Airwaves set and
the rear canopy deck came from a wrecked F-86 Sabre.
All the canopy bits were to each other and to the fuselage using white
glue.
I replaced the landing gear doors and wing fences with the PE parts from the Airwaves set. All the parts were painted based on photos from various walk arounds and attached to the model with CA glue.
| CONCLUSIONS |
The GP FJ-4B is a beast of a kit and I don’t recommend it to anyone except those who want a challenge (seriously, the Hobby Boss FJ-4 series is the better choice by far.) If you do build one then I do recommend the Airwaves PE set and the SAC landing gear as they fix some of the problematic detail parts of the GP Fury.
May 2013
If you would like your product reviewed fairly and fairly quickly, please contact the editor or see other details in the Note to Contributors.