| KIT #: | H-211 |
| PRICE: | $10.00 |
| DECALS: | One option |
| REVIEWER: | Torben Plesberg |
| NOTES: | Flygvapnet edition |
| HISTORY |
The PBY Catalina is probably the best known flying boat in the world. Consolidated Aircraft developed the type to fulfil a military specification for a patrol bomber. The construction is using a parasol wing to get the engines well above the sea. The aircraft is slow, economical cruising speed being a modest 200 km/h. More important, however, was its ability to stay airborne for up to 24 hours. During WWII the Catalina got immortal because of its success as a SAR-plane. Air men who ended in the sea far from land were happy, when they spotted a Catalina, because this meant that they would be picked up and flown back to their base.
The Catalina also served with distinction as a reconnaissance bomber. As an ASW aircraft the Catalina played a major role in the Pacific and Atlantic Theaters of war. 40 submarines were destroyed by Catalinas, and it was a RAF Coastal Command Catalina that spotted the Bismarck in the Atlantic, and thus made it possible for the Royal Navy to eliminate this very serious threat to convoys.
The Catalina served with the US Navy, the US Army Air Forces, the RAF, the RCAF and the RAAF. It was produced from 1936 to 1945, and more than 4000 were built, mainly in the USA and Canada, but a number was also produced in the Soviet Union.
After the war the amphibious versions of the Catalina continued service with US forces and many other smaller air forces, among these Denmark (16 aircraft), Norway (21) and Sweden (3). Many Catalinas were modified as flying water bombers to fight against forest fires. And some of these are still flying – 2016!
 In Sweden the SAR service
appeared by chance so to say, as a German Dornier Do 24 T escaped to Sweden late
in 1944. It was a rather new plane, and Sweden negotiated with Germany about
purchasing the DO 24T. Flygvapnet got the DO 24, and was now able to do SAR
missions, mainly in the Baltic. Flygvapnet realized that a single SAR-plane was
not sufficient, and in 1947 three CANSOs were bought from Canada. The PBY-5As
were modified for SAR missions only: no armament, six stretchers, seats for a
doctor and a nurse and a crew of five: two pilots, a navigator, a sparks and a
mechanic. The big waist blisters were removed, and large upwards opening doors
with small blisters were built in. This modification would facilitate getting
people on board from the sea.
In Sweden the SAR service
appeared by chance so to say, as a German Dornier Do 24 T escaped to Sweden late
in 1944. It was a rather new plane, and Sweden negotiated with Germany about
purchasing the DO 24T. Flygvapnet got the DO 24, and was now able to do SAR
missions, mainly in the Baltic. Flygvapnet realized that a single SAR-plane was
not sufficient, and in 1947 three CANSOs were bought from Canada. The PBY-5As
were modified for SAR missions only: no armament, six stretchers, seats for a
doctor and a nurse and a crew of five: two pilots, a navigator, a sparks and a
mechanic. The big waist blisters were removed, and large upwards opening doors
with small blisters were built in. This modification would facilitate getting
people on board from the sea.
The TP 47 Catalina served with Flygvapnet until 1966, when the two surviving aircraft were succeeded by helicopters. The Catalina that did not survive was shot down in June 1952 by a Soviet MiG 15 over the Baltic. The Catalina was searching for possible survivors from a Flygvapnet C-47, which disappeared on a mission the day before. The shooting down of the Catalina was watched from a German merchant vessel, the Münsterland, the crew of which saved the Catalina crew before the aircraft disappeared under the Baltic waves.
The C-47 was located in 2003 after three years of intensive searching. In 2004 the wreckage was salvaged by the HMS Beloss (of the Royal Swedish Navy). The investigation of the holes in the C-47 concluded that the plane was shot down by a MiG 15 fighter. However, this was not a piece of news: In 1991 during a meeting between the Soviet leader Nikita Chrusjtjov and the Swedish PM Tage Erlander, Mr. Chrusjtjov admitted that the C-47 was shot down by a Soviet fighter!
The C-47 did not violate Soviet air territory, but the plane might have been too close to the brand new Sverdlov heavy cruiser. A mystery was that only four of the eight crew members were found in the wreckage. What happened to the other four crew members? The wreckage of the C-47 can be seen in the Swedish Air Force Museum at Malmslätt.
| THE KIT |
The kit comes in a nice sturdy box with a picture of two “black Cats” in action over the sea, and it was released in 1969. There are 5 (?) sprues in black styrene and a small sprue with transparencies. The instructions is one large sheet to fold out, and containing a short story of the Catalina, eleven exploded views, each with the necessary steps and list of numbered parts to assemble the model correctly. And there are some suggestions how to paint some details of the model – IF you want to paint the model! It seems that Revell did not expect anyone to paint the model. The plastic is black, and this is the color of this particular model! The colors suggested by the instructions are: light green – interior parts, light grey – engines, silver – undercarriage legs and wheel hubs and pitot-tube, and yellow – propeller tips.
The decal sheet is rather sparse with one option only. It consists of 4 US national markings, two for the wings, and two for the fuselage, and two markings for the top of the fin and rudder.
 The quality of the parts is
good for its time, actually the best. Almost all parts fit perfectly together.
An exception is one of the wing struts, which is about 3 mm too long. However,
this is better than if it was too short! The plane can be made with
undercarriage up or down, and wing tip floats up or down. The cockpit is rather
sparse with only a couple of seats and steering columns. The blister area is
without any detail inside. The overall dimensions are correct within a few mms.
When the wing tip floats are up, there is a 2 mm gap between the wing and the
floats. This gap should not be there. The fin and rudder are too thick in the
top. The rivets should be sanded down, and the raised panel lines, too. The
wings are finely detailed, and it is easy to see, where the fabric covering is!
The quality of the parts is
good for its time, actually the best. Almost all parts fit perfectly together.
An exception is one of the wing struts, which is about 3 mm too long. However,
this is better than if it was too short! The plane can be made with
undercarriage up or down, and wing tip floats up or down. The cockpit is rather
sparse with only a couple of seats and steering columns. The blister area is
without any detail inside. The overall dimensions are correct within a few mms.
When the wing tip floats are up, there is a 2 mm gap between the wing and the
floats. This gap should not be there. The fin and rudder are too thick in the
top. The rivets should be sanded down, and the raised panel lines, too. The
wings are finely detailed, and it is easy to see, where the fabric covering is!
| CONSTRUCTION |
I started to assemble the kit in 1970. It was my intention to do a Danish PBY-5A with gear up and floats down and place the model in a nylon wire under the ceiling. However, for some reason I did not finish the project. The fuselage was completely assembled with tail plane and closed nose wheel doors glued in place. The wing was also assembled, and likewise the cowlings with engines and propellers.
In the end of September this year (2016) I found the fuselage and the wing of the half- finished Catalina, and the rest of the parts were found in some different places in my stocks, most of the parts in the original Catalina box, including the instructions. I decided it was about time to finish the model now!
However, the project did
change: I found no challenge in making a Danish Cat out of the box. A Swedish
Cat would be a challenge, because it is not a standard Cat. For the
documentation I had some good ph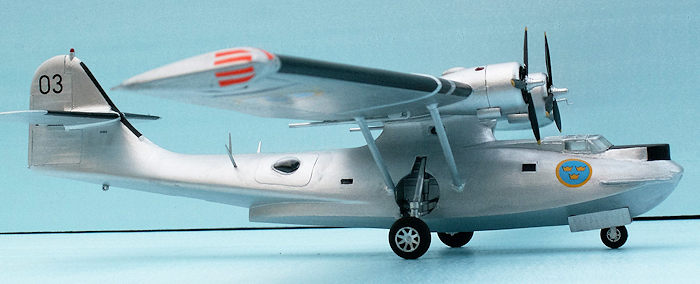 otos of the 001 taken at Malmslätt in 1962 and
1994. Besides there was Karlström’s drawing illustrated by some fine photos of
the Swedish Cats, which actually are CANSOs built by Canadian Vickers.
otos of the 001 taken at Malmslätt in 1962 and
1994. Besides there was Karlström’s drawing illustrated by some fine photos of
the Swedish Cats, which actually are CANSOs built by Canadian Vickers.
I wanted my Swedish Cat to stand on the ground, exactly as I saw it at Malmslätt in 1962. The first thing to do was to remove the big waist blisters and the nose wheel doors from the assembled fuselage. This should be done very carefully to avoid any damage. The blisters came off using a small knife and they were intact. The wheel doors were more difficult and only one of them was without damage. The damaged wheel door lost a corner to the rear, and the fuselage lost a small piece which was glued too hard to the door. I repaired the fuselage and the wheel door, and it would now be possible to glue both of the wheel doors in open position. However, the nose wheel should be in place before that. According to the instructions the nose wheel should be glued in place BEFORE the assembly of the two fuselage halves. I had to find an alternative way of fixing the nose wheel! But this problem was a part of the nose configuration and nose weight problem. Actually a challenge!
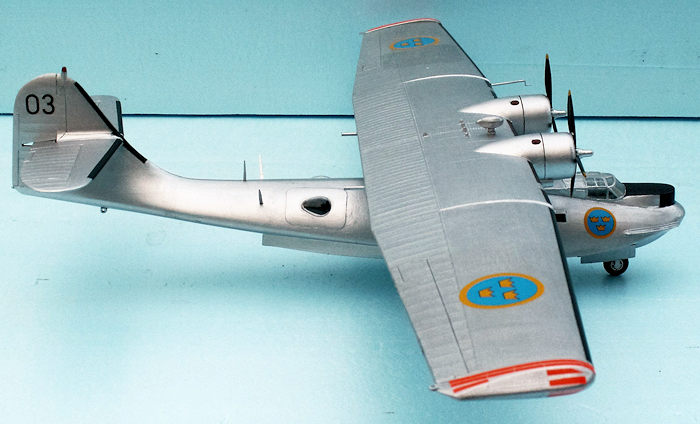
The nose turret had to be removed, and this could not be done in the same way as with the big blisters. I clamped the fuselage in the vice of my milling machine and very slowly, I milled the turret away, and this revealed the structure underneath. This structure was milled away, too, as much as possible without damaging the fuselage sides or bottom, and what was left after the milling, I removed with a flat nose plier. Now the front end of the Cat only consisted of the two fuselage halves. The cockpit interior was of course intact. The canopy was removed without any damage just as a precaution. The turret should be replaced by a radar dome. The first radar on the Swedish Cats was raised above the turret, however, this destroyed the good forward view from the cockpit, and the Swedish technicians moved the radar down to the position of the turret. The difference between the turret and the radar dome was that the side of the turret was oblique, vertical for the dome. I made a work piece of Ureol (artificial wood) and glued it in place with super glue. Now the top of the nose was closed again, and it was only a matter of sanding to get the right shape of the dome.
And now for the nose weight
problem: A Cat needs a lot of nose weight to avoid being a tail sitter. I glued
some small bars of lead on the underside of the cockpit floor and on the side
walls. To get further weight I filled the nose und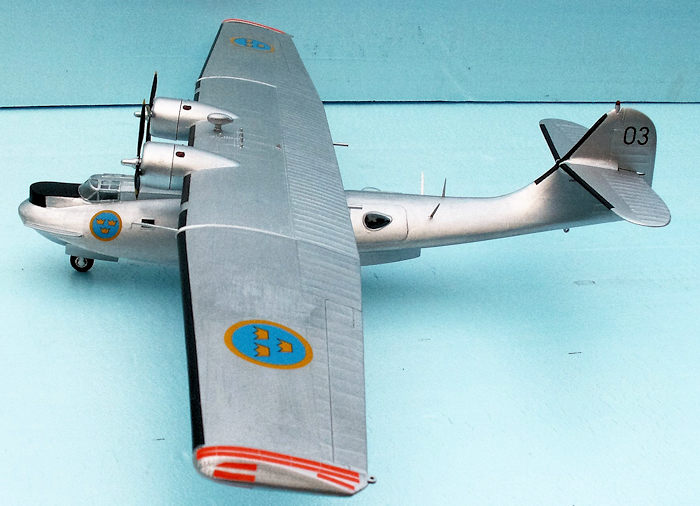 er the dome as much as
possible with small pieces of brass and iron from my scrap stock and sealed it
through the wheel well with melting glue. I hoped that this considerable nose
weight would do the job.
er the dome as much as
possible with small pieces of brass and iron from my scrap stock and sealed it
through the wheel well with melting glue. I hoped that this considerable nose
weight would do the job.
The nose wheel was the next issue. I cut off the horizontal bar from the leg and furthermore a part of the leg. Then I drilled a 0.8 mm hole through the center of the leg and glued a bit of 0.8 mm hard brass wire to reinforce the leg. And at last I drilled a 0.8 mm hole in the lead bar under the cockpit floor for the fixture of the nose wheel. With the nose wheel and the doors glued in place, the nose problem was solved.
Now I had to deal with the large openings of the blisters. I filed the edge oblique to get suitable area for the bond. Using 1 mm plastic card I made two covers – with oblique edges to cover the openings. A further two + two covers a little smaller were glued upon the first covers, they were important to obtain the necessary thickness to deal with the curving of the fuselage. Now it was a matter of sanding to reshape the fuselage, where the blisters had been.
The greatest challenge of this model was, however, to create the smaller blisters of the Swedish Cat. I had no experience with vacu-forming, but this was the only way to get the blisters. First thing to do was to make a positive form. A small bar of Ureol was the perfect material for a master. It was no problem to carve and sand this master, which was altered a couple of times to obtain the correct shape. In the middle of the bar, I drilled a hole for a 4 mm brass rod. With the brass rod pressed in place, the master could be clamped in the three-yaw chuck of the drilling machine. In this way it would be possible to move the master into the heat softened transparent material exactly the same distance and always perpendicular!
I used an electronic hot-air gun for the heating and learned quickly how to handle the master with the movements of the drilling machine stand. The material softened in less than 10 seconds, the master was moved 5 mm down into the material, and elevated again after 10 seconds. It was fascinating to learn this technique, and the perspective was very promising: I would be able to do my own canopies, if the ones supplied with kits are not good enough or need a change for a modification.
Another problem was to sand the
basis of the small blisters to conform with the curving of the fuselage sides.
The bl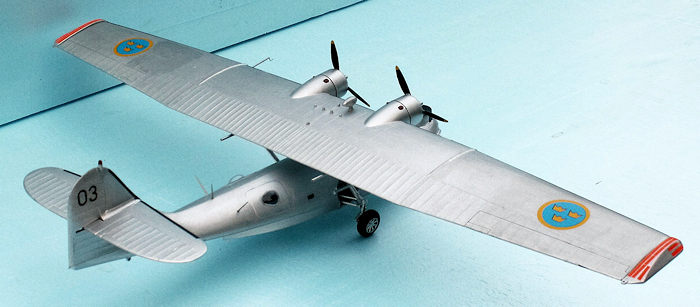 isters were simply too small for my fingers to hold, mostly because of
their curving shape. I made a sanding block with the same curving as the
fuselage, and I used a Micro Stix to get a firm grip of the blister. A Micro Stix is a 7 cm long plastic stick with a bubble of an adhesive stuff in the end.
This stuff will take form after the object it is pressed down upon – and act as
if it were glued to the object. Now it was an easy job to sand the base of the
blisters. When the operation is well done, you simply pull the Micro Stix off
the object – slowly. During this process the stuff will get very long, and
eventually let the object go. Shortly after, the stuff will have regained its
bubble appearance.
isters were simply too small for my fingers to hold, mostly because of
their curving shape. I made a sanding block with the same curving as the
fuselage, and I used a Micro Stix to get a firm grip of the blister. A Micro Stix is a 7 cm long plastic stick with a bubble of an adhesive stuff in the end.
This stuff will take form after the object it is pressed down upon – and act as
if it were glued to the object. Now it was an easy job to sand the base of the
blisters. When the operation is well done, you simply pull the Micro Stix off
the object – slowly. During this process the stuff will get very long, and
eventually let the object go. Shortly after, the stuff will have regained its
bubble appearance.
With the finished blisters in my hand it was not a difficult job to make the new openings where the blisters should be placed. The large “blister-doors” were made of 0.3 mm plastic board. I found it too unsafe to scribe the doors in the fuselage sides. The fuselage was somewhat thicker on these spots because of the reshaping procedure. The whole thing would have been much easier to do before the fuselage was assembled - of course. But I did not have this option, since I did not have the guts to try disassembling the fuselage!
Another challenge showed up to
be gluing the main undercarriage in place. According to the instructions the
undercarriage should be glued into the wheel wells BEFORE the assembly of the
fuselage. Without any doubt this is definitely a very good idea, because it was
very difficult to do AFTER the assembly of the fuselage. Too many small parts
should be glued in place at the same time. I made several “dry” exercises before
I dared to put glu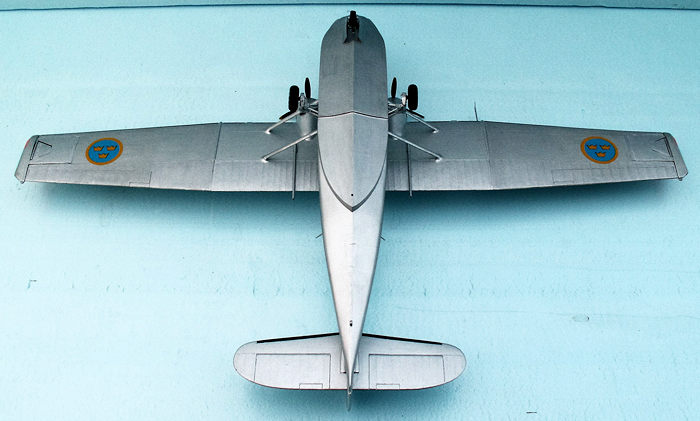 e on the parts. The starboard wheel was a success, the
backboard was a limited success, because the wheel had a list outwards.
e on the parts. The starboard wheel was a success, the
backboard was a limited success, because the wheel had a list outwards.
With the complete undercarriage in place I realized, that the nose weight was sufficient. If not, I would still have the possibility of adding some weight in the engine cowlings.
Other modifications for the Swedish Cat: The windows (parts 22 and 26) are both too small and need to be replaced by acrylic ones. The nose front window (part 62) should be replaced by a plate with four small circular recesses in it. The two fuel dumping pipes on the underside of the wing at the outer sides of the cowlings were made of 1.5 mm brass tube. These pipes should have been included in the kit, since they were standard equipment of a PBY-5A. The loop antenna should be replaced by a much larger bulb antenna, and this should be placed about 10 mm to the starboard. The pitot- tube should be replaced by one with a thin angle in the front end. A piece of one mm brass tube with a 0.5 mm hole for the small angle will do. Behind the blister doors there are three pointed and flat rod antennas. One behind each blister and oblique about 45 degrees – that is perpendicular with the curving of the fuselage. A smaller vertical one is placed on the dorsal about 12 mm behind the oblique ones. On the top of the fin there is a small beacon – 2 mm gauge acryl rounded in the top and transparent red, pointed in the bottom where it merges with the fin. There are some more details, but I choose to stop here!
| COLORS & MARKINGS |
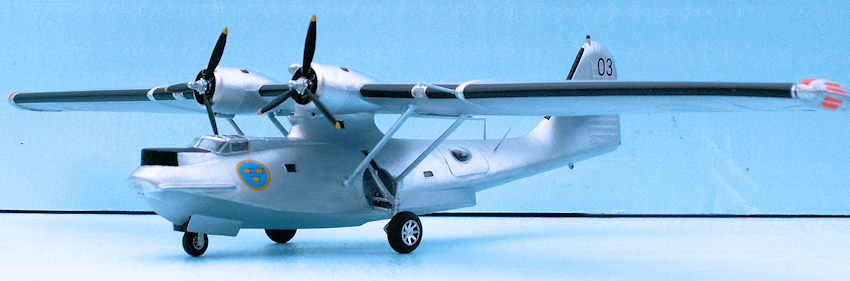
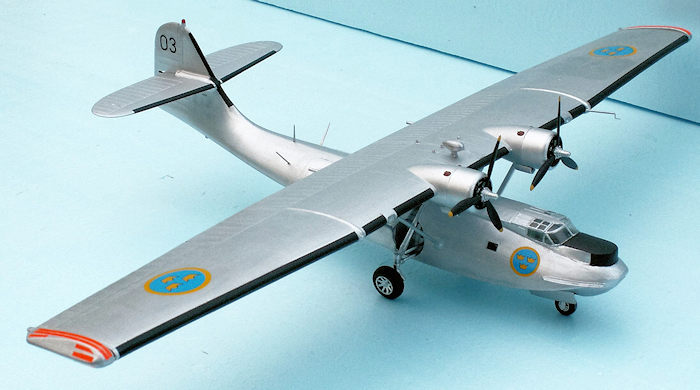
The color scheme of the Swedish Cats is very simple: The plane is bare metal all over and silver doped on the fabric covered parts of the wings and fin. There are matt black deicing devices on the front of the wings, tail planes and the fin. The radar dome and the anti-glare stripe are matt black, the tires are matt black as well. The exhaust pipes are brick red.
There is a special decal sheet covering Swedish seaplanes: He 115, Do 24 T and PBY 5A. This sheet covers all three Cats serving with Flygvapnet: 001, 002 and 003. 001 is the one preserved and on permanent exhibition in the Swedish Air Force Museum at Malmslätt. 002 was the plane that was shot down by a Soviet MiG 15 fighter, and 003 is the plane that was scrapped in 1966. My choice was the 003, since my son wants to build the 001. If I had chosen the 002, it would not have been necessary to replace the turret with the radar dome. In 1952 the Cats did not have a radar.
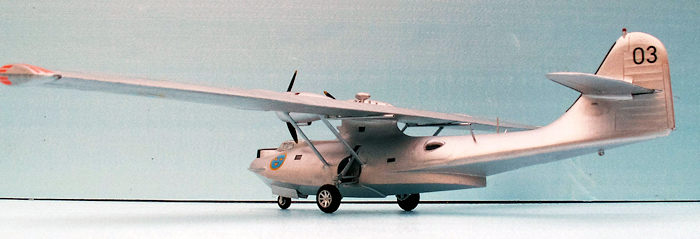
 Besides the large markings 003
for the top of the rudder, there are small serial markings 47003 to be placed
underneath the tail plane on the fin. On the outer side and the bottom of the
floats there are some day-glow stripes. The decal sheet does not include these
stripes, even if a small sketch shows the exact position of these stripes. I
tried to paint a piece of white decal paper with fire orange paint. However, the
dried paint peeled off when I tried to cut the stripes. Fortunately, I had a
second option: On a special decal sheet for Percival Pembroke in Flygvapnet
service there were some day-glow squares and stripes surplus, and these were cut
to make a perfect match for the Catalina.
Besides the large markings 003
for the top of the rudder, there are small serial markings 47003 to be placed
underneath the tail plane on the fin. On the outer side and the bottom of the
floats there are some day-glow stripes. The decal sheet does not include these
stripes, even if a small sketch shows the exact position of these stripes. I
tried to paint a piece of white decal paper with fire orange paint. However, the
dried paint peeled off when I tried to cut the stripes. Fortunately, I had a
second option: On a special decal sheet for Percival Pembroke in Flygvapnet
service there were some day-glow squares and stripes surplus, and these were cut
to make a perfect match for the Catalina.
The three crowns markings on the wings (1800 mm actual size) and on the fuselage beneath the cockpit (1320 mm actual size) give the plane its military identity. I find the Swedish markings very attractive from an aesthetic point of view – probably the reason for my preference for modeling Swedish military aircraft.
At this stage the wing is still not married to the fuselage – and this is the last operation to finish the model. The wing struts fit well in the backboard side, the longer in front and the smaller to the rear. In the starboard side, the smaller fit in the front, and the larger must be cut about 3 mm in length to fit to the rear. This is the only serious flaw of the kit, but in return it is easy to deal with. Since the wing cannot be glued to the fuselage out of alignment, the explanation must be that the fixing points for the struts on the starboard wing are a little bit too close to the fuselage.
| CONCLUSIONS |
It was a challenge to convert the Revell PBY 5A to the Swedish CANSO edition, and I can recommend this ancient kit to anyone, who fancies the Catalina and just wants to build an OOB model. Nose weight is absolutely necessary if you want the undercarriage in down position. I will recommend to paint the model, even if it is to remain black. There are several after- market decal sheets for the Catalina with other color schemes, if you find an all-black Cat to gloomy.
| REFERENCES |
Wikipedia.org articles “Consolidated PBY Catalina” and “Catalinaaffären”
FlygvapenNytt no 3/98: Leif Möller: Försvarets Flygräddning under 50 år. (Swedish SAR in 50 years)
Björn Karlström: Flygplansritningar 5 – Swedish Air Force Transport Aircraft 1926-1989 in scale 1/50, 1/72 and 1/144. Drawing and 13 photos of the Tp 47.
Allt om Hobby AB, Box 42006, S-12612 Stockholm. ISBN 91-85496-30-8
William Greene: War Planes of the Second World War, vol. 5 flying boats.
Mac Donald London 1962 (no ISBN)
Torben Plesberg’s photos of Tp 47 001 Malmslätt 1962 and 1994
16 January 2017
Copyright ModelingMadness.com If you would like your product reviewed fairly and fairly quickly, please
contact the editor
or see other details in the
Note to
Contributors.