
Trumpeter 1/32 AD-4 Skyraider
| KIT #: | 02252 |
| PRICE: | $130.00 SRP |
| DECALS: | Two options |
| REVIEWER: | Donald Zhou |
| NOTES: |
+Much simpler kit than the
Zukei-Mura one. Plenty of weapons. Assembly a lot easier. Nicely
detailed with nice fit. -Half of the weapons cannot be used. Decals not complete. Color call out completely wrong. Instruction call out sometimes confusing and even flat out wrong.t |
| HISTORY |
Again. Not gonna do a history on this aircraft. Again, I’ll let mister history reviewer Mr. Tom Cleaver do that for me. Just read his review of the Zukei-Mura version here.
| THE KIT |
I’ll just refer you to my preview
here.
The short of it is basically, 1. Far easier to
assemble than the Zukei-Mura one. 2. A great load out of weapons but half of it
can not be used due to the fact they are for the Vietnam Spad and the HVAR is a
complete unusable mess. And 3. Decal is good but not complete. Hope some
aftermarket companies can come up with a complete maintenance stencil sheet.
| CONSTRUCTION |
 After perusing the instructions and understand it
completely, construction begins. Now the instructions starts out with the very
nice Wright R-3350 engine. But I decided to digress and go all the way to the
end and started with the weapons. These are easy and should wax the mojo and get
it going. My plan was to do everything, including the Vietnam weapons and then
take a “loadout” photo (yes, I did make all those mess of a mess HVAR rockets,
then promptly threw all of them into the “junkyard” box)…But as you will learn
later on, events eventually conspired to make short work of that plan,
After perusing the instructions and understand it
completely, construction begins. Now the instructions starts out with the very
nice Wright R-3350 engine. But I decided to digress and go all the way to the
end and started with the weapons. These are easy and should wax the mojo and get
it going. My plan was to do everything, including the Vietnam weapons and then
take a “loadout” photo (yes, I did make all those mess of a mess HVAR rockets,
then promptly threw all of them into the “junkyard” box)…But as you will learn
later on, events eventually conspired to make short work of that plan,
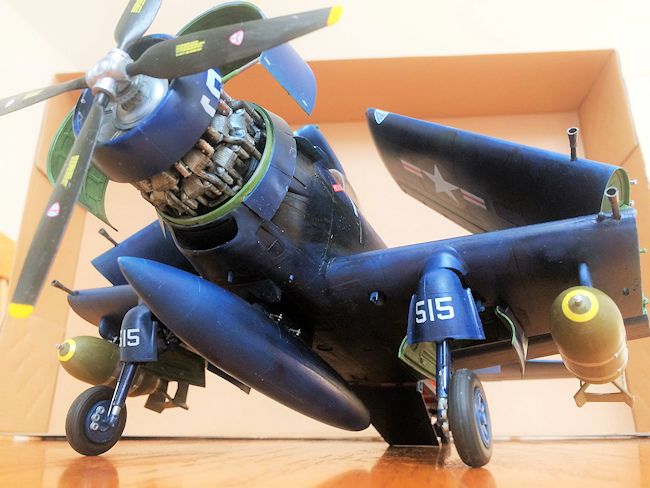
When all the weapons were done, puttied and primed, I
set them aside later for painting. Now to step 1 and that gorgeous R-3350
engine. Over 50 parts goes into it and it’s a beau. Now, it seems the Zukei-Mura
one, as describe by Mr. Thomas Clever, the exhaust pipes were a real PITA and
just will not go. Well, I had a hell of a time with the pipes too. The biggest
problem was that the instruction here just sucked. There is no description of
the engine orientation and what exhaust part goes into what hole(s). The end
result was I had to look a few steps ahead at the engine to see the pipes in
their correct relations to the correct engine orientation. That, and also a lot
dry fit and trial and error. Luckily, everything fits and the holes are tight
enough that you just need to tap it in mostly and it will settle. Once I got the
correct orientation and got the first pipe in correctly, the rest was easy.
Although, it took a bit of elbow grease, cajoling and plenty of F bombs and S
bombs along the way to get there.
Now for painting of the engine, I used plenty
of Model Master Metalizers. I find these to be a better option than Alclad since
one little mistake with those, and you are in for it. Base color is MM Chrome
Silver, then washes of Tamiya Flat Black (I find this Flat Black to be more
“sooty”, perfect for general washes and for engines), MM Metalizer Exhaust, Gun
Metal and near the end, a little spray of
 Glossy Sea Blue. For the exhaust
pipes, again, start with Chrome Silver as a base, then washes of Tamiya Metallic
Silver, Gunmetal, and patches of Exhaust. Finally, a good wash of Tamiya Smoke
really brings it out. The crank case is MM Dark Ghost Grey, with good washes of
Tamiya Flat Black, with Testor’s Grey as an offset. With the engine done, I set
it aside for much later. Onto the cockpit.
Glossy Sea Blue. For the exhaust
pipes, again, start with Chrome Silver as a base, then washes of Tamiya Metallic
Silver, Gunmetal, and patches of Exhaust. Finally, a good wash of Tamiya Smoke
really brings it out. The crank case is MM Dark Ghost Grey, with good washes of
Tamiya Flat Black, with Testor’s Grey as an offset. With the engine done, I set
it aside for much later. Onto the cockpit.
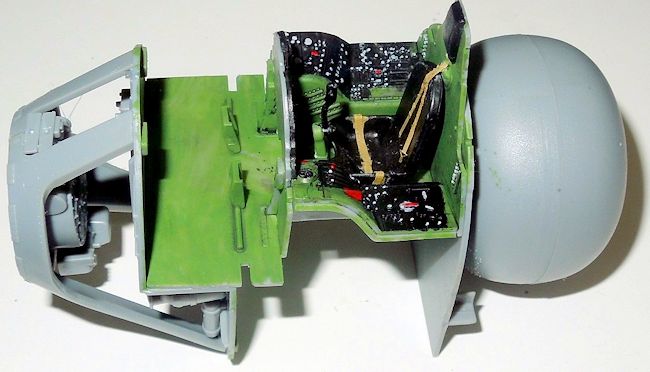
The cockpit is pretty simple, but well detailed and
appointed. Like the engine, ignore the color call outs. They are completely
wrong. With research and reading other people’s builds, I painted the cockpit
with a basic color MM Green Zinc Chromate. In fact, all exposed surfaces except
the speed brakes are this color. So I took it to the wheel wells also. The
instrument panel and sides are MM Flat Black and when dried, I used MM Light
Ghost Grey to pick out the buttons along with red and green colors also. A good
reference help here. The seat is painted in the same Green Zinc Chromate and I
used the kit’s seat belts. They are pretty rudimentary but look good in a coat
of paint and on the seat. Now, for the front bulkhead, I did assemble the oil
tank and pipes, same with the big gas tank behind the cockpit but I did not
paint them since they all but disappear when the fuselage halves are closed up.
The cockpit itself was again, washed with Tamiya Flat Black.
Speaking of the fuselage, before I closed them up,
with a couple of eye rolls, I decided to tackle Trumpeter’s brain fart first,
namely, the big openings underneath the front lower fuselage. Two clear pieces,
GP1 and GP7 go in the slots so you can view the oil tank etc. But of course, I
chose not to. With plenty of shoving and cajoling, they went in and settled down
without a step. I then attached the cockpit, with the engine mount and bracing
in front. However, I did not attach the engine to make painting easier. Now,
there are plenty of fuselage braces, G24, G28, G27, A7, A8, and G26. I don’t
know why they are
 there since they seem to be doing nothing. But still I did
attach parts G24, G28 and especially parts G27 and A7 since they go on top of
the bottom speed brake and seems to help to keep it down. I did not attach A8
and G26 since A8 broke and G26 seems to interfere with the two halves. It turned
out they are not need anyways since the tailwheel well more than holds the two
halves together. Just to remember to dig out the two holes for the two fuselage
air scoops before assemble the fuselage together. I left off the tail wheel
itself till the end.
there since they seem to be doing nothing. But still I did
attach parts G24, G28 and especially parts G27 and A7 since they go on top of
the bottom speed brake and seems to help to keep it down. I did not attach A8
and G26 since A8 broke and G26 seems to interfere with the two halves. It turned
out they are not need anyways since the tailwheel well more than holds the two
halves together. Just to remember to dig out the two holes for the two fuselage
air scoops before assemble the fuselage together. I left off the tail wheel
itself till the end.
With that done. It’s on to the details. Say what you
will about Trumpeter’s accuracy, at least everything fits and fits nicely! The
only thing is, if it looks like “carpet monster food,” leave it off! This is
what happened with parts G4 and G22. I left G22, the antennae off but not G4
thinking the canopy operation linkage will go nowhere! WRONG! It….Well, let’s
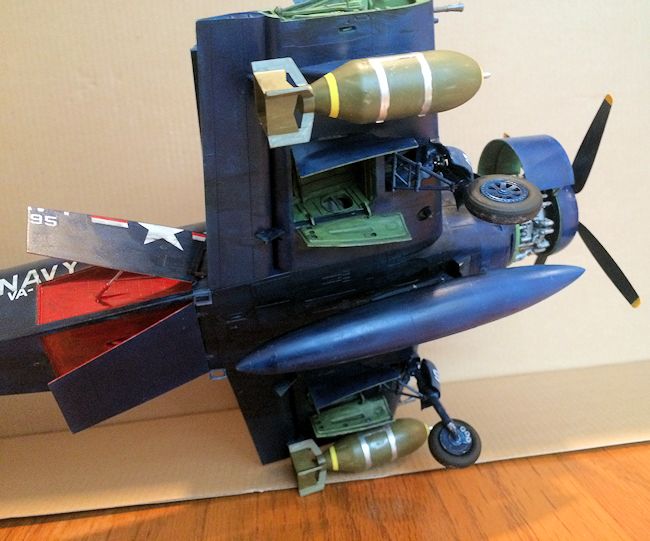
just say the carpet monster ate it! The only big decisions are the speed brake,
wings, and cowls and whether you want them open or closed, folded or open. I
decided to go for the all splayed out, all open mode so folded wings, open speed
brakes and cowl panels. Yeah, yeah, I know those speed brakes are usually closed
on the ground. But for this version, that’s the way it will be. Again, follow
the instructions and everything should be fine since they all fit! Also, be
noted that normally, canvas tarps cover the fold joints to prevent salt water
and air entering into the assemblies and causing havoc. But since 1. I’m too
lazy and 2. I want to show the details, I did not make them (Yeah, yeah, it’s
“you are too lazy”, right?). The only major hitch was when time came to mate the
inner wings onto the bottom of the fuselage, it will not go. For some strange
reason, the front cockpit bulkhead and lower engine braces was too low and
interfered with the mating process. I simply took a good clipper and clipped
most of the bottom of the bulkhead and braces off and it went on without any
problems.
With that, the major assemblies are done. Onto the
paint shop we go!
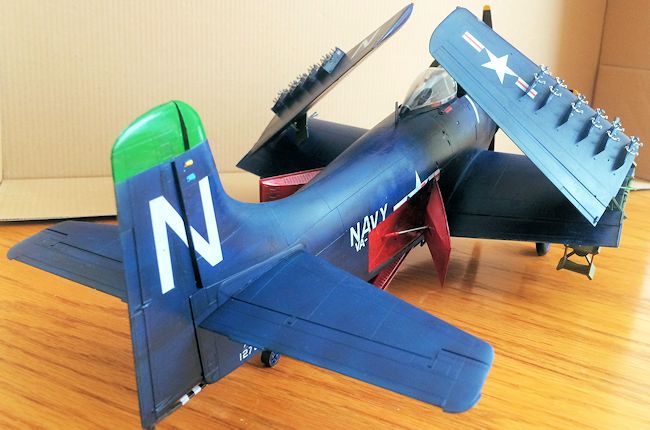
| COLORS & MARKINGS |
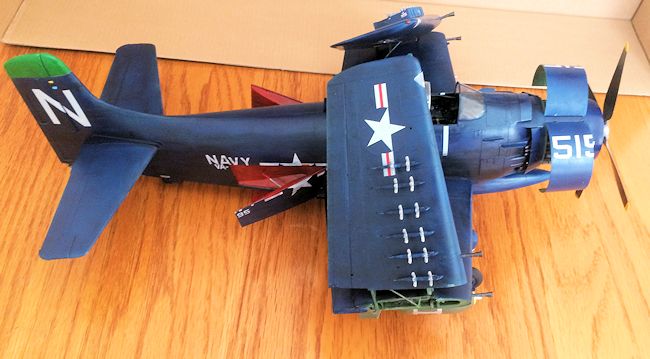
Yep, with this version, you get one choice in color,
Glossy Sea Blue. As a substitute, I used Tamiya Royal Blue, which is a very
close version. The original plan was to do a clean spanking new Able Dog that
just entered service. That plan was soon shot to hell though since I soon found
out there is no clean Skyraider per say. These things sprayed oil, smoke and gas
all over the instant that big R-3350
 roared to life. Hell, there is an old
saying, “if it ain’t leaking, it ain’t flying!” Many a newbie crew chief spent a
night shift spanking, spitting, shining a Skyraider as if it just left the
assembly line and left dismayed and crying one mission later when it came back
an angry ball of smoke and soot! So yeah, it needs to be dirty! However,
it will still be “new” as I’m not planning to do sunfading to drive home that
fact!
roared to life. Hell, there is an old
saying, “if it ain’t leaking, it ain’t flying!” Many a newbie crew chief spent a
night shift spanking, spitting, shining a Skyraider as if it just left the
assembly line and left dismayed and crying one mission later when it came back
an angry ball of smoke and soot! So yeah, it needs to be dirty! However,
it will still be “new” as I’m not planning to do sunfading to drive home that
fact!
So, to start, I use my same ol’ same ol’, a good wash
with Tamiya Flat Black. Again, it dry a little “sooty”, perfect for grime and
oil. Many places I did not clean up too well so the sooty mess will show
through. I then spay the whole thing, plus what is still left on the tree that
needs to be the same color, a thin coat of Royal Blue to start, waited 12 hours
for it to be completely dry, then a second coat of wash where needed before a
second thicker coat goes on. After that is dry, a third coat goes on to cover
whatever spots that needs it. This ends in a rather dirty bird but you won’t see
it in the photos as the blue really “compliment” the black a little too well.
One thing I did not do is dinging or paint chipping. The Navy is pretty adamant
about paint chips since the salty air and water will quickly corrode any exposed
spot if left open too long and aluminum corrode like mad in open water
conditions. More often than not, the minute an aircraft gets taken below into
the hanger deck, a bevy of men with paint cans and brushes in hand were waiting
for it to go through a thorough check-up and paint over any exposed spots. This
is the reason the minute I see any naval aircraft that look like it just
participated in The Battle of the South Pacific, even if it’s something say a
Tomcat or Intruder I just cringe! I did left two very small spot with a
paint chips since these paints do corrode quickly in the salty air. But again,
with any naval aircraft, don’t overdo it. They are not needed.
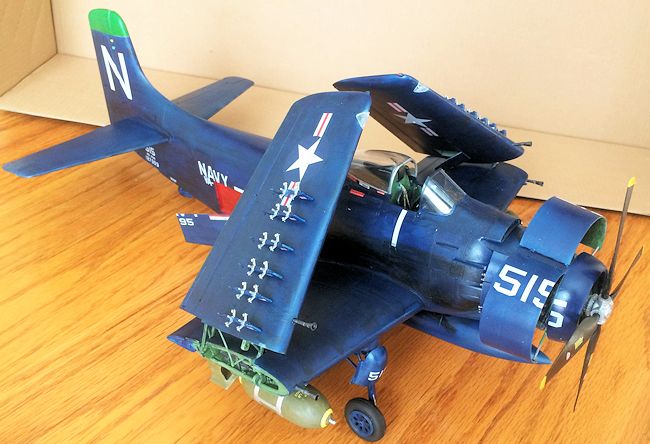 It’s at this point that I decided to add the nose
cowling and engine on. This is because no matter the version, there is a big
block number on the engine cowling and you need the cowling and panels closed
together to do it correctly. I chose the Navy VA-95 version. After getting the
nose cowling on the engine (after the cement is dry), I carefully dry fitted the
cowling panels and marked off where the second part of the decal, the decal that
goes on the panel before continuing (remember I’m building the panel in the open
position to show off that big R-3350 engine). Same with the speed brakes since
the decals there are split into three pieces! The decal goes on smoothly and in
perfect register. A good tip on Trumpyboss’s decal. They are extra thin and
settle down instantly it touches the plastic. However, that thinness also causes
it to roll up on you if you are not careful. Read a few reviews on Trumpyboss’s
kits here and you will hear some laments thrown at those decals way. After
building way too many Trumpyboss kits and learning the hard way, I slowly found
out a good way to deal with that problem. First, let the decal settle in the
water for several extra dozen seconds longer than necessary. I usually let it
soak for 2-3 minutes. This wash away most of the decal solution on the sheet.
That solution is the num. 1 cause of the decal roll ups. If you left too much of
it on, IT WILL cause the ultra-thin decal to crinkle and roll. And once it
rolled, it will cause it to stick together and that is that……….Second, if you
can get it, get Mr. Mark Softer. If not, my replacement, Testor’s decal solution
will also work. This is because with most of the original decal solution gone,
you need a replacement. Mr. Mark is absolutely the best! Just apply after the
decal is
It’s at this point that I decided to add the nose
cowling and engine on. This is because no matter the version, there is a big
block number on the engine cowling and you need the cowling and panels closed
together to do it correctly. I chose the Navy VA-95 version. After getting the
nose cowling on the engine (after the cement is dry), I carefully dry fitted the
cowling panels and marked off where the second part of the decal, the decal that
goes on the panel before continuing (remember I’m building the panel in the open
position to show off that big R-3350 engine). Same with the speed brakes since
the decals there are split into three pieces! The decal goes on smoothly and in
perfect register. A good tip on Trumpyboss’s decal. They are extra thin and
settle down instantly it touches the plastic. However, that thinness also causes
it to roll up on you if you are not careful. Read a few reviews on Trumpyboss’s
kits here and you will hear some laments thrown at those decals way. After
building way too many Trumpyboss kits and learning the hard way, I slowly found
out a good way to deal with that problem. First, let the decal settle in the
water for several extra dozen seconds longer than necessary. I usually let it
soak for 2-3 minutes. This wash away most of the decal solution on the sheet.
That solution is the num. 1 cause of the decal roll ups. If you left too much of
it on, IT WILL cause the ultra-thin decal to crinkle and roll. And once it
rolled, it will cause it to stick together and that is that……….Second, if you
can get it, get Mr. Mark Softer. If not, my replacement, Testor’s decal solution
will also work. This is because with most of the original decal solution gone,
you need a replacement. Mr. Mark is absolutely the best! Just apply after the
decal is 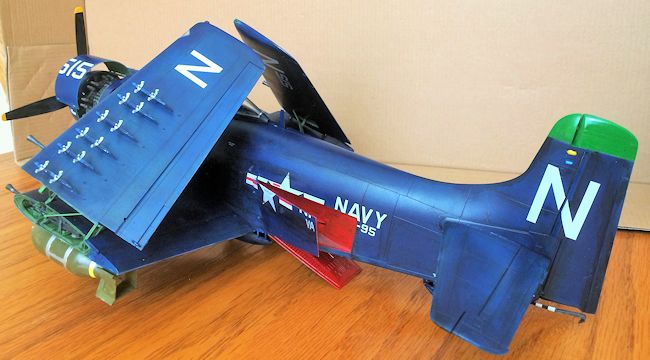 settled in the correct place. Unlike Tamiya decals, you can put it on,
and let it settle for 2 minutes and the decal will be completely melted on but
still good to the touch (don’t even bother to try that trick with the Tamiya
decals! Anything over 20 seconds with those and you DARE to touch it…..Learned
that the hard way!!). With Testors, wait until the solution is completely
vaporized. Then a swipe of a soft tissue paper will clean it all up! No need to
worry about air bubbles since by this time, the decal has settled down so much,
it automatically squeezed out any air pockets anyways. This is absolutely the
easiest and simplest way to deal with Trumpyboss’s decals. That first step is
the most important. Take those decals out too early and you are in for it!!!!!!!
Anyways, the decals, with my methods, went on no problem but again, most of the
maintenance stencils are not there so here’s hoping the aftermarket will
capitalize on it.
settled in the correct place. Unlike Tamiya decals, you can put it on,
and let it settle for 2 minutes and the decal will be completely melted on but
still good to the touch (don’t even bother to try that trick with the Tamiya
decals! Anything over 20 seconds with those and you DARE to touch it…..Learned
that the hard way!!). With Testors, wait until the solution is completely
vaporized. Then a swipe of a soft tissue paper will clean it all up! No need to
worry about air bubbles since by this time, the decal has settled down so much,
it automatically squeezed out any air pockets anyways. This is absolutely the
easiest and simplest way to deal with Trumpyboss’s decals. That first step is
the most important. Take those decals out too early and you are in for it!!!!!!!
Anyways, the decals, with my methods, went on no problem but again, most of the
maintenance stencils are not there so here’s hoping the aftermarket will
capitalize on it.
| FINAL CONSTRUCTION |
Now, onto the final assembly…And boy there are still
A LOT left! First to go are the landing gears. They are the same Glossy Sea
Blue, not white as the color call outs (they did not go white until the Vietnam
era). Careful construction and a good wash of the same ol’ Tamiya Flat Black
really brought it out nicely. Then the number that go on the leading front door
cover (I have a real soft spot for those door covers. They make the Able Dog
look like as if it have two knee pads!) is put on using the same methods above.
Same with the tail wheel. After the arrestor hook is put on. I started on the
most tedious part of the kit,
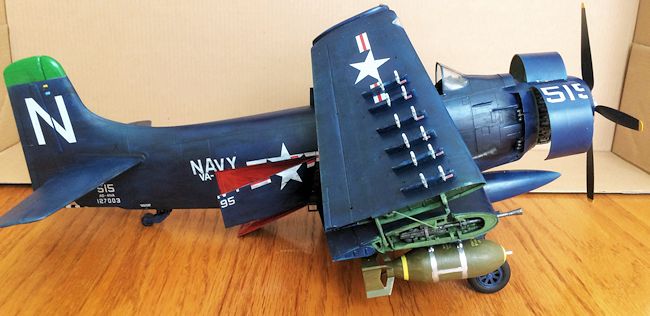 the pylons for the outer wings. There are six per
side, with two sway braces on each and four stencil decals also. That makes 24
sway braces and 48 decals! Took some tedious nights to go through all those.
Once again, the instructions have all the pylons reversed. So dry fit to make
extra sure! Afterwards, it’s on to the speed brakes. These went on with no
problems. Just make sure the hydraulic linkages are cemented on nicely before
trying. After the canopy is unmasked, I made an extra canopy linkage that was
eaten by the carpet monster using stretch sprue. The canopy was put in the open
position to show off the cockpit. Now, onto the most annoying part of the
assembly…Those pesky cowling panels.
the pylons for the outer wings. There are six per
side, with two sway braces on each and four stencil decals also. That makes 24
sway braces and 48 decals! Took some tedious nights to go through all those.
Once again, the instructions have all the pylons reversed. So dry fit to make
extra sure! Afterwards, it’s on to the speed brakes. These went on with no
problems. Just make sure the hydraulic linkages are cemented on nicely before
trying. After the canopy is unmasked, I made an extra canopy linkage that was
eaten by the carpet monster using stretch sprue. The canopy was put in the open
position to show off the cockpit. Now, onto the most annoying part of the
assembly…Those pesky cowling panels.
The big problem with those panels are the fact there
just isn’t that many contact points for the cement to hold onto the panels and
allow them to settle into positon. There are only three measly tinnie points,
two for the panel pins and one for the linkage which means cement is out and
superglue is in. First, I cement on the linkage with tube cement using a hobby
knife. Tube cement dries a lot slower than liquid so it give you time to work
with it to set the correct angle in order to hold the panel up. After getting
the correct angle, I set the panel aside to allow the linkage to be completely
dry. Then with trepidation, I dropped a few superglue drops onto a hobby knife,
then with a second one, added a few tinnie drops onto the panel pins, carefully
insert the panel in and slowly drop it onto the linkage. It worked out pretty
well except the right one. I goofed on it and had to do it again, resulting in a
superglue blotch on the pin location. Ohh well, the bird is not going onto the
contest table and it’s in an obscure location so I left it at that. It’s also at
this point that I discovered that the prominent tail pitot tube was included in
the kit, part H13 if I remembered correctly. However, I did not drill out a hole
and put it in cause it looks like it will break if you just look at it (Yeah,
yeah, you are just too lazy aren’t cha?!?!?)
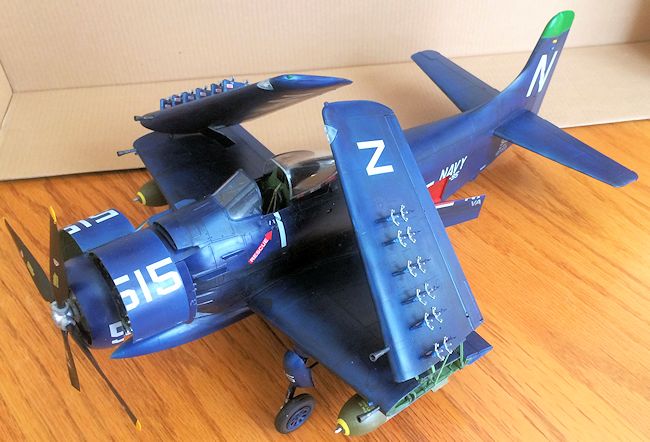 Finally, weapons. As I’ve said in the beginning, I
was planning to do all of them and then take a “loadout” photo. But events
conspired, namely two little kids named Alex and Alan, one a 3 year old, the
other 1 made short work of that plan. On top of that, what with my parents going
home and my IPMS demanding to see something, anything forced me to slap some
olive drab paint with silver highlights onto the big AN-M66 2000 pounders. Once
the decals are done, I just cemented them on the inner wing pylons and call it a
day. Again, a side note. The inner wing pylons. The instructions will have you
use “pylon I and III”. These are not correct for a Korean War bird (They are
correct for a Vietnam one however). Use pylons II and IV instead. Even though
the instruction says they are for AN-M66 only, they are correct for anything
that goes under the inner wings since they are the correct pylons for a Korean
War bird! With that done. The bird is finally finished. The outer wing pylons
will remain empty until my friends and parents can send me my stash with all
those correct extra HVAR’s that I left in China!
Finally, weapons. As I’ve said in the beginning, I
was planning to do all of them and then take a “loadout” photo. But events
conspired, namely two little kids named Alex and Alan, one a 3 year old, the
other 1 made short work of that plan. On top of that, what with my parents going
home and my IPMS demanding to see something, anything forced me to slap some
olive drab paint with silver highlights onto the big AN-M66 2000 pounders. Once
the decals are done, I just cemented them on the inner wing pylons and call it a
day. Again, a side note. The inner wing pylons. The instructions will have you
use “pylon I and III”. These are not correct for a Korean War bird (They are
correct for a Vietnam one however). Use pylons II and IV instead. Even though
the instruction says they are for AN-M66 only, they are correct for anything
that goes under the inner wings since they are the correct pylons for a Korean
War bird! With that done. The bird is finally finished. The outer wing pylons
will remain empty until my friends and parents can send me my stash with all
those correct extra HVAR’s that I left in China!
| CONCLUSIONS |
 All in all, a great alternative to the Zukei-Mura
version and had some fun times assembling it, problems not withstanding. As I’ve
said in the preview, if you ever just want to get one Spad and is planning to
work on it for quite a while, get the Zukei one. But if you ever want to get
more than one and want to keep your sanity intact, get the Trump version,
especially since one of them can be the Korean War and the other Vietnam to
represent just how long this craft was in service despite the fact many tried to
replace it (remind you of something? Like the B-52 BUFF?). In fact, I already
did. The A-1H version is waiting for me to assemble it in the (in)famous “Paper
Tiger II”, aka, the toilet bomber colors!
All in all, a great alternative to the Zukei-Mura
version and had some fun times assembling it, problems not withstanding. As I’ve
said in the preview, if you ever just want to get one Spad and is planning to
work on it for quite a while, get the Zukei one. But if you ever want to get
more than one and want to keep your sanity intact, get the Trump version,
especially since one of them can be the Korean War and the other Vietnam to
represent just how long this craft was in service despite the fact many tried to
replace it (remind you of something? Like the B-52 BUFF?). In fact, I already
did. The A-1H version is waiting for me to assemble it in the (in)famous “Paper
Tiger II”, aka, the toilet bomber colors!
Kit courtesy of SWMBO, who was kind enough to open her tighter than a @#$@$@#$ pocket book as a birthday gift.
December 2014
Thanks to for the review kit. You can find this one at your favorite hobby shop or on-line retailer.
If you would like your product reviewed fairly and fairly quickly, please contact the editor or see other details in the Note to Contributors.