KP 1/72 Mig-15
|
KIT # |
12 or 3101 |
|
PRICE: |
$9.98 MSRP |
|
DECALS: |
Three options: 2 Czech, one North Korean |
|
REVIEWER: |
Les Dorr Jr |
|
NOTES: |
Modelart Decals used. |
|
HISTORY |
The MiG-15 is one of the world’s best-known aircraft, so rather than reinventing the wheel, let me quote from a capsule history on the National Air & Space Museum’s website:
“First flown on December 30, 1947, the MiG-15 featured the first
production swept wing on a Russian aircraft, the first pressurized
cockpit and the first ejection seat. Although Mikoyan and Gurevitch (sic)
were aware of German turbojet and swept-wing work, this design was wholly
Russian--except for the engine. The Cold War had just begun and Stalin
was readying the B-29 clone, the Tu-4, and was developing the atomic
bomb, both in high-priority programs. MiG-15 production
 was authorized in
March 1948, only 3 months after first test flight, and substantial
numbers were in service by the end of 1948 with the both Soviet Air
Forces (VVS, the tactical air arm) and IA-PVO (the air defense arm).
was authorized in
March 1948, only 3 months after first test flight, and substantial
numbers were in service by the end of 1948 with the both Soviet Air
Forces (VVS, the tactical air arm) and IA-PVO (the air defense arm).
“Late in 1950, MiG-15s piloted by Russians appeared over North Korea, and their prowess ‘shocked and stunned’ Americans. Their deadly attacks, using one 37mm and two 23mm cannon, quickly ran all piston-engined aircraft from the skies, including the B-29. First generation jets like the F-80 and F-84 were no match, and America had to rush the F-86 into Korea to reestablish air superiority. Despite its high speed, excellent maneuverability, and high service ceiling, the MiG-15 was not very stable as a gun platform, with a tendency to Dutch roll at high speeds because of wing flexing and poor aileron effectiveness. Its cockpit instrumentation was primitive and stick forces were heavy. In combat against the F-86, a much more advanced fighter but with very similar performance, the MiG-15 suffered a 10:1 loss ratio.
“Russians were joined by Chinese and North Korean MiG-15s before the Korean War ended, and the MiG-15 was ultimately flown in some 35 countries, remaining in service in China as late as 1978, where it was called the J-2 (F-2 in an export version). The MiG-15UTI trainer version, also used throughout the world, is still in common service today. More than 12,000 MiG-15s were built in 17 versions, in Poland, Czechoslovakia, and China, as well as in the USSR.”
|
THE KIT |
The MiG-15 was an early kit from KP (or Kopro, as
the company now prefers) and it shows that heritage. All the panel lines
are prominently raised and the airframe surface is peppered with rivets.
Soft recessed lines represent the control surfaces. The fuselage is split
into left and right halves with a separate shallow nose intake piece.
Each wing has an upper and lower half, with raised detail in the wheel
wells. There is no detail in the nose gear “well,” which really is just a
very shallow indentation in each fuselage half. The horizontal
st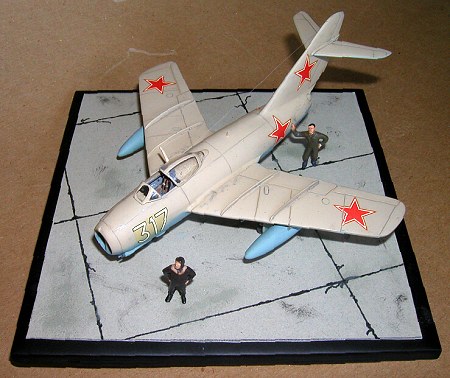 abilizers are molded as single pieces. All the airframe parts in my
sample showed considerable flash; it was difficult to tell where the
rudder actually ended! The tailpipe is a short, lumpy piece of plastic
that is better replaced with hollow tubing of some sort.
abilizers are molded as single pieces. All the airframe parts in my
sample showed considerable flash; it was difficult to tell where the
rudder actually ended! The tailpipe is a short, lumpy piece of plastic
that is better replaced with hollow tubing of some sort.
The cockpit consists of a tub with raised detail on the side consoles, an instrument panel featuring raised dials, a control stick and a simplistic representation of the KK-1 ejection seat. There is no pilot figure.
The main gear struts are simplified, with wheel-mounting pegs that extend well past the diameter of the wheels. The nose gear and wheel are molded as a unit. The main wheels are terrible: Mine were lopsided, and the hub detail looks spurious compared to reference photos. Stores are varied for a kit of this vintage, but like many other parts, they exhibit a lot of flash. Four separate weapons pylons are included. You can build your MiG-15 with a pair of rocket packs, individual air-to-ground rockets, or two drop tanks. Pods featuring a pair of 23mm machine guns and a 37mm cannon – all rather crude – mount to the forward fuselage, but the prominent ejector bulges for the MGs are not included. A neat touch is an optional pair of what appear to be rocket-assisted take-off (RATO) units for either side of the fuselage.
Decals for aircraft from the Czech aerobatic team and regular Czech Air Force are included, along with a North Korean MiG-15.
(You can check our intrepid editor’s preview of the 1/72 KP MiG-17 here for a visual idea of how the parts sprues break down. The MiG-15 is virtually identical.)
|
CONSTRUCTION |
Faced with the heavy raised panel lines, I decided to sand all the surfaces smooth and replace details by rescribing or penciling them in. It took several passes with progressively finer grits of wet-n-dry sandpaper to make sure I’d eliminated all those rivets.
I started actual construction by painting the
cockpit tub and fuselage sidewalls. References suggest several color
choices; I chose Testors Model Master (MM) Dark Gull Gray as a decent
match to photos of the U.S. Air Force Museum’s MiG-15. I picked out the
console details with drybrushed MM Chrome Silver. Next, I painted the
instrument panel MM Aircraft Interior
 Black. I replicated the dial faces
by first placing a small drop of MM Header Flat White in each circle,
followed, when dry, by a drop of Interior Black. I then carefully
scratched patterns through the black with the tip of a hobby knife so
that tiny white marks showed through. Finally, I placed a drop of future
on each dial with a toothpick. I think the technique is very effective in
1/72…although I really prefer decal instrument panels in this scale. I
then glued the panel to the cockpit tub with CA glue.
Black. I replicated the dial faces
by first placing a small drop of MM Header Flat White in each circle,
followed, when dry, by a drop of Interior Black. I then carefully
scratched patterns through the black with the tip of a hobby knife so
that tiny white marks showed through. Finally, I placed a drop of future
on each dial with a toothpick. I think the technique is very effective in
1/72…although I really prefer decal instrument panels in this scale. I
then glued the panel to the cockpit tub with CA glue.
Mating the cockpit to the fuselage was a challenge. There are no locator pins, only a circular peg that juts from the bottom of the tub. I believe the peg is supposed to sit on the inside of what passes for the nose gear well, but the position just didn’t look right. Instead, I superglued the assembly directly to the side of the fuselage. Whatever method you use, check that the tub is level by looking through the nose opening. I didn’t at first, and ended up having to realign the whole thing. I also added a rear bulkhead to the tub with thin sheet styrene.
I tossed the kit ejection seat in favor of a finely detailed resin KK-1 replacement from Pavla. I painted the seat Dark Gull Gray, with an acrylic dark brown cushion and headrest, acrylic tan straps and MM Metallic Silver head armor. Apparently colors varied, so check references on the MiG-15 you’re building if possible. Test-fitting showed that the Pavla KK-1 as molded would interfere with the canopy, so I sanded down the bottom until it sat low enough.
I carefully lined up the fuselage halves to minimize
filling, and mated them with liquid cement. When the assembly was dry, I
tried as best I could to clean up the flash around the rudder area and
maintain the rudder contour. No go. I ended up replacing a small piece of
the trailing edge with a thin strip of styrene. Once I’d assembled the
wing halves, I gave similar attention to their trailing edges. One
accuracy note: The inner wing fences on this issue of the kit have small
semicircular  cutouts (These were apparently added so that the pilot could
see the main gear position indicators. Ed). I couldn’t find this feature
in any photos of real MiG-15s, so I filled the cutouts with small bits of
styrene rod cut to shape. I finished major assembly work by gluing on the
assembled wings, horizontal stabilizers and nose intake. The fit of the
latter was very poor, requiring substantial sanding just to get it inside
the fuselage.
cutouts (These were apparently added so that the pilot could
see the main gear position indicators. Ed). I couldn’t find this feature
in any photos of real MiG-15s, so I filled the cutouts with small bits of
styrene rod cut to shape. I finished major assembly work by gluing on the
assembled wings, horizontal stabilizers and nose intake. The fit of the
latter was very poor, requiring substantial sanding just to get it inside
the fuselage.
I filled the four small weapons pylon holes on each lower wing with CA glue -- I planned to mount only the drop tanks. When all the seams and holes were filled and sanded smooth, I rescribed the lost panel lines guided by thin strips of plastic label tape, or double layers of black electrical tape for tight curves. Three-view drawings showed the MiG-15 dotted with many round and oval access panels. I decided to reproduce a few of these with a drawing pencil after painting.
I cemented the drop tank parts together, sanded them smooth, and mounted them to the underside of the wings. Next, I glued the cannon and machine gun blisters to the forward fuselage. The lopsided molding on these parts needed a lot of sanding to get something approaching the proper contours. I drilled out the cannon barrel, which was useable, but I replaced the two MG barrels with plastic rod. I also cut away what passed for the nose gear well and substituted a piece of plastic sheet. I then replaced a few bumps on the bottom of the fuselage and added the MG shell ejectors, all with bits of scrap plastic. I decided to leave assembly of details such as landing gear, gear doors and canopy until after I’d painted the airframe, but I did add a couple of small antennas (one a kit part) to the upper fuselage.
|
COLORS & MARKINGS |
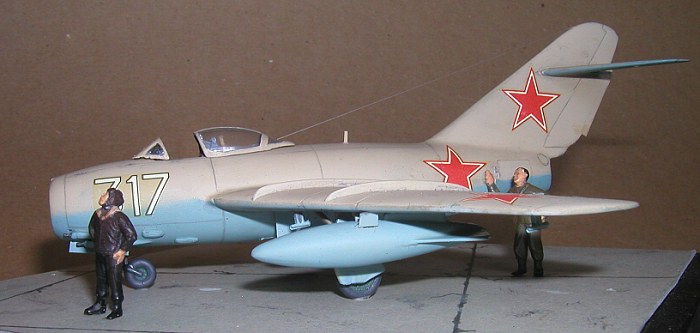
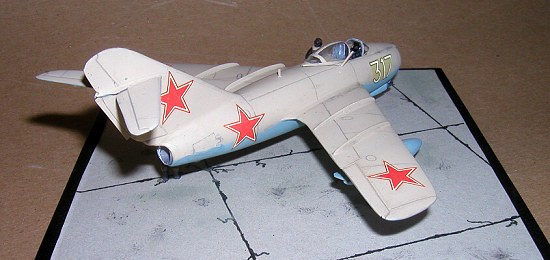
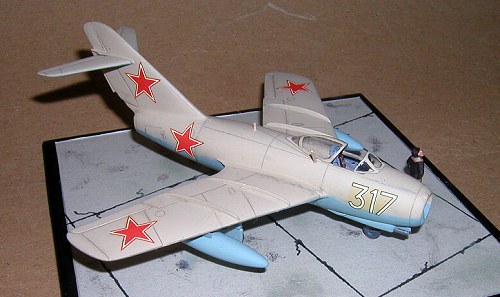
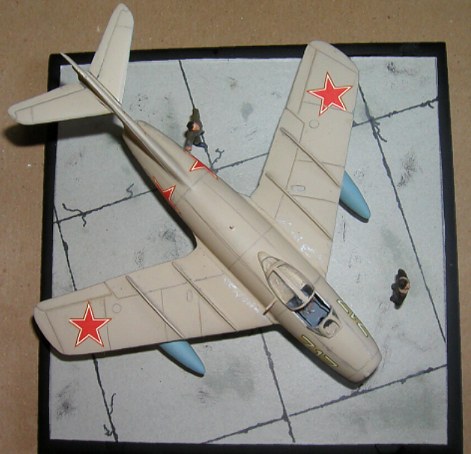
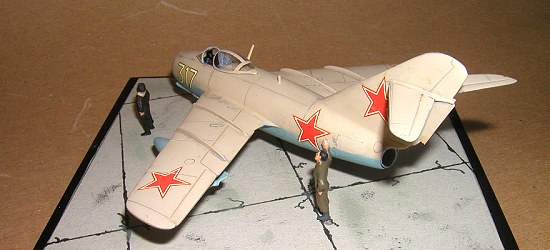
Most contemporary photos I’ve seen of the MiG-15 in Soviet Air Force service show the aircraft in natural-metal with the familiar Soviet stars and a bort number on the forward fuselage. But a color profile of a sand-over-light-blue MiG-15 “White 317” in the Squadron/Signal book MiG Alley caught my eye. Both Modelart (1/72) and Propagteam (1/48, see review here) issued decal sheets that feature this aircraft. I used the former on my model. The Modelart instructions may have some information on this MiG’s colors and service history...but it’s all in Czech, which I don’t read! The M2 review of the Propagteam sheet gives the colors as FS 33448 (sand) and FS 35450 (light blue), which sounded fine to me. That sheet says the camo scheme is from the “Soviet AF Far East” circa 1955, so perhaps this was a post-Korea aircraft.
 I
began by airbrushing the plane with an overall primer-cum-finish coat of
MM US Army/Marines
Gulf Armor Sand lightened with enough Header Flat White to bring it close
to FS33448. I got lucky; only a few spots on the seams needed touching
up. I covered the sand areas (except the sand/blue fuselage demarcation
line) with chunks of masking tape. To achieve a softer color separation,
I masked the lower fuselage with small pieces cut from a file folder,
holding them about 1/4 inch off the surface with bits of rolled-up
masking tape. With everything in place, I airbrushed several coats of MM
Russian Underside Blue, slightly lightened with white. I also hit the
inside and outside of the gear doors with the same color.
I
began by airbrushing the plane with an overall primer-cum-finish coat of
MM US Army/Marines
Gulf Armor Sand lightened with enough Header Flat White to bring it close
to FS33448. I got lucky; only a few spots on the seams needed touching
up. I covered the sand areas (except the sand/blue fuselage demarcation
line) with chunks of masking tape. To achieve a softer color separation,
I masked the lower fuselage with small pieces cut from a file folder,
holding them about 1/4 inch off the surface with bits of rolled-up
masking tape. With everything in place, I airbrushed several coats of MM
Russian Underside Blue, slightly lightened with white. I also hit the
inside and outside of the gear doors with the same color.
With both colors dry, I drew a few of the more prominent access panels onto the flat paint with a medium gray art pencil. Before decaling, I gloss-coated the entire airframe with Future using Q-Tips, which work quite well if you apply the stuff slowly to minimize bubbles. Next, I applied a Floquil Grimy Black “sludge wash” to the panel lines. Although the technique has worked well for me on past models, this time it flopped. I couldn’t get enough of the wash to stay in the panel lines and control surfaces (which I’d deepened with a scribing tool). Perhaps the lines were too shallow. I know some had been partially filled by the color coats. In any event, I used the trusty art pencil again to highlight the panels in lieu of a wash.
The Modelart decals were simple, just eight red stars and a pair of white “317” bort numbers. The only odd thing was that the sheet had a continuous coat, which meant laboriously cutting out each decal close to the design with a hobby knife. The markings went on without a hitch, and snuggled down with an application of Micro-Sol. When everything was dry, I airbrushed MM Flat Lacquer over the airplane, producing a realistically flat finish.
I sanded the misshapen main gear wheels as round as I could, then covered the outer hub with photoetched spokes from an Eduard TBF Avenger set. I painted the main gear struts MM Steel and the nose gear strut MM Engine Gray. I then used MM Japanese Green on the wheel hubs and Grimy Black on the tires. The strut and hub colors were best guesses based on photos and posts on several modeling-related Internet groups. Are they accurate? To my knowledge, no photo of “White 317” exists, so “Kto znayet?” (Who knows?)
I glued the main wheels to the struts and installed the assemblies. You have to bend what I guess are actuator arms on the struts about 70 degrees to have them rest against the tops of the wheel wells. Next, I installed all the gear doors; the main doors have to be cut along a scribed line and the pieces slightly overlapped. For the jet tailpipe, I cut a piece of plastic straw to a suitable length, shut off one end with scrap plastic, and installed it in the rear of the fuselage. I painted it Metallic Silver inside and out.
|
FINAL CONSTRUCTION |
There were a couple minor items needed to polish off
the cockpit. I dropped in the resin seat, fastening it to the floor with
white glue. I then glued the control stick into the narrow space between
the seat and instrument panel. I also added a simplified gunsight made
from scrap plastic to the top of the instrument panel.
I carefully separated the canopy with a razor saw, then hand-painted the frames Dark Gull Gray overlaid with Sand. I cleaned up most irregularities with a toothpick, but I had to use a painted decal strip over the fore-and-aft frame on the canopy bubble. I wrapped up construction of the aircraft itself by stringing a stretched-sprue antenna from the mast to the tail.
Since people fly and maintain airplanes, I scrounged a couple suitable figures from my spares box and modified them to look like a MiG-15 pilot and ground crewman. I placed them on a base made from a painted ceramic tile and a piece of boxtop. I made “tar lines” with a thin black laundry marker. Note that the panels are rectangular (per frequent Soviet practice) rather than square. The “stains” are drybrushed Grimy Black and drops of goop from the bottom of my thinner jar.
I call this vignette “Drug ili Vrag?” – “Friend or Foe?” in Russian. I imagined the MiG-15 pilot and mechanic gazing at an approaching contrail high in the sky, wondering if it belongs to a Soviet aircraft or a U.S. reconnaissance plane....
|
CONCLUSIONS |
It takes considerable work to get this kit looking like a MiG-15, but nothing an experienced modeler can’t handle. You could skip all the sanding and rescribing I did, but then you’ll have to figure some way to replace all those rivets. You’ll still have to cope with the overall crummy fit if you tackle the early issue of this kit. Perhaps the quality of the current version is better. Internet reviews and previews of kits manufactured by Dragon/Italeri, Airfix and Zhengdefu suggest that none offers a significant improvement over the KP kit in detail, accuracy or fit.
|
REFERENCES |
National Air & Space Museum website: http://www.nasm.si.edu/research/aero/aircraft/mig15.htm
U.S. Air Force Museum website: http://www.wpafb.af.mil/museum/air_power/ap42.htm
Virtual Aircraft Museum: avia.russian.ee/air/ russia/mig-15.html
VVS Russia website (Russian text): http://www.airforce.ru/history/localwars/localwar1.htm
Mig Alley Air to Air Combat over Korea, Squadron/Signal Publications
August 2004
Copyright ModelingMadness.com. All rights reserved. No reproduction in
part or in whole without express permission from the editor. If you would like your product reviewed fairly and fairly quickly, please
contact
the editor or see other details in the
Note to
Contributors.