| KIT #: | A02037 |
| PRICE: | $10.00 or so SRP |
| DECALS: | Three options |
| REVIEWER: | Ralph Koziarski |
| NOTES: | New mold kit |
| HISTORY |
What can I
say about the Mig-15 that most aircraft aficionados do not already know?
It was the first mass produced, mass exported of the Mig jets, and
perhaps one of the most successful jet designs of the early cold war. It served
with many airforces, and scared the pants off of the UN forces during the Korean
War. Even pilots flying the venerable F-86 Sabre had their hands full with when
encountering Mig-15s flown by well trained North Korean (read Soviet) pilots.
The type served well past the 1950s with many nations, and may still be flying
in
| THE KIT |
 Airfix’s new
Mig-15 was recently released to generally favorable reviews, and hopefully is a
glimpse of things to come from them. The kit features approximately 50 parts in
a robust kid-friendly plastic, a nice clear canopy, the deeply recessed panel
lines characteristic of recent Airfix offerings, and beautiful decals for three
aircraft.
Airfix’s new
Mig-15 was recently released to generally favorable reviews, and hopefully is a
glimpse of things to come from them. The kit features approximately 50 parts in
a robust kid-friendly plastic, a nice clear canopy, the deeply recessed panel
lines characteristic of recent Airfix offerings, and beautiful decals for three
aircraft.
When you open the attractive red box you can almost immediately see that this kit will just fall together. The kit is made of up two fuselage halves, two horizontal stabilizers, four wing halves, a tail pipe, jet intake, three separate cannons, positionable speed brakes, about a dozen landing gear components, one piece canopy, two antennae and a simple but effective cockpit consisting of a basic tub, instrument panel, control column and seat. Instruments are rendered with some very detailed and attractive decals. Also present are parts for two styles of drop-tanks.
| CONSTRUCTION |
Construction started with assembling the cockpit and painting
it in a light greenish blue. Once dry I applied some Future floor polish and
then the instrument panel decals. I painted the seat black and dry brushed in in
very dark gray, then added some
 harnesses
made from masking tape.
harnesses
made from masking tape.
Airfix includes an old friend; Johnny Pilot, but he hasn’t
aged well, and his face is now almost featureless. JP got pressed into service
flying an old Frog Miles Magister, but I did test fit him into the seat and
cockpit and he looked fine.
Once completed, the cockpit was inserted into the fuselage,
which is a tight fit, and could probably done without the use of glue. I glued
in about 7 grams of lead weights into the forward fuselage below the cockpit
floor, glued in the tail-pipe and then closed up the fuselage halves. They fit
like a glove, and only minor sanding and filling was required to clean up the
seam. The wings, nosecone and horizontal stabilizors were added next, and they
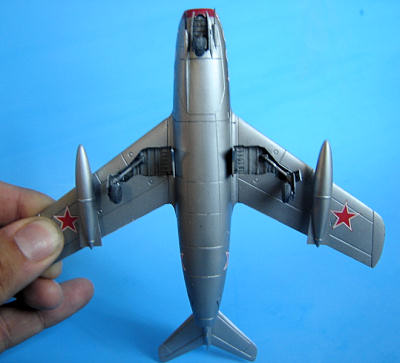
too fit very well. I then glued on the three cannons below the nose, and the
stub antenna on top of the fuselage. I decided to glue on the large drop tanks,
inner main gear doors, and nose gear doors prior to painting. Finally I glued on
and painted the “HUD” portion in front of the instrument panel, and masked and
attached the canopy with Micro Krystal Klear and was ready for painting.
| COLORS & MARKINGS |
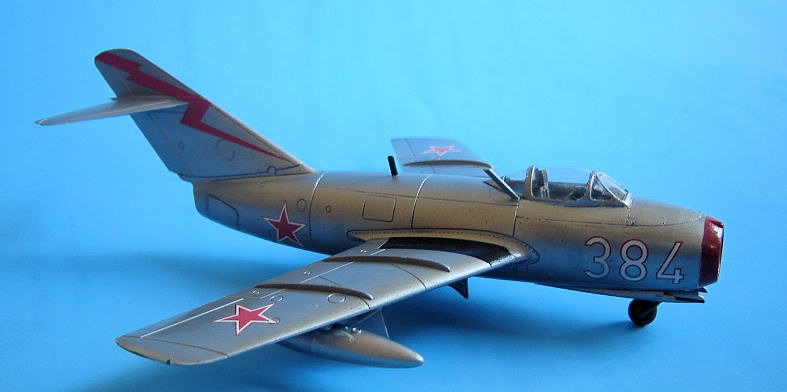
Airfix gives you decals for three options on the decal sheet;
an overall silver Soviet aircraft from the early 1950s, a 3-tone camouflaged
Hungarian bird from the 1970s, and a Korean War era North Korean (flown by a
Soviet pilot) aircraft with black undersides and sand-yellow with green
squiggles uppers. The silver Mig is perhaps the most iconic, so I chose the
first finishing option (I thought it would also be the easiest to paint) and
sprayed my model with Citadel chainmail silver.
A note to beginners; if you decide to model your aircraft in
silver, do yourself a favor and get a spray can of enamel or lacquer based
paint. As much as I swear by acrylics, acrylic metallic finishes are very
fragile. For the remainder of the project I was continuously rubbing off paint,
and had to touch up wing edges and other spots numerous times. Had I used a
lacquer like 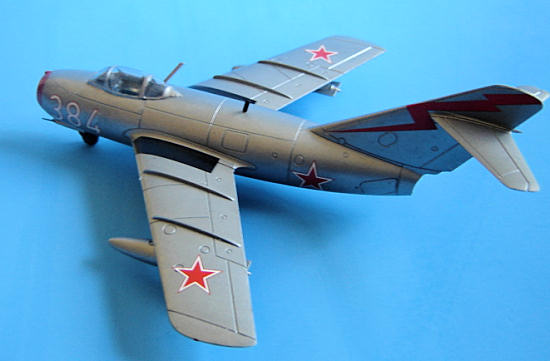 Tamiya’s
silver leaf, the project could have been finished over a weekend.
Tamiya’s
silver leaf, the project could have been finished over a weekend.
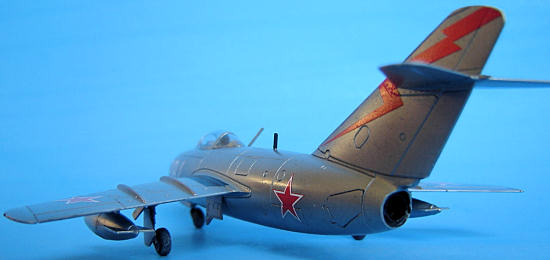
The jet intake on the nose was painted red, and the landing
gear components and insides of gear doors with a dull dark aluminum metallic
paint. The instructions suggest using Humbroll 56, go with it. Finally, the
tailpipe was painted with a dark metallic brown color called burnt iron. It was
time to apply the decals.
Airfix has a spotty history when it comes to decals. At times
they were very nice, while at others not so much (the dreaded brown backing
paper era of the mid 2000s probably being the lowest point). The decals which
come in the new red-box kits are just wonderful; certainly on par with what you
might find in a Trumpeter or Dragon kit. The red stars, numbers, and
lightning-bolts on the tail all went on without a hitch. There really isn’t much
more to say. I used some decal softener for good measure, but I’m not sure it
was necessary. Airfix gives you a full set of stencils (two versions actually),
but I left them off, as I find stencils on 1/72 to be a bit too busy looking in
most (but not all) cases.
Once the decals were dry I brushed on a coat of Future floor
polish to protect the finish. I know relatively little about the Mig-15, and I
don’t know if the silver finish on the real aircraft was just unpainted metal,
or an aluminum lacquer as on some aircraft. The future coat gave the model a
lacquered look and it was back to the workbench to tie things up.
| FINAL CONSTRUCTION |
 After all of
the decaling and painting was done, I removed the masking from the canopy (which
proceeded to fall off and had to be re-glued) and attached the previously
painted landing gear components. The small outer gear doors are a bit tricky to
fit, but everything else is very easy and lines up perfectly. I painted the
various oleo struts with chrome paint, and the tires (tyres on an Airfix kit)
with a very dark gray which was later drybrushed with a lighter gray to simulate
wear.
After all of
the decaling and painting was done, I removed the masking from the canopy (which
proceeded to fall off and had to be re-glued) and attached the previously
painted landing gear components. The small outer gear doors are a bit tricky to
fit, but everything else is very easy and lines up perfectly. I painted the
various oleo struts with chrome paint, and the tires (tyres on an Airfix kit)
with a very dark gray which was later drybrushed with a lighter gray to simulate
wear.
Final finishing touches included a second antenna mounted near
the canopy, painting the cannons dark gray and then rubbing with pencil
graphite, and my one small modification on this kit. Airfix does not include any
navigation lights on this model, but they’re very easy to make from scratch. The
Mig 15 had little bulbs on the wing ends, which I reproduced by cutting a tiny
notch into the outer edge of each wing. I put in a dab of clear red and clear
green paint into the notches, and then “filled” them with some Krystal Klear.
| CONCLUSIONS |
That’s all there is to it; a very simple but satisfying build.
There is no use bemoaning the deep panel lines, they’re just an Airfix “thing”
these days. I’m not wild about them, but they look fine as long as you don’t try
to add a dark wash. Those who choose to do so, can further tone them down with a
few applications of filler. The kit looks like a Mig-15 to my eye, and I think
the silver and red finish looks very attractive sitting on my shelf. I will not
hesitate to buy at least another one, and recommend it to both beginner and
experienced modelers looking for a fun carefree build.
Kit courtesy of my awesome wife.
Ralph Koziarski
http://rkicbuilds.wordpress.com/
If you would like your product reviewed fairly and quickly, please contact me or see other details in the Note to Contributors.