Revell 1/72 MiG-21F-13
| KIT #: | 03967 |
| PRICE: | 14.99 Euro |
| DECALS: | Two options |
| REVIEWER: | Fernando Rolandelli |
| NOTES: |
| HISTORY |
The Luftstreitkräfte der Nationalen Volksarmee - LSK, the Air Force of the People’s National Army (the air force of the German Democratic Republic) followed necessarily a different path from the Bundesluftwaffe. Shunning the terminology used by the former Luftwaffe, it picked her traditions form the Imperial Germany’s Air Force, also called Luftstreitkräfte. Even its uniforms were Field Gray, like the latter, instead of an “aeronautical” bluish grey. It was established in 1956 with two Air and an AA divisions; HQ was in Cottbus. Insignia was taken from the DDR flag colours; it got her Coat of Arms (a hammer, a compass and a twin sheaf of wheat, symbolizing the “Republic of Workers and Farmers”) a bit later.
 The MiG-21
doesn’t need an introduction; suffice to say here that the early versions (the
“First” and “Second Generation” ones) look like severely underarmed and
underlegged, possibly as a consequence of the small size imposed by the
performance goals established, to the point of making you consider how such a
limited machine would have been considered for active service at all. They were
no more than single-shot point defense interceptors, thought to operate under
strict control from ground radar operators, in a “grid” pattern quite similar to
that used by WWII German night air defense organization; probably able to get to
only one target and have only one firing solution at it in any single sortie.
That the machines were nimble and quite maneuverable saved them in a way, making
their use as tactical fighters possible; especially in the hands of operators
which lacked the extensive radar coverage Soviet-style tactics needed. It is
remarkable that Warsaw Pact air forces, including the LSK, continued with such
tactics even to their demise, as discovered by Bundesluftwaffe personnel when
incorporating JG3’s MiG-29s and personnel after the reunification.
The MiG-21
doesn’t need an introduction; suffice to say here that the early versions (the
“First” and “Second Generation” ones) look like severely underarmed and
underlegged, possibly as a consequence of the small size imposed by the
performance goals established, to the point of making you consider how such a
limited machine would have been considered for active service at all. They were
no more than single-shot point defense interceptors, thought to operate under
strict control from ground radar operators, in a “grid” pattern quite similar to
that used by WWII German night air defense organization; probably able to get to
only one target and have only one firing solution at it in any single sortie.
That the machines were nimble and quite maneuverable saved them in a way, making
their use as tactical fighters possible; especially in the hands of operators
which lacked the extensive radar coverage Soviet-style tactics needed. It is
remarkable that Warsaw Pact air forces, including the LSK, continued with such
tactics even to their demise, as discovered by Bundesluftwaffe personnel when
incorporating JG3’s MiG-29s and personnel after the reunification.
| THE KIT |
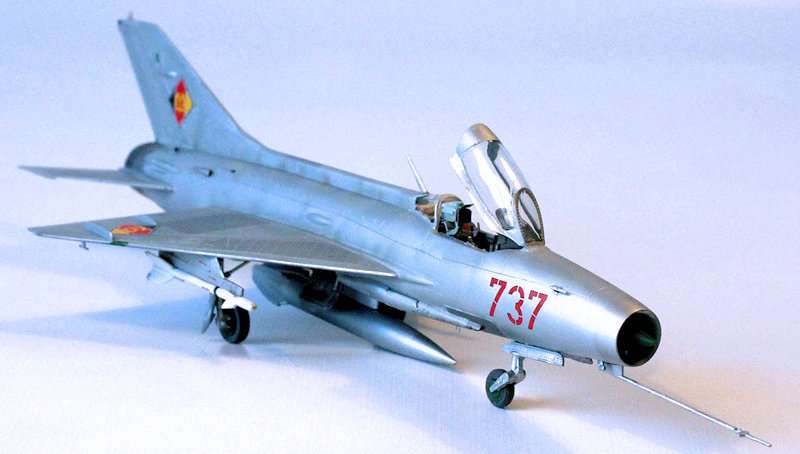
This is the excellent kit from Revell AG, which features good shape with petite
surface details. Decals are supplied for two versions, one VVS and another from
the LSK, both are rather anonymous machines. It is claimed that the German one
was flown by the first German astronaut, but this is put to doubt for it seems
he actually served in JG8. There is one glaring shape problem, and that is the
nose ring, which “flares out” as if the rim was oversized (and has four braces
holding the central cone). The effect is very visible. Minor problems are the
seat, which is decidedly chunky (not that the real one were a stylized piece of
 design); the
inner armoured glass (far too big; you cannot pose the canopy close without
doing something about it; fearing it was just a matter of thickness of the
material, I left it as it is; however, in the Eduard PF it is considerably
shorter); and the armament (only dummy missiles are provided in case you want to
configure your model for air-to-air; acceptable 57mm rocket pods and very
suspicious bombs (looking like a cross between a FAB-500 and a ZAB-360 napalm
canister) are provided in case you want a ground attack plane –but LSK machines
were usually in the air defense role) As routine, I threw in an Eduard Zoom PE
set, but stubbornly refused to acquire a resin nose ring or a bang seat, which
are available for less industrious souls.
design); the
inner armoured glass (far too big; you cannot pose the canopy close without
doing something about it; fearing it was just a matter of thickness of the
material, I left it as it is; however, in the Eduard PF it is considerably
shorter); and the armament (only dummy missiles are provided in case you want to
configure your model for air-to-air; acceptable 57mm rocket pods and very
suspicious bombs (looking like a cross between a FAB-500 and a ZAB-360 napalm
canister) are provided in case you want a ground attack plane –but LSK machines
were usually in the air defense role) As routine, I threw in an Eduard Zoom PE
set, but stubbornly refused to acquire a resin nose ring or a bang seat, which
are available for less industrious souls.
For many operations I used as a reference an Eduard 1/48 21PF. Very useful.
| CONSTRUCTION |
I began with the seat, which you can built up from PE pieces and a few plastic
squares from the scratch. It didn’t look a good idea, but it was actually far
simpler than imagined. The worst part was adapting the very complex harness
(consider it is prepainted so you cannot anneal it) The side consoles (their
only problem is that they are painted in a lurid colour which resembles nothing
of Russian Interior Green) and
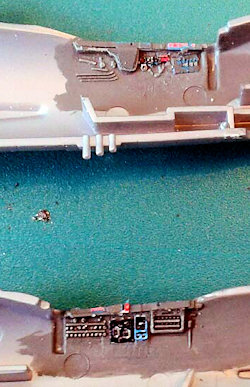 instrument
panel are great and fit like a glove (I thinned the plastic piece to provide a
backing for the panel). I built up a gunsight with a piece of square plastic. I
assembled the exhaust and then closed the fuselage. There is plenty of room for
the much needed nose weight.
instrument
panel are great and fit like a glove (I thinned the plastic piece to provide a
backing for the panel). I built up a gunsight with a piece of square plastic. I
assembled the exhaust and then closed the fuselage. There is plenty of room for
the much needed nose weight.
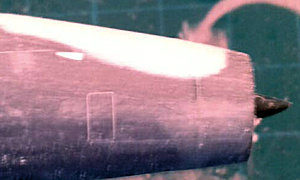
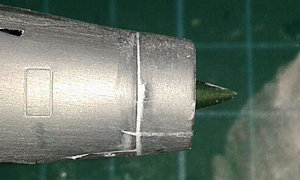 The central
cone I tackled eliminating the two horizontal braces. Then I glued it to the
front fuselage, and built up using Milliput the upper surface: it should be a
smooth slope from windscreen to the nose rim. It was not difficult, Milliput is
a great stuff. I do not know if the rim itself is too big, or the front fuselage
halves are too small in diameter; anyway, this fix clearly gives the front
fuselage the correct look. Having painted the shotgun balls I use as nose weight
and its surroundings in Black, there is absolutely no see-through effect.
The central
cone I tackled eliminating the two horizontal braces. Then I glued it to the
front fuselage, and built up using Milliput the upper surface: it should be a
smooth slope from windscreen to the nose rim. It was not difficult, Milliput is
a great stuff. I do not know if the rim itself is too big, or the front fuselage
halves are too small in diameter; anyway, this fix clearly gives the front
fuselage the correct look. Having painted the shotgun balls I use as nose weight
and its surroundings in Black, there is absolutely no see-through effect.
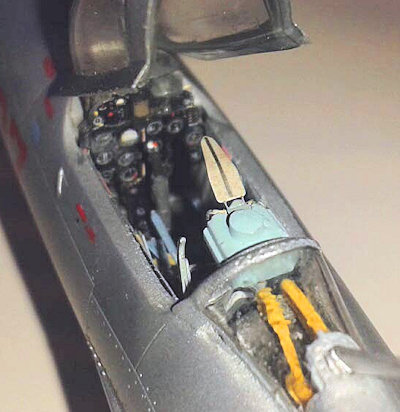
I detailed the rear cockpit adding the very prominent Yellow hydraulic tubing in
copper wire, then added the clear part. The armored glass piece I painted and
detailed with some pieces of plastic mimicking the
 electrical
boxes behind the instrument panel; this was added (already painted) inside the
clear part. I left it for the final assembly. Do not worry about the seam in the
coaming; if properly painted, the base of the clear part will deal with it.
electrical
boxes behind the instrument panel; this was added (already painted) inside the
clear part. I left it for the final assembly. Do not worry about the seam in the
coaming; if properly painted, the base of the clear part will deal with it.
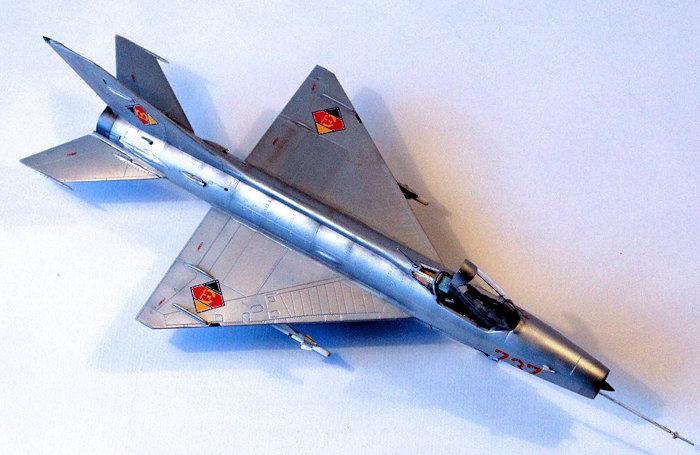
Fuselage was closed without problems. I erased the grossly oversized IFF antennae to replace them with PE parts at a later stage. I puttied and sanded the lower fuselage seams before adding the cannon fairings. All airbrakes I posed closed; in this scale, open airbrakes look inevitably chunky. The aircraft design is anything near clean and there are a lot of fairings, bumps, bulges and intakes. They are very well represented.
Wings posed no problems. I detailed the wheel wells with some wiring. Having decided to depict an operational, armed machine, I separated the dummy missiles and smoothed the launchers. Then I used a pair of Sidewinders (AIM-9Bs from a Fujimi Phantom) in lieu of R-3Ss. Undercarriage legs have a very positive fit and the model got squared in the first go. The doors were not so friendly but after some juggling they got fixed in an acceptable attitude. Front leg is a bit fragile.
I have a penchant with fuel tanks. This one, just as usual, has an extremely poor design that was a nightmare to fill and sand, losing all the raised detail.
| COLORS AND MARKINGS |
After some consultations with resources, I went for a Dark Grey finish in the cockpit (exception made of the seat, which was lighter; I left it in the Light Blue-Grey the PE was pre-painted in), mostly after some pictures in the “4+” book which left little doubt (other than its relevance to the particular airframe I was modeling!) That forced me to carefully repaint the small pre-painted PE parts, whose rendition of the infamous Light Green was totally unacceptable anyway!
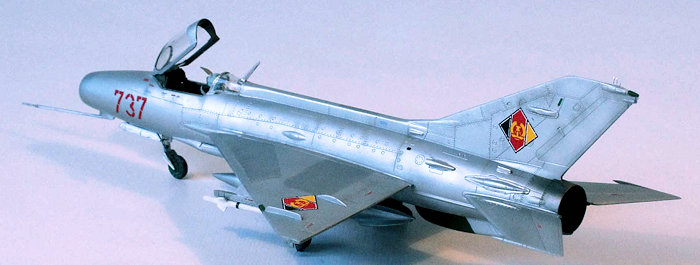
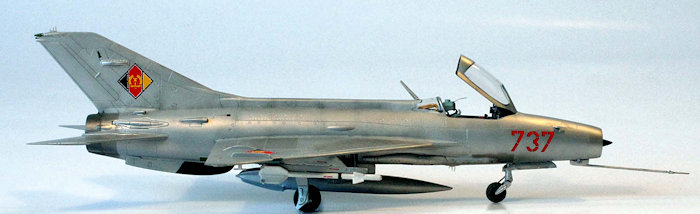 After
reading some discussion around the classic NMF or Aluminium paint option, I
decided to go for a “Soviet NMF”, which is much duller than the “Warbird in the
US” look you see in most NMF models. I used an Alclad Grey Primer, buffed it
lightly, and went for a base of Alclad Aluminum. Then I picked some panels
(using a couple of pictures and the painting instructions on Eduard’s PF) and
used a mix of the same Alu with a little Magnesium. The rear end was painted
using this Magnesium and Burnt Iron. The cone and the dialectric panels were
painted in a bluish green from a concoction made on the spot.
After
reading some discussion around the classic NMF or Aluminium paint option, I
decided to go for a “Soviet NMF”, which is much duller than the “Warbird in the
US” look you see in most NMF models. I used an Alclad Grey Primer, buffed it
lightly, and went for a base of Alclad Aluminum. Then I picked some panels
(using a couple of pictures and the painting instructions on Eduard’s PF) and
used a mix of the same Alu with a little Magnesium. The rear end was painted
using this Magnesium and Burnt Iron. The cone and the dialectric panels were
painted in a bluish green from a concoction made on the spot.
I applied a couple of coats of Xtracrylixs gloss varnish, which I find do not affect the NMF to any great extent. The decals went in nicely on that; full marks to the box decal sheet. Some spurious stencils were applied to the (equally spurious) R-3Ss. On top of that, another gloss coat and then went a light artist’s acrylic matt coat. A very restrained weathering with a dark grey completed the dusty, dull, weathered look of Soviet jets of the era.
| CONCLUSIONS |
It was a great month-long project, mostly straightforward and satisfying. There is scope for a more involved build, converting the aircraft to the recce configuration, with a vertical camera, used in their late years, in camouflage paint. That, if you manage to find some hard information!
| REFERENCES |
“MiG-21”; “4+” publications
“MiG-21 Walkaround”, Squadron Signaal Publications
“MiG-21”, Air Vanguard nº 14, Osprey Publications
“Modell Fan MiG-21F-13”
January 2016
Copyright ModelingMadness.com
If you would like your product reviewed fairly and fairly quickly, please contact the editor or see other details in the Note to Contributors.