| KIT #: | HC 1690 |
| PRICE: | $24.99 for this one but often found at different prices. |
| DECALS: | Two options |
| REVIEWER: | Kevin Thompson |
| NOTES: |
| HISTORY |
The MiG-15 needs very little introduction. To most who read reviews on MM (and are therefore relatively knowledgeable in aviation history), it is not necessary to go into the full history of the MiG-15 any more than going into the history of the F-86 Sabre, BF 109, Spitfire, Zero or Mustang. It is a well-known plane. First flown in 1947, it was the Soviet Union’s first major swept-wing jet fighter. It was manufactured in the Soviet Union, as well as under license in Czechoslovakia and Poland.
By 1952, MiG-15s were the major nemesis of the F-86 Sabre in the skies over North Korea. While these MiGs were in both North Korean and Chinese service, the majority of pilots who flew them were in fact, Soviets. This was not as widely known until recently, when much more information became available. The USAF F-86 pilots of the 4th and 51st Fighter Groups must have known something, though, having seen at least one or more instances of a MiG pilot bailing out of his stricken jet, only to reveal his blonde hair when his helmet was blown off by the wind! The MiG-15 was armed with two 23mm and one 37mm cannon, and the F-86 had six 50-caliber machine guns. This was the first Cold-War shootout of jet versus jet, east versus west, and was to pit two similarly performing aircraft against one another.
 In September 1952, Semen
Alexeivich Fedorets was a Soviet pilot flying with the 913th IAP, 32nd
IAD in the North Korean Air Force. By July the next year, when the fighting
stopped, Fedorets would have completed 98 missions, and become an ace with eight
kills, all of which were F-86E and F-86Fs. Fedorets’ most interesting combat
would, however, come on April 12, 1953 when he engaged and fired upon an F-86
piloted by Joe McConnell (who ended the war as the USAF’s highest-scoring ace),
successfully damaging the F-86 where McConnell was eventually forced to bail
out. But not before McConnell, after being hit, rolled his wounded jet over,
engaged Fedorets’ MiG-15 and succeeded in turn in shooting him down! The Soviet
pilot immediately bailed out of his MiG-15 at about 33,000 feet, and McConnell
limped his damaged Sabre out over the East China Sea, finally bailing out and
being subsequently rescued. McConnell was Fedorets’ sixth victim, and Fedorets
became McConnell’s eighth kill. This had to be one of the most unusual aerial
engagements ever, with two opposing pilots shooting one another down in the same
fight! It almost sounded like a Hollywood movie script. Both men went on to
score more kills before the cease-fire in July 1953.
In September 1952, Semen
Alexeivich Fedorets was a Soviet pilot flying with the 913th IAP, 32nd
IAD in the North Korean Air Force. By July the next year, when the fighting
stopped, Fedorets would have completed 98 missions, and become an ace with eight
kills, all of which were F-86E and F-86Fs. Fedorets’ most interesting combat
would, however, come on April 12, 1953 when he engaged and fired upon an F-86
piloted by Joe McConnell (who ended the war as the USAF’s highest-scoring ace),
successfully damaging the F-86 where McConnell was eventually forced to bail
out. But not before McConnell, after being hit, rolled his wounded jet over,
engaged Fedorets’ MiG-15 and succeeded in turn in shooting him down! The Soviet
pilot immediately bailed out of his MiG-15 at about 33,000 feet, and McConnell
limped his damaged Sabre out over the East China Sea, finally bailing out and
being subsequently rescued. McConnell was Fedorets’ sixth victim, and Fedorets
became McConnell’s eighth kill. This had to be one of the most unusual aerial
engagements ever, with two opposing pilots shooting one another down in the same
fight! It almost sounded like a Hollywood movie script. Both men went on to
score more kills before the cease-fire in July 1953.
By this time, the USAF Sabre pilots had claimed a 10-to-1 kill ratio over the MiG-15, though the figures from the communist side are, of course, very different. In the end, it was the superior training and skill of the USAF pilots that prevailed, many of whom were aces in propeller-driven aircraft just a few years earlier, during World War II. MiG-15s went on to be front-line fighters for all Soviet-friendly Air Forces throughout the 1950s, and the two-seat MiG-15UTI trainer was used by many air forces through the early 1970s.
| THE KIT |
The Chinese Trumpeter brand introduced its first kits about ten years back, in the mid-90s. The MiG-15bis (Chinese J-2) and MiG-17F (J-5) in 1/32nd scale were their first efforts. Any time a new company gets their “feet wet” in the modeling industry, there is always a learning curve. Any kit manufacturer that comes to mind will invariably bring memories of at least one or two early kits that were “sub par” with that same company’s later efforts. This MiG-15 from Trumpeter has been the subject of some serious criticism over the years by many a builder and reviewer, some of it a bit more harsh than the kit actually deserved.
 It is my opinion that, while
this kit has at least one major and seven minor issues, it is by far a much
greater triumph than a failure, and I will discuss all of these issues in the
construction process. Kit has about 104 pieces molded in light gray and clear
plastic with three rubber tires. Detail is pretty good, with engraved panel
lines and rivet detail. Kit fuselage pieces have a slightly grainy or rough
surface, but this is easily remedied with light sanding/ polishing, and the
detail is deep enough to be there after the fact. Thicknesses and shapes are
overall quite good and appear accurate (they should be; the Chinese should have
had access to at least one real example for measuring and reference).
It is my opinion that, while
this kit has at least one major and seven minor issues, it is by far a much
greater triumph than a failure, and I will discuss all of these issues in the
construction process. Kit has about 104 pieces molded in light gray and clear
plastic with three rubber tires. Detail is pretty good, with engraved panel
lines and rivet detail. Kit fuselage pieces have a slightly grainy or rough
surface, but this is easily remedied with light sanding/ polishing, and the
detail is deep enough to be there after the fact. Thicknesses and shapes are
overall quite good and appear accurate (they should be; the Chinese should have
had access to at least one real example for measuring and reference).
Several parts have optional positions, including the flaps, ailerons, elevators and rudder, and the air brakes can be displayed in the open or closed positions. A fully detailed Klimov VK-1 engine can be displayed with the aft portion of the fuselage removed, as on the real aircraft. Parts are even included for a cart to hold the aft fuselage assembly when removed, a nice touch. So at first glance, the majority of the parts look pretty good, and kit has reasonable detail for its scale. Upon first inspection of the clear parts, however, it is revealed that the canopy and windshield are a complete disaster. That’s right, a complete disaster. The shape and framing is so far off, it is wondered what was used for reference. The front windshield is too deep from the vertical frame, and the rake or angle is completely off. Again, I have no idea how they could get these pieces so wrong, when everything else looks pretty accurate. The canopy is a major part of the MiG’s character, so something will have to be done there… OK, let’s get started with this kit.
| CONSTRUCTION |
 As with most models, the
cockpit comes first. Now most modern 1/32nd scale kits have
intricately detailed cockpits, but these earlier Trumpeter kits were a bit
sparse in this area, and most modern 1/48th kits have even more
cockpit parts than this. Cockpit consists of six pieces: floor, seat, headrest,
stick, instrument panel and gunsight. Now I’m not real big on heavy cockpit
detail most of the time, but this kit could use some seat belts, and some more
detail and switches in the side panels. Anyway, what was there was painted in
Model Master FS 36375 Light Ghost Gray, with black and flat silver details. Next
one of these I do will have some cockpit enhancements. The whole cockpit
assembly was cemented into the locater pegs on the right front fuselage half and
the fit is very good. Several “dry fits” revealed that the cockpit tub could be
fit between the fuselage halves with no cement at all, and would not rattle in
place. That’s a good fit.
As with most models, the
cockpit comes first. Now most modern 1/32nd scale kits have
intricately detailed cockpits, but these earlier Trumpeter kits were a bit
sparse in this area, and most modern 1/48th kits have even more
cockpit parts than this. Cockpit consists of six pieces: floor, seat, headrest,
stick, instrument panel and gunsight. Now I’m not real big on heavy cockpit
detail most of the time, but this kit could use some seat belts, and some more
detail and switches in the side panels. Anyway, what was there was painted in
Model Master FS 36375 Light Ghost Gray, with black and flat silver details. Next
one of these I do will have some cockpit enhancements. The whole cockpit
assembly was cemented into the locater pegs on the right front fuselage half and
the fit is very good. Several “dry fits” revealed that the cockpit tub could be
fit between the fuselage halves with no cement at all, and would not rattle in
place. That’s a good fit.
Next step was the front intake splitter and nose weight. I use automotive tape weights for ballast as they can easily be cut into small bits and have adhesive backing. Several weights (about 1.5 oz, 42g) were attached with CA glue below the cockpit (above the weapons and front landing gear bay). Kit has horizontal pegs on intake splitter sides that go into the circular fuselage walls. The real MiG has these as well, but they are much further aft than on the kit, and don’t show immediately on the real aircraft due to distance and darkness. Therefore, I removed these tabs on the intake splitter sides, attached the splitter via its top where it meets the top of the circular fuselage wall. Next step was to make some discs out of Plastruct sheet to block off the fuselage interior aft of the splitter, as some of the cockpit floor and locater pegs would show undesirably. These discs were painted flat black for depth and shadow, and the intake splitter was also done in the same gray as the cockpit (FS 36375). It is believed that some of the MiGs that were camouflaged had a gray intake as opposed to natural metal. Once the intake splitter, disc halves and weight were installed, front fuselage halves were cemented together. A slight warping of these parts meant some clamping was necessary while cement dried. Next step was to cement the weapons panel and front gear bay in place. Fit of this piece to fuselage halves is very good. The front intake ring was also installed at this time.
 With the front fuselage
basically done, it was time for me to make a decision. As mentioned earlier,
this kit has a nicely detailed engine with a detachable rear fuselage/ tail
section. It has been my experience over the years that “action” parts usually
create gaps that are out of scale or misaligned. The old Monogram 1/48th
Avenger, Wildcat, Hellcat and Helldiver with folding wings come to mind when I
think of action parts. I did not want to risk a sagging rear fuselage or overly
large gap on the finished model, so I decided to conceal the engine and glue the
aft fuselage / tail assembly to the forward fuselage. The engine and bulkhead
were built up and installed unpainted though, so the exhaust tube would be
correctly aligned.
With the front fuselage
basically done, it was time for me to make a decision. As mentioned earlier,
this kit has a nicely detailed engine with a detachable rear fuselage/ tail
section. It has been my experience over the years that “action” parts usually
create gaps that are out of scale or misaligned. The old Monogram 1/48th
Avenger, Wildcat, Hellcat and Helldiver with folding wings come to mind when I
think of action parts. I did not want to risk a sagging rear fuselage or overly
large gap on the finished model, so I decided to conceal the engine and glue the
aft fuselage / tail assembly to the forward fuselage. The engine and bulkhead
were built up and installed unpainted though, so the exhaust tube would be
correctly aligned.
With the fuselage assembly complete, the horizontal stabilizers, elevators and rudders were all assembled. As mentioned in other reviews, almost every photo I have ever seen of a MiG-15 (or any other MiG, for that matter) has had all the control surfaces locked in the neutral position when on the ground, with flaps closed. So that is how I built this kit, with all the control surfaces neutral, and airbrakes shut. It should be mentioned that all of the control surface parts fit the corresponding flying surface very well, with small, even gaps. Outer trailing edge tips of elevators must be rounded off with light sanding, as kit parts are sharp-edged with no curve. Detail enthusiasts are probably thinking, “all of those options and he’s bottling this kit up, completely closed.” As stated earlier, these aircraft are usually parked with everything shut. Maybe someday I’ll do this kit again with flaps down and airbrakes open. In any case, fuselage and tail assembly is now complete, and wings are next.
Assembly of the wings is
straightforward, with upper and lower wing panels, upper and lower aileron
halves, flaps and wing fuel tanks. Kit is supplied with both the early small and
later large fuel tanks. I used the early-vintage smaller fuel tanks, as these
were probably more prevalent on Korean War MiGs. Again, fit of all parts is very
good, with some minor sanding to fit on the tanks. Once
 the wing assemblies were done,
they were married to the fuselage. MiG-15 has very slight anhedral, so they were
continuously head-on sighted for over an hour until cemented joints were dry
enough to no longer sag. Airframe assembly was now completed, and allowed to dry
for a day or so prior to sanding. Once the assembly had dried sufficiently, some
filler was added to bottom wing/ fuselage joints, as the gap is quite big in
this area. Thankfully this is on the underside, and the topside fit is virtually
flawless with no filler and only light sanding needed. There are also two small
holes in the left forward fuselage to locate the crew ladder that must be filled
in, as the actual full-size machine has no such locating holes in its fuselage.
The upper wings have small sink holes at the trailing edges near the root that
need minor filling. The entire airframe was now seam-sanded, and finished off
with wet 400 and then wet 1000 grit. As mentioned earlier, the slightly grainy
fuselage surfaces were buffed out and retained the surface detail. This is far
more critical on a natural metal finish than on a camouflaged paint scheme,
however.
the wing assemblies were done,
they were married to the fuselage. MiG-15 has very slight anhedral, so they were
continuously head-on sighted for over an hour until cemented joints were dry
enough to no longer sag. Airframe assembly was now completed, and allowed to dry
for a day or so prior to sanding. Once the assembly had dried sufficiently, some
filler was added to bottom wing/ fuselage joints, as the gap is quite big in
this area. Thankfully this is on the underside, and the topside fit is virtually
flawless with no filler and only light sanding needed. There are also two small
holes in the left forward fuselage to locate the crew ladder that must be filled
in, as the actual full-size machine has no such locating holes in its fuselage.
The upper wings have small sink holes at the trailing edges near the root that
need minor filling. The entire airframe was now seam-sanded, and finished off
with wet 400 and then wet 1000 grit. As mentioned earlier, the slightly grainy
fuselage surfaces were buffed out and retained the surface detail. This is far
more critical on a natural metal finish than on a camouflaged paint scheme,
however.
Once all the seams were filled and
sanded, the wet sanding and polishing completed, it was time to install some of
the smaller, more delicate pieces that could have gotten broken during the
sanding process. Fuselage antennae need some minor help. The
 small vertical post in the
upper fuselage center is molded too bulky and is off set to the left, which is
incorrect. Cut this off, and make a slightly thinner piece from stretched sprue.
Cement it dead center on the upper fuselage, roughly equidistant from the
vertical fin and rear of the canopy. The swept antenna post on the right side of
the canopy needs about 1/16” removed from it, and it needs to be installed 1/8”
higher on the model than where the cut out in fuselage originally was. Fill the
original hole with some plastic or putty. The two under wing antennae were
fitted in their respective spots (outboard left and inboard right) and the pitot
tube was installed in the right wing leading edge. Front gear doors and inboard
main gear doors were cemented in place prior to painting, for a stronger joint.
The three cannon were now installed. The two 23mm guns required a little
repositioning to be sighted straight ahead, but this was no real problem. The
big 37mm gun, however, is partially molded in the belly weapons panel and the
main gun fairing is to be cemented to the weapons panel. This gun is a poor fit
and requires some serious filling and sanding to get the gun fairing to look
smooth and as one piece. Inboard wing fences were also slightly cut out at
mid-chord using a Dremel Moto-Tool. I believe the real aircraft have it only on
one side, so I may have a built-in mistake after the fact! Oh well. Once that
was accomplished, it was now time for painting.
small vertical post in the
upper fuselage center is molded too bulky and is off set to the left, which is
incorrect. Cut this off, and make a slightly thinner piece from stretched sprue.
Cement it dead center on the upper fuselage, roughly equidistant from the
vertical fin and rear of the canopy. The swept antenna post on the right side of
the canopy needs about 1/16” removed from it, and it needs to be installed 1/8”
higher on the model than where the cut out in fuselage originally was. Fill the
original hole with some plastic or putty. The two under wing antennae were
fitted in their respective spots (outboard left and inboard right) and the pitot
tube was installed in the right wing leading edge. Front gear doors and inboard
main gear doors were cemented in place prior to painting, for a stronger joint.
The three cannon were now installed. The two 23mm guns required a little
repositioning to be sighted straight ahead, but this was no real problem. The
big 37mm gun, however, is partially molded in the belly weapons panel and the
main gun fairing is to be cemented to the weapons panel. This gun is a poor fit
and requires some serious filling and sanding to get the gun fairing to look
smooth and as one piece. Inboard wing fences were also slightly cut out at
mid-chord using a Dremel Moto-Tool. I believe the real aircraft have it only on
one side, so I may have a built-in mistake after the fact! Oh well. Once that
was accomplished, it was now time for painting.
| COLORS & MARKINGS |
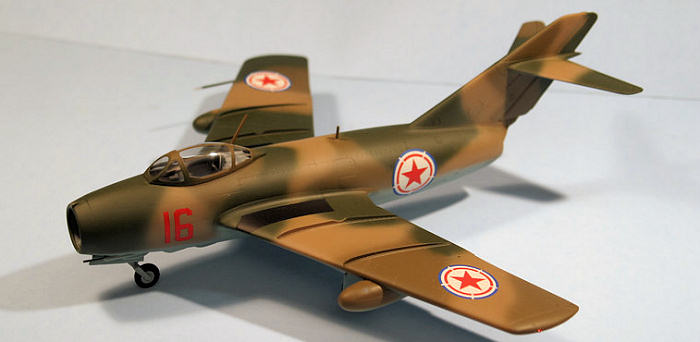
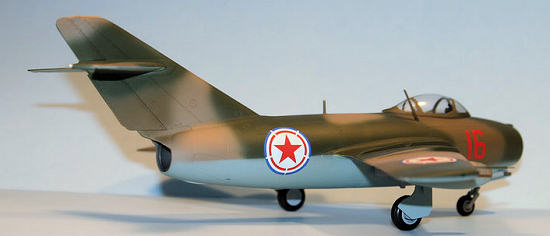
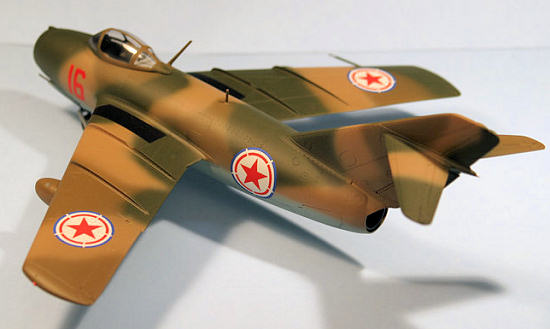
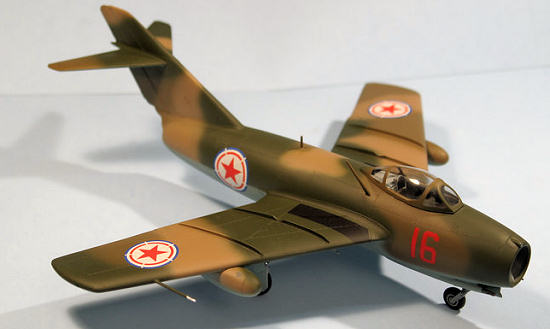
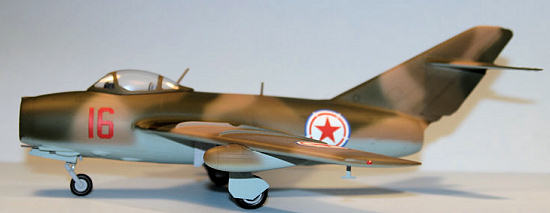
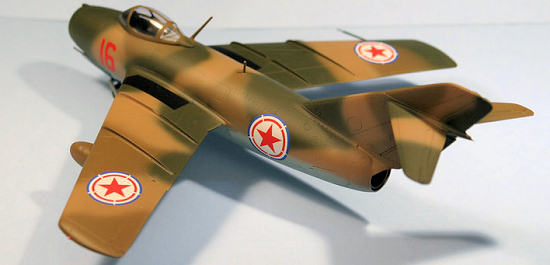
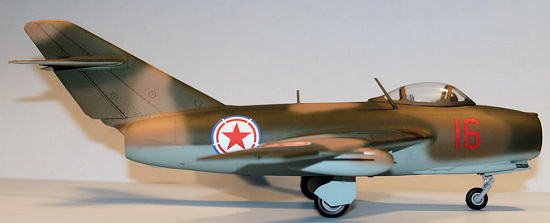
 Fedorets’ last MiG-15,
camouflaged “red 16” is well-represented in Aeromaster’s sheet 32-006, “Korean
War MiG Aces, Part II” that includes two Chinese aircraft as well as the
Fedorets plane in North Korean markings. The MiG carries a three-tone upper
scheme of tan, brown and dark green with light blue undersides. Photos of North
Korean MiG-15s are almost nonexistent. The research for this AeroMaster sheet
was by Bob Hanes and Yuri Vykhodsev (the latter being a flight engineer for
Aeroflot, who provided some of the Korean War paint schemes “believed to be
accurate among the Russian modeling and aeronautical world”). Using the
AeroMaster painting guide for reference, I used a mix of Model Master FS 32019
dark tan (1742) and Italian sand (2110) as the base color. Then the brown was
applied, which was the Model Master ANA 617 dark earth (2054) with just a touch
of olive drab FS 34087 (1711) mixed in. The third upper surface color was Model
master FS 34079 dark green (1710). Once the scheme was satisfactorily applied,
the underside color was approximated using Model Master RLM 78 hellblau
(light blue 2087), with a bit of white mixed in. Again, I am at the mercy of
those who researched the AeroMaster sheet, as I have no photographic evidence to
go by. A soft demarcation line separates the upper and lower surface colors.
Fedorets’ last MiG-15,
camouflaged “red 16” is well-represented in Aeromaster’s sheet 32-006, “Korean
War MiG Aces, Part II” that includes two Chinese aircraft as well as the
Fedorets plane in North Korean markings. The MiG carries a three-tone upper
scheme of tan, brown and dark green with light blue undersides. Photos of North
Korean MiG-15s are almost nonexistent. The research for this AeroMaster sheet
was by Bob Hanes and Yuri Vykhodsev (the latter being a flight engineer for
Aeroflot, who provided some of the Korean War paint schemes “believed to be
accurate among the Russian modeling and aeronautical world”). Using the
AeroMaster painting guide for reference, I used a mix of Model Master FS 32019
dark tan (1742) and Italian sand (2110) as the base color. Then the brown was
applied, which was the Model Master ANA 617 dark earth (2054) with just a touch
of olive drab FS 34087 (1711) mixed in. The third upper surface color was Model
master FS 34079 dark green (1710). Once the scheme was satisfactorily applied,
the underside color was approximated using Model Master RLM 78 hellblau
(light blue 2087), with a bit of white mixed in. Again, I am at the mercy of
those who researched the AeroMaster sheet, as I have no photographic evidence to
go by. A soft demarcation line separates the upper and lower surface colors.
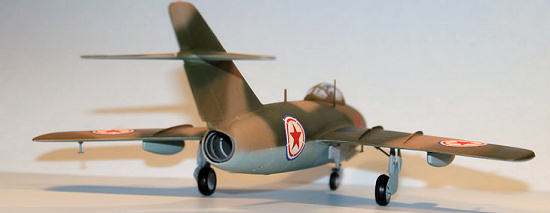
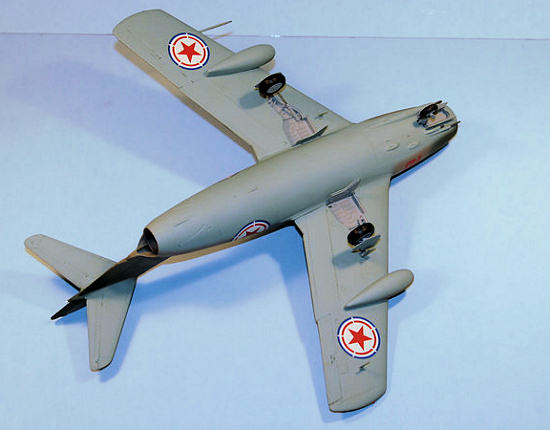
After the main painting was applied, wing root walks were masked and sprayed flat black. Exhaust was painted with Model Master exhaust non-buffing metalizer, and all wheel wells were finished off in the FS 36375 gray. Entire model was then sprayed with Testors gloss clear lacquer to aid decal adhesion. Decals were quite simple: North Korean insignia with white background in six positions and “red 16” tactical numbers on each side of the nose. Once decals were applied and set with Micro Sol, two coats of Testors Dull Cote were applied and allowed to dry overnight.
| FINAL CONSTRUCTION |
 What remained was to paint
and install the landing gear assemblies and canopy. The gear door inner
surfaces, gear legs and hubs were painted FS 36375 gray. Chrome silver was used
for oleo struts. Main gear door outer surfaces were underside color light blue.
Since the tires were rubber, they were left unpainted, but were ‘dull coated” in
an attempt to take some shine out. Once the gear was installed, the landing
light transparency was carefully glued to the intake splitter, and the gun
camera lens attached to the intake ring. The left and right wingtip lights were
painted red and blue/green and the tail fairing light painted in chrome silver,
as was very tip of pitot tube. Cannon barrels were painted in gunmetal gray.
Last step was the canopy. As mentioned earlier, the original kit canopy was so
inaccurate as to be unusable. A vacu-formed Squadron Crystal Clear Canopy
(#9408) is the perfect solution for this kit’s main problem, is accurately
shaped and a bargain at $4.00. Once it was cut out from its base, trimmed and
was test fitted, it was masked, painted, dull coated and attached with white
glue. That was the last step; the model is now completed.
What remained was to paint
and install the landing gear assemblies and canopy. The gear door inner
surfaces, gear legs and hubs were painted FS 36375 gray. Chrome silver was used
for oleo struts. Main gear door outer surfaces were underside color light blue.
Since the tires were rubber, they were left unpainted, but were ‘dull coated” in
an attempt to take some shine out. Once the gear was installed, the landing
light transparency was carefully glued to the intake splitter, and the gun
camera lens attached to the intake ring. The left and right wingtip lights were
painted red and blue/green and the tail fairing light painted in chrome silver,
as was very tip of pitot tube. Cannon barrels were painted in gunmetal gray.
Last step was the canopy. As mentioned earlier, the original kit canopy was so
inaccurate as to be unusable. A vacu-formed Squadron Crystal Clear Canopy
(#9408) is the perfect solution for this kit’s main problem, is accurately
shaped and a bargain at $4.00. Once it was cut out from its base, trimmed and
was test fitted, it was masked, painted, dull coated and attached with white
glue. That was the last step; the model is now completed.
| CONCLUSIONS |
 Before I built this kit, I was
worried that it would be inaccurate due to all the bad press it’s gotten over
the years. The reality is that once the canopy situation is remedied, the kit is
generally very accurate and just needs a little attention in a half-dozen small
areas to be correct. I really enjoyed building it, and especially doing the camo
scheme as opposed to so many of the natural metal ones we’re so used to seeing.
I could have exposed so much more of this kit’s detail as well, but just wanted
to do a simple, accurate MiG in big 1/32nd scale. Overall, it was a
very rewarding build. Not perfect, and some picky modelers may brand it as “unbuildable”,
but when finished it looks like a MiG-15, is fun in this large scale, and
is well worth the meager price it commands; a real bargain. Just remember to get
a Squadron canopy for it. It’s not a Tamiya or Hasegawa, but this was the start
for Trumpeter that has become a major player in the model kit manufacturing
world. Good job. Can’t wait to do the MiG-17!
Before I built this kit, I was
worried that it would be inaccurate due to all the bad press it’s gotten over
the years. The reality is that once the canopy situation is remedied, the kit is
generally very accurate and just needs a little attention in a half-dozen small
areas to be correct. I really enjoyed building it, and especially doing the camo
scheme as opposed to so many of the natural metal ones we’re so used to seeing.
I could have exposed so much more of this kit’s detail as well, but just wanted
to do a simple, accurate MiG in big 1/32nd scale. Overall, it was a
very rewarding build. Not perfect, and some picky modelers may brand it as “unbuildable”,
but when finished it looks like a MiG-15, is fun in this large scale, and
is well worth the meager price it commands; a real bargain. Just remember to get
a Squadron canopy for it. It’s not a Tamiya or Hasegawa, but this was the start
for Trumpeter that has become a major player in the model kit manufacturing
world. Good job. Can’t wait to do the MiG-17!
September 2006
| REFERENCES |
AeroMaster sheet 32-006: Korean War MiG Aces
MiG Dynasty, David Oliver, Motorbooks International 1990.
Various MiG-15 and Korean War internet references, particularly those with consistent and matching information regarding Soviet pilots in the Korean War.
Kevin Thompson
Copyright ModelingMadness.com. All rights reserved. No reproduction in part or in whole without express permission.
If you would like your product reviewed fairly and fairly quickly, please contact the editor or see other details in the Note to Contributors.
Back to the Review Index Page 2023