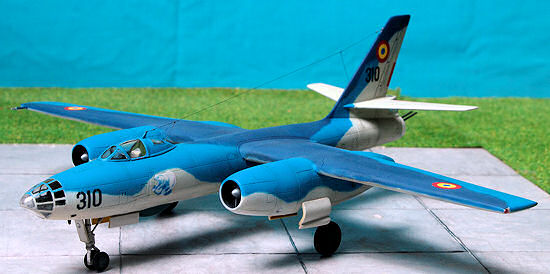
Trumpeter 1/72 H-5 (IL-28) 'Beagle'
| KIT #: | 01603/4 |
| PRICE: | About $10.00 |
| DECALS: | One option |
| REVIEWER: | Gordon Zammit |
| NOTES: | H-5/Il-28 are same kit, with a replaceable turret. Decals home printed. |
| HISTORY |
 engines, unlicensed copies
of the RR Nene turbojet, the Il-28 was able to exceed the 500mph (800km/h)
requirement that it was designed for even though it had perfectly straight
wings. The tail and fin surfaces were however swept, and this gave a distinctive
shape to the aircraft.
engines, unlicensed copies
of the RR Nene turbojet, the Il-28 was able to exceed the 500mph (800km/h)
requirement that it was designed for even though it had perfectly straight
wings. The tail and fin surfaces were however swept, and this gave a distinctive
shape to the aircraft.
| THE KIT |
| CONSTRUCTION |
 an H-5R recce plane,
but from the available photos, there seems to be no photo equipment carried
underneath, or it may have been removed for the airshow colour scheme.
an H-5R recce plane,
but from the available photos, there seems to be no photo equipment carried
underneath, or it may have been removed for the airshow colour scheme.
The engine nacelles came next. The
undercarriage bays have to by folded into boxes after cutting from the sprue,
and then cemented to one of the halves. You have to cement the engine fronts and
jetpipes to the same halves before closing them to form the complete engine bay.
I painted the inner exhausts but decided to smooth out the intake fronts after
construction before painting the front end as these are a prominent feature of
the aircraft and need to be finished accordingly. There are intakes on the sides
of the nacelles, which are moulded solid. I drilled these out to make them look
more realistic. Next came the main wings. I dry fitted these after cleaning them
up, and fit was very good. However, the aerofoil section of the wings is totally
wrong. If left as they come, you would end up with something more like an
elliptical section than an aerofoil section. So some sanding was carried out,
and rescribing of the lost detail especially on the top parts of the wing is
needed as the sanding will eliminate most of the details. After some session it
looked satisfactory enough and the wings were glued together. The nacelles were
also glued in place, and here came the first major mistake in this kit. The
engines’ upper edge is in line with the lower surface of the wing, where as in
the real thing it is in line with the upper surface of the wings. There is a
step in the Trumpeter representation, and it is obvious even if you don’t see
the real thing that it’s not how it should be. The engines however seem to be
quite well otherwise, even in the angle at which they are fixed, so some filler
on the upper side solved this problem quite easily. I used Tamiya epoxy filler
and left it to cure for 2 days before sanding it and rescribing the panel lines
onto it again. After these looked good enough, I glued them to the fuselage. Fit
was not very good, needing a strip of plastic sheet on top. Also filling and
sanding was required,
 mostly on the lower sides. Next came the horizontal tail
surfaces, and these went on without any trouble and fit was very good here.
After I had the basic airframe completed I noticed that the port wing was not a
smooth taper when view from the front. So I cracked it open again with a hobby
knife and sanded it some more to get the correct section up to the wing tip.
mostly on the lower sides. Next came the horizontal tail
surfaces, and these went on without any trouble and fit was very good here.
After I had the basic airframe completed I noticed that the port wing was not a
smooth taper when view from the front. So I cracked it open again with a hobby
knife and sanded it some more to get the correct section up to the wing tip.
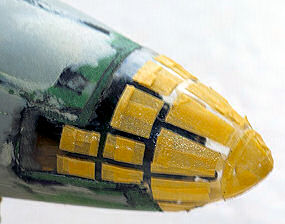
Now it was up to the transparencies, and here
is the real problem of building this kit! I had prepared to start masking the
nose glazing when I noticed that on this part of the transparency, Trumpeter had
moulded the frames recessed compared to the clear windows, but I reasoned that I
would leave them as they are, as they would not be apparent when painted. So I
started the masking process and to aid me I printed a close up photo I found
online of the nose section. Then I realized that then was another major mistake.
The frames on the Trumpeter nose continued as a straight line along the whole
nose part, while on the real aircraft they do not. As a result there were two
small windows half the size of the others in line with them, and they looked
ridiculous. Here I thought about the Italeri kit I had in the stash, and decided
to see if this kit’s nose transparency would fit onto the half built
 Trumpeter I
now had on the bench. I was also curious about the framing on the Italeri (Bilek)
kit. Till now, I was expecting to see a copy of what I had in front of me, due
to believing that Trumpeter was a copy of the Bilek kit as I had read several
times previously. But to my surprise, the Bilek glazing is different. The
framing is not moulded very crisply, but it stands raised of the window panels,
Trumpeter I
now had on the bench. I was also curious about the framing on the Italeri (Bilek)
kit. Till now, I was expecting to see a copy of what I had in front of me, due
to believing that Trumpeter was a copy of the Bilek kit as I had read several
times previously. But to my surprise, the Bilek glazing is different. The
framing is not moulded very crisply, but it stands raised of the window panels,
 surface and just mask the windows and airbrush over what’s left as the
frame would be convincing at this scale. I filled the canopy with milliput on
the inside and outside as well and started sanding to obtain a smooth finish.
After completing this, I was off trying to form the replacement nose glazing
(now I required 2 as I also destroyed the other unbuilt kit’s) and after around
six or seven attempts, I still did not have one whole nose as the plastic tore
just as I was to pull it all the way along all the nose. Several more attempts
later I finally managed to get a full nose, but it wouldn’t come off the former.
I started cutting with a new blade on the hobby knife, and when I cut it exactly
along the edge of the former canopy, it jut popped out. Test fitting on the
assembled kit was rewarding as it was very close in shape and size as well, but
the plastic was so thin, that it was just too flexible. I made several more
attempts, but decide to go on and try this one as all broke again. I attached it
with pieces
surface and just mask the windows and airbrush over what’s left as the
frame would be convincing at this scale. I filled the canopy with milliput on
the inside and outside as well and started sanding to obtain a smooth finish.
After completing this, I was off trying to form the replacement nose glazing
(now I required 2 as I also destroyed the other unbuilt kit’s) and after around
six or seven attempts, I still did not have one whole nose as the plastic tore
just as I was to pull it all the way along all the nose. Several more attempts
later I finally managed to get a full nose, but it wouldn’t come off the former.
I started cutting with a new blade on the hobby knife, and when I cut it exactly
along the edge of the former canopy, it jut popped out. Test fitting on the
assembled kit was rewarding as it was very close in shape and size as well, but
the plastic was so thin, that it was just too flexible. I made several more
attempts, but decide to go on and try this one as all broke again. I attached it
with pieces 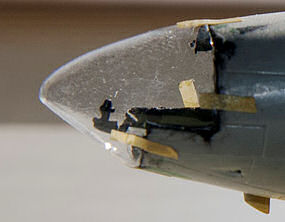 of tape and then added small drops of super glue. I had tested super
glue on the material and found that there is no effect on it. So I glued as much
as I could with superglue, removed the tape and added more superglue and white
glue to fill all the gaps. I then masked all the windows one by one following
the photos of real aircraft, and concluded that they needed to be a bit shorter
than the whole length of the part as I made it. This aided me in filling and
sanding the nose to the rest of the airframe. After I was satisfied with the
front part, I turned on the transparencies on the rear turret. It looked good
enough so I used the one provided with the kit, masked it and attached it with
white glue. There is nothing inside and I left at like that as nothing will be
seen through the small windows. I did the same with the main canopy, and
continued adding the various antennas and small parts. I filled in the entrance
hatch for the bomb aimer and rescribed it as it was too far forward. After some
more retouching and some finer sanding and filling it was ready for the
painting.
of tape and then added small drops of super glue. I had tested super
glue on the material and found that there is no effect on it. So I glued as much
as I could with superglue, removed the tape and added more superglue and white
glue to fill all the gaps. I then masked all the windows one by one following
the photos of real aircraft, and concluded that they needed to be a bit shorter
than the whole length of the part as I made it. This aided me in filling and
sanding the nose to the rest of the airframe. After I was satisfied with the
front part, I turned on the transparencies on the rear turret. It looked good
enough so I used the one provided with the kit, masked it and attached it with
white glue. There is nothing inside and I left at like that as nothing will be
seen through the small windows. I did the same with the main canopy, and
continued adding the various antennas and small parts. I filled in the entrance
hatch for the bomb aimer and rescribed it as it was too far forward. After some
more retouching and some finer sanding and filling it was ready for the
painting.
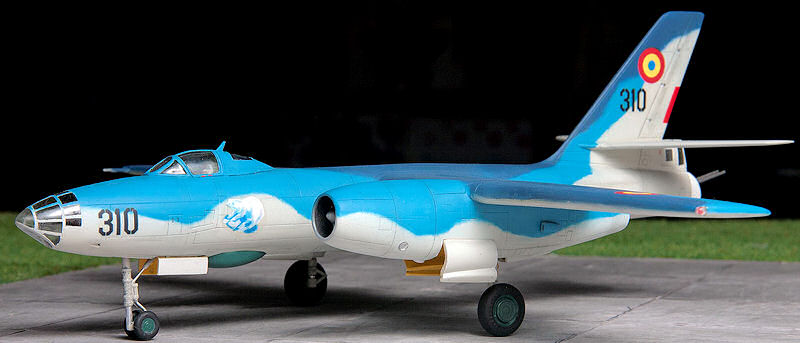
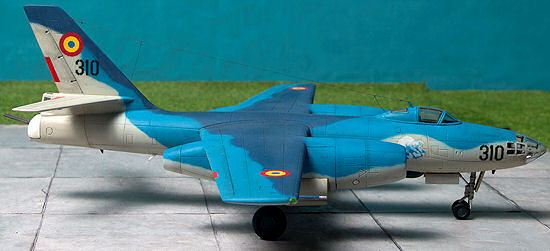
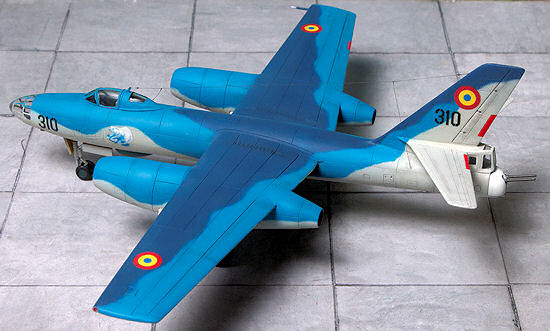
| COLORS & MARKINGS |
As this was a one off aircraft, finding the
true colours proved impossible. I therefore decide to match the available photos
that are present on the internet. The lighter grey seemed to match Humbrol 147,
while for the middle blue Humbrol 48 was a good match and Revell 56 for the dark
blue. Obviously, I am not stating that these are 100% correct, but the final
result seems good enough for me. With such colour schemes we may never get a
chance to find a good reference, so it’s either guessing, or skipping it and go
to something else. I airbrushed the three colours freehand in a couple of days.
After some touch ups, it was ready from the
 main colours. I than masked the
lower radome and mixed a dark green from Humbrol 88 and black, as
I did not find any matching colour
ready. The turret was sprayed in satin white, and the trim tabs masked and
sprayed in red. The trim tab on the starboard aileron had been rescribed as it
was not present on the kit.
main colours. I than masked the
lower radome and mixed a dark green from Humbrol 88 and black, as
I did not find any matching colour
ready. The turret was sprayed in satin white, and the trim tabs masked and
sprayed in red. The trim tab on the starboard aileron had been rescribed as it
was not present on the kit.
This was a first for me for printing decals
onto laser printer film, and I must say that it’s much easier than the inkjet
printer, since there is no need to coat the printed decals with any varnish as
laser printers do not use water based ink. The printing quality though is not as
good, although it might be the performance of the printers themselves and not
the paper. I printed the roundels, numbers, and the polar bear onto the clear
film. For the roundels I cut a 12mm (half inch) mask onto masking film and used
it to spray white for the backing of the roundels. As for the polar bear motif,
I darkened the graphic on the computer software and printed it on the white
sheet, not on the decal side but on the backing paper side. I cut it along the
outline and used the plain white for the backing of the polar bear on the
aircraft. After dry, I placed the coloured decal which was printed on the
transparent. I have used this method for the inkjet printed decals to avoid
cutting the edge of the printed decal, but I think that is not necessary with
laser printing, so I might have just printed it on the white sheet and used it
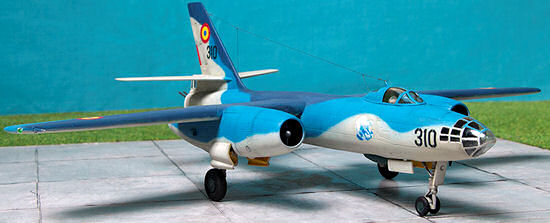
at one go. There isn’t any stenciling apparent on the real aircraft so I only
applied the printed decals and a few marking near the canopy. Next the Beagle
was given a light coat of Klear again, a slight wash and some subtle weathering.
The real aircraft didn’t have much time to weather after its paint job, so no
heavy weathering here. After a day, I applied some final flat varnish to the
whole model and removed the masking from the transparencies. Final steps were
adding the wheels, antennas and turret, and navigation lights, and an aerial
from fishing line.
| CONCLUSIONS |
| REFERENCES |
Iljuszyn il-28 Beagle, Serie Pod Lupa, ACE
publications.
Gordon Zammit
December 2012
If you would like your product reviewed fairly and fairly quickly, please contact the editor or see other details in the Note to Contributors.