|
KIT # |
HC 1321 |
|
PRICE: |
? |
|
DECALS: |
Two versions: see review |
|
REVIEWER: |
|
|
NOTES: |
|
|
HISTORY |
The F-82 Twin Mustang was developed during World War II as a very long-range escort fighter for escorting bomber formations attacking Japan. North American engineers came up with the concept of a twin engine fighter without a central fuselage, using two modified XP-51F fuselages and outer wing panels, joined by a constant chord center wing and tailplane. The fuselage was lengthened behind the cockpit by 57 inches and the outer wing panels were modified by deletion of the gun bays and wheel wells. A large dorsal fillet was added to the vertical tail assemblies. Armament consisted of six 0.50 machineguns in the center wing panel. The XP-82 prototype made its first flight on 16 June 1945, by which time 500 P-82B production models had already been ordered. Though too late for service in World War II, the P-82 (or F-82, as it was renamed post war) was developed into the P-82C/D night fighter, the F-82E escort fighter and the F-82F/G all-weather interceptor. The F-82G saw service in Korea from 1950 to 1952, scoring the first official kill.
|
THE KIT |
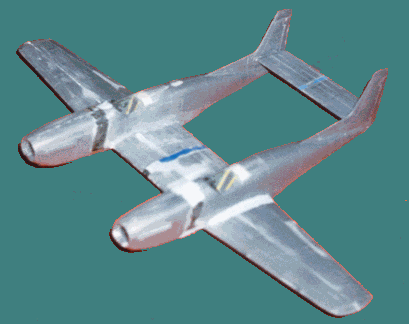
The Hobby Craft kit is presented as an Allison engined F-82E escort fighter or a F-82G night fighter, but in fact only the G is represented as indicated by the flame damping exhausts. The kit is molded in silver gray plastic and features heavy raised panel lines and oversized rivet detail.
The fuselages are split vertically. The wings comprise a one-piece lower wing and three piece upper wing. The tailplane is one- piece. The simple cockpits feature one-piece floors/seats, instrument panels, control columns and a representation of radio equipment behind the headrests. The cockpit transparencies are thick and inaccurate and a mounting frame is provided for the canopy allowing them to move. The landing gear is crude, but with a little work can be made acceptable. The tail wheels are roughly cylindrical lumps of plastic. A radar pod and armament in the form of rockets and bombs is provided for both the night fighter and escort fighter variant, though building the last one would require modifying the exhaust stacks. HobbyCraft also provide a set of machine guns, to be mounted under the separate gun bay hatch.
The parts suffer from lots of flash and overall fit is poor. The kit does not scale up very well either. Comparison of the main parts with scaled-up three view drawings show the following shape problems: the noses are 5 mm short, the wing and tailplane chord is too large (2 mm), span is 4 mm short, the distance between the fuselages is too small (2 mm), the fins are shaped incorrect and the radiator scoops are a bit too far back. All in all this result in a "fat" version of the Twin Mustang which does not capture the lines of the original at all. Added to all this are inaccuracies like unhanded propellers instead of handed.
|
CONSTRUCTION |
Since the kit has so many inaccuracies I decided to correct only the most notable ones. First the wing was assembled and filled (as an experiment) with expanding foam to strengthen it. The wing was sawed through span-wise at mid-chord, using a coarse blade, which conveniently removed the required 2 mm. The foam filling was helpful in keeping the wing parts intact, making sawing and handling easier. The wing halves were then cleaned up, re-assembled and left to dry. After drying the center section of the wing was sawed through chord-wise at mid-span and re-assembled using plastic rod as spars, leaving a "2 mm + saw cut" gap, which was filled with plastic sheet. I decided not to bother about the remaining 2 mm lack of span. After more drying the affected areas were filled, filed and sanded into shape, during which the raised panel lines were removed and reapplied. The now misaligned gun ports were closed an drilled in the correct location. The treatment was repeated on the tailplane, except for the foam of course.
The fuselage halves were modified by inserting a 5 mm plug at the oblique panel joint just ahead of the cockpit. This was done before joining the fuselage halves, using a simple template. The cockpits were assembled, adding small details as seatbelts after which the fuselages were assembled. The steps in the cowling area resulting from the lengthening were filed and sanded back to the right contours and new cockpit rear decking was added, replacing the slot for the sliding canopy. The radiator scoop was added after the intake lips had been thinned down, and they were blended into the fuselages with lots of filler. The nose area required still more work as HobbyCraft provides a sort of insert for the carburetor intake which (theoretically) should leave it open. The results looked like nothing, but since the carburetor intakes were a bit too far back anyway, new ones were fashioned with plastic strip and more filler. Finally the fuselage surface detail was removed and reapplied.
 Next
the wings and fuselages were assembled. The reduction in wing chord makes the
not-so-great fit of the wing to fuselage joint even worse, especially the
outboard ones. The fit is corrected by more filler
Next
the wings and fuselages were assembled. The reduction in wing chord makes the
not-so-great fit of the wing to fuselage joint even worse, especially the
outboard ones. The fit is corrected by more filler
Aligning the two fuselages correctly is tricky. I used a jig but still ended up with one tailwheel dangling noticeably. This was corrected by strapping the model on a piece of flat wood and pouring boiling water on the wing center section.
The radome was assembled and added to the center section. Some sink marks on the radome were filled and the mating surface was filed into shape to match the lower wing surface. Finally the remaining panel lines were reapplied. After adding the main gear legs the model was ready for painting. Since little can be seen of the tail wheels after the doors have been fitted I decided to use them "as-is". HobbyCraft provides some detail for the wheel wells, though most of this is hidden by the closed main wheel doors.
|
PAINT & DECALS |
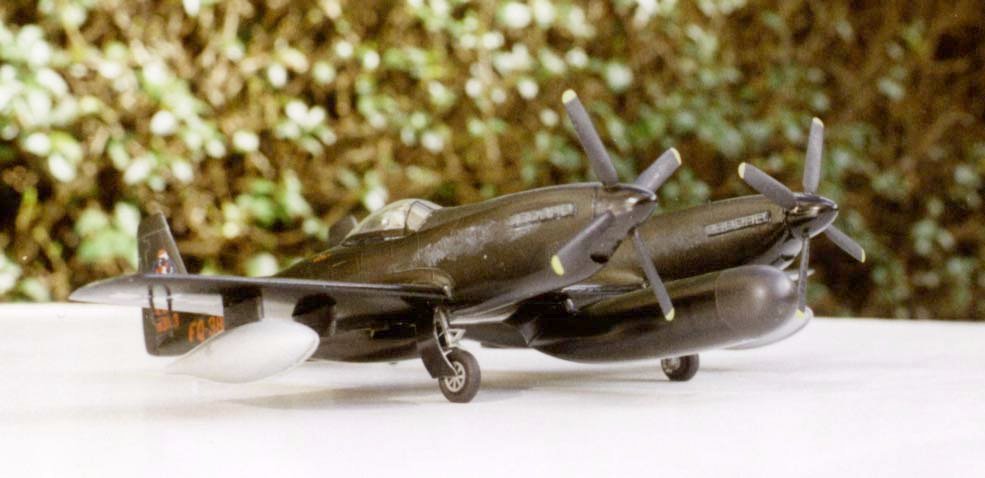
I finished the model as an F-82G, which has a simple overall gloss black finish, with flat black anti-glare panels. As if the model had not taken long enough already I managed to screw up the gloss black coat, which came out far too heavy. So much for the new panel lines and back to the sanding paper to remove the worst damage.
Decals are provided for both a night fighter and an escort fighter, without identifying the actual sub-variants and units. As luck has it the aircraft is pictured on the cover of the reference I used and it belonged to the 4th Fighter (all Weather) Squadron. The decals are fuzzy and out of register and should be replaced. There appears to have been a Superscale sheet for the F-82, but it is out of production. Regrettably I could not get hold of one nor could I find an alternative. Since I really wanted the kit of my workbench I decided to use the kit decals. They went on well and the model was finished of by a coat of semi-gloss varnish to reduce the glossiness and give it a better "scale appearance". The flat black anti-glare panels and the radome nose were hand brushed. A mixture of flat black and red was used for the radome nose to create a reddish appearance. Finally a bit exhaust staining.
|
FINISHING |
After painting the wheels, wheel doors, pitot tube, pylons, propellers and drop tanks were added. The drop tanks were painted aluminum. Note that since the pylons are integral with the drop tanks they should be mounted on the outboard position. The inner pylons have a different shape. The kit shows this the wrong way around. Though the shape of the propellers, which are molded integrally with the spinner, is reasonable, the fit of the spinner on the back plate is terrible, requiring a lost of filler and patience to get an acceptable result. Being somewhat tired of the kit I decided to retain the incorrect propellers. Finally a pair of Squadron vacform canopies was added replacing the kit parts.
|
CONCLUSIONS |
All in all this is a rather disappointing kit. With a lot of work it can be turned into a reasonable representation of the F-82 though this requires at least the replacement of the canopies and decal sheet. However, since it is the only 1/72 F-82 available (as far is I know) it is worth the effort. Perhaps I will give it another go in the future, or simply wait until a better 1/72 F-82 comes along.
|
REFERENCES |
F-82 Twin Mustang in Action (Mini No. 8 Squadron/Signal publications)
If you would like your product reviewed fairly and fairly quickly, please contact the editor or see other details in the Note to Contributors.