Encore 24 pound Naval Gun
|
KIT # |
9690 |
|
PRICE: |
$ |
|
DECALS: |
See review |
|
REVIEW : |
|
|
NOTES: |
|
ROUND SHOTS AND RAMRODS
UNITED STATES NAVAL 24-POUNDER
REVOLUTIONARY WAR AND WAR OF 1812
|
HISTORY |
I have not had so much fun in modeling in a long while, as I did doing the research and construction of this simple, cheap kit. Although I prefer to build airplanes (military warplanes at that), I probably couldn't tell you scratch about the weapons used on these machines. I have never been a weapons person, with the exception of .22 caliber rifles and a couple gauges of shotgun. I enjoyed the respite from handling extremely small parts of model airplanes and the simple mechanics and physics behind old cannons, which were referred to as guns in their day.
We, at the end of the twentieth century, tend to think of weapons as disposable commodities to be left on the battlefield or stacked in rusting heaps at war's end. But this was not so one hundred and thirty or forty years ago. For the land armies, whose use of cannons in the field began in the American War of Independence (prior to that field artillery was used only in sieges of forts and walled fortresses), these weapons were priceless items to be defended at all costs. Losing a gun to an opposing force was every bit as humbling as losing a regiment. Indeed, these weapons often were the last line of defense and artillery batteries saved the day for many a retreating army. Naval ships, which had employed cannons since the mid-16th century, valued their guns every bit as much and considered enemy guns seized during sea battles or sieges as valuable booty.
At this point I would like to pause and reflect. From the invention of the gun in the early fourteenth century to the mid nineteenth century, the advancement of the gun was very slow. There was little in the gun made in 1800 that would have puzzled a master gunsmith in 1400. The basic weapon, while it had improvements in manufacture, from its original welded stave form to its cast form, was still a simple smoothbore. Let me now take the uninitiated on an examination to see what and how the weapon works.
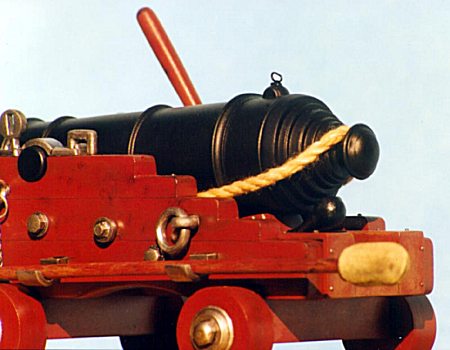
 Starting at
the front of the barrel we have the "muzzle"; the thickened
circumference around it is called the "muzzle swell". The body of the
barrel is called the "chase" and at intervals there are thicker hoops,
which are called "reinforces", put partly for strength and partly for
ornament. At the point of balance are two rounded protrusions known as the
"trunnions", which fit into prepared surfaces on the carriage of
choice, field or naval, and allowed the gun to be elevated and depressed. At the
rear of the gun, the metal is rapidly reduced in diameter and finished off with
an ornamental knob called the "cascabel", and generally speaking a
solid cascabel indicates a field piece, while a pierced cascabel indicates a
naval weapon, the recoil on board ship was partially checked by passing a rope
through the cascabel. At the top of the breech end of the gun is the
"vent", a drilling which passes down into the gun "chamber".
Starting at
the front of the barrel we have the "muzzle"; the thickened
circumference around it is called the "muzzle swell". The body of the
barrel is called the "chase" and at intervals there are thicker hoops,
which are called "reinforces", put partly for strength and partly for
ornament. At the point of balance are two rounded protrusions known as the
"trunnions", which fit into prepared surfaces on the carriage of
choice, field or naval, and allowed the gun to be elevated and depressed. At the
rear of the gun, the metal is rapidly reduced in diameter and finished off with
an ornamental knob called the "cascabel", and generally speaking a
solid cascabel indicates a field piece, while a pierced cascabel indicates a
naval weapon, the recoil on board ship was partially checked by passing a rope
through the cascabel. At the top of the breech end of the gun is the
"vent", a drilling which passes down into the gun "chamber".
Internally the barrel is bored out to the required diameter or "caliber" until the chamber is reached, at which point the bore is slightly reduced so that the projectile, when loaded and rammed down, stops at the same place each time to give a regular volume of chamber in which the gunpowder will ignite.
To load the gun the charge would be prepared, which by the time of the Revolutionary War was weighed out into prescribed amounts and packed into bags made of linen, canvas, paper, or preferably flannel. The charge was placed into the muzzle and pushed into the chamber by a "ramrod". Above the charge would go a "wad" made from paper or wood to act as a seal above the charge to ensure that when the charge was fired, as much gas as possible was trapped behind the projectile and actually aided in pushing the projectile out. On naval guns a wad was often rammed home on top of the projectile to prevent it from rolling back up the muzzle on a tossing sea.
Once the gun was maneuvered into position for firing, a "vent spike" was stuck into the vent to open up the gunpowder bag and gunpowder from a powder horn was poured into the vent. The gunner would then apply a "portfire", which was a long rod containing a slow burning cord impregnated with saltpeter, to the gunpowder in the vent. Great care was taken to stand away from the weapon, for it would recoil backward several feet.
After firing, the gunners would apply a wet sponge rammer to the bore and scrub vigorously. This served two purposes; first it scrubbed away and removed the worst of the fouling generated by the exploding gunpowder and second it was hoped that this would extinguish any smoldering residue lingering in the barrel. Once the bore had been sponged, one gunner placed his thumb over the vent, a process known as "serving the vent" and held it there while the gun was being reloaded. This created a vacuum within the barrel while the charge was being pressed into the chamber and prevented the fanning of any spark that the sponge may not have extinguished.
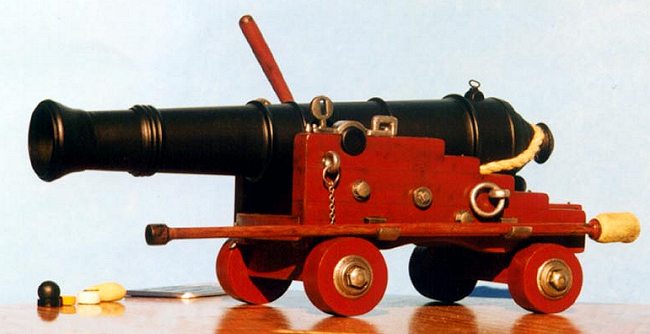
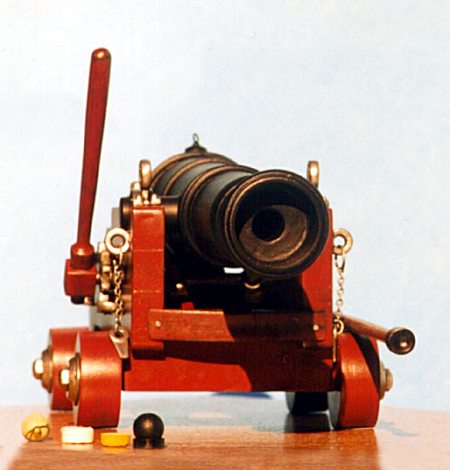
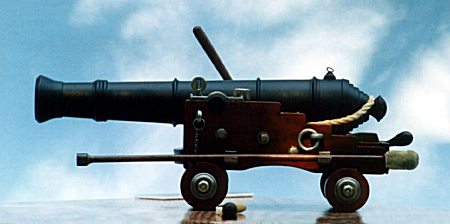
The model represents a naval 24-pounder, which was the primary gun on board early U.S. Navy vessels during the Revolutionary War and the War of 1812. The U.S.S. Constitution carried thirty 24-pounder guns on her gun deck below the spar deck, which carried twenty-four 32-pounder carronades. The guns were mounted in naval carriages, which were sometimes painted green, black, red, or brown, but more than likely left in their natural wood, but treated with a protective varnish that had a slight red-brown hue. All 24-pounders made in the United States were cast from iron as tin and copper were not assessable natural resources at the time, so they were painted black to prevent rust. Even the bores were painted black with a scrub brush on a rod. At sea they were cleaned and painted often. Iron 24-pounder guns actually weighed some 300 pounds lighter than their bronze or brass contemporaries. The dimensions for a heavy 24-pounder are: Length: 9 ft. 6 in.; Weight: 5,488 pounds; Caliber of gun: 5.83 in.; Caliber of projectile: 5.54 in.; Weight of charge: 4 to 6 pounds; Types of projectiles: 24 pound round shot, grape shot, chain shot, and case or canister shot; Range: 300 - 400 yards.
|
CONSTRUCTION |
The gun:
 The gun
was comprised of five parts: cascabel, breech, two barrel halves, and the
muzzle, but the bore of the barrel did not exist. By simple arithmetic, I was
able to discern that 5.83 inches in 1/24 scale would be 0.249 inches. Close
enough to 1/4 inch in my book, so I cut an appropriate sized section of 1/4 inch
inside diameter styrene tube (approximately 5 inches) a cemented it to the
predrilled muzzle (I worked up the drilling of the muzzle from small bits to
just under 1/4 inch). Once the bore tube was secure, I took my Dremel tool and
sanded the muzzle opening to match the tube diameter. After painting the inside
of the bore, I closed the back with a precut and prepainted black circle from
sheet styrene. The two barrel halves were cemented together and cleaned up
before attaching the muzzle and bore assembly. I packed the rear of the gun at
the chamber with epoxy putty to give the barrel some heft and secure the tube.
After the putty had set up, I attached the breech end and cascabel. The vent was
drilled out to except a scratch-built vent pick made from a straight pin and
wire. The gun was primed in TAMIYA Medium Gray and finished in Polly Scale Steam
Power Black. The bore was painted steam power black using a make-up sponge
attached to a cocktail stick. Once completely dry, I buffed the barrel with my
Dremel tool and buffing brush. The gun was set aside in a safe container for
completion of the carriage, trucks, and accouterments.
The gun
was comprised of five parts: cascabel, breech, two barrel halves, and the
muzzle, but the bore of the barrel did not exist. By simple arithmetic, I was
able to discern that 5.83 inches in 1/24 scale would be 0.249 inches. Close
enough to 1/4 inch in my book, so I cut an appropriate sized section of 1/4 inch
inside diameter styrene tube (approximately 5 inches) a cemented it to the
predrilled muzzle (I worked up the drilling of the muzzle from small bits to
just under 1/4 inch). Once the bore tube was secure, I took my Dremel tool and
sanded the muzzle opening to match the tube diameter. After painting the inside
of the bore, I closed the back with a precut and prepainted black circle from
sheet styrene. The two barrel halves were cemented together and cleaned up
before attaching the muzzle and bore assembly. I packed the rear of the gun at
the chamber with epoxy putty to give the barrel some heft and secure the tube.
After the putty had set up, I attached the breech end and cascabel. The vent was
drilled out to except a scratch-built vent pick made from a straight pin and
wire. The gun was primed in TAMIYA Medium Gray and finished in Polly Scale Steam
Power Black. The bore was painted steam power black using a make-up sponge
attached to a cocktail stick. Once completely dry, I buffed the barrel with my
Dremel tool and buffing brush. The gun was set aside in a safe container for
completion of the carriage, trucks, and accouterments.
Carriage and wheels:
Each of the carriage sides was a two part affair, but fortunately they did not attach in the center, which would have created an impossible seam to sand. They were hollow at the bottoms, so I filled the hollows with epoxy putty. The truck bottoms, the back side of each wheel, and the underside of the elevating block were hollow also, so these items also received a filling of epoxy putty. Once the putty had set, it gave the pieces an increased heft and felt more like resin than plastic pieces. The wheels were chucked into my Moto-lathe and cleaned up considerably, as there was not a flat spot on them when cut from the thick sprue. Likewise the carriage halves, trucks, and elevating block were sanded a good bit. I loved constructing this kit, but it brought out all those modeling tools collecting dust over the years due to lack of usage.
The carriages were scribed where my references had shown three sections of wood in each carriage. The carriages, trucks, wheels, bumper, ratchet handle, ramrod, elevating block, and elevating block plate were all primed in medium gray, cleaned up, and given two coats of Polly Scale Italian Camo Brown, which had a deep reddish- brown chestnut color. Once dried, all items were given dry brushings of dark brown, sandy brown, yellow-brown, and black. When the dry brushings were to my liking, I gave all items a couple coats of Polly Scale Clear Satin, in which I had added two drops of Camo Brown and a little clear gloss. Once dry, these items were set aside for work on the attachments. The handle to the elevating block was painted semi-gloss black. The sponge end of the ramrod was sawn off and replaced with a like-sized sponge from a ladies make-up set. The sponge was lightly painted dirty white and given brushings of powdered brown and black pastel chalk. The ramrod end was slightly concaved with a Dremel round cutting bit before painting.
All other attachments seen on this model came with the kit, with exception of the bolt and rivet heads, which I constructed from stretched sprue heated with the end of a hot toothpick. The chain for the hinge locks was supplied in the kit, but I had to construct the links to attach the chain to the O-rings and locks from aluminum wire. The larger O-rings were attached to the smaller O-rings and the separation in the larger rings closed with CNA glue before painting (these large rings had a rope fed through them to control recoil and help pull the gun back into firing position after reloading). All of these items were painted Polly Scale Graphite and given a clear gloss overcoat before receiving a light ink wash. After the ink had dried, I lightly rubbed the items with SNJ powder before giving them a finish coat of clear satin.
The securing rope was included in the kit. I stained it with coffee and attached it to the rope bar before attaching the rope bar to the carriage. The weighed charge was constructed from epoxy putty and painted dirty white before receiving a wash of coffee and ink. The wooden wad was cut from a 1/4 inch basswood dowel and stained in coffee (I drank a little of it too). The paper wad was done by soaking tissue in a mixture of Elmers and water and pressing out the tissue through a 1/4 inch inside diameter section of styrene tube with a 1/4 inch outside diameter section of basswood dowel and letting the pressed out wad air dry. The shot is represented by a 15/64 inch (0.231) ball bearing, which I painted steam power black. The shot mount is nothing more than a short section of 1/4 inch outside diameter styrene rod painted black. All items save for the installation of the trucks to the carriage were done with PVA glue, the trucks being secured with gel-type CNA glue.
Copyright ModelingMadness.com
If you would like your product reviewed fairly and fairly quickly, please contact the editor or see other details in the Note to Contributors.
Back to Reviews Page 2018