Lindberg Tyrannosaurus Rex
| KIT: | Lindberg Tyrannosaurus Rex |
| KIT #: | 70275 |
| PRICE: | $17.99 MSRP |
| DECALS: | Where would you put them? |
| REVIEWER: | Greg Ewald |
| NOTES: | Fun afternoon or go crazy with the changes. |
| HISTORY |
I doubt there is a kid out there who hasn’t heard of the infamous T-Rex (the animal, not the band), stalking through primeval forests and swamplands, in search of…MEAT ! AAAhhh!
 With dozens of teeth as long
as a butcher’s knife, and a mouth big enough to pack them all in, a Tyrannosaur
charging down the pike at you would be enough to make the bravest of us chili
the shorts. Luckily for mankind, this magnificent animal became extinct a
number of years ago, but even the reconstructed bones manage to bring a sense of
the awesome power this beast must have had while it was alive and thriving.
With dozens of teeth as long
as a butcher’s knife, and a mouth big enough to pack them all in, a Tyrannosaur
charging down the pike at you would be enough to make the bravest of us chili
the shorts. Luckily for mankind, this magnificent animal became extinct a
number of years ago, but even the reconstructed bones manage to bring a sense of
the awesome power this beast must have had while it was alive and thriving.
And, thrive it did! Tyrannosaur fossils have been found worldwide, from desert climates, to near the polar regions. There are several different varieties of Tyrannosaurs, from the smaller Tarbosaurus to the giant, and appropriately named, Rex.
| THE KIT |
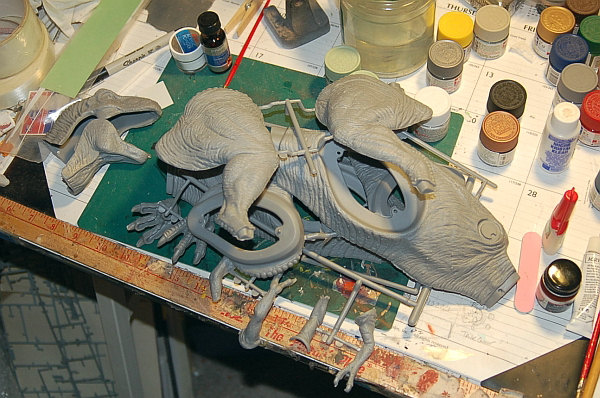 Molded
in light gray plastic, the Lindberg T-Rex doesn’t look like much when you first
open the massive box, but you will find that the fit of the parts is actually
quite nice. The styrene is very heavy, and soft…this is a kit meant for an
afternoon build, then when the glue is dry, some serious backyard stomping about
growling. (yes, I do this with my dinosaur models)
Molded
in light gray plastic, the Lindberg T-Rex doesn’t look like much when you first
open the massive box, but you will find that the fit of the parts is actually
quite nice. The styrene is very heavy, and soft…this is a kit meant for an
afternoon build, then when the glue is dry, some serious backyard stomping about
growling. (yes, I do this with my dinosaur models)
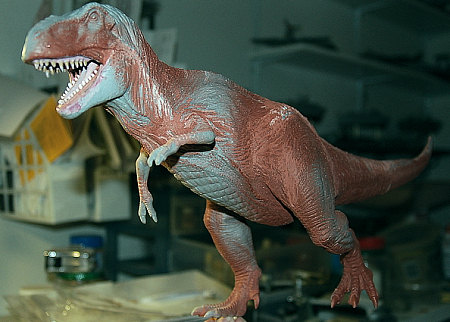
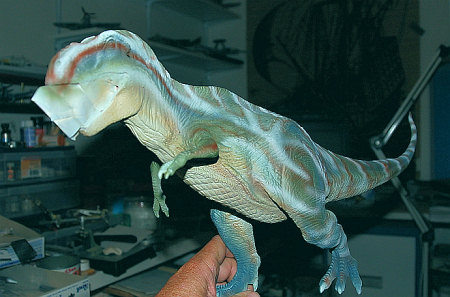
The detail is well done, not too heavy handed, and not too light. 70275 was released after “Jurassic Park”, and you can tell that they took the wide hipped stance from the critter in the film. Looking at Rex skeletons, they were a little leaner for the most part, but the model does build into a fairly convincing off-the-shelf tyrannid. But, here is where I veered off course…
| CONSTRUCTION |
I found this kit for sale at a lhs at
the outrageous price of 6 bucks. The last thing I needed to do was buy another
model, so I bought it, of course, just to keep my image up. I had just finished
re-reading Greg Paul’s “Predatory Dinosaurs of the World”, and
 the imagination was running rampant, I
needed a Tyrannosaur on my shelf to keep the Velociraptors company.
the imagination was running rampant, I
needed a Tyrannosaur on my shelf to keep the Velociraptors company.
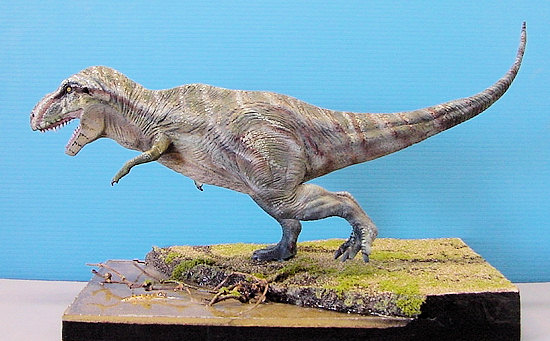
After doing a test fit, I figured out that either this female dinosaur could be built as one coming from the American Midwest, or I could do some hip-surgery and try to tone her down a bit. I taped the bits together, and began doing some random poses, while consulting Paul’s book, and also Horner’s wonderful tome “The Complete T Rex”, which is quite possibly the greatest dinosaur book ever written. It was in these two source materials that I ran across the Albertosaurus (or Gorgosaurus) and found the perfect match for the kit.
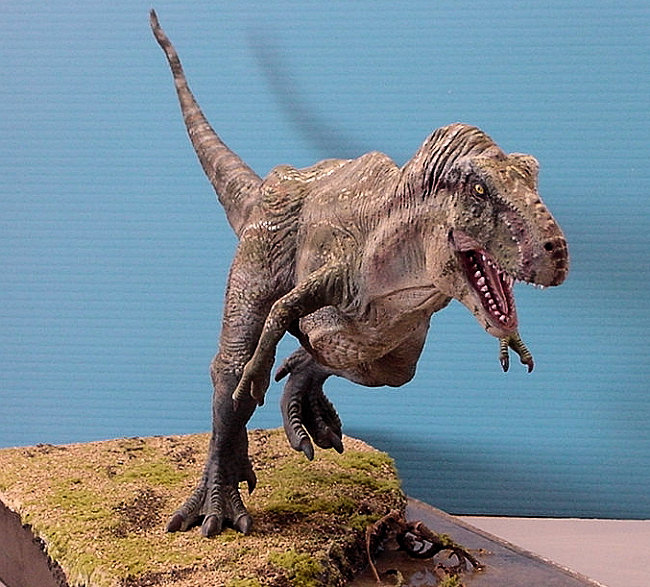
The legs: While the kit pose isn’t bad (hey, at least the tail is off the ground), the legs need to be heavily modified if you are going to make a Rex that doesn’t look like it just ate a bunch of burritos from the local taco joint, and can’t find the can. I carved off the locating pegs right away, and taped the torso together, looking for the right effect. When I found the correct dynamic pose, using a permanent marker, the locations for the legs were put on as reference points. Now, it was time to whip out the dremel and a cutting disk.
 Sheering
off the inner thighs brought the hips into a more normal posture, I would cut a
little, and then test fit…I didn’t want an dino on a diet, after all. The feet
needed to be addressed as well, the sinkholes were ginormous on several parts of
the casting, especially on the lower surfaces. Using Bondo red auto body putty,
the air drying type, I filled in all of the holes and cut-outs in thin layers.
If you put this stuff on at about 1/16th of an inch, it dries in
minutes. To fit the hips to the torso, and have all of the wrinkles come out
well, I had to use the two part filler, slathering it on, and then sanding it
down between coats.
Sheering
off the inner thighs brought the hips into a more normal posture, I would cut a
little, and then test fit…I didn’t want an dino on a diet, after all. The feet
needed to be addressed as well, the sinkholes were ginormous on several parts of
the casting, especially on the lower surfaces. Using Bondo red auto body putty,
the air drying type, I filled in all of the holes and cut-outs in thin layers.
If you put this stuff on at about 1/16th of an inch, it dries in
minutes. To fit the hips to the torso, and have all of the wrinkles come out
well, I had to use the two part filler, slathering it on, and then sanding it
down between coats.
 The
toes were cut, pinned with steel needles, and repositioned to match the stride
of the upper legs, as if the Rex was speeding along at a stately 20 miles per
hour or so. Yeah, it doesn’t sound like much, until you imagine a few tons of
meat with big pointy things on the front bearing down on you at that speed.
The
toes were cut, pinned with steel needles, and repositioned to match the stride
of the upper legs, as if the Rex was speeding along at a stately 20 miles per
hour or so. Yeah, it doesn’t sound like much, until you imagine a few tons of
meat with big pointy things on the front bearing down on you at that speed.
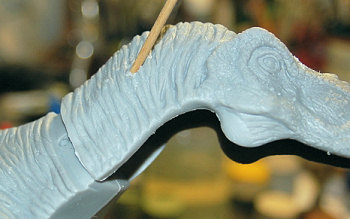 The
Head and Neck: The kit head is absolutely stellar, and fits together nicely, so
the first thing I did was to chop it up, inserting a bamboo skewer raided from
the kitchen through the upper skull and into the torso for support. Liberal
portions of gap filling super glue and putty were then applied to fix the
surgically enhanced areas. I held off installing the lower jaw and teeth for the
moment, trying to get the overall look for the ‘saurus first, and knowing that
painting the inside of the mouth wasn’t going to be a whole lot of fun.
The
Head and Neck: The kit head is absolutely stellar, and fits together nicely, so
the first thing I did was to chop it up, inserting a bamboo skewer raided from
the kitchen through the upper skull and into the torso for support. Liberal
portions of gap filling super glue and putty were then applied to fix the
surgically enhanced areas. I held off installing the lower jaw and teeth for the
moment, trying to get the overall look for the ‘saurus first, and knowing that
painting the inside of the mouth wasn’t going to be a whole lot of fun.
 The
Tail: Correctly positioned, the tail is perfect for the “I gotta go” stance,
but not for the running dino I wanted, and it was too short…so, cut and fill
with styrene robbed from the blank sprue worked wonders, as did following my
wife’s suggestion to simply turn the tail upside down. Hey, that looks much
better! I put a gentle s-curve into the back and tail by heating the plastic and
slowly bending it into form, spend a lot of time looking at it from above so you
don’t go too crazy, and end up with a tipsy T-Rex.
The
Tail: Correctly positioned, the tail is perfect for the “I gotta go” stance,
but not for the running dino I wanted, and it was too short…so, cut and fill
with styrene robbed from the blank sprue worked wonders, as did following my
wife’s suggestion to simply turn the tail upside down. Hey, that looks much
better! I put a gentle s-curve into the back and tail by heating the plastic and
slowly bending it into form, spend a lot of time looking at it from above so you
don’t go too crazy, and end up with a tipsy T-Rex.
 The
Arms: O.K. the kit arms are simply
horrible, and resemble two twigs stuck out of an Ent figurine from a geek
convention. Lots of cutting and forming to do here, as well, all pinned with
steel needles for upper body strength. I added on ¼” of sprue to the forearm,
and bulked up the
The
Arms: O.K. the kit arms are simply
horrible, and resemble two twigs stuck out of an Ent figurine from a geek
convention. Lots of cutting and forming to do here, as well, all pinned with
steel needles for upper body strength. I added on ¼” of sprue to the forearm,
and bulked up the biceps with some putty. The protective scales covering the right and left was
easy enough to do with the putty, just smear it on, let it dry , and attack it
with a file.
biceps with some putty. The protective scales covering the right and left was
easy enough to do with the putty, just smear it on, let it dry , and attack it
with a file.
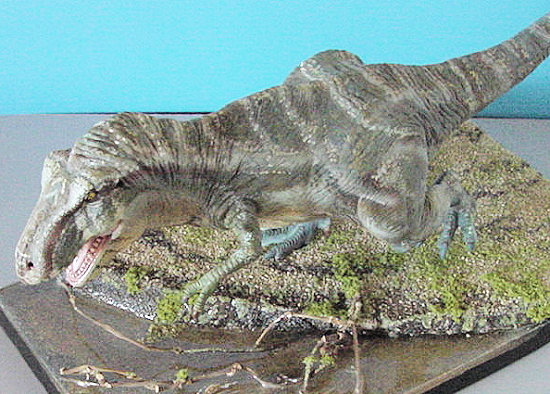
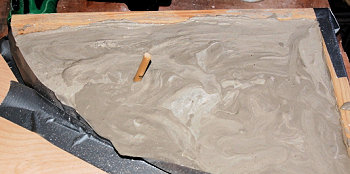 The
Base: Since I was basing this model on a bit of a story, I figured now was a
good time to get off my rear and start building the base for the finished model.
This Albertosaurus female was going to be charging off of a bank into a shallow
river, which meant clear casting, and a lot of work. Drilling a hole into the
right leg, I inserted a ¼ inch dowel all the way up, and a corresponding hole
into the base material, sculpted from thinset mortar. This took three days to
dry out enough for me to apply paint and powdered greenery as necessary, but
there was still plenty of dino work to do…
The
Base: Since I was basing this model on a bit of a story, I figured now was a
good time to get off my rear and start building the base for the finished model.
This Albertosaurus female was going to be charging off of a bank into a shallow
river, which meant clear casting, and a lot of work. Drilling a hole into the
right leg, I inserted a ¼ inch dowel all the way up, and a corresponding hole
into the base material, sculpted from thinset mortar. This took three days to
dry out enough for me to apply paint and powdered greenery as necessary, but
there was still plenty of dino work to do…
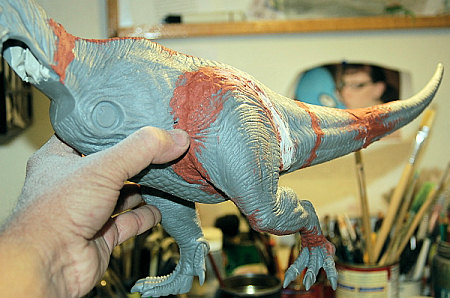
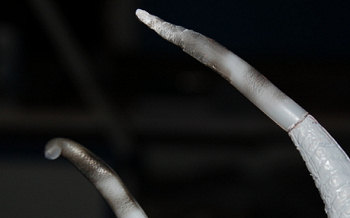
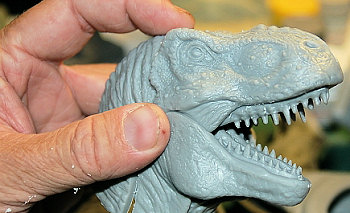 The
Jaws: Perhaps the most memorable bit of a T-Rex, according to recently
discovered historical documents, is the rather huge mouth, studded with teeth
that could slice through…slice through…well, dang near anything. The teeth were
shaped so as to take perfect wedges of flesh, bone, cartilage, and sinew off of
a prey animal in as little time as possible, so Mrs. Rex could run off and make
more baby Tyrannosaurs. The kit jaws are o.k., but can use some dental
The
Jaws: Perhaps the most memorable bit of a T-Rex, according to recently
discovered historical documents, is the rather huge mouth, studded with teeth
that could slice through…slice through…well, dang near anything. The teeth were
shaped so as to take perfect wedges of flesh, bone, cartilage, and sinew off of
a prey animal in as little time as possible, so Mrs. Rex could run off and make
more baby Tyrannosaurs. The kit jaws are o.k., but can use some dental
 adjustments, easily performed with a
sanding stick and a sharp #11 blade. You will probably want to paint the inner
mouth prior to attaching the lower jaw, and so start with a base coat of flesh.
A few washes of pink and purple helped make the mouth start looking like the
inside of a predator’s mouth…I would like to thank my Collie for putting up with
me constantly prying her mouth open to check on colours.
adjustments, easily performed with a
sanding stick and a sharp #11 blade. You will probably want to paint the inner
mouth prior to attaching the lower jaw, and so start with a base coat of flesh.
A few washes of pink and purple helped make the mouth start looking like the
inside of a predator’s mouth…I would like to thank my Collie for putting up with
me constantly prying her mouth open to check on colours.
As was so wisely pointed out to me by a MM reader’s child “make sure the teeth aren’t too white, ‘cause T-Rex didn’t use a toothbrush”*. The teeth were painted Testor’s “desert sand”, and then capped with a light mixture of white. Several coats of pure Future were applied to give the assembly a “wet look”.
The Forearms Revisited: Now, it was time to get the angle of the arms just right so the Albertosaurus would have a good runner’s gait. This was accomplished by racing around the house in different styles , trying to figure out which would be the most applicable. After terrifying the cat and our neighbors, a reasonable assumption was reached as to just how the arm movement would work with the lower leg pose. That, and I was out of breath. Glue them on with gap filling super glue, and putty.
 Back
to the Base: While all of this nonsense was going on, the base had been
drying, and was ready to be painted with acrylics, and liberally sprinkled with
odd bits of railroad diorama greenery. I like to use white glue, and then a
shaker to apply the stuff. You can borrow the spouse’s flour sifter too, just
remember to clean it out like I didn’t. Let the glue and paint dry well before
tackling the pour of c
Back
to the Base: While all of this nonsense was going on, the base had been
drying, and was ready to be painted with acrylics, and liberally sprinkled with
odd bits of railroad diorama greenery. I like to use white glue, and then a
shaker to apply the stuff. You can borrow the spouse’s flour sifter too, just
remember to clean it out like I didn’t. Let the glue and paint dry well before
tackling the pour of c lear resin. There are a few different schools of thought
on this stuff, whether to use the hot set or the cold set. Both are two part
mixtures, but the hot set (read: fiberglass resin) is about 1/3rd the
price and smells like something left over from Area 51. It also has the
capability to get so hot that it actually will melt styrene, trust me on this (“no, I actually meant to
do a sunken plane diorama”). I also made a lungfish out of sculpey clay, and
painted it prior to forming up the sides of the dio and pouring in the casting
resin.
lear resin. There are a few different schools of thought
on this stuff, whether to use the hot set or the cold set. Both are two part
mixtures, but the hot set (read: fiberglass resin) is about 1/3rd the
price and smells like something left over from Area 51. It also has the
capability to get so hot that it actually will melt styrene, trust me on this (“no, I actually meant to
do a sunken plane diorama”). I also made a lungfish out of sculpey clay, and
painted it prior to forming up the sides of the dio and pouring in the casting
resin.
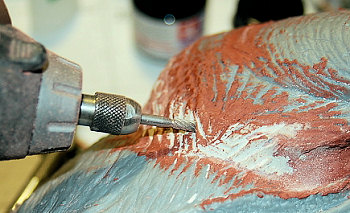
The Body: So, the puttying is all finished right up. Whooohoo! Now, break out a carving bit for your moto-tool, and start matching up the skin lines. Putty, Sand, Repeat. This is the dogma that we live by. PSR until everything looks kosher, the folds all match up, and there are no more corrective scars than you can see on Dr. 90210.
| COLORS & MARKINGS |
 One
of the most wonderful things about building dinosaurs, is that there aren’t
(usually) jmn’s who will come out of the woodwork and tell you that your colours
are incorrect. T-Rexes, as far as we know, did not use any sort of standardized
code, so you can pitch the federal standard measures chips out the window. Make
sure the window is open first.
One
of the most wonderful things about building dinosaurs, is that there aren’t
(usually) jmn’s who will come out of the woodwork and tell you that your colours
are incorrect. T-Rexes, as far as we know, did not use any sort of standardized
code, so you can pitch the federal standard measures chips out the window. Make
sure the window is open first.
There have been a thousand arguments as to how this great predator would have been coloured, personally, I think a mottled grey and green seem to make the most sense. I know a lot of people like them to be brick red, but unless they were sunning themselves in Sedona, Arizona, I doubt it would have helped them in their hunt and enemy avoidance. I used a mixture of NATO green (anti-commie dinos) and Testor’s Sand, for the lines, with two aircraft grays and a little bit of white for the belly and naughty bits.
 A
lot of people like to put in artificial eyes on their dino models, and on the
larger versions, such as the Horizon Velociraptor, they look pretty good…but
with these dinky little dots, there wasn’t much point. Better, I thought, to
just do a simple layered technique with a tiny brush, and then Future the heck
out of it
A
lot of people like to put in artificial eyes on their dino models, and on the
larger versions, such as the Horizon Velociraptor, they look pretty good…but
with these dinky little dots, there wasn’t much point. Better, I thought, to
just do a simple layered technique with a tiny brush, and then Future the heck
out of it
Facial streaks were added, after charging through the underbrush in chase of my escaped Collie on a hike, it seemed to me that horizontal lines would have been quite successful in keeping the sensory equipment (the head) somewhat camouflaged while seeking quarry from the shelter of the pines.
| CONCLUSIONS |
At
the local modeling show, I was told by a photographer that in all of the years
he has been taking shots at different shows, he had more fun with this dinosaur
than ever before. Can’t get much better than that!
The clinker was the comment from an observer “the hips are too wide”. Bloody modelers.
* I am paraphrasing this statement, I couldn’t find the original.
| REFERENCES |
“Predatory Dinosaurs of the World” Gregory S. Paul
“The Complete T Rex” J Horner
I’d also like to thank Mike Trcic for his unbelievable work on therapod running.
October 2007
If you would like your product reviewed fairly and quickly, please contact me or see other details in the Note to Contributors.