
| KIT #: | ? |
| PRICE: | $10 at a swap meet |
| DECALS: | None |
| REVIEWER: | Mark Hiott |
| NOTES: |
Bought in a bag, no idea
of scale or maker |
| HISTORY |
 I
have no idea of the history of Dragons. However, I did find this on Wikipedia:
I
have no idea of the history of Dragons. However, I did find this on Wikipedia:
A dragon is a
legendary creature, typically with serpentine or reptilian traits, that features
in the myths of many cultures. There are two distinct cultural traditions of
dragons: the European dragon, derived from European folk traditions and
ultimately related to Greek and Middle Eastern mythologies, and the Chinese
dragon, with counterparts in Japan, Korea and other East Asian countries. The
two traditions may have evolved separately, but have influenced each other to a
certain extent, particularly with the cross-cultural contact of recent
centuries. The English word "dragon" derives from Greek δράκων (drákōn),
"dragon, serpent of huge size, water-snake".
A dragon is a
mythological representation of a reptile. In antiquity, dragons were mostly
envisaged as serpents, but since the Middle Ages, it has become common to depict
them with legs, resembling a lizard. Dragons are usually shown in modern times
with a body like a huge lizard, or a snake with two pairs of lizard-type legs,
and able to emit fire from their mouths. The European dragon has bat-like wings
growing from its back. A dragon-like creature with wings but only a single pair
of legs is known as a wyvern.
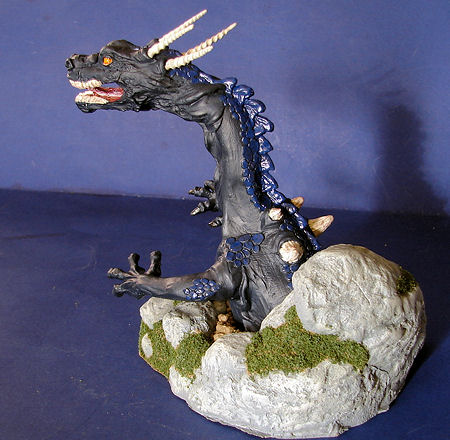
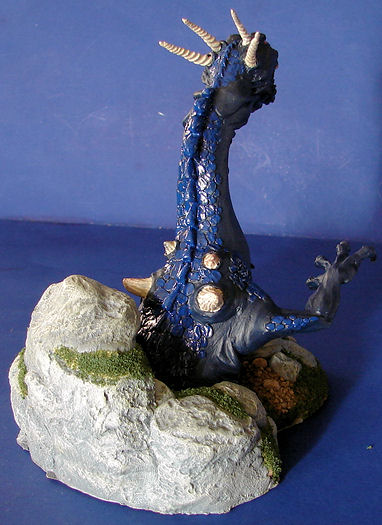
| THE KIT |
 I
have always wanted to try a figure model. They are normally out of my price
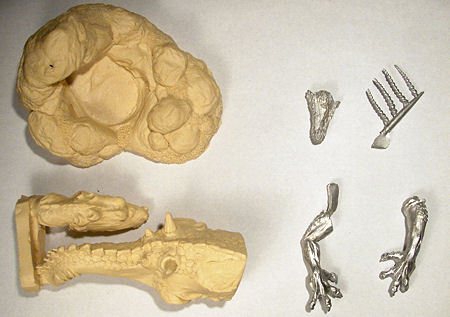
range, but when I saw this for $10 at swap meet, I snatched it up. A simple kit,
it consists of 3 crème colored resin parts with the arms, lower jaw and 4 horns
made of white metal. The detail is good, but there are molding seams on most of
the parts. The base is quite nice as it has molded on moss among the rocks.
There were no instructions in the bag, so I have no idea who made it or what
scale it is.
I
have always wanted to try a figure model. They are normally out of my price
range, but when I saw this for $10 at swap meet, I snatched it up. A simple kit,
it consists of 3 crème colored resin parts with the arms, lower jaw and 4 horns
made of white metal. The detail is good, but there are molding seams on most of
the parts. The base is quite nice as it has molded on moss among the rocks.
There were no instructions in the bag, so I have no idea who made it or what
scale it is.
| CONSTRUCTION |
The
base is a single large resin casting, so there is nothing to do but paint it.
The first thing I did was remove all the casting seams from the various parts.
This was done with a combination of sandpaper and micro files. Care had to be
taken so as not to destroy t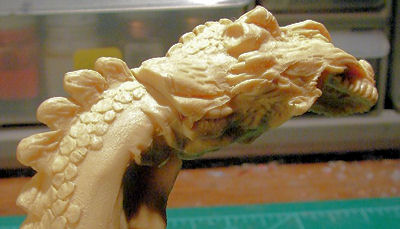 he
nice detail. After that was done, everything was given a bath in some soapy
water and left to dry.
he
nice detail. After that was done, everything was given a bath in some soapy
water and left to dry.
The
first part attached was the head. Being a "newbie", I may have removed too much
resin, because the fit of the head left large lips between it and the body. I
used 3M glazing and Spot putty to build up the areas and let it dry overnight. I
then used a round micro file to carve what I thought were
 reasonable
folds to match the existing ones. The neck was then sanded smooth with 3M
flexible sanding pads and checked for any missed spots. It took me 3
applications of filler to get what I thought looked acceptable.
reasonable
folds to match the existing ones. The neck was then sanded smooth with 3M
flexible sanding pads and checked for any missed spots. It took me 3
applications of filler to get what I thought looked acceptable.
Next
up were the arms. The fit is also bad here and there are no positive locators to
tell what the arms positions should be. I inserted the body into the base and
used that to set where I wanted the arms. They were then attached with CA glue.
The gaps were filled with glazing putty and allowed to dry overnight. Again, it
took a couple applications to get a good result.
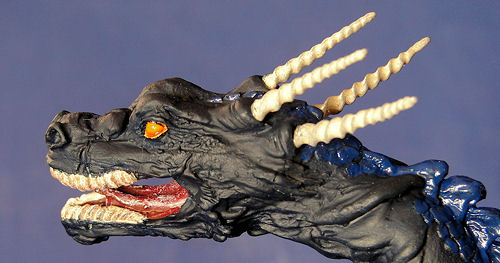
The lower jaw was added after the mouth was painted but before the body was. While the fit here was rather good, I still used the glazing putty to fill a small gap that was left. The last parts installed were the 4 horns on the back of the head. I used no filler here as I thought they looked ok without any.
| THE BASE |
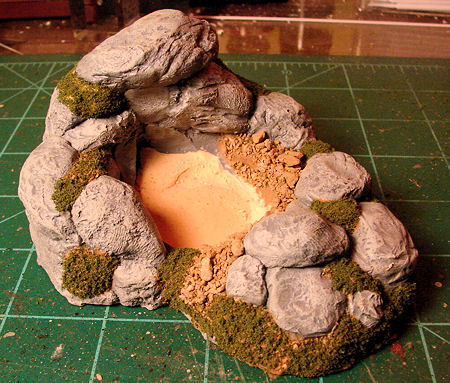 I'm
going to cover the base separately, as it was the first thing I painted. I
wanted to see how well I could do this before giving the actual dragon a try.
I'm
going to cover the base separately, as it was the first thing I painted. I
wanted to see how well I could do this before giving the actual dragon a try.
I
went down to Hobby Lobby and picked up a SceneArama "Desert Oasis Diorama Set".
Now these sets are really cool. They come in different type settings, contain
everything in the box you need to make the diorama and cost less the $20. If
anyone ever wanted to give a diorama a try, this is the way to start!
The
first thing I did was give it a base coat of MM primer. The rocks were then
drybrushed with 2 shades of light gray. Sorry, I can't remember what colors I
used. The dirt and moss areas were then painted with Testors Flat Dark Tan
acrylic.
I followed the instructions in the diorama kit and applied a diluted white glue to the dirt areas and sprinkled on the rocks. I used the same method on the moss areas and sprinkled on the grass. It took a couple tries to get something I liked, but the end result is very nice. After everything had dried for a couple days, I gave it a coat of Floquil Clear Flat.
| COLORS & MARKINGS |
 Once
the head and arms were finished, I gave the whole thing a coat of MM Enamel
primer to check for imperfections. After fixing any found, they were repainted
in primer. Since this was an experiment for me, I didn't want to go out and
spend money on paints that I may never use again. So I decided that I had to use
what was on hand... aircraft, auto and ship colors! I looked online for pictures
of dragons and decided that shades of blue was the best choice given the colors
I had available.
Once
the head and arms were finished, I gave the whole thing a coat of MM Enamel
primer to check for imperfections. After fixing any found, they were repainted
in primer. Since this was an experiment for me, I didn't want to go out and
spend money on paints that I may never use again. So I decided that I had to use
what was on hand... aircraft, auto and ship colors! I looked online for pictures
of dragons and decided that shades of blue was the best choice given the colors
I had available.
First off, the entire thing was brush painted with a mixture of enamels and
acrylics. The body was painted with 2 coats of MM Insignia Blue enamel. After
allowing that to thoroughly dry, the scales were painted with
The
inside of the mouth was painted first with MM Rust acrylic and the tongue was
painted Testors Flat Red acrylic. The tongue was then lightly drybrushed with MM
Light Sea Gray enamel. The teeth and horns on the dragons back were painted with
MM Panzer Interior Buff enamel. They were then drybrushed with MM Flat White
enamel, followed by a very light dry brushing with MM Flat Brown enamel. After
painting the lower jaw was attached, any filler needed applied and painted. The
eyes were first painted MM Flat White and then given 2 coats of Tamiya Clear
Once
all the painting was done, everything but the scales was given a coat of Floquil
Clear Flat to seal it all. The dragon was then inserted into the base, but was
not glued down.
| CONCLUSIONS |
This being my first figure, I wasn't expecting too much. However, I found that I really enjoyed building this and I have already started my second figure! If anyone is wanting to try a figure, I suggest you troll around a swap meet and see what simple, cheap figures you can find. You never know what you can find, I recently bought 3 figures out of the Trumpy 1/24 Spitfire for $1 each! If I mess them up, no big deal.
I
also suggest trying the SceneArama sets. They really are the easiest way to get
into dioramas without spending a load of money.
| REFERENCES |
Wikipedia for some kind of history
Various dragon photos on the 'net
If you would like your product reviewed fairly and fairly quickly, please contact the editor or see other details in the Note to Contributors.