The Encounter: Bigfoot and Tonto
| KIT #: | ? |
| PRICE: | Roughtly $25 each from auctions |
| DECALS: | None |
| REVIEWER: | Scott Lyle |
| NOTES: |
| HISTORY |
“The
Encounter”
A Diorama Featuring Johnson Resin’s
“Bigfoot” and
Growing up in the 1970s, it seemed like 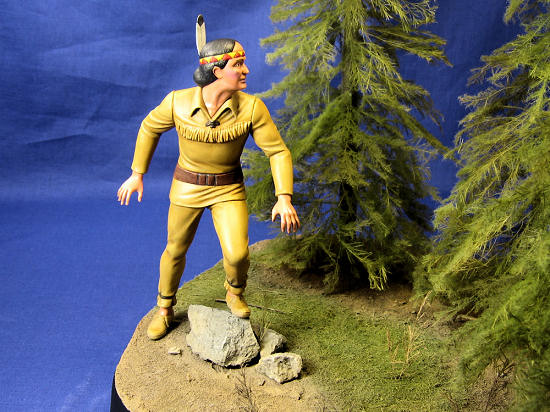 eatured
slightly creepy 70s synthesizer music and bad recreations of people supposedly
being scared witless by whatever that week’s mysterious phenomenon was.
As a child I took it all in and was alternately
fascinated or terrified by each new unknown creature or occult force.
My favorite however, by far and to this day, was
none other than Bigfoot.
For a kid under the age of ten like me the idea
of a giant hairy creature roaming around the forests of the
eatured
slightly creepy 70s synthesizer music and bad recreations of people supposedly
being scared witless by whatever that week’s mysterious phenomenon was.
As a child I took it all in and was alternately
fascinated or terrified by each new unknown creature or occult force.
My favorite however, by far and to this day, was
none other than Bigfoot.
For a kid under the age of ten like me the idea
of a giant hairy creature roaming around the forests of the
| THE KITS |
 Today Bigfoot is a still an undeniable piece of our
pop culture.
He hawks pizzas and beef jerky and lives on in new, equally
cheesy horror movies.
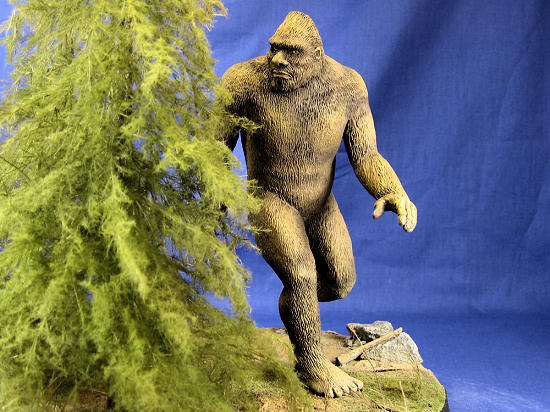
About five years ago I happened to find a resin
model of Bigfoot on eBay.
A limited run kit produced by a sculptor named Jeff
Johnson, I had to have it.
It’s a beautiful casting, set in the famous pose of
the blurry 60s Patterson film clip that we’ve all seen too many times.
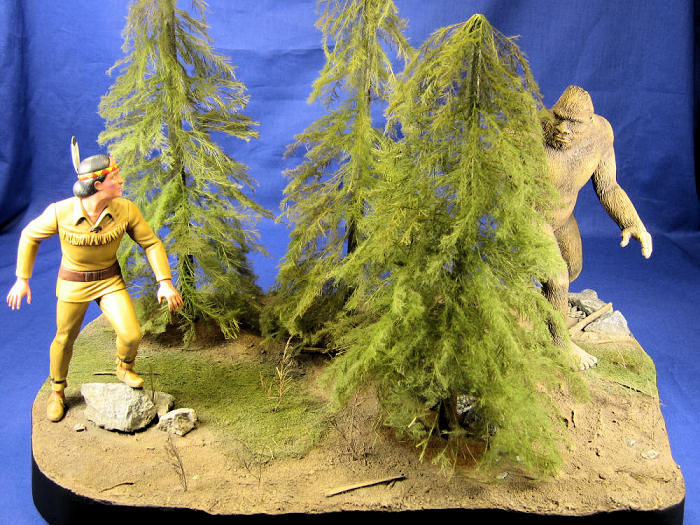
I decided that to do a nice Bigfoot model justice,
he had to be set in a diorama, walking through the woods.
To complete the scene however I needed some drama.
It would be nice if he were spooking a hiker, or
something along those lines.
Looking through websites of
Today Bigfoot is a still an undeniable piece of our
pop culture.
He hawks pizzas and beef jerky and lives on in new, equally
cheesy horror movies.
About five years ago I happened to find a resin
model of Bigfoot on eBay.
A limited run kit produced by a sculptor named Jeff
Johnson, I had to have it.
It’s a beautiful casting, set in the famous pose of
the blurry 60s Patterson film clip that we’ve all seen too many times.
I decided that to do a nice Bigfoot model justice,
he had to be set in a diorama, walking through the woods.
To complete the scene however I needed some drama.
It would be nice if he were spooking a hiker, or
something along those lines.
Looking through websites of
| CONSTRUCTION |
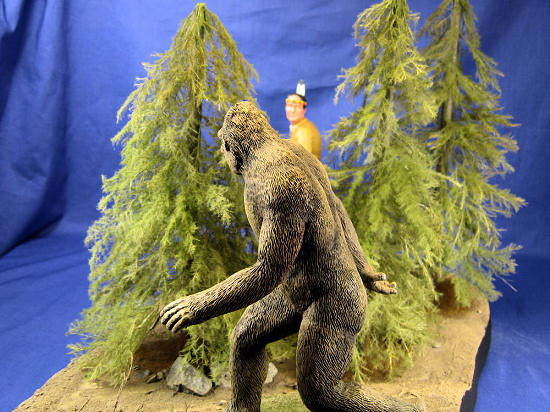
Building and Painting Bigfoot
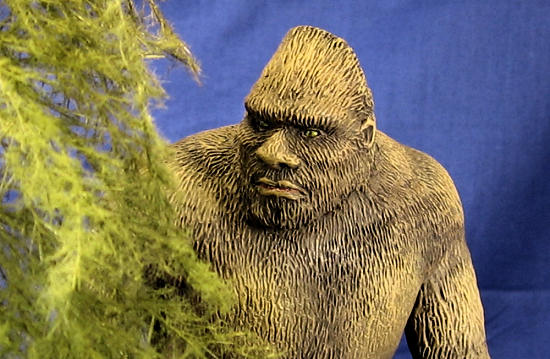 Construction of the resin Bigfoot model was very
easy.
There are two parts – the body and his right arm!
Once a little bit of Squadron Green putty “fur” was
sculpted over the joint, I primed him with Tamiya Light Gray Primer sprayed
right out of the can.
I then airbrushed on a layer of Testors Acrylic Raw
Umber for his base coat, and then drybrushed him in successively lighter shades
of brown.
I tried to highlight the various muscle groups of his body
to make him look more dynamic.
The well-sculpted fur of the model is really suited
for some nice dry-brushing effects.
To make his eyes look a little creepy I painted them
Tamiya Yellow-Green before adding black pupils.
Some Testors Gloss on his eyes and lips completed
the model.
Construction of the resin Bigfoot model was very
easy.
There are two parts – the body and his right arm!
Once a little bit of Squadron Green putty “fur” was
sculpted over the joint, I primed him with Tamiya Light Gray Primer sprayed
right out of the can.
I then airbrushed on a layer of Testors Acrylic Raw
Umber for his base coat, and then drybrushed him in successively lighter shades
of brown.
I tried to highlight the various muscle groups of his body
to make him look more dynamic.
The well-sculpted fur of the model is really suited
for some nice dry-brushing effects.
To make his eyes look a little creepy I painted them
Tamiya Yellow-Green before adding black pupils.
Some Testors Gloss on his eyes and lips completed
the model.
Building and
Painting Tonto
Construction of the Native American figure was also
quite straightforward.
The arms, legs, torso, and head are molded in halves
and needed to be glued together first.
The usual gaps were filled with superglue and/or
Squadron Green Putty and then sanded smooth.
The various limbs were then joined to the body, and
the resulting gaps were filled as before.
The 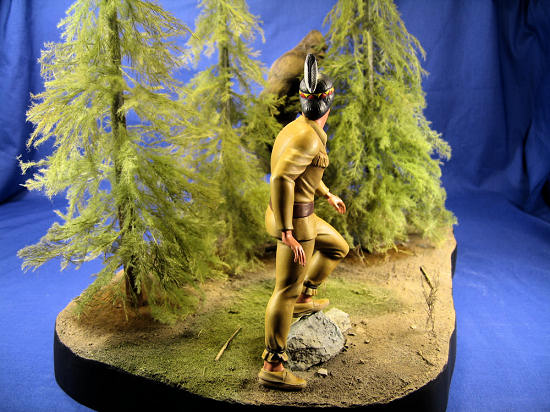 wash of
medium brown oil paint, which helped define the various folds and wrinkles of
his clothes.
Next, I drybrushed his clothes with a lighter version of
the basecoat.
His belt was painted Vallejo Saddle Brown, and then it was
time to tackle the flesh tones.
wash of
medium brown oil paint, which helped define the various folds and wrinkles of
his clothes.
Next, I drybrushed his clothes with a lighter version of
the basecoat.
His belt was painted Vallejo Saddle Brown, and then it was
time to tackle the flesh tones.
Painting faces are not my specialty, so I decided to keep it simple. I used Testors Warm Flesh tone as a base coat and applied it with a brush. Next I washed all of the flesh areas with a wash made of Testors Flesh Shadow and thinner. I used a little bit of Testors Light Flesh tone to highlight his nose, brow, and chin. I then put a couple of dabs of pink on his cheeks and lower lip, and blended them in with a #10/0 brush and thinner. Next I painted his eyes with a custom off-white shade; basically Testors White with some Sand mixed in. I used Raw Umber for his pupils and eyebrows. Finally I painted his hair Polly S Grimy Black and lightly drybrushed it with some Testors Panzer Gray. Some Testors Gloss was applied to his eyes, and the feather was glued to his head. The man was now ready for his encounter with the unknown!
Building and
Painting the Base
As diorama builders know, making the
base and terrain can be a project in and of itself, and this one was no
exception.
The main feature of the base is a row of pine trees that
separate Bigfoot from the Native American.
This was done to create a little mystery – I thought
it was creepier to have Bigfoot sort of skulking behind the trees than out in
the open in plain view.
Issue 86 of Tamiya Model Magazine contains an
article that describes how to simply make good looking model pine trees, and I
followed that as closely as I could.
Basically you take wooden dowels about 3/8” in
diameter and cut them to the length you want (in my case about 12”).
Using a utility knife I whittled the dowels down a
bit on one end; tapering them so they would look like a real tree.
I intentionally kept the whittling rough to simulate
the rough bark of a real tree.
The dowels were then painted dark brown to look like
real tree trunks.
Next I drilled random holes into the trunks with a
very small drill bit – these would hold the branches of the
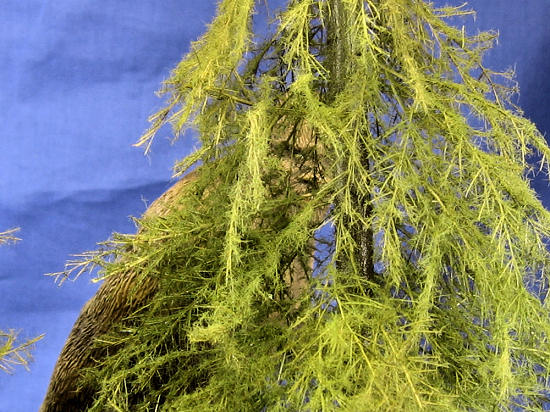 trees.
For branches I used some small dried plants from a
craft store that were then cut to different sizes and glued with white glue into
the various holes.
I tried to glue longer ones into the lower holes and
bend them downwards.
I worked my way up the tree in this fashion, sort of
like putting together an artificial Christmas tree.
Once the “branches” were in place I sprayed them
with aerosol glue, making sure they were good and sticky.
I then sprinkled static grass all over them, the
idea being that the static grass would stick to the branches and simulate pine
needles.
I was happy with their appearance, and I’ll definitely be
making more pine trees like this for my future dioramas.
They’d look great in a WW2 Ardennes/Battle of the
Bulge winter scene.
trees.
For branches I used some small dried plants from a
craft store that were then cut to different sizes and glued with white glue into
the various holes.
I tried to glue longer ones into the lower holes and
bend them downwards.
I worked my way up the tree in this fashion, sort of
like putting together an artificial Christmas tree.
Once the “branches” were in place I sprayed them
with aerosol glue, making sure they were good and sticky.
I then sprinkled static grass all over them, the
idea being that the static grass would stick to the branches and simulate pine
needles.
I was happy with their appearance, and I’ll definitely be
making more pine trees like this for my future dioramas.
They’d look great in a WW2 Ardennes/Battle of the
Bulge winter scene.
Once the trees were done I turned to
the groundwork.
For a base I used a 2” thick Woodland Scenics
Styrofoam base, and cut the various shapes and contours into it using hand saws
and their hot wire cutter.
I then smeared a mixture of water and white glue
over the whole thing and sprinkled on my groundwork, a mixture of a couple of
different grades of model railroad ballast and sand.
Kitty litter provided nice scale-sized rocks, and
actual pieces of gravel simulated the larger boulders, one of which was needed
for the Native American to be posed on.
Static grass was used to simulate not only grass,
but also dead pine needles lying under the pine trees.
Other small twigs from the yard were scattered about
to provide more forest floor debris.
One effect that I had to create was of course, a
Bigfoot footprint!
I spread a l ittle
joint compound onto the base and the mashed the Bigfoot model’s plastic-wrapped
foot into it.
Once dry, I added some sand to it for texture.
No Bigfoot diorama would be complete without a
footprint!
ittle
joint compound onto the base and the mashed the Bigfoot model’s plastic-wrapped
foot into it.
Once dry, I added some sand to it for texture.
No Bigfoot diorama would be complete without a
footprint!
With the ground work dry it was time to paint it. I airbrushed a layer of Tamiya Flat Earth over all of the earthy areas, and then sprayed different, lighter brown and beige shades around to provide shading and variation. The rocks were painted in a couple different shades of gray by hand. A wash of heavily thinned Raw Umber oil paint was brushed over the dirt areas and rocks, and then each was dry-brushed with light brown and light gray respectively. The grass was sprayed with some medium green and yellow-green shades, and then drybrushed with yellow. Next the pine needles under the trees were airbrushed a homemade orange color. To tone everything down and blend the different colors together I lightly sprayed some Tamiya Buff onto the rocks and grassy areas. Finally I brush-painted the edges of the base with some Black craft paint. This framed the scene nicely, and now it was ready for some action.
| FINAL CONSTRUCTION |
With everything now painted, my next step was to
glue the trees to the base.
I drilled 3/8” holes in the base, filled them half
way with white glue, and seated them in the holes.
Next I drilled a small hole in one of the feet of
Bigfoot and Tonto respectively,
 and
then a matching hole in the base where those feet would go.
Inserting a screw up from the bottom, I was able to
carefully attach the figures securely to the base.
It was a nerve-wracking procedure – I could just
imagine seeing one of Tonto’s leg seams split open as I was turning the
screwdriver!
Before tightening the figures down, I coated the bottoms of
their feet with white glue.
With the screws tightened up, my figures were
looking good.
Bigfoot was in full stride in the woods, and Tonto was
looking like he just remembered he forgot to file his taxes, and the IRS had
just pulled into his driveway.
and
then a matching hole in the base where those feet would go.
Inserting a screw up from the bottom, I was able to
carefully attach the figures securely to the base.
It was a nerve-wracking procedure – I could just
imagine seeing one of Tonto’s leg seams split open as I was turning the
screwdriver!
Before tightening the figures down, I coated the bottoms of
their feet with white glue.
With the screws tightened up, my figures were
looking good.
Bigfoot was in full stride in the woods, and Tonto was
looking like he just remembered he forgot to file his taxes, and the IRS had
just pulled into his driveway.
| CONCLUSIONS |
My Bigfoot diorama is a nice tribute
to a part of my childhood and growing up in the 1970s.
Sandwiched between my dinosaur phase and my Star
Wars phase, I’ll always have a fondness for the big guy, be he peaceful and
docile, as portrayed to children, or scary and violent, as portrayed to adults.
I’ve always thought that if
November 2008
Copyright Modelingmadness.com
If you would like your product reviewed fairly and fairly quickly, please contact the editor or see other details in the Note to Contributors.