Screamin 1/6 Freddy Krueger
| KIT #: | 105 |
| PRICE: | Somewhere around $40.00 |
| DECALS: | None |
| REVIEWER: | Stephen Venters |
| NOTES: | Vinyl kit |
| HISTORY |
A NIGHTMARE IN VINYL!
Everybody has to sleep sometime! That is what makes the Freddy Krueger character in Wes Craven’s A Nightmare on Elm Street, brilliantly played by Robert Englund, one of the most unique and terrifying villains to emanate from the horror movie genre. Once you fall asleep he’s got you! Quite a few years ago, at one of the ResinHedz trade shows, I picked up Screamin’s™ 1/6 scale hollow vinyl figure kit of Freddy Krueger with the intention of merely slapping a paint job on it and putting it on the shelf. It didn’t quite work out that way.
| THE KIT |
Examination of the parts provided by Screamin’™ revealed the figure had a nice threatening pose and the basic clothing and anatomy were fine but there were several points of contention for my taste. First of all, I felt the head sculpt of the kit was too cartoon-like to do Mr. Englund justice. In addition, the kits vinyl hat was considerably too small for the head, the vinyl blades on Freddy’s glove had to go and the shoes, with their laces molded on, were way too soft in detail. All the flesh detail on the face and hands was soft and inaccurate as well. This pretty much left me with the arms, legs and a torso that I considered fine the way they were. So here we go again…keep the box and throw away the parts!
| CONSTRUCTION |
WORKING WITH VINYL
 Vinyl is an
interesting material that need not be intimidating to the modeler who
understands its characteristics and idiosyncrasies. The great thing about vinyl
is it captures every detail of the mold without seam lines that need to be
cleaned up and it’s relatively cheap to cast compared to polyurethane resin.
This allows manufactures to sell vinyl kits for a fraction of the cost than if
the kit were cast in resin. Another great characteristic of vinyl is that it has
a mold ‘memory’. Any distortion in a vinyl part is easy to fix by gently heating
it with a hair dryer until it returns to the shape it was cast. The bad thing
about vinyl is that it is a soft, flexible plastic and we all know what happens
to paint when the surface it is covering flexes beneath it.
Vinyl is an
interesting material that need not be intimidating to the modeler who
understands its characteristics and idiosyncrasies. The great thing about vinyl
is it captures every detail of the mold without seam lines that need to be
cleaned up and it’s relatively cheap to cast compared to polyurethane resin.
This allows manufactures to sell vinyl kits for a fraction of the cost than if
the kit were cast in resin. Another great characteristic of vinyl is that it has
a mold ‘memory’. Any distortion in a vinyl part is easy to fix by gently heating
it with a hair dryer until it returns to the shape it was cast. The bad thing
about vinyl is that it is a soft, flexible plastic and we all know what happens
to paint when the surface it is covering flexes beneath it.
Many manufacturers of vinyl kits suggest you fill your kit with plaster of Paris or expandable foam to reinforce its integrity. I found a better solution that consistently works for me that I used on Freddy. First, after washing the parts thoroughly in warm soapy water to remove any mold release or finger oil and allowing the parts to air-dry, I assembled the torso, arms and legs with cyanoacrylate (Super Glue) while making sure that no remaining vinyl blocked the passage between the arms, waist and torso. This gave me a hollow assembly which is necessary for my technique to work. Then I cut out the disks of vinyl under the pants where the shoes are intended to be glued to the legs. Now, one leg had a pour hole and the other leg had a vent hole. At this point it’s time to take the project outside or run the risk of joining Alice in her Wonderland! I mean it…go outside for this step!
Bondo™, Snow White™, 3M™… the brand doesn’t
matter. Using a fairly large container, I mix a syrup made of 50% polyester auto
body filler and 50% fiberglass resin until it has the consistency of Mrs.
Butterworth’s™ breakfast syrup. You can get these products in any auto body
supply store and in most big box retailers. Once the two products are thoroughly
mixed with no solids or ‘lumps’, I then add both their respective hardeners in
proportion to the amount of each product used according to the manufacturer’s
instructions and stir quickly but thoroughly. Working rather quickly, I then
pour this syrup into one of the leg holes on the figure and, occasionally
tilting it from side to side to be certain the arms are filled as well, continue
to pour until the entire figure is filled. I then balance the figure head down
between rolls of paper towels and let the syrup do its magic. After a few
minutes, a chemical reaction takes place and the syrup
 becomes very warm. So
warm it becomes uncomfortable to the touch! That means it is working. In fact,
it’s the chemically generated heat that solidifies the polyester resins in body
filler and fiberglass. That same heat also affects the vinyl kit while the syrup
is still in a liquid state and causes any remaining distortion in the figure to
disappear! If any of the syrup leaks out from between joints on the figure,
simply wait for it to solidify and, while it is still flexible, flick it off
with your fingernail. It comes right off the vinyl and doesn’t leave a residue.
After an hour or so, the polyesters solidify into a rock-hard solid core the
exact interior shape of the figure eliminating any chance it will flex or
distort over time. However, it can still be easily drilled or ground out for
pinning parts together during assembly. I use finishing nails crimped a few
times along their shaft with wire cutters so they catch and hold cyanoacrylate
or five minute epoxy for pins. When grinding or drilling solid polyester be sure
to wear eye protection and a respirator!
becomes very warm. So
warm it becomes uncomfortable to the touch! That means it is working. In fact,
it’s the chemically generated heat that solidifies the polyester resins in body
filler and fiberglass. That same heat also affects the vinyl kit while the syrup
is still in a liquid state and causes any remaining distortion in the figure to
disappear! If any of the syrup leaks out from between joints on the figure,
simply wait for it to solidify and, while it is still flexible, flick it off
with your fingernail. It comes right off the vinyl and doesn’t leave a residue.
After an hour or so, the polyesters solidify into a rock-hard solid core the
exact interior shape of the figure eliminating any chance it will flex or
distort over time. However, it can still be easily drilled or ground out for
pinning parts together during assembly. I use finishing nails crimped a few
times along their shaft with wire cutters so they catch and hold cyanoacrylate
or five minute epoxy for pins. When grinding or drilling solid polyester be sure
to wear eye protection and a respirator!
CUSTOMIZING
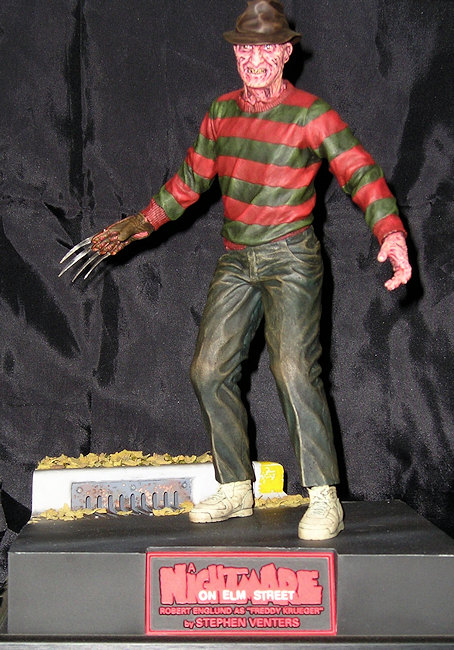
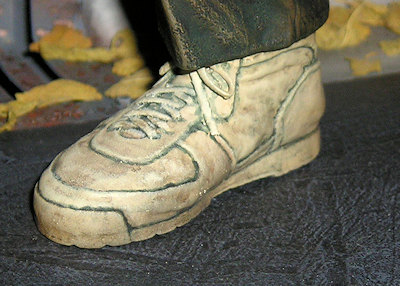
The first step in customizing this figure was deciding which kit parts could be modified and which had to be fabricated from scratch. I decided that Freddy’s tennis shoes needed more and better detail so I filled the kit’s vinyl shoes with Sculpey™, made RTV silicone molds of them and cast copies in resin. I removed the laces from the castings and refined the detail in the shoes then added eyelets punched from styrene sheet and laces made from strips cut from an old silk scarf. Once the shoes were complete, I drilled into the soles to glue finishing nails into them and mounted them to wooden blocks for painting. The finishing nails would later be cut from the blocks and used to securely mount the figure to the base.
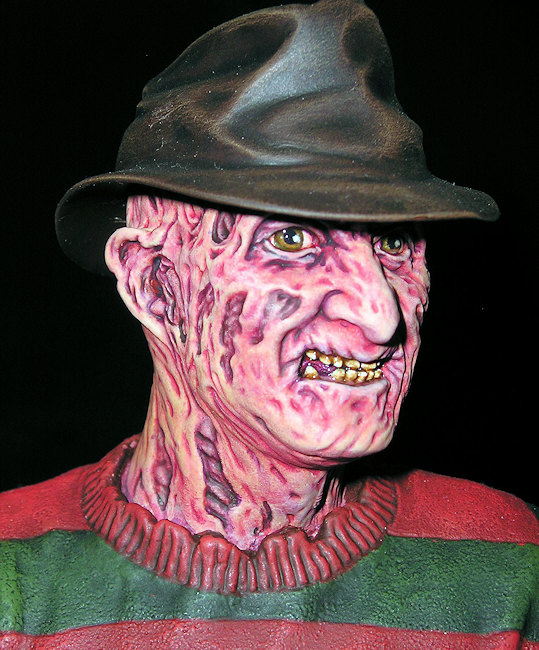
I did not feel the
head and hands supplied in the Screamin’™ kit were fixable to my satisfaction
so, using the tried and true wire armature as a starting point, I sculpted a new
head and hands from Super Sculpey™. Constant reference to photos of Mr. England
in the Freddy makeup, and being careful to only use photos from the first movie,
resulted in what I believe to be a reasonable likeness of the character and a
definite improvement over the kit parts. You can be the judge of that. When
sculpting the new parts, I was careful to maintain the position of the head,
hands and fingers to keep them consistent with the original concept of the
figure as supplied in the kit. Super Sculpey™, when baked, still isn’t as strong
and durable as I would like and tends to be very brittle and prone to cracking
over time. I made RTV silicone molds from the Super
 Sculpey™ parts I created and
cast a new head and hands in polyurethane resin. Once I had a resin copy of the
head, I mounted it to a finishing nail and wooden block and stretched plastic
wrap over it. This gave me a barrier so that I could go ahead and sculpt a new
hat for Freddy, again using Super Sculpey™, without damaging the resin head.
Another RTV Silicone mold, some pouring of resin and voila! I now had a resin
hat that actually fit Freddy’s head. The finishing nail in the neck and wooden
block have me a handle for painting the head and later it would be cut down and
used as a pin when connecting the head to the torso.
Sculpey™ parts I created and
cast a new head and hands in polyurethane resin. Once I had a resin copy of the
head, I mounted it to a finishing nail and wooden block and stretched plastic
wrap over it. This gave me a barrier so that I could go ahead and sculpt a new
hat for Freddy, again using Super Sculpey™, without damaging the resin head.
Another RTV Silicone mold, some pouring of resin and voila! I now had a resin
hat that actually fit Freddy’s head. The finishing nail in the neck and wooden
block have me a handle for painting the head and later it would be cut down and
used as a pin when connecting the head to the torso.
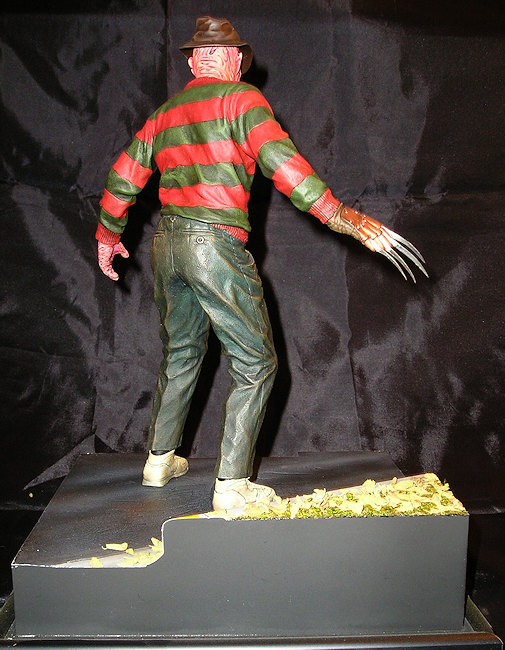
Now it was time to give Freddy his famous knives. I cut the knife blades from stainless steel sheet using my trusty old Dremel™ scroll saw and a lot of motor oil to keep the blade cool. I then filed them to final shape, gave them their edge and polished them. I attached them to the appropriate hand with cyanoacrylate and blended them into the glove with A/B epoxy putty. Now, finally, I was ready to put it all together. I assembled the parts using pins for strength and two-part, five minute epoxy, filling any seams with Bondo™ surfacing putty and smoothing it with acetone. I kept the hat separate. Once assembled, the entire figure was washed with a soft brush and several good spritzes of Windex™ to remove any oil or grime and rinsed well with water. I masked off the knife blades with a couple of coats of latex mold building compound and primed the kit for painting with two coats of Rust-oleum™ white sand-able primer. The first coat is to reveal any flaws I may have overlooked. The second coat is to provide a hard, permanent surface for the acrylic to adhere. Here’s a tip; how can you tell when the primer is dry completely? When you can no longer smell paint with your nose close to the surface, it’s dry and good to go.
| COLORS & MARKINGS |
 I use
acrylic artist paints such as Liquitex™ and Golden™ almost exclusively on my
figures and dioramas so here’s a couple of points I’d like to make from my own
experience. First, I prefer white primer as a base because acrylics are slightly
translucent when they dry and gray primer tends to kill the intensity of the
color. White primer results not only in more color vibrancy but also gives you
better control when mixing custom colors. Second, acrylic paint does not dry; it
cures into a structured plastic coating as the water evaporates. That’s why it’s
resistant to water after it cures. It is not however, resistant to ammonia.
Since I seal every step of my work with a good spritz of Testor’s DullCote™, if
I get fresh acrylic paint in an unwanted area, it’s easy to clean it back off
after it cures with a little Windex™ on a Q-tip© or paintbrush. I painted Freddy
by following my reference photos from the first Elm
Street movie.
I use
acrylic artist paints such as Liquitex™ and Golden™ almost exclusively on my
figures and dioramas so here’s a couple of points I’d like to make from my own
experience. First, I prefer white primer as a base because acrylics are slightly
translucent when they dry and gray primer tends to kill the intensity of the
color. White primer results not only in more color vibrancy but also gives you
better control when mixing custom colors. Second, acrylic paint does not dry; it
cures into a structured plastic coating as the water evaporates. That’s why it’s
resistant to water after it cures. It is not however, resistant to ammonia.
Since I seal every step of my work with a good spritz of Testor’s DullCote™, if
I get fresh acrylic paint in an unwanted area, it’s easy to clean it back off
after it cures with a little Windex™ on a Q-tip© or paintbrush. I painted Freddy
by following my reference photos from the first Elm
Street movie.
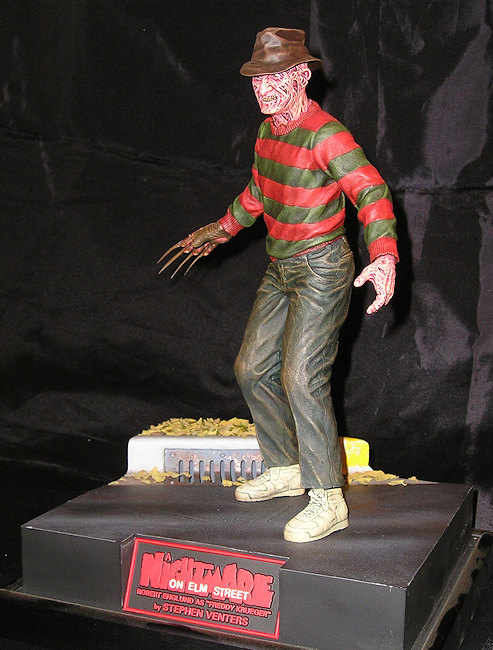
Large scale figure
modelers usually refer to a diorama as a topical base for their figure that
replicates an element of its environment from the movie or story in which it was
featured. So where to put Freddy? I wanted a base that was relatively small and
concise so as not to overpower the figure but still lend a touch of atmosphere
relevant to the movie. I’m almost ashamed to say that, after my usual overthinking of the problem, it finally occurred
 to me to put him on…Elm Street!
I recall a few scenes in the movie where Freddy was running around outside being
a jerk, so, while my ‘Elm Street’ isn’t a replication of the street in the
movie, it conveys the right ambiance for this display. I build my bases with a
wood frame covered with styrene sheet laminated with two-part, five minute
epoxy. I cross hatch the joining side of the styrene with an X-Acto™ knife to
insure a permanent bond. A trip to the corner with a digital camera and tape
measure gave me the reference I needed for the curb and storm drain detail.
Scaling real life to 1/6th scale is easy. Two inches in scale equals
one foot in real life so just divide your actual measurements by six and there
you have it. I used the ‘sea salt’ technique to create the pits in the metal
drain which I cut from styrene sheet. The area under the drain and hidden is a
light tight
to me to put him on…Elm Street!
I recall a few scenes in the movie where Freddy was running around outside being
a jerk, so, while my ‘Elm Street’ isn’t a replication of the street in the
movie, it conveys the right ambiance for this display. I build my bases with a
wood frame covered with styrene sheet laminated with two-part, five minute
epoxy. I cross hatch the joining side of the styrene with an X-Acto™ knife to
insure a permanent bond. A trip to the corner with a digital camera and tape
measure gave me the reference I needed for the curb and storm drain detail.
Scaling real life to 1/6th scale is easy. Two inches in scale equals
one foot in real life so just divide your actual measurements by six and there
you have it. I used the ‘sea salt’ technique to create the pits in the metal
drain which I cut from styrene sheet. The area under the drain and hidden is a
light tight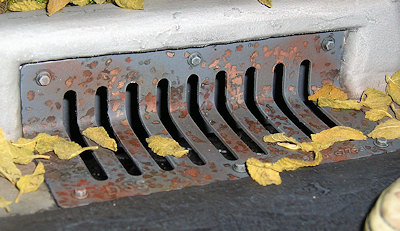 box painted black to add depth to the drain and create the illusion
of a sewer. The surface of the street was formed with Bondo and carved to match
reference of the blacktop street in front of my house. The curb is formed from
basswood covered with A/B epoxy putty to simulate formed concrete. The
groundwork is from Woodland Scenics™ products and the leaves are actually raw
spices obtained at the ethnic grocery down the block. I left them unpainted to
replicate dead leaves of Autumn …you know, Halloween…and glued them in position
as if they had freshly fallen. I created artwork for the nameplate in Adobe™
PhotoShop© on the MAC and Fritz, the ‘Headless Hearseman’, did a fine job as
always of converting it into a three dimensional aluminum nameplate. Fritz’
nameplate service in indispensable and I’m certainly grateful for it.
box painted black to add depth to the drain and create the illusion
of a sewer. The surface of the street was formed with Bondo and carved to match
reference of the blacktop street in front of my house. The curb is formed from
basswood covered with A/B epoxy putty to simulate formed concrete. The
groundwork is from Woodland Scenics™ products and the leaves are actually raw
spices obtained at the ethnic grocery down the block. I left them unpainted to
replicate dead leaves of Autumn …you know, Halloween…and glued them in position
as if they had freshly fallen. I created artwork for the nameplate in Adobe™
PhotoShop© on the MAC and Fritz, the ‘Headless Hearseman’, did a fine job as
always of converting it into a three dimensional aluminum nameplate. Fritz’
nameplate service in indispensable and I’m certainly grateful for it.
| CONCLUSIONS |
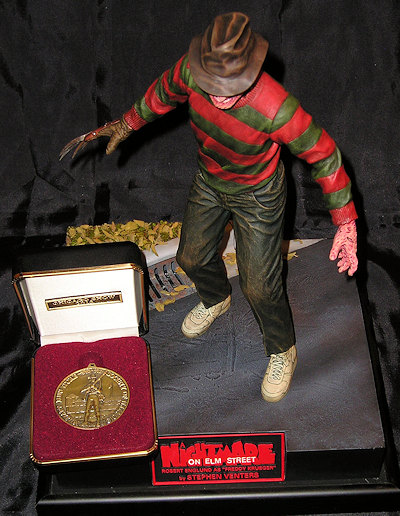 I realize this was
quite a bit of effort to invest in a forty dollar vinyl kit but there you have
it. Was it worth it? I believe so. Not only do I now have a unique Freddy
haunting my collection but it was an excellent opportunity to further hone my
sculpting skills. In fact, I believe this is only the third or fourth portrait
sculpt I had done since art school and it was definitely practice for the work
I’m doing now. This Freddy garnered a gold medal at the 2013 Military Miniature
Society of Illinois show. I hope you enjoy it!
I realize this was
quite a bit of effort to invest in a forty dollar vinyl kit but there you have
it. Was it worth it? I believe so. Not only do I now have a unique Freddy
haunting my collection but it was an excellent opportunity to further hone my
sculpting skills. In fact, I believe this is only the third or fourth portrait
sculpt I had done since art school and it was definitely practice for the work
I’m doing now. This Freddy garnered a gold medal at the 2013 Military Miniature
Society of Illinois show. I hope you enjoy it!
9 June 2016
Copyright ModelingMadness.com
If you would like your product reviewed fairly and fairly quickly, please contact the editor or see other details in the Note to Contributors.