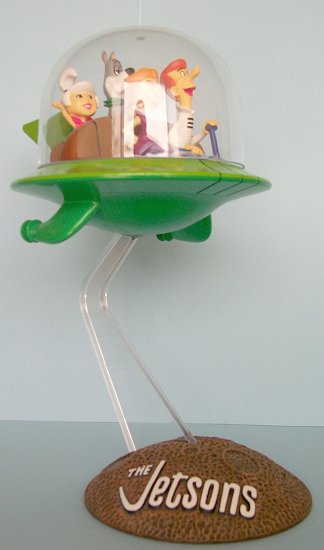
Polar Lights Jetson's Space Car
|
KIT # |
6810 |
|
PRICE: |
AU $35.00 |
|
DECALS: |
None |
|
REVIEWER: |
Lorraine Johnson |
|
NOTES: |
Easy and fun to build |
|
BACKGROUND |
On September 23, 1962, Hanna-Barbera showed the world their vision of everyday family life in the United States in 2062, premiering an all-new prime time series - The Jetsons, with a catchy theme intro that went: Meet George Jetson, his boy Elroy, daughter Judy, Jane his wife.
Having grown-up watching this cartoon (and yes singing this theme song) I just had to buy the model kit of the Jetsons in their family flying, umm, space ship/car thingy, when, my husband, Michael showed it to me at a Stanbridges Club night.
|
THE KIT |
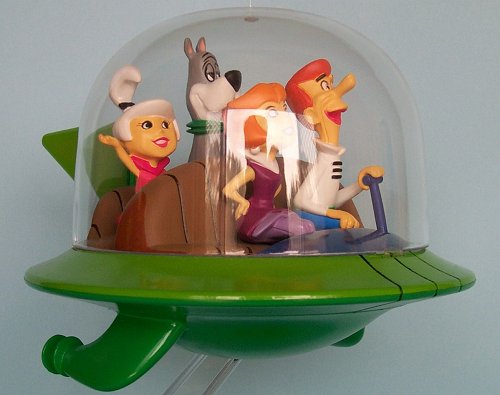
Once home with my new treasure, I hurriedly opened the rectangular brightly coloured box. To my surprise and delight the characters were quite neatly pre-painted which made this an even more fun project. The parts to the spaceship/car thingy were all dark green excepting the bubble canopy, which was clear plastic along with the stand. On inspection I was disappointed to find the bubble canopy had a horribly large ejection pin mark and I must admit I was not sure how I was going to remove or camouflage it.
The instruction sheet gave basic instructions with dubious painting instructions. Mouldings were very good; however dry fitting revealed small gaps that would need to be filled and carefully sanded, but these flaws were very minor. Even though the kit is snap together and the parts went together smoothly, I still used glue to smooth up the seams as well as for the added benefit of permanency. I found that I was not going to be able to snap/glue all the parts together immediately as the space ship/car needed the seats, floor, etc to be painted.
For a bit more info and a look at the bits, please visit the preview.
|
CONSTRUCTION |
On hunting through Michael’s spare supplies department, I found a small spray can of Dark Tan Paint, which I then applied to the inside seat and floor of the cabin insert. When this was dry I used Brown Ink to highlight the individual cushion detail. To finish the seats I masked off the ends and painted them with Vermin Brown. The floor was then painted very carefully, as trying to mask the edges of the seats was a total nightmare, using Dark Angels Green.
|
COLORS AND MARKINGS |
 At this point my
project ground to a halt as I needed to buy some cans of paint, but as
time went by I became exceedingly frustrated at trying to find the
correct shades of light green, dark green and blue needed to paint the
outer hull of the space ship/car.
At this point my
project ground to a halt as I needed to buy some cans of paint, but as
time went by I became exceedingly frustrated at trying to find the
correct shades of light green, dark green and blue needed to paint the
outer hull of the space ship/car.
Finally on a trip to Perth Hobby I found a can of Park Green, which looked like a close match to the colour of the lower hull in the picture on the box. After using a coat of Tamiya primer to check for flaws or bad filling and after correcting two small areas that I missed earlier I put on my first coat of the Park Green. The second coat of Park Green decided to have other thoughts and left a few run marks, which I then sanded with 1200 wet ‘n’ dry and Novus polish (from Michael’s stash of goodies again) before adding the final coat.
The project came to a halt AGAIN until I looked into my Hobby Box and found I had the required blue amongst my Citadel Paints. The upper hull was primed using Skull White and after masking the outer ring I painted the dashboard and joystick with Ultramarines Blue; it turned out that the upper hull was going to be mask, unmask and mask some more. The inside wall was painted with Dark Angels Green. I originally used Citadel’s Goblin Green on the outside of the upper hull but next to the Park Green it looked too dull. After painting over the Goblin Green with a few coats of Scorpion Green, I carefully painted the six panel lines with Dark Angels Green. Finally I raided Michael’s Future (a floor polish from the US) and proceeded to give the dashboard and outer upper hull a number of coats to add the required gloss. While each coat of Future was drying I painted the funky looking fin, the edge that clipped to the clear dome was painted Park Green and the main body of the fin was painted with Scorpion Green.
This was then coated with the aforementioned Future so that it matched the upper hull for glossiness.
|
MORE CONSTRUCTION |
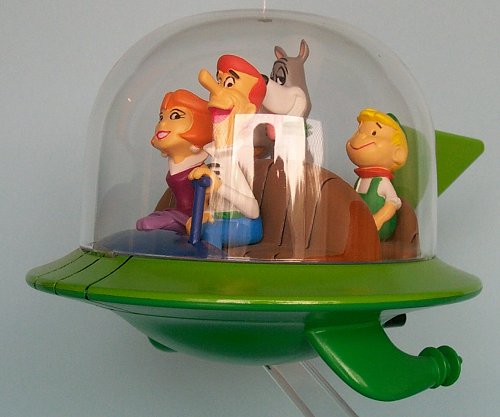
 Assembly of the
space ship/car was a breeze; firstly I glued the joystick into its
location hole in the cockpit floor. Each character had a pre-drilled hole
in their base (bottom) and the chairs had pins removing the need for
guesswork. After getting the characters into position I glued the cockpit
to the lower hull, and then carefully I slipped the upper hull into
position and glued this into place at its location pins and holes.
Assembly of the
space ship/car was a breeze; firstly I glued the joystick into its
location hole in the cockpit floor. Each character had a pre-drilled hole
in their base (bottom) and the chairs had pins removing the need for
guesswork. After getting the characters into position I glued the cockpit
to the lower hull, and then carefully I slipped the upper hull into
position and glued this into place at its location pins and holes.
I looked at the ejection pin mark
on the bubble canopy with disdain, sighed and decided to have a chat with
both Michael, and my brother, Kevin, for ideas about this awful flaw.
Both Michael and Kevin agreed that sanding the ejection pin mark out
would thin the canopy too much, weakening it and ruining the shape of the
dome with a flat spot. 
 It was Kevin who
came up with the “brilliant” (in my opinion) idea of making an aerial
antenna and gluing it into the ejection pin mark. Michael showed me how
to stretch old sprue after heating it over the flame of a candle thus
making an antenna out of it. After hunting through Michael’s box of old
sprue runs and finding a piece of clear sprue perfect for the job (and
having practised on a few pieces of old unusable sprue) I copied
Michael’s earlier technique and stretched the sprue into a very thin
piece for use as the antenna. Leaving the stretched sprue to cool and
reharden I placed the funky fin into place on the bubble canopy and using
a glue for transparent canopies glued the canopy onto the upper hull.
Finally I cut the stretched sprue to the required length at the base of
the stretched piece (giving a nice tapered effect), I glued this into the
ejection pin mark thus camouflaging this flaw. To reinforce the join I
used Testors Clear Parts Cement, this also filled in the remaining
sinkhole. Now that the space ship/car was finished I put it to one side
and turned my attention to the stand.
It was Kevin who
came up with the “brilliant” (in my opinion) idea of making an aerial
antenna and gluing it into the ejection pin mark. Michael showed me how
to stretch old sprue after heating it over the flame of a candle thus
making an antenna out of it. After hunting through Michael’s box of old
sprue runs and finding a piece of clear sprue perfect for the job (and
having practised on a few pieces of old unusable sprue) I copied
Michael’s earlier technique and stretched the sprue into a very thin
piece for use as the antenna. Leaving the stretched sprue to cool and
reharden I placed the funky fin into place on the bubble canopy and using
a glue for transparent canopies glued the canopy onto the upper hull.
Finally I cut the stretched sprue to the required length at the base of
the stretched piece (giving a nice tapered effect), I glued this into the
ejection pin mark thus camouflaging this flaw. To reinforce the join I
used Testors Clear Parts Cement, this also filled in the remaining
sinkhole. Now that the space ship/car was finished I put it to one side
and turned my attention to the stand. 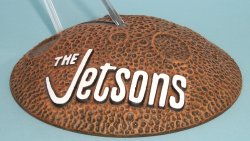
The stand was a round clear plastic disc with mouldings of craters on it, thus making it look like a planet or asteroid’s surface. Painting began with a prime coat of Skull White, then using Scorched Brown I painted the entire base, followed by a dry brushing of Vermin Brown and finally finishing with a dry brush of Vermin Brown and Skull White mix. To enhance the Jetsons name on the base I painted it Skull White and then painted carefully around the edges with Chaos Black. To complete the model I glued the clear plastic arm of the base into position and then carefully placed the Jetsons space ship/car onto the top of the arm.
|
CONCLUSIONS |
All in all a great no building hassles model that was a sheer pleasure to paint and build.
My paints come from varying companies and a list follows for those of you who might be interested in what paint belong to what company:
Model Master: Dark Tan Paint, spray can.
Citadel: Brown Ink, Vermin Brown, Dark Angels Green, Skull White, Ultramarines Blue, Scorpion Green, Scorched Brown, Chaos Black.
Tamiya: Park Green, spray can.
|
REFERENCES |
Various internet sites
March 2004
Copyright ModelingMadness.com If you would like your product reviewed fairly and
fairly quickly, please contact
the editor or see other details in the
Note to
Contributors.