|
KIT: |
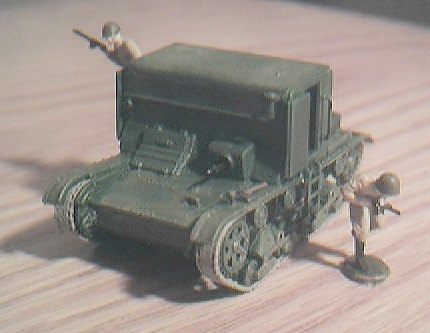
Mirage 1/72 T-26 TB Ammo Transporter |
|
KIT # |
72607 |
|
PRICE: |
$13.98 MSRP ($12.47 at Squadron) |
|
DECALS: |
none |
|
REVIEWER: |
Andrew Nelson |
|
NOTES: |
Tiny parts. Two versions: ammo and personnel carrier. |
|
HISTORY |
To quote the Mirage’s instructions:
“Self-propelled armoured carriers based on the chassis of the T-26 tank
were first shown in 1933 at the OKMO design bureau test range. The
TR-4-1 ammunition carrier was tested then. For two years further
carriers, necessary for support of armoured and artillery units or as
carriers for fast mechanized units, were attempted to
 be introduced into
Red Army service. This resulted in new lighter transporter prototypes
that differed from basic chassis in only minor details. No. 174
Factory (in Leningrad) and No. 185 Factory were selected for
manufacture. The T-26T artillery tractor, earlier in production, was
selected as the basis for the infantry and ammunition carrier. Loading
hold was obtained by raising and widening the body. The ammunition
carrier could carry up to 1 tonne load, and the infantry carrier - a
squad of 7 troops. Both vehicles were similar, differing only in the
ladders. Those on the infantry carrier were located on the side, on
the wing, to facilitate quick exit through the side doors. The
ammunition carrier had no ladder, but at the front of the tub there was
a ladder for climbing onto te vehicle. The carriers were armed with a
single machine gun, as these were intended to operate escorted convoys
only.”
be introduced into
Red Army service. This resulted in new lighter transporter prototypes
that differed from basic chassis in only minor details. No. 174
Factory (in Leningrad) and No. 185 Factory were selected for
manufacture. The T-26T artillery tractor, earlier in production, was
selected as the basis for the infantry and ammunition carrier. Loading
hold was obtained by raising and widening the body. The ammunition
carrier could carry up to 1 tonne load, and the infantry carrier - a
squad of 7 troops. Both vehicles were similar, differing only in the
ladders. Those on the infantry carrier were located on the side, on
the wing, to facilitate quick exit through the side doors. The
ammunition carrier had no ladder, but at the front of the tub there was
a ladder for climbing onto te vehicle. The carriers were armed with a
single machine gun, as these were intended to operate escorted convoys
only.”
For a look at what comes in the box, please visit the preview.
|
CONSTRUCTION |
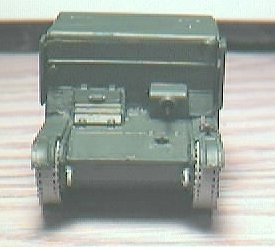
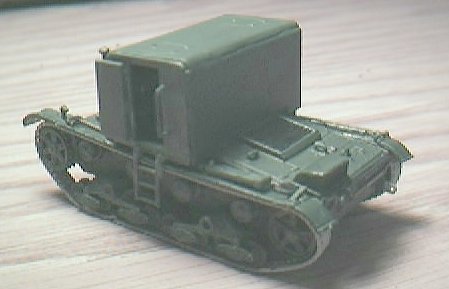
Mirage’s instructions lay out construction in 15 parts, starting with the chassis. The construction seems a little out of order, and the steps are illustrated with exploded diagrams that are sometimes confusing because of how cluttered they get. Construction is also largely dealt with in subassemblies, which help makes construction easier. There are two choices to be made before starting the build: to build the ammunition or personnel carrier, and whether or not to pose the side doors open. I chose the personnel carrier with opened doors.
 I started with
the chassis. Some of the wheels had to have pegs trimmed down to go
together correctly, but otherwise no difficulties were encountered.
Once the chassis was finished and attached to the hull, I painted the
lower hull. Next I added the one piece vinyl tracks, it was a
difficult fit but I managed to squeeze them into place. The tracks
were longer than required, and quite a bit had to be trimmed before
they were attached. I didn’t like this feature of the kit because I
made the joining point of the tracks difficult to hide. Finally the
tracks were affixed to the chassis with super glue, I find this works
better than gluing the actually track together. I moved on to the
upper hull.
I started with
the chassis. Some of the wheels had to have pegs trimmed down to go
together correctly, but otherwise no difficulties were encountered.
Once the chassis was finished and attached to the hull, I painted the
lower hull. Next I added the one piece vinyl tracks, it was a
difficult fit but I managed to squeeze them into place. The tracks
were longer than required, and quite a bit had to be trimmed before
they were attached. I didn’t like this feature of the kit because I
made the joining point of the tracks difficult to hide. Finally the
tracks were affixed to the chassis with super glue, I find this works
better than gluing the actually track together. I moved on to the
upper hull.
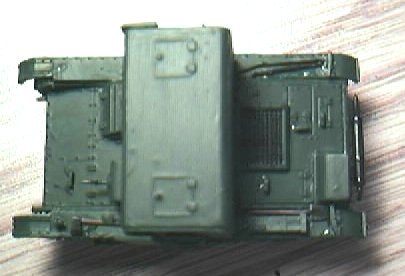
The floor for the interior had to be trimmed to fit inside the compartment correctly. Detail on the inside consists of a wooden bench for seating, a machine gun and two racks of ammunition for the gun. The magazines for the machine gun and storage racks are some of the trickiest parts of the kit. They’re extremely small and round, and they are difficult to place on the storage racks. Once the interior was finished, I finished the superstructure. The roof and sides required some filling and sanding to finish it. After the superstructure was complete I added the smaller detail parts to the upper hull (headlights, tools, etc.).
|
CAMOUFLAGE & MARKINGS |
 No decals or
painting information is provided with this kit, so markings are fairly
simple. The instructions refer you to the box art and suggest finding
other sources. Try as I might, I could find no references to this
vehicle type. I decided to paint this kit with the color I usually use
for Soviet armor, Euro I Dark Green. In my opinion it’s a nice match.
No decals or
painting information is provided with this kit, so markings are fairly
simple. The instructions refer you to the box art and suggest finding
other sources. Try as I might, I could find no references to this
vehicle type. I decided to paint this kit with the color I usually use
for Soviet armor, Euro I Dark Green. In my opinion it’s a nice match.
The interior was painted the same color since I had no references other than the box art. I ended up wish I’d used a lighter grey instead so interior details could be seen better. The bench and handles for the ax and shovel were painted Leather ½ (NK). The machine gun, exhaust pipe, vents, and tool heads were painted Gun Metal ½. All paints used came from the Testor’s Model Masters acrylic line.
|
CONCLUSIONS |
 This kit was a good
building experience overall. Fit was sometimes tricky and some parts
(fenders) were warped. The large number of tiny parts was sometime
frustrating, but they contributed to a well detailed kit. Most 1/72
armor kits I’ve build didn’t have any interior detail, and I have to
commend Mirage for including it in this kit. Also, the subject of this
kit is unusual and a nice change of pace. Building the T-26TP was
definitely an enjoyable experience, I had a great time using it as the
subject of my first kit review. I’d recommend this kit to armor models
who aren’t afraid of lots of small parts, but this kit probably isn’t for
beginners.
This kit was a good
building experience overall. Fit was sometimes tricky and some parts
(fenders) were warped. The large number of tiny parts was sometime
frustrating, but they contributed to a well detailed kit. Most 1/72
armor kits I’ve build didn’t have any interior detail, and I have to
commend Mirage for including it in this kit. Also, the subject of this
kit is unusual and a nice change of pace. Building the T-26TP was
definitely an enjoyable experience, I had a great time using it as the
subject of my first kit review. I’d recommend this kit to armor models
who aren’t afraid of lots of small parts, but this kit probably isn’t for
beginners.
You can find this kit and many others at

If you would like your product reviewed fairly and quickly by a site that has over 200,000 visitors a month, please contact me or see other details in the Note to Contributors.