MPC 1/72 Xwing Fighter
|
KIT # |
8932 |
|
PRICE: |
$10-28 AUD |
|
DECALS: |
one option |
|
REVIEWER: |
|
|
NOTES: |
Snap kit with working wings. |
|
HISTORY |
X-Wing Fighter – Dressed to Kill
When Star Wars burst onto the movie screen in 1982, like all keen Sci-Fi fans, I just had to see it. What made the film a winner (for me) was the believable space ships that broke away from the traditional spindle or flying saucer designs. I liked the X-Wing fighter best of all – OK, they flew like atmospheric aircraft, but they still looked right, even in the umpteenth watching of the movie.
 Naturally, I also rushed-out and bought myself an MPC
1/48(?)-scale model of the X-Wing, but it is still languishing in its
box, still awaiting my attention. However, I later received a smaller
AMT/Ertl 1/72-scale model of the X-Wing from my wife, Wendy (also a
modeller). This is the one I tackled to completion.
Naturally, I also rushed-out and bought myself an MPC
1/48(?)-scale model of the X-Wing, but it is still languishing in its
box, still awaiting my attention. However, I later received a smaller
AMT/Ertl 1/72-scale model of the X-Wing from my wife, Wendy (also a
modeller). This is the one I tackled to completion.
As a keen military man, I couldn’t help but notice what I perceive to be glaring faults with the spaceships of Star Wars, both in their presentation and their deployment. For example, I anticipated that the hero would dive-bomb the small target-vent, because this would have given his targeting computer plenty of time to lock onto the target and almost guarantee a hit. And despite the presence of sophisticated robots, gigantic spaceships and hyperspace travel via hyper-drive, I was surprised that none of the sides had simple fire-and-forget missiles (like the American Sidewinder). Instead, targets had to be found with a Mk.1 Eyeball, then the pilot had to shoot in front of the target (lead it) to hit it.
This led me towards my project. I researched the reason(s) why the Rebel fighters were painted white, red and grey. They were painted that way because the Producer wanted the audience to be able to see his fighters in a well-used battle-worn condition. To further that, the hero’s fighter (Red 5) had five red bars on each wing, and the villain had a different-shaped TIE-fighter so that they could be identified from the other fighters. In reality, a fighter pilot does not want his craft to be seen by the enemy, and so would insist that it be camouflaged. I built my X-Wing with this latter thought in mind.
|
THE KIT |
 This kit was a snap-together kit, but I wanted to build it
properly. It was 100% plastic consisting of 34 kit parts, a clear
forward canopy (the rear piece was cast as part of the solid upper
fuselage). There was also a 2-part clear stand that would socket into a
hole in the belly away from the models balance point, as I would find
later.
This kit was a snap-together kit, but I wanted to build it
properly. It was 100% plastic consisting of 34 kit parts, a clear
forward canopy (the rear piece was cast as part of the solid upper
fuselage). There was also a 2-part clear stand that would socket into a
hole in the belly away from the models balance point, as I would find
later.
I didn't like the intake & exhaust edges because they were too thick and almost all parts bore mould seams. More significantly, the legs & guns suffered from misaligned moulds. On the plus side, there was sufficient cast-on surface detail for this scale. The kit could be built to allow the splitting wings to be opened & closed after the model is assembled.
A decal sheet was provided with markings for Red 5, Luke Skywalker's X-Wing. These could be cut-up to make Red 1 to 4 if desired.
|
CONSTRUCTION |
In order to build this snap kit properly, I removed all of
the large locating pins and used Humbrol liquid glue to assemble the
model. Under normal modelling practices, I incorporated a few
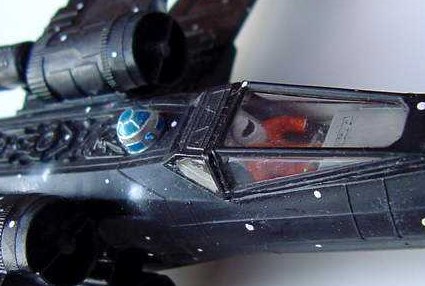
modifications into my X-Wing. The pilot was cast
 embedded into a backing
plate. I cut most of it away so that he was more 3-dimensional. I gave
him a steering bar to occupy his hands, but kept him in the bright orange
uniform from the movie. If I build this model again, I’ll have a go at
fixing the pilots open-face helmet. The R2-unit kept the movie’s
polished silver & blue colours to remind us that it was detachable from
the fighter. It was detailed with a few bits of sprue and strip.
embedded into a backing
plate. I cut most of it away so that he was more 3-dimensional. I gave
him a steering bar to occupy his hands, but kept him in the bright orange
uniform from the movie. If I build this model again, I’ll have a go at
fixing the pilots open-face helmet. The R2-unit kept the movie’s
polished silver & blue colours to remind us that it was detachable from
the fighter. It was detailed with a few bits of sprue and strip.
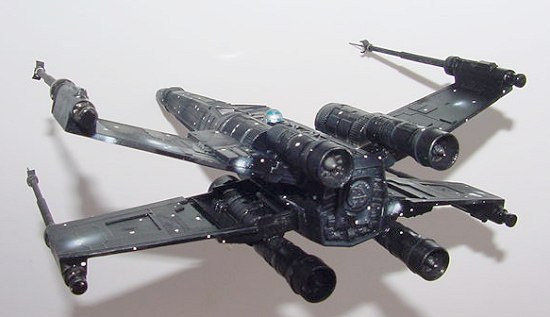
Naturally, I thinned-down all of the edges of the intakes and exhausts which was pretty tedious. Not wanting to use the model’s operating wing-splitting system, I separated the two wings into four halves and attached them directly to the rear fuselage. The four wing-tip laser cannons were poorly moulded, so they were replaced by two sizes of sleeving brass tubing, and detailed with pins & plastic strip. The guns were mounted on coathanger wires embedded in the cannon bodies and anchored with 5-minute Epoxy Araldite. Generally, the kit was assembled as per the instructions. I almost forgot the fill the sockets for the undercarriage legs – almost.
The last part attached was the clear canopy. It was attached with Selly's PVA Wood glue (or white glue) which also served to seal the gaps around the contact points. I painted liquid Maskol on all of the 'glass' panels leaving the frames exposed.
|
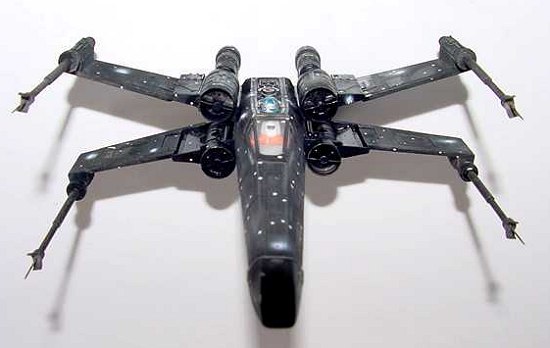
COLORS & MARKINGS |
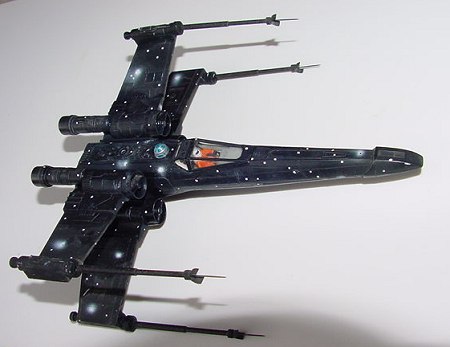
Painting was easy – an all-over Tamiya acrylic flat black applied with my double-action airbrush. After days of drying (I was busy) my X-Wing was dry-brushed with a light grey to highlight the details of the upper fuselage and engines. Now, she got a few random bursts of white from an airbrush, then a liberal random spotting of more white with a toothpick – with a few reds, greens, blues and oranges as well. At this point, the three rear windows were cut out and Kristal Kleared, and the canopy masks removed. Because of my concept, I didn't use any of the decals provided. But I wasn’t finished with my model yet. I needed a photo to prove my point.
|
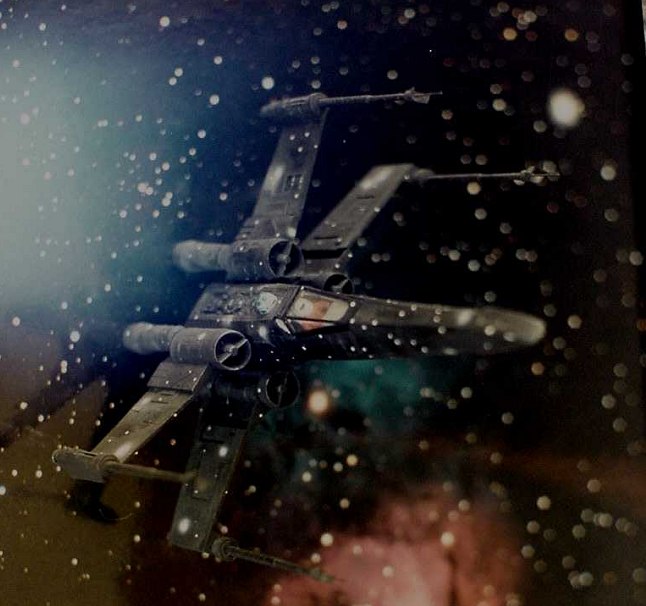
THE LEAD PHOTO |
 I took a whole roll of colour photos of my X-Wing against a
laminated poster of the Trifid Nebula. All of the shots were taken
inside on an overcast day, with watery light coming-in through a large
glass door. I used my old Praktika LTL3 SLR camera and 50mm lens, loaded
with Kodak 400 colour print film. The camera was set at a shutter-speed
of 1/60-second, and the f-stop was set by the light meter to slightly
under-expose the shot. This also gave me a shallow depth of field, but I
didn’t realise it till I got my prints back. The model was photographed
suspended from cotton, supported by it’s stand, resting on two of its
wing-tips, and finally, sitting on it’s four tail-pipes.
I took a whole roll of colour photos of my X-Wing against a
laminated poster of the Trifid Nebula. All of the shots were taken
inside on an overcast day, with watery light coming-in through a large
glass door. I used my old Praktika LTL3 SLR camera and 50mm lens, loaded
with Kodak 400 colour print film. The camera was set at a shutter-speed
of 1/60-second, and the f-stop was set by the light meter to slightly
under-expose the shot. This also gave me a shallow depth of field, but I
didn’t realise it till I got my prints back. The model was photographed
suspended from cotton, supported by it’s stand, resting on two of its
wing-tips, and finally, sitting on it’s four tail-pipes.
This last shot seems to work best, even with the narrow depth of field. I knew there was a reflection of the door on the poster, but it was my last shot, so I was willing to live with it. The photo was taken with the X-Wing’s nose pointing into the air, but turning the photo 90 degrees to the right makes it realistic. A careful observer will see the reflection of the X-Wing behind the model. But, I built my X-Wing in this colour scheme to get this photo, and now I have it.
|
CONCLUSIONS |
When I displayed this model on a starfield poster, I placed a brick-red & white A-Wing fighter beside it. Unfortunately, my X-Wing got 0/10 for accuracy to reference because the Judge thought about the movie & ignored my reasoning. But I was cheered-up immensely by a fellow modeller (as aircraft modeller) who said my concept was beautifully executed because he saw the A-Wing, and was about to move-on when he saw the X-Wing pilot's orange uniform and realised that there was another model there. Or the child to correctly identified that Luke's fighter was the wrong colour. His dad said that Luke's new fighter was like that so that Darth Vader couldn't see him. Many thanks, whoever you are.
I thoroughly enjoyed building this model, but not as a snap kit. It's a good kit for beginners & juniors, and a must for avid Sci-Fi buffs. Incidentally, This craft was never called an X-Wing till the second Star Wars movie (The Empire Strikes Back). In the book, it was an Incom T-65.
December 2003
If you would like your product reviewed fairly and fairly quickly, please contact the editor or see other details in the Note to Contributors.