| KIT #: | 6676 for the big E |
| PRICE: | $20 or so |
| DECALS: | See review |
| REVIEWER: | Hank Gruben |
| NOTES: | Conversion also good on Polar Lights kit. |
| HISTORY |
Unless you’ve been living under a rock, you’ve *probably* heard of Star Trek. Like all kids of the formative years, I watched it and wondered at what the whole Star Trek universe included. Where there other types of ships? What kind of ships were there besides the Constitution (enterprise) class ships? It took some inventive fans to fill in the gaps!
In the world
of board games, a particularly inventive group created a whole fleet of ships
for the game
Star Fleet Battles (which your editor has but has never played. Ed) and some bright person made accurate diagrams. Included
in the diagrams is one for a heavy convoy escort (The USS Enterprise was listed
as a heavy cruiser) which can be scratch-built using the parts from the
 AMT/Ertl
USS Enterprise kit. As it was, I didn’t have a choice as my kit had a crushed
lower hull and one engine nacelle was pan-caked… Ouch.
AMT/Ertl
USS Enterprise kit. As it was, I didn’t have a choice as my kit had a crushed
lower hull and one engine nacelle was pan-caked… Ouch.
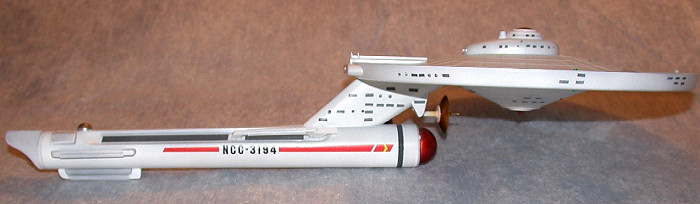
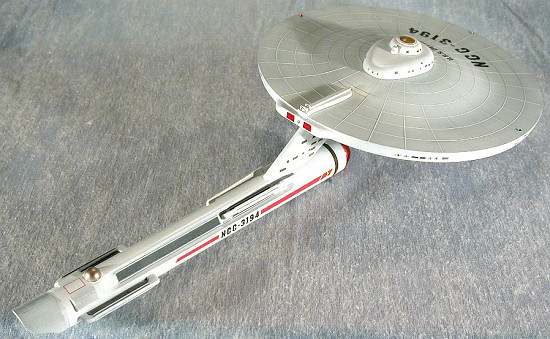
In this article, I’ll try and guide you through the process of converting the Enterprise kit into the Defiant. No extra parts are needed and cutting of the original parts is minimal… One note on the ship’s name, in Star Trek, they have a habit of naming new starships after famous ships of the past, since the defiant was wildly popular as a “tough, little ship” in the show Deep Space Nine, I decided to back track and create it’s ancestor…
The Defiant (Saladin class heavy convoy escort) was designed in the star date 8108.17 and was one of twenty ships of the class built at the San Francisco Space Dock. The Defiant was built around the philosophy of heavy firepower and superior maneuverability. As such, it incorporated the same fire power as a heavy cruiser with the maneuverability of a destroyer. The penalty for this massive power and agility was that the ship has limited science and refit capabilities. There is no shuttlecraft hanger deck and range is limited to a maximum of 3 months on station. In brief, this is a short-range escort vessel that relies on re-supply. Manned by 55 crew and 12 officers. Maximum speed of Warp 5.5 with an emergency warp of 7.5 for very limited duration.
| THE KIT |
 Wow. This
kit is nearly older then I am. Although I couldn’t find a date on the box, the
molds date back to the early ‘70’s. We’re talking about 30-35 years old here
people! Parts are molded in a light grey styrene and have little detail other
than numerous small windows of the raised panel line variety. The only real
panel lines are on the top of the saucer section and they are heavy! You also
get a clear dome for the top and bottom of the saucer section. Unlike the more
recent Star Trek kits produced by Bandi and Polar Lights, this kit does not have
clear plastic Bussard collectors at the front of the engine nacelles. Oh yeah,
VERY large sprue gates… Eek.
Wow. This
kit is nearly older then I am. Although I couldn’t find a date on the box, the
molds date back to the early ‘70’s. We’re talking about 30-35 years old here
people! Parts are molded in a light grey styrene and have little detail other
than numerous small windows of the raised panel line variety. The only real
panel lines are on the top of the saucer section and they are heavy! You also
get a clear dome for the top and bottom of the saucer section. Unlike the more
recent Star Trek kits produced by Bandi and Polar Lights, this kit does not have
clear plastic Bussard collectors at the front of the engine nacelles. Oh yeah,
VERY large sprue gates… Eek.
| CONSTRUCTION |
First
off, lets look at a blue print of the ship. Parts that we’re going to use are
the saucer section, one complete engine and the ‘neck’ that connects the two.
The Saucer section is the first thing to complete and this goes together exactly
like the instructions say… No surprises but break out the putty! Fit is
interesting but I needed to sand the heck out of it to lose the seam line –
Thank 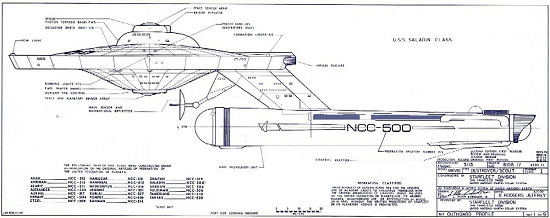 goodness that the plastic is good and thick! I had built one of these
kit-bashed Star Trek ships before and this time I decided to make a symmetrical
engine as opposed to the asymmetric, handed engines of the Enterprise. Each
engine has a left and a right side, since I had crushed parts, I was forced to
use a left side from the left engine and a right side from the right engine…
Sound confusing, but this means that each side is the same as opposed to looking
different.
goodness that the plastic is good and thick! I had built one of these
kit-bashed Star Trek ships before and this time I decided to make a symmetrical
engine as opposed to the asymmetric, handed engines of the Enterprise. Each
engine has a left and a right side, since I had crushed parts, I was forced to
use a left side from the left engine and a right side from the right engine…
Sound confusing, but this means that each side is the same as opposed to looking
different.
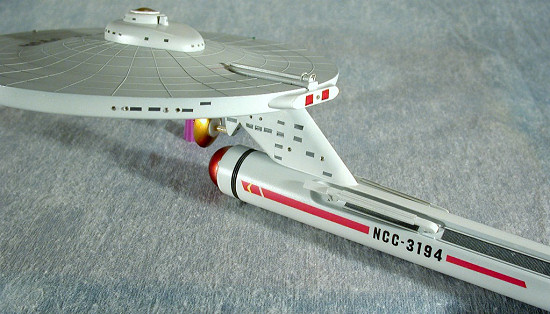
For practicality, I assemble most of the kit (Filling, sanding, gluing, REPEAT! Always repeat!) before painting. One important word on the ‘neck’, you will have to sand the back mating edge (the edge that connects to the engine nacelle) two millimeters down to keep the plane of the saucer in line with the nacelle… See the profile picture? On the original Enterprise kit, the neck connects the saucer to the ‘cigar’ hull and thus, has a slight dip due to the ‘cigar’ section being curved. On this conversion, you have to make the top and the bottom of the ‘neck’ parallel. I crafted an extension for the main sensor/navigational deflector out of sheet plastic with the idea of blending it in to the neck. The Nav deflector is stock with a bit of stretched sprue as an extension. To hide a rather large hole (caused when the kit was damaged) I glued an end of a piece of sprue to the back of the nacelle. That’s the gold dome at the end… That’s the good thing about scratch-building a science fiction piece, CLOSE is close enough!
One thing that’s painfully obvious is that the windows (both rectangular and circular) need help. I planned on masking the rectangular windows but the circular ones would be a problem… I decided to use a technique I learned about on this site… I drilled out the windows and when I finished painting, I used stretched CLEAR sprue to plug the holes. On some, I used my lighter to “mushroom” the end of the clear sprue to make bubble windows! But all the windows were left until after…
| COLORS & MARKINGS |
 Hmmm. What
color do you paint a theoretical space ship that nobody can accurately put an FS
color chip to? The instructions are wonderfully vague and only list “white” as
the main hull color. Should you check the internet, you’ll see every color from
medium grey to bright, gloss white… I primed the Defiant with Model master
Medium sea grey and when that had dried completely, I carefully applied little
rectangles to mask the “windows” on the saucer section and the ‘neck’. I also
masked the exhaust area on the engine and two panels on either side of the
engine.
Hmmm. What
color do you paint a theoretical space ship that nobody can accurately put an FS
color chip to? The instructions are wonderfully vague and only list “white” as
the main hull color. Should you check the internet, you’ll see every color from
medium grey to bright, gloss white… I primed the Defiant with Model master
Medium sea grey and when that had dried completely, I carefully applied little
rectangles to mask the “windows” on the saucer section and the ‘neck’. I also
masked the exhaust area on the engine and two panels on either side of the
engine.
On with the
white! Instead of blasting this with a rattle-can, I slowly airbrushed the
entire surface with Tamiya white and adding a touch of grey here and there to
vary the color. This took some time but the result is a non-uniform covering
that hints at panels, seams et, al. This was set aside for a few days to dry.
Once it’s dry, I masked the bussard collector (the dome at the front of the
engine) the back dome, the nav deflector, and the exhaust dome. I painted these
areas with Alclad gold and when that was dry, a coat of Tamiya clear red was
applied to the bussard dome. The end result was a beautiful, glossy, deep red
for the engine front! In the light, the effect is very convincing. A little
dry-brushed white to highlight the corners and edges and then it was on to the
decals.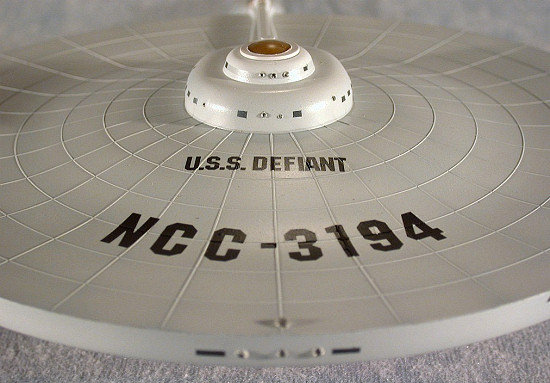
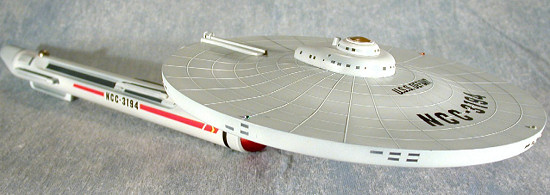
If you use the instruction sheet for decal placement, you save a lot of internet researching! All Federation ships have a name and registry number on the front somewhere… There are smaller registry numbers on the bottom of the saucer and the engine decal is… well, from the engine decal section. To come up with the name “U.S.S. DEFIANT” I had to cut the individual letters from the other ship names. The kit decals are glossy with lots of carrier film but are easy to use and settled with microsol… Once they were pain-stakingly positioned!
Everything was coated with Testors acrylic semi-gloss/matt coat. I masked the clear bits and when when the top coat was dry, proceeded the pick out the top clear dome with Tamiya clear orange and the bottom clear dome with clear red. I also painted the left and right nav lights red and green. Once the window masking was removed and the “bubble” windows inserted into the circular window holes, the whole project was complete! The only thing I still haven’t figured out was how to display it… Another one to hang from the ceiling!
| CONCLUSIONS |
I love scratch-building… These kits are relatively cheep and the variations on ship design are easy to imagine. Even if you don’t have an imagination, there are enough designs on the internet to get it right! While researching the parts, I found paint masks, etched bits, resin conversions and decals so the need to experiment is well supported. Next time, I build in the smaller polar lights scale!
| REFERENCES |
http://www.starshipmodeler.com/trek/trekship.htm
http://www.memory-alpha.org/en/wiki/USS_Saladin
http://www.trekmania.net/the_fleet/utopia/others/saladin.htm
“Live long, prosper, and don’t spill glue on your pants…”
May 2006
Copyright ModelingMadness.com
If you would like your product reviewed fairly and fairly quickly, please contact the editor or see other details in the Note to Contributors.