
| KIT #: | 85-6441 |
| PRICE: | $26.50 MSRP |
| DECALS: | One option |
| REVIEWER: | Dan Lee |
| NOTES: | Updated from original kit. |
| HISTORY |
“By your command, Imperious Leader.”
 proved to
be the Human 12 Colonies greatest enemy although one wonders why when the Cylon
warriors had an eye that moved back and forth.
Thanks to a scene chewing traitor
named Baltar, the Cylons wiped out the 12 Colonies leaving only “a rag-tag
fugitive fleet on a lonely quest for a shining planet known as Earth.”
proved to
be the Human 12 Colonies greatest enemy although one wonders why when the Cylon
warriors had an eye that moved back and forth.
Thanks to a scene chewing traitor
named Baltar, the Cylons wiped out the 12 Colonies leaving only “a rag-tag
fugitive fleet on a lonely quest for a shining planet known as Earth.”
| THE KIT |
Revell/Monogram’s 1/64? scale Cylon Raider consists of a whopping 25 grey parts plus 2 clear inserts of the engines. The parts are in pretty good shape for the age of the mold and has a trace of flash on many parts. Several of the parts have ejection pin marks that need to be dealt with plus it has holes that need to be covered (the kit was originally designed to shoot missiles.)
The details for this kit are considered soft and not completely accurate when compared to the actual studio models, but it looks it will make a passable kit for anyone except the uber anal or super fans of the show.
The instructions are straight forward and the decals look fine.
| CONSTRUCTION |
 There is
no cockpit so I did not start there.
From what I’ve read about this kit
is that it doesn’t have the best fit.
A couple of test fittings showed
that I wasn’t going to deal with a bunch of different seams, but one rather big
sort of circular one.
Out came the 220/400/600 dry/wet
sandpaper and CA glue.
There is
no cockpit so I did not start there.
From what I’ve read about this kit
is that it doesn’t have the best fit.
A couple of test fittings showed
that I wasn’t going to deal with a bunch of different seams, but one rather big
sort of circular one.
Out came the 220/400/600 dry/wet
sandpaper and CA glue.
I generally followed the instructions. First thing I did was seal up the holes in the forward inserts with plastic card and then glue the inserts into the bottom half of the “fuselage.”
The fuselage top and bottom halves were glued together. I did this one sector at a time. Lots of liquid glue, clothes pins to hold it together till the glue hardened. This meant that I could not just slam the thing together as many of my friends did when they built this kit long ago.
When the glue was sufficiently dry, I started applying thin beads of CA glue one section at a time. For the most part I let it cure naturally for 30/45 minutes while I worked on other kits. In certain sections (the bow portion of the Raider) accelerator was used for the first layer because the CA glue seeped thru the gaps and did not fill the way it was supposed to. Once the gaps were sealed a 2nd and 3rd layer of glue was used to fill in those sections.
 Once dry,
a lot of wet sanding was done with 220 grit followed up with 400 and 600 to
smooth it down.
This took a period of two weeks to
do.
The most difficult areas were the
gaps where the weapons go (bow and stern.)
No more difficult than working on a
intake (which I am not a fan of.)
The underside of the Raider has the
RM copyright in raised letters which was also sanded off.
Once dry,
a lot of wet sanding was done with 220 grit followed up with 400 and 600 to
smooth it down.
This took a period of two weeks to
do.
The most difficult areas were the
gaps where the weapons go (bow and stern.)
No more difficult than working on a
intake (which I am not a fan of.)
The underside of the Raider has the
RM copyright in raised letters which was also sanded off.
Next, the engines and canopy cover were added. There were lots of small gaps to deal with, but I used Vallejo Plastic Putty which is an acrylic based putty. Normally, I’d use Mr Surfacer, but I’m getting rather sick of the lacquer thinner fumes and needed something that won’t make me more clueless than I already am. This stuff is as thick as Mr Surfacer 500 and can be used the same way. Apply with a toothpick into a small gap and then wipe the excess off with a Q-Tip dipped in rubbing alcohol. So far, I am very pleased with the results and recommend it for those who want a less noxious filler for small gaps.
The model was then washed with dish soap and warm water to remove the excess dust then left to dry.
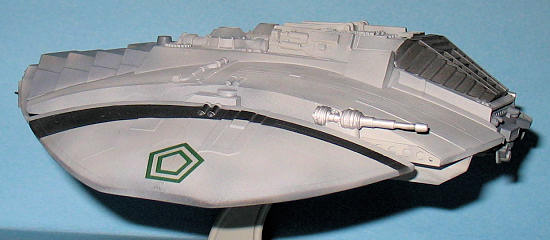
| COLORS AND MARKINGS |
A very simple task. No real weathering as Cylon Raiders were usually Colonial Viper bait.
 The model
was preshaded with flat black and then sprayed XF-19.
The instructions say grey so I
picked the most generic grey I could find (XF-19 Sky Grey fits the bill.)
I sprayed on two thin coats of Sky
Grey over everything but just enough that the black shows through faintly
through in places to provide a shadow effect.
The model
was preshaded with flat black and then sprayed XF-19.
The instructions say grey so I
picked the most generic grey I could find (XF-19 Sky Grey fits the bill.)
I sprayed on two thin coats of Sky
Grey over everything but just enough that the black shows through faintly
through in places to provide a shadow effect.
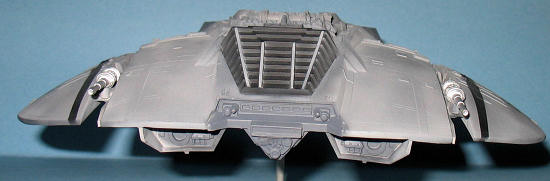
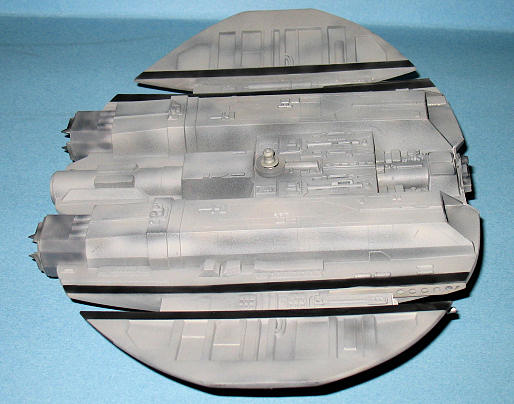
The engine covers and forward section were sprayed dark grey. The “canopy” was masked with green painters tape and pre cut strips of painters green tape for the grey “canopy” frames and then sprayed with Tamiya Flat black.
I opted to paint the black
stripes instead of using the decals.
The sections were masked and
sprayed.
It is a bit more work, but it looks
better than the decals (I don’t do well with long decals and edges.)
The engine vernier inserts were sprayed steel while the nozzles were done in Sky Grey with flat black “weathering.” While the laser guns were sprayed flat aluminum.
I skipped the gloss coat for the green pentagon decals and used lots of Solvaset/pin holes to get the decals to settle down and remove any silvering. The decals were left to dry over a couple of days and then the model was sprayed with a flat coat based on a mixture of Tamiya gloss and flat base.
| FINAL CONSTRUCTION |
The engine inserts were assembled and then glued in place along with the weapons. The stand was quickly assembled, the decal added, the Raider placed on the very stable stand and voila, one Cylon Raider.
| CONCLUSIONS |
This kit is very simple to build. It should be noted that if you build this kit then most of your time will be spent filling and sanding the kit, but it is not difficult to do if you take your time and are patient with it.
It might not be accurate compared to the actual studio models, but it looks like a Cylon Raider.
November 2008
If you would like your product reviewed fairly and fairly quickly, please contact the editor or see other details in the Note to Contributors.