| KIT: | Revell-Monogram 1/72 Starfury |
| KIT #: | 85-3621 |
| PRICE: | CDN $25.00 |
| DECALS: | Four options |
| REVIEWER: | Dan Lee |
| NOTES: | Out of production. SSM resin and aftermarket decals |
| HISTORY |
“It was the dawn of the third age of mankind, ten years after the Earth-Minbari
War. The Babylon Project was a dream given form. Its goal: to prevent another
war by creating a place where humans and aliens could work out their differences
peacefully. It's a port of call, home away from home for diplomats, hustlers,
entrepreneurs, and wanderers. Humans and aliens wrapped in two million, five
hundred thousand tons of spinning metal, all alone in the night. It can be a
dangerous place, but it's our last, best hope for peace. This is the story of
the last of the Babylon stations. The year is 2258. The name of the place is
Babylon 5.”
-Captain Jeffery Sinclair
And so it began.
Babylon 5 was not the total Star Trek clone that many TV critics and long time
Star Trek fans (like me initially) thought it was. Of course there were some
elements taken from Star Trek but then again what science fiction of today
hasn’t been influenced by Star Trek? Later on, when Star Trek: DS9 “borrowed” a
large chunk of B5’s plot, the irony was not lost on the reviewer/now B5 fan who
joyfully busted the chops and other extremities of his Trekker friends, who
hated B5, by describing DS9’s “exciting” plot as last week’s previous B5
episode.
B5 showed that you can do a well written epic within the confines of TV. One
thing that helped was that Jan Michael Straczynski (known to fans as JMS) wrote
over 80% of the episodes and was the producer of the show.
 Personally, I enjoyed Babylon 5
much more than its contemporary Star Trek rivals because they didn’t remove
conflict (the drama) from the show, didn’t try to be cute (no braniac kids,
daggits, teddy bears, pet aliens etc) or project some pathetically naive and
half baked/witted view of human nature.
Personally, I enjoyed Babylon 5
much more than its contemporary Star Trek rivals because they didn’t remove
conflict (the drama) from the show, didn’t try to be cute (no braniac kids,
daggits, teddy bears, pet aliens etc) or project some pathetically naive and
half baked/witted view of human nature.
One of the bad trends that B5 did
start was in the way TV producers talked about their TV shows as they prattled
meaninglessly about story arcs and casually threw about the word epic to
describe their sucky works in interviews.
Unlike Star Trek, B5 did not spawn a fleet of models. Outside of kits made by
various garage kit makers, the only major company to dip their toes into the B5
waters was Revell Monogram who produced two models that did not sell all that
well—the B5 Station itself and EarthForce’s Starfury fighter.
Upon first glance, the Starfury looks like the runt brother of the Star Wars
X-Wing. About the only thing it does share is the distinct X-shape, but
otherwise not much else because JMS wanted a fighter to be as realistic as one
could get so he consulted engineers from NASA on the design. The Starfury wass
unlike most other SF fighter craft because it was designed by real rocket
scientists rather than the fanciful imaginations of the art department using
slapped together bits of rocket, aircraft and tank model kits.
Instead of inappropriate aerodynamic wings and stabs, the Starfury was designed
to use rocket thrusters and deflectors for maneuvering. Things like momentum
and inertia are still valid in outer space so the design had to be sturdy enough
to do the space equivalent of high-G maneuvers without breaking up (which is
currently beyond the ability of today’s manned spacecraft.) As one might guess
from the layout and shape, the Starfury Mk I was not designed to be used in the
atmosphere although a newer version seen in later episodes could “fly.”
For those interested, the Starfury is “armed” with four large bore PPGs (phased
plasma guns) that shoot hot helium plasma contained in a magnetic field that
disappears on impact. The Starfury can also carry missiles (which is another
resin set from starshipmodeler.com but one that I did not buy.)
B5’s Starfury so impressed NASA that they decided to use the Starfury design as
the basis for a future work pod and JMS allowed them to use it as long as they
called it a Starfury.
| THE KIT |
 It was first reviewed by our
editor, Scott Van Aken, and one of the points he made was that the B5 Starfury
is not for the faint of heart. This kit requires “some” modeling skill as it
has many ill fitting seams and raised detail which require skillful sanding and
filling. Part of me doesn’t understand why RM did the Starfury “old school”
unlike their other models in that time frame. Ah the curse of being a SF
modeler.
It was first reviewed by our
editor, Scott Van Aken, and one of the points he made was that the B5 Starfury
is not for the faint of heart. This kit requires “some” modeling skill as it
has many ill fitting seams and raised detail which require skillful sanding and
filling. Part of me doesn’t understand why RM did the Starfury “old school”
unlike their other models in that time frame. Ah the curse of being a SF
modeler.
The kit I bought comes with the markings of various EarthForce units including
the presidential escort, Commander Susan Ivanova—one of the major characters and
show hottie—markings for an unknown pilot and the PsiCorp’s—the human telepath
organization in the B5 universe and one of B5’s many enemies—Black Omega
squadron. Unfortunately, I have read that the large kit supplied decals are
borderline pointless and that obtaining aftermarket ones would be better.
| CONSTRUCTION |
Scott was not kidding about the fit and gaps in this kit. The worst gaps were
just before the leading and trailing edges of the four wings which mean the
Starfury had eight very prominent seams to sand and fill on the inner halves of
the wings. It took several applications of CA glue, Mr Surfacer 500 and 1000
and several days of work to make everything nice and smooth.
The top half of the Starfury was mated to the bottom half and then I had to deal
with the internal seams at the attachment points. This was done with shoving Mr
Surfacer 1000 into the gaps and cleaning the excess with several Q-Tips soaked
in Lacquer thinner before it dried.
At this point I added the unpainted cockpit and added a thin strip of 20
thousand sheet styrene into the prominent gap at the top of the cockpit.
Next, I had to deal with the gaps at the top underside of the Starfury. I
sanded it down the best I could. I didn’t fully fill and sand the gaps except
along the rear lip as that part of the model has no detail to speak of so I
“pretended” that they were panel lines.
I then attached the four inner wing panels to the fuselage. I was not surprised
that the panel lines on the inner wing panels did not line up to the panel lines
of the outer halves of the engine pods. It did not matter as I had to sand the
panel lines away due to filling in the gaps between the engine pod parts.
 The inner wing attachment points
to what passes for the fuselage were not so good either. I cut up 20 thou card
stock to fill in the gaps between the inner wing and the fuselage.
The inner wing attachment points
to what passes for the fuselage were not so good either. I cut up 20 thou card
stock to fill in the gaps between the inner wing and the fuselage.
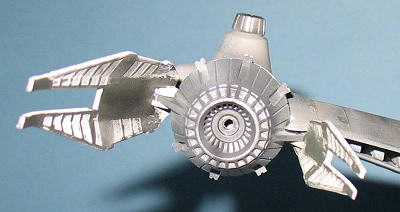
I cleaned the model of all the dust and when it was dry I redid the detail on
the engine pods by cutting grooves on the sanded surfaces with a #11 blade.
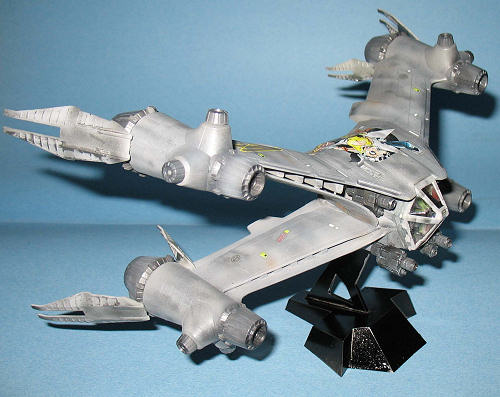
Painting
I preshaded the exterior of the model with flat black along the panel lines and
random splotches everywhere in the panels themselves. I do this because it adds
a subtle shading effect when I sprayed over the Starfury with a thin coat of
Tamiya XF-19 Grey which was the base color.
When it was dry enough to touch, I loaded up with German Grey, set the
compressor to 12 PSI and started airbrushing thin lines to represent the dark
streaks common on B5 Star Furies. I did not intend to make them sharp lines
which I suspect was due to the limitations of the CGI. I then followed up with
lines painted with Dark Earth, Flat Black and Steel. To soften the tones and
blend everything in, I sprayed a really thin coat of Sky Grey over the Starfury.
I painted the engine nozzles next using Gunze Acrylic steel and then sprayed
thinned flat black (at 10 PSI) for the exhaust marks in the nozzles. One thing
that bothered me was the huge contrast between the steel nozzles and the grey
Starfury which was different than the photos I had so I took some thinned Sky
Grey and sprayed a very thin coat on the sides of the nozzles to tone down the
contrast.
Once dry, I took a silver pencil to show chipped paint and weather my Starfury
even more. Once done, I sealed it in two thinned coats of Future.
| COLORS & MARKINGS |
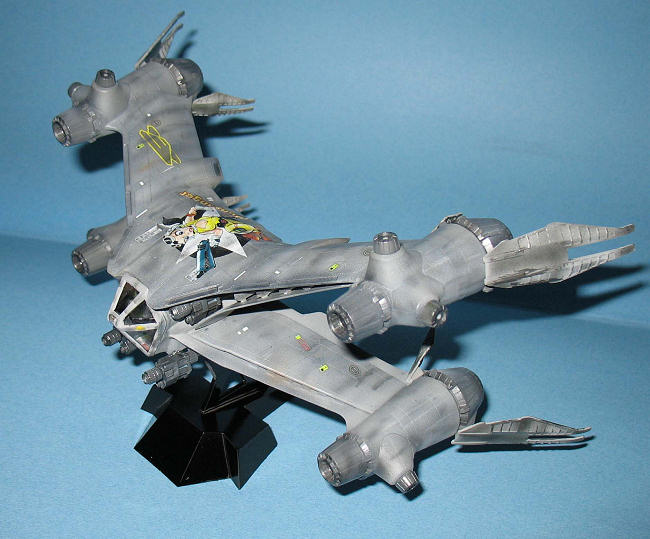
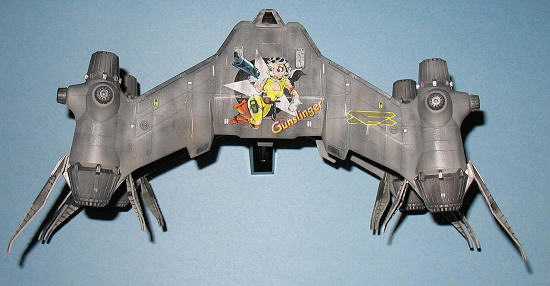
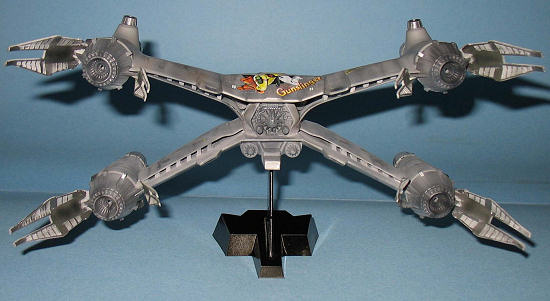
As I said earlier, the large decals are awful so I went to Starshipmodeler.com
and bought one that I liked which was a Female Gunslinger motif allegedly based
on WW2 bomber nose art. The gunslinger had two caption options, SuperFly or
Gunslinger. I selected Gunslinger because it reminded me of my younger days
when I spent much of my time playing air combat sims and used the call sign,
Gunslinger (I am not that deluded and realize that my truthful call sign would
have been Half Blind Wannabe…)
I used the RM Starfury stencils as I had no choice but to use them. They went
down okay, but they are RM “old school” decals, thick and glossy. This means
that one needs to put down a couple of coats of Future to smooth out the decals
to get them to blend in with the surface of the model.
The ALPS decals from Starshipmodeler went on okay, but only because I’ve dealt
with similar decals before. There were places where the carrier film weren’t so
thick and the decal was rather fragile. The transfer from the paper backing to
the Starfury went okay. One of the things I learned to do with ALPS decals is
to put down some water on where the decal is going to help slide the decal in
place as an ALPS decal has an unfortunate ability to stick where it is
placed. I then put some Microset setting solution down and let it dry. Once
dry, I put down some Microsol to make sure that the decals settled down
completely. Once the solvent was dry, I gently wiped down the model in
preparation for some weathering with pastels.
I used black pastels to dirty up the decals where required. I used a Q-Tip
mixed with some pastel powder to very gently run along the decals. I figured
that the Starfury “plane” captain and maintenance crew liked their pilot and
kept the ID markings fairly clean so I didn’t go overboard with the pastel
weathering.
There are some prominent ejection pin marks on the underside of the deflection
fins that needed to be sanded away which I took care of quickly. Once cleaned,
I sprayed down a coat of Sky Grey on the deflectors. Then I hand painted the
underside flat surfaces and the ribs of each deflector on top and bottom with
Citadel Chainmetal paint. I then sprayed thinned Flat Black at low pressure to
make “burn” and exhaust marks.
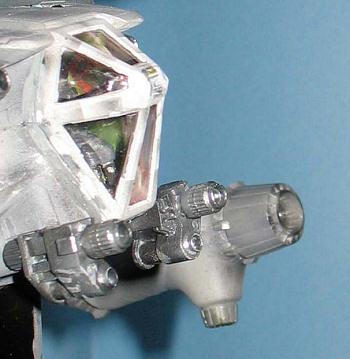
The cockpit had yet to be painted. I used photos from the amazing SF model
archive that is Starshipmodeler.com to get the colors I needed for the
interior. RM states that the cockpit was grey which it is not. From the photos
of the actual set under normal lighting conditions, I could see the cockpit
primary color was a near medium green with light green highlights. I masked off
the cockpit with 3M Blue Painter’s Tape and sprayed on XF-5 Flat Green as the
base coat.
 <Aside>I like Tamiya tape, but I’m
always on the lookout for cheaper low tack masking material which is why I tried
out leftover 3M Blue from doing some outdoor painting this summer. BTW, I have
found that 3M Blue is lousy for masking canopies and odd shapes because it is
too thick, but it is great stuff to mask the model from overspray and for flat
surfaces things that use up the majority of my Tamiya tape—which is what it was
designed for! <End of Aside>
<Aside>I like Tamiya tape, but I’m
always on the lookout for cheaper low tack masking material which is why I tried
out leftover 3M Blue from doing some outdoor painting this summer. BTW, I have
found that 3M Blue is lousy for masking canopies and odd shapes because it is
too thick, but it is great stuff to mask the model from overspray and for flat
surfaces things that use up the majority of my Tamiya tape—which is what it was
designed for! <End of Aside>
I hand painted the rest of the details using Citadel paints (my new brush paint
of choice) and Tamiya IJN cockpit green. I did cut up some thin plastic card to
do some further details that only a semi-obsessed fan/modeler (me) would
notice. Those bits were painted gloss black and glued into place.
The canopy piece was next. I masked it off and sprayed it with Sky Grey. When
it was dry and before I removed the tape covering the clear panes, I took some
scrap 3M Blue to mask the canopy as I sprayed on thin flat black in section one
at a time to create a similar pattern of weathering on the canopy frame as the
ones found on B5. Some sharp eyed folks might notice that the canopy glass has
a reddish tinge to it. In flight, the Star Furies were backlit red so I though
it would be a great idea to paint the inside of the canopy clear red. It looked
great till I attached the canopy to the Starfury and I couldn’t see any of the
detail that I added due to the clear red. Disappointed, I took some rubbing
alcohol and removed my brainwave away.
| FINAL CONSTRUCTION |
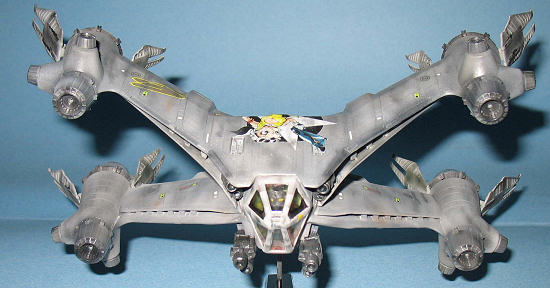
The remaining KIT parts weren’t as difficult as the main Starfury. The engine
nozzles (all 16 of them) were attached using thin superglue and the deflectors
were stuck on using Tamiya thin glue. The nozzles were drilled out with a 1/16”
drill bit to provide depth to the nozzles.
I then attached the eight deflector
fins which went on without any swearing.
I then took a look at the resin PPGs that were a replacement for the poorly done
kit weapons. The detail was well done, but there was some flash that needed to
be removed which was done with a sharp #11 blade and some careful sanding. I
painted the guns using Gunze Steel, but it took several coats to do. The mold
release agent was a pain in the butt to clean. I had to strip the paint and
wash the resin bits twice before the acrylic paint would grip to the resin.
 Before I put the guns in, the
Starfury has mounting tabs for the top guns that needed to be shaved down before
installation. I followed the update set instructions and cut them down to be
only 1mm high.
Before I put the guns in, the
Starfury has mounting tabs for the top guns that needed to be shaved down before
installation. I followed the update set instructions and cut them down to be
only 1mm high.
It should be noted that there is a reason why the instructions tell you to do
things in order. If I had then I would have saved my ego a major popping. I
selected the two guns that had prominent flaws on the bottom (which would be
hidden by the inner wing) to be used for the guns located at the top of the
cockpit. When I tried to get them in, I reaffirmed my own stupidity. The guns
wouldn’t fit. I had to do some gentle prying of my well glued parts and pull
the inner wing pieces apart enough to jam the guns into position. I took some
superglue on a toothpick to help secure them in place. Then I proceeded to
repair what I had damaged using thin Tamiya glue and clamps.
The bottom guns were superglued on without any problems.
The canopy was the last thing to be put in place. Again, the fit was atrocious
as there are rather noticable gaps in the fit. Nonplussed, I took some thinned
Krystal Kleer and jammed it into the gaps. When it was dry, I took a super fine
brush with some Sky Grey to paint over the glue. I used a cut piece of Tamiya
tape to be used as a yellow warning decal on the portside of the canopy.
| CONCLUSIONS |
The Starfury is no Tamigawa slammer, but I enjoyed building it. I really had
fun doing the paint job and am really happy/proud on how it turned out (if no
one else is.) Any flaws are completely the fault of the modeler.
I have to thank the folks at Starshipmodeler.com for providing the database of
hard to find reference information for those of us who dabble on the geekier
side of the hobby.
Kit and update sets courtesy of my wallet.
If you would like your product reviewed fairly and quickly by a site that has over 300,000 visitors a month, please contact me or see other details in the Note to Contributors.