Special Hobby EWM A-4b & A-9
| KIT #: | SH 7210 & 72009 |
| PRICE: | $8.00 each when new |
| DECALS: | One option each |
| REVIEWER: | George Oh |
| NOTES: | Short run with vacuformed parts. |
| HISTORY |
 With an
operational range of about 320km/200miles, the V-2 (German:
Vergeltungswaffe 2, "Retribution Weapon 2"),
technical name
Aggregat-4 (A-4), was the world's first
long-range
ballistic missile.
Developed by Germany during the
Second World War, the V-2 had a
liquid-propellant rocket, and could reach
speeds of over 5,000km/h.
Because its accuracy wasn’t guaranteed, it was aimed at
an area (eg, a city), there it would arrive with the bang of its 1-ton warhead,
then the roar of its super-sonic arrival.
With an
operational range of about 320km/200miles, the V-2 (German:
Vergeltungswaffe 2, "Retribution Weapon 2"),
technical name
Aggregat-4 (A-4), was the world's first
long-range
ballistic missile.
Developed by Germany during the
Second World War, the V-2 had a
liquid-propellant rocket, and could reach
speeds of over 5,000km/h.
Because its accuracy wasn’t guaranteed, it was aimed at
an area (eg, a city), there it would arrive with the bang of its 1-ton warhead,
then the roar of its super-sonic arrival.
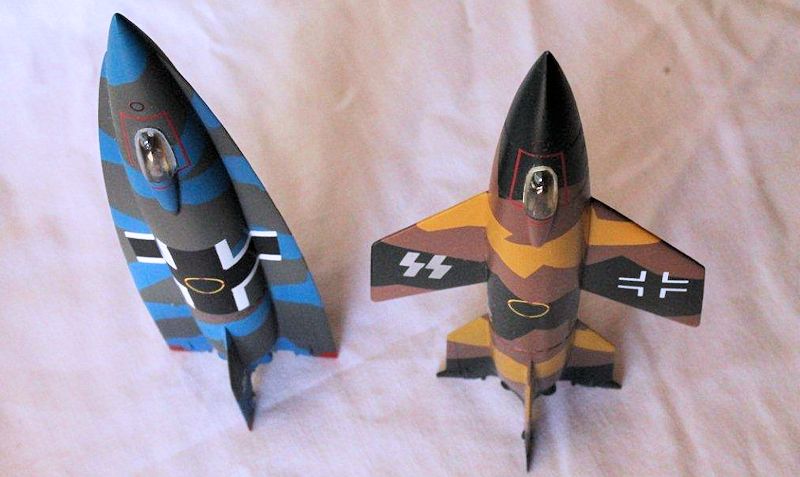
These modified V-2s were part of the
Aggregat(e) series of rockets.
The concept was to fit the V-2 with flight surfaces to
increase its range (say, to hit England from Germany), and a pilot to increase
its accuracy.
I dunno if they would have worked, or what the escape plan was
for the pilot, but they sure seems like a one-way ticket to me.
I wonder which would have had the better range.
Both were trialled with varying degrees of success, and
the A-9 was proposed as the final stage of the multi-staged A-9/A-10 Amerika-rocket.
Allied forces successfully strove to capture German rocket hardware and rocket scientists. Post-war efforts resulted in surface-to-surface battlefield weapons, Inter-Continental Ballistic Missiles with ranges measured in thousands of miles & nuclear warheads, and rockets that took man into space.
| THE KITS |
 I
bought these kits separately, when I needed to pad-out orders so that I could
qualify for a free offer.
I selected them because they tickled my curiosity.
Both came in flimsy end-opening boxes containing a
standard V-2 sprue and a small sprue of extra parts for the modified version.
I
bought these kits separately, when I needed to pad-out orders so that I could
qualify for a free offer.
I selected them because they tickled my curiosity.
Both came in flimsy end-opening boxes containing a
standard V-2 sprue and a small sprue of extra parts for the modified version.
Each kit has one (1) small vacformed
canopy, 13 identical parts, with 8 extra parts for the A-4b verses 6 for the
A-9, and 38 parts for the launch stand.
The plastic is dense but soft and slightly grainy (but a
coat of paint will fix that – I hope).
The sticks and fins showed some mould slip.
The panel lines were recessed and some on the sides of
the fins did not line-up.
The cockpit is basic (floor, seat & stick) and should be
barely visible.
However, the fit was sound though everything was to be
butt-joined.
| CONSTRUCTION |
I started the A-4b (wings) because it
(like ALL of my projects) looked like a quick build to me (Yeah,
right!!), it arrived first and is an unusual subject.
I started the A-9 (chimes) a little later, because I
reckoned that it’d be an even quicker build (experience, you know).
On both models, I used a clamp to hold the front & rear
cockpit bulkheads vertical and parallel, while the floor between them dried.
This went into the rocket halves and was adjusted fore &
aft till it fit – signified by the closing of the halves.
Only then did I glue it in place and, after painting it,
glued the rocket halves together.
Now I could shoe-horn in the seat so that it sat low
enough to clear that small canopy.
Tape seat belts followed, and there was just enough room
to insert the control stick.
The A-9 got its lap belts before installing the seat –
I’d learnt from the A-4b.
 Both cockpits
were hidden under those tiny thin vacformed canopies.
They had to be carefully excised from the surrounding
plastic sheet by repeated gentle scribing.
Soon after this stage, I was in DEEP despair with the
A-4b (and the model was shelved) because I’d lost the carefully-extracted
canopy.
I found it over two weeks later - several days AFTER the area had been
vacumed – undamaged, some 2mr/6ft from where I was sitting when it went AWOL.
The contact line of the canopies is a flat plain, so
it’ll need some gentle work to fit nicely into the curved surface of the rocket
body.
Be warned!!
Both cockpits
were hidden under those tiny thin vacformed canopies.
They had to be carefully excised from the surrounding
plastic sheet by repeated gentle scribing.
Soon after this stage, I was in DEEP despair with the
A-4b (and the model was shelved) because I’d lost the carefully-extracted
canopy.
I found it over two weeks later - several days AFTER the area had been
vacumed – undamaged, some 2mr/6ft from where I was sitting when it went AWOL.
The contact line of the canopies is a flat plain, so
it’ll need some gentle work to fit nicely into the curved surface of the rocket
body.
Be warned!!
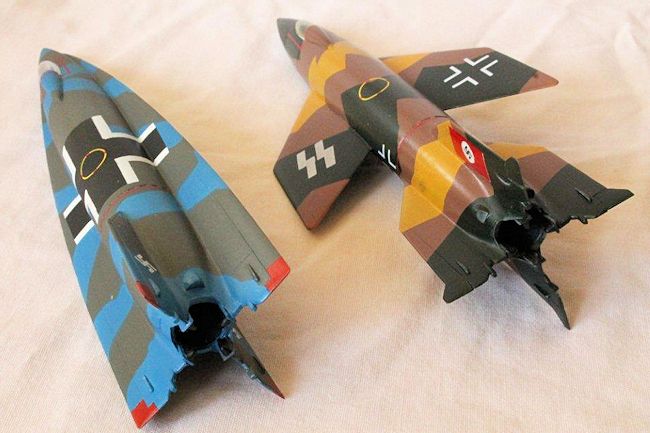
The top & bottom fins were moulded
with the right half of the rocket body.
On the A-4b, the left & right fins needed to be
attached, so I carefully measured (with dividers) the distance of the fixed fins
from the recessed connecting ring, and attached the lateral fins at that
distance – only to find that they sat about 1mm too high.
Rats!!
Each fin had a displaced panel line on one side that did
not line-up with the same line on the other side.
The difference was about 0.2mm, but it was very
noticeable.
The fix was to fill them with Mr. Surfacer 500 liquid filler,
wet-sand, then rescribe them in their correct position.
The instructions specified 63mm from the tip of the
nosecone to the LE of the wings, so I measured this with dividers and positioned
the wings, ensuring that they lined-up with the lateral fins.
Filler was (naturally) needed at the wing roots and fin
roots.
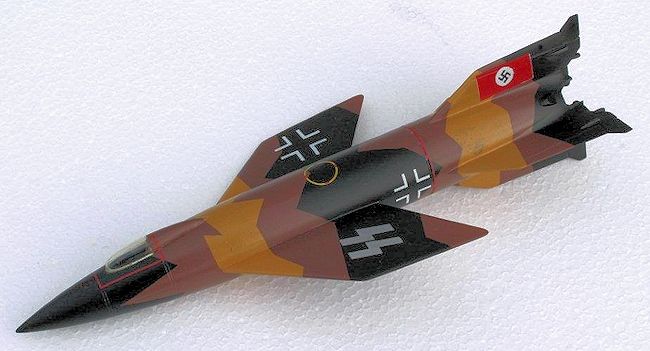
On the A-9, the left & right fins were
incorporated into the chines.
When I attached the chimes, I was
careful to keep them straight along the sides, and level at the base to avoid
sit problems.
See, I learnt from the winged V-2!!!
Filler was (naturally) needed at the chime roots and fin
roots.
 About
half-way along the body, the V-2 had a distinctive connecting ring of
alternating gaps and blocks. On these kits, it was represented only by a trench.
Naturally, I wanted something more realistic.
So I measured the circumference of the rocket body –
70mm - and placed a pencil mark every 2mm.
Now it was just a matter of gluing a 1mm square-section
stick against each mark, at right angles to the axis of the rocket.
Way after they were dry, I clipped them almost flush
with the surface, and sanded them smooth.
It’s not quite perfect, but then again, I’m a model
builder – not a rocket scientist.
About
half-way along the body, the V-2 had a distinctive connecting ring of
alternating gaps and blocks. On these kits, it was represented only by a trench.
Naturally, I wanted something more realistic.
So I measured the circumference of the rocket body –
70mm - and placed a pencil mark every 2mm.
Now it was just a matter of gluing a 1mm square-section
stick against each mark, at right angles to the axis of the rocket.
Way after they were dry, I clipped them almost flush
with the surface, and sanded them smooth.
It’s not quite perfect, but then again, I’m a model
builder – not a rocket scientist.
While all this was going on, I planned
to build the launching tables.
All of the support struts showed a mould seam and would
be replaced with plastic or wire rods.
Scraping them back would have been fiddly and tedious
(they are short and there are lots f them) and besides, the wire was stronger.
Several parts had large distinctive knock-out pin scars.
The fix for these was to fill them with plastic card
discs cut from thin plastic card with my punch-&-die set (a really useful tool).
The launcher has a control(?) box on one side.
I sanded them thinner then wrapped thin foil around it.
I’m trying to replicate an open control box.
However, since starting these rockets, I’ve moved house
and I’ve yet to relocate the plastic box containing the launch stands.
So, they are
still in-progress.
| COLORS & MARKINGS |
I masked the cockpit canopies with
long thin strips of Tamiya tape – tedious, but effective.
The instructions identified the required colours by RLM
number, name, Tamiya number and Humbrol number (Wow!!).
My painting sequence for the A-4b was nothing special
except that I couldn’t find a sand yellow colour that I liked, so I use Citadel
Miniatures Beastial Brown.
It looked right and brushed-on easily.
This was masked with strips of Tamiya tape to produce a
narrow random splinter camouflage band.
The yellow was oversprayed with Tamiya JA Green, then
Flat earth (these instead of Light blue, Light green, Brown-violet and Sand
yellow as per the instructions).
The masking was removed and a clear coat of Future Floor
wax was brushed-on as a base coat for the decals.
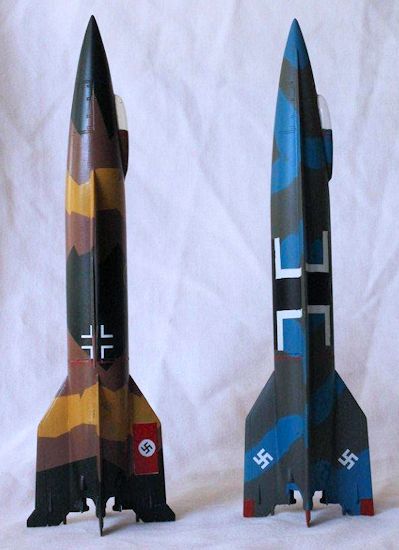
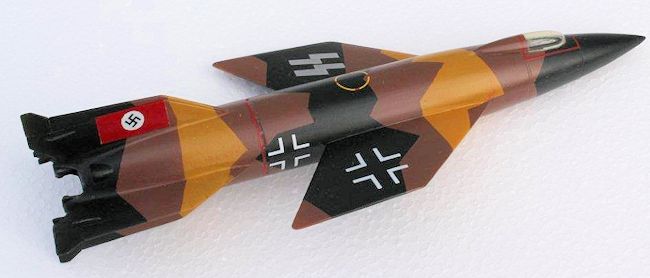
Before I even started painting the
A-9, I started thinking of differences that I could incorporate into the
finished model.
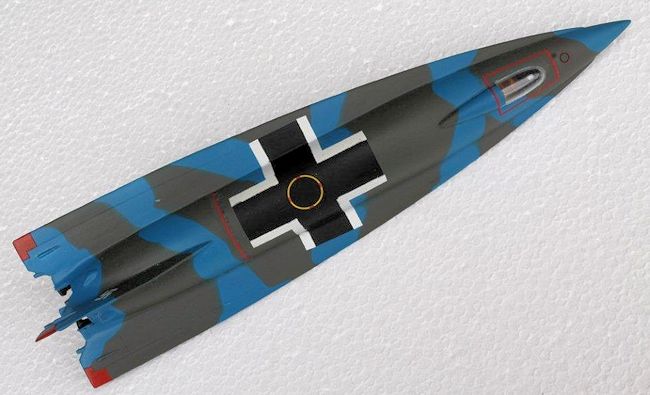
I hit on the idea of HUGE National crosses on the spine & belly
of the rocket, from a photo of early-war He 111’s over Poland where some sported
huge full-chord crosses to aid in ID.
Now, I
 knew that I
didn’t have any large enough crosses in the decal stash, so, I elected to paint
them on – a first for me.
The size of the required crosses/masks was calculated by
upscaling the dimensions of a kit-supplied cross (white corners only).
The width of the chines
was 46mm/@ 1.8”.
So the finished crosses would be 44mm
long x 48mm wide (to account for the curve of the body).
The black core would be 11mm wide, and the white corner
chevrons, 3mm wide.
knew that I
didn’t have any large enough crosses in the decal stash, so, I elected to paint
them on – a first for me.
The size of the required crosses/masks was calculated by
upscaling the dimensions of a kit-supplied cross (white corners only).
The width of the chines
was 46mm/@ 1.8”.
So the finished crosses would be 44mm
long x 48mm wide (to account for the curve of the body).
The black core would be 11mm wide, and the white corner
chevrons, 3mm wide.
Under the light-before-dark rule, I
first painted the whole rocket gloss white that I would mask.
Then I cut 2 x 11mm-wide strips of Tamiya tape to the
produce the core lengths & widths to lay over the white undercoat.
To tell the truth, I had to do it again in order to
lengthen the spine tapes so that I could butt them up against the fins to ensure
correct placement.
These core bits of tape masked the guts of the crosses
that would eventually be black.
3mm-wide strips of tape were laid-down against the sides
of the core bits to mask the required white corner chevrons – my real objective.
The core bits were removed and the whole rocket sprayed
gloss black.
Now 15mm-wide strips of tape were carefully laid to cover the
black and to overlap the chevron masks.
They were all heavily burnished down to ensure a good
seal, and the rocket was now ready for its real cam coats.
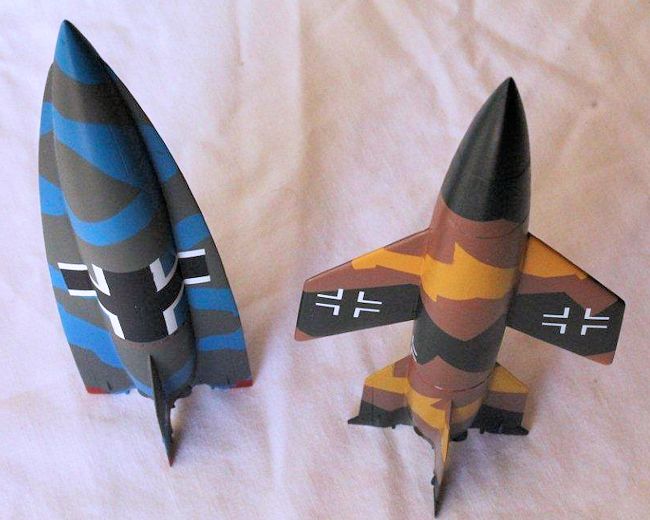
 The painting
guide showed only the top & left side, so the other 50% of the cam pattern is
100% guess-work.
It suggested Tamiya XF-14 blue, but I had only X-14 that looked
too garish.
So I darkened it with some Royal blue (because it happened to be
on the work bench) and sprayed an overall coat.
For the first time, I used long snakes of Blutac to mask
the rocket.
I used dark sea grey as the other cam-colour because it, too, was
at hand (I’m working on a SAAB Draken).
My aim was a feathered edge to the cam, so I sprayed
from a slightly further distance (150mm/6’) and kept the rocket body vertical.
The masking – including that over the crosses - was
stripped-off an hour after painting (during-which I cleaned the spray gun & let
the paint dry slowly in the cold).
The results were OK, and required some touching-up.
With all of the masking stripped-off and the paint
dried, I brushed her with Future so’s I could decal both V-2s at the same time.
The painting
guide showed only the top & left side, so the other 50% of the cam pattern is
100% guess-work.
It suggested Tamiya XF-14 blue, but I had only X-14 that looked
too garish.
So I darkened it with some Royal blue (because it happened to be
on the work bench) and sprayed an overall coat.
For the first time, I used long snakes of Blutac to mask
the rocket.
I used dark sea grey as the other cam-colour because it, too, was
at hand (I’m working on a SAAB Draken).
My aim was a feathered edge to the cam, so I sprayed
from a slightly further distance (150mm/6’) and kept the rocket body vertical.
The masking – including that over the crosses - was
stripped-off an hour after painting (during-which I cleaned the spray gun & let
the paint dry slowly in the cold).
The results were OK, and required some touching-up.
With all of the masking stripped-off and the paint
dried, I brushed her with Future so’s I could decal both V-2s at the same time.
Some of the bits around the rocket
nozzle had to be painted so I did it with a brush.
I didn’t use red for the inside of the nozzle (as per
the instructions) - I used flat black with a gloss black throat, because I was
advised that it would make the throat appear deeper.
And it does.
| FINAL CONSTRUCTION |
Because I wanted to do something
different on the A-4b, and for the heck of it, I photo-reduced an SS twin
lightning bolt insignia to the size of the normal Balkencruz, covered it with
clear sticky tape, then Tamiya tape, and cut-out a stencil of it in the Tamiya
tape.
All this so I could spray it on one of the wings in-lieu of one of the
national markings - an idea I’ve never seen before.
No doubt, someone will object.
DILLIGAFF!!
I reasoned that, at that late stage of the war,
the SS were the best-supplied and the last full-strength Units of the German
Army.
And, if I recall correctly, the SS were put in charge of the
 production of,
and the launching of, the V-2 rockets.
The rest of the decals were the kit-supplied
ones. ‘Cept
the flags on the tailfin of the A-4b – those I made-up from solid decal sheet.
The
instructions reckon that the crosses on the side of the A-4b were to go astride
the waist ring.
I didn’t do that (too hard & too untidy).
They all went-on beautifully, and settled under the
usual MicroSet/Sol liquid sandwich.
production of,
and the launching of, the V-2 rockets.
The rest of the decals were the kit-supplied
ones. ‘Cept
the flags on the tailfin of the A-4b – those I made-up from solid decal sheet.
The
instructions reckon that the crosses on the side of the A-4b were to go astride
the waist ring.
I didn’t do that (too hard & too untidy).
They all went-on beautifully, and settled under the
usual MicroSet/Sol liquid sandwich.
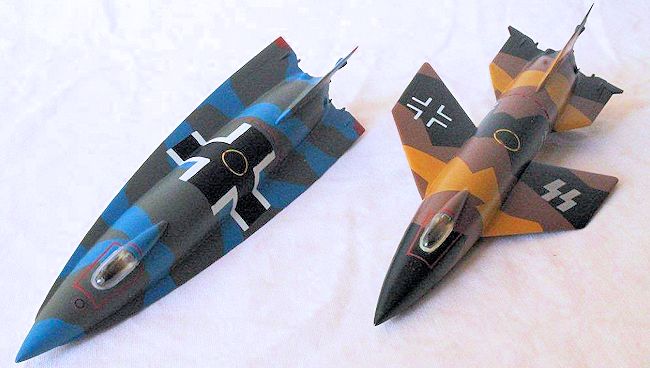
Both models had a red rectangular outline around the cockpit. These had to be built-up from two ling straight lines, and were no problem. But I slipped-up with the circular decal on the spine – I put them in a slightly different position on each model – Rats!! No weathering was done on them as each is/was a one-use machine. However, I did put a black wash into the connecting ring that I’d improved. A clear satin coat later, and I’m in the home straight.
Each fin each requires a trailing probe, so I’ll used really-fine stiff wire to replicate them. Because of the tail fin positioning problem on the A4b, that rocket will not sit squarely on the launch table. I coulda’ hidden this by mounting the rocket in a launching mode – but I’d need a pilot under the canopy. Rats!! I’ll tack them onto the launchers later, for display purposes.
| CONCLUSIONS |
Well, building these wasn’t as fast as
I’d hoped because of the amount of filler that they required, and because I
elected to muck around with the paint schemes & markings.
But all of these tinkerings are well within the
abilities of a modeller with a few models under his (or her) belt.
So, despite being a short-run kit, I’d recommend these
to all but the novice builder.
As I expected, the SS marking on the A-4b received a lot of criticism – on a weapon that probably never existed. DILLIGAFF!! I build models to please me, and I now have something else that is unusual in my new model display cases. Further to this theme, I still have to do a standard V-2 on its (resin) transport trailer, with its attendant (resin) launch vehicle. And I have to complete the two launch stands – after I find them!! Wish me luck………..
November 2014
If you would like your product reviewed fairly and fairly quickly, please contact the editor or see other details in the Note to Contributors.