Revell 1/48 Mercury Spacecraft
| KIT #: | H-1847 |
| PRICE: | $3.80 in 1969 |
| DECALS: | Six options |
| REVIEWER: | Steven Pietrobon |
| NOTES: | From a three kit set. RealSpace Detail Set 48MW ($25) and New Ware Decals NWD003 ($11) |
| HISTORY |
 The McDonnell Aircraft Mercury was the United States first manned spacecraft.
Limited by the carrying capacity of the US's most powerful launch vehicle at the
time, the Atlas-D intercontinental ballistic missile, it could carry only one
astronaut for missions lasting up to 34 hours. A Redstone short range ballistic
missile was used to carry America's first man in space, Alan Shepard, into a
suborbital trajectory on 5 May 1961, reaching a peak altitude of 187 km. The
mission was called Mercury-Redstone 3 with the spacecraft called Freedom 7
(spacecraft serial number 7). Over nine months later, on 20 February 1962, John
Glenn was launched on Atlas 109D, becoming America's first man in orbit. The
spacecraft was called Friendship 7 (spacecraft serial number 13) with the
mission called Mercury-Atlas 6. Friendship 7 made three 159 by 265 km orbits
around the Earth and was successfully recovered after four hours and 55 minutes
from launch.
The McDonnell Aircraft Mercury was the United States first manned spacecraft.
Limited by the carrying capacity of the US's most powerful launch vehicle at the
time, the Atlas-D intercontinental ballistic missile, it could carry only one
astronaut for missions lasting up to 34 hours. A Redstone short range ballistic
missile was used to carry America's first man in space, Alan Shepard, into a
suborbital trajectory on 5 May 1961, reaching a peak altitude of 187 km. The
mission was called Mercury-Redstone 3 with the spacecraft called Freedom 7
(spacecraft serial number 7). Over nine months later, on 20 February 1962, John
Glenn was launched on Atlas 109D, becoming America's first man in orbit. The
spacecraft was called Friendship 7 (spacecraft serial number 13) with the
mission called Mercury-Atlas 6. Friendship 7 made three 159 by 265 km orbits
around the Earth and was successfully recovered after four hours and 55 minutes
from launch.| THE KIT |
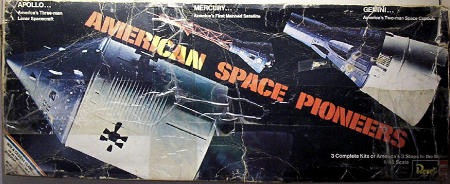 The Revell 1/48 Mercury spacecraft was first issued in
1964, in a twin kit together with a 1/48 Gemini spacecraft. My kit is a 1969
issue that was included in the American Space Pioneers set which I got on eBay
for only US$17.50 in 2003. The box was pretty beat up and on inspecting the
contents, I found three round BB bullets along with the corresponding holes in
the box top! Some kid had obviously taken pot shots at the set sometime during
its previous life. Fortunately, the Mercury kit survived but the Gemini and
Apollo CSM kits had taken some damage. Other than that, the set was pretty much
complete.
The Revell 1/48 Mercury spacecraft was first issued in
1964, in a twin kit together with a 1/48 Gemini spacecraft. My kit is a 1969
issue that was included in the American Space Pioneers set which I got on eBay
for only US$17.50 in 2003. The box was pretty beat up and on inspecting the
contents, I found three round BB bullets along with the corresponding holes in
the box top! Some kid had obviously taken pot shots at the set sometime during
its previous life. Fortunately, the Mercury kit survived but the Gemini and
Apollo CSM kits had taken some damage. Other than that, the set was pretty much
complete.
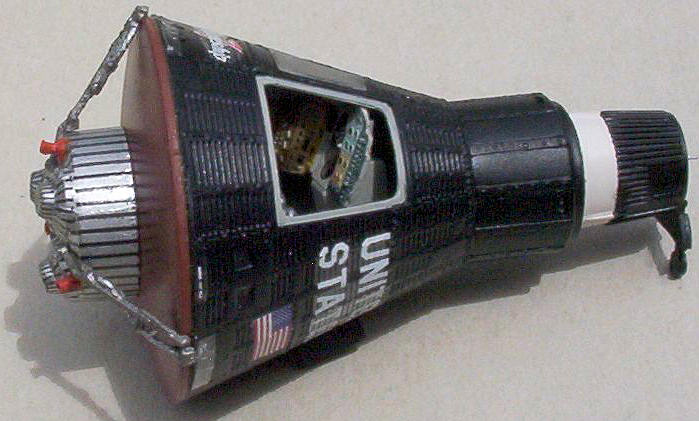
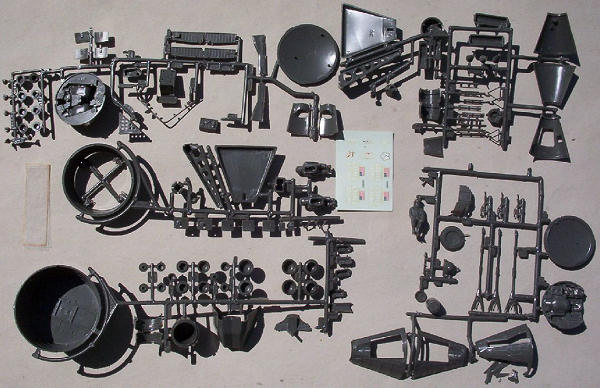 The Mercury kit is the orbital window version, but despite being first issued in
1964, one year after the program had completed, there are a large number of
inaccuracies, especially in the body and escape tower motor. There are 50
plastic parts altogether, including four parts for the stand. The plastic is
moulded in a dark green plastic, which I later found out to be a bit brittle.
The kit also includes a small cutting of clear plastic sheet for the window,
The Mercury kit is the orbital window version, but despite being first issued in
1964, one year after the program had completed, there are a large number of
inaccuracies, especially in the body and escape tower motor. There are 50
plastic parts altogether, including four parts for the stand. The plastic is
moulded in a dark green plastic, which I later found out to be a bit brittle.
The kit also includes a small cutting of clear plastic sheet for the window,
which is shared with the Gemini kit. Decals for all the six manned missions are
included.
To correct the inaccuracies of the kit, I bought the RealSpace detail set, which
replaces the body and escape tower motor and nozzles with accurate resin parts,
obviously modified from the kit parts. RealSpace also has a porthole version of
the kit for those who want to build the suborbital version. Also included are
two parachute compartments, for the launch and on-orbit configurations,
instrument panel, hand controller and other miscellaneous external parts. The
set replaces 23 plastic parts of the kit with 13 resin parts, half of the kit
components (not including the stand)!
As the kit decals were pretty basic and probably too old to use, I bought the
New Ware 1/48 Mercury aftermarket decals set (this also includes decals for the
1/48 Gemini, Apollo CSM and Apollo LM kits). The decals include the large
marking for all six manned missions, including the small stencils on the body
and escape tower, plus the black line markings for the retropack used in the
orbital missions.
| CONSTRUCTION |
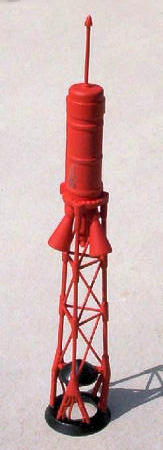
I decided to build the kit in its orbital
configuration while also building the escape tower on its own. I pretty much
followed the sequence in the instructions, starting with the escape tower,
interior and body and finally the heatshield and retro pack.
 The base of the RealSpace escape tower motor was a little missmoulded, which I
corrected with putty, although it was difficult to replicate some of the nuts
that were missing. I had some problem with the struts in the escape tower, as
they were brittle and prone to breaking. For the tower vertical member part 11,
there is an extra umbilical cable on the right side. As this did not seem to
appear in the photos and drawings I could find, I removed this cable. The attach
ring part 8 had the inside moulding removed, as the escape tower would be
separate from the spacecraft. I probably could have removed a little more from
the inside, to give a better fit over the drogue chute housing.
The base of the RealSpace escape tower motor was a little missmoulded, which I
corrected with putty, although it was difficult to replicate some of the nuts
that were missing. I had some problem with the struts in the escape tower, as
they were brittle and prone to breaking. For the tower vertical member part 11,
there is an extra umbilical cable on the right side. As this did not seem to
appear in the photos and drawings I could find, I removed this cable. The attach
ring part 8 had the inside moulding removed, as the escape tower would be
separate from the spacecraft. I probably could have removed a little more from
the inside, to give a better fit over the drogue chute housing.
I first painted the escape tower Humbrol H19 Gloss Red, but it looked a little
too red. Looking at some photos, I changed my mind and then sprayed the escape
tower H132 Satin Red which was little lighter in colour. The insides of the
nozzles were painted H133 Satin Brown. The attachment ring and drogue chute cap
were painted H85 Satin Black.
I had a bit of a problem with the flow generator part 4 on top of the motor. Due
to its thin shape and the brittle plastic, this broke once during assembly and
once after painting. I managed to repair the part both times, but the tower was
mishandled by a member of my family without my knowledge, with the flow
generator being being broken off and lost to the infinity of space. I was left
with no choice but to scratch build a replacement part. I removed the remaining
stub and drilled a small hole in the middle of the forward cap part 3. I then
cut a short straight length from a paper clip to which I superglued a small
piece of plastic. The plastic was then shaped into a cone, the part superglued
into the hole, and finally repainted. This is now a much stronger part and
hopefully should survive any further mishandling.
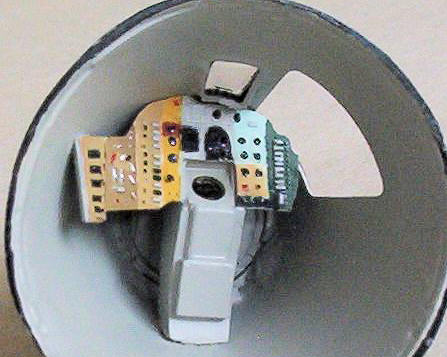
The most complicated painting exercise is the instrument panel. Each of the
sections of the panel was painted in a different colour. For reference, I used
Phil Smith's fantastic build of the http://www.astrazoic.com/Friendship-7.html
Atomic City 1/12 Mercury kit. Phil gives the Floquil Railroad paints he used in
this http://www.astrazoic.com/Mercury47.JPG photo. However, as these paints are
difficult to obtain for me, I used Humbrol paints instead. Here are the mixtures
I used:
 Floquil Railroad
Humbrol
Floquil Railroad
Humbrol
F414308 Dirt H26 Khaki + H93
Desert Yellow
F414308 Dirt + White H26 Khaki + H93
Desert Yellow + H34 White
F414302 Sand + F414378 Reading Yellow H24 Trainee Yellow
+ H93 Desert Yellow
F414352 Freight Car Red + F414308 Dirt H60 Scarlet + H26
Khaki
F414203 GN Big Sky Blue + White H65 Aircraft Blue
+ H34 White
F414317 Concrete + White H93 Desert Yellow
+ H34 White
F414368 Penn Central Green + F414203 GN Big Sky Blue H149 Dark Green +
touch of H65 Aircraft Blue
F414368 Penn Central Green + F414203 GN Big Sky Blue + Black H149 Dark Green +
touch of H65 Aircraft Blue + H33 Black
The central column and rear of the panel was painted H129 Satin US Gull Grey.
After painting the rest of the switches and instruments according to this
http://www.astrazoic.com/Mercury71.JPG photo I filled in the periscope window
with some clear drying glue.
 In the kit, the main body is provided in three sections, but the resin
replacement is moulded in one piece with a large pour stub attached on top. The
bulk of the stub was cutoff with a razor saw, with the remaining stub carefully
In the kit, the main body is provided in three sections, but the resin
replacement is moulded in one piece with a large pour stub attached on top. The
bulk of the stub was cutoff with a razor saw, with the remaining stub carefully
sanded away. The resin drogue chute was then superglued in place, being careful
with the alignment. The body was then sprayed H85 Satin Black with the base of
the drogue chute housing painted H130 Satin White. The window was then cut from
the clear sheet and attached using clear drying glue. The interior was painted
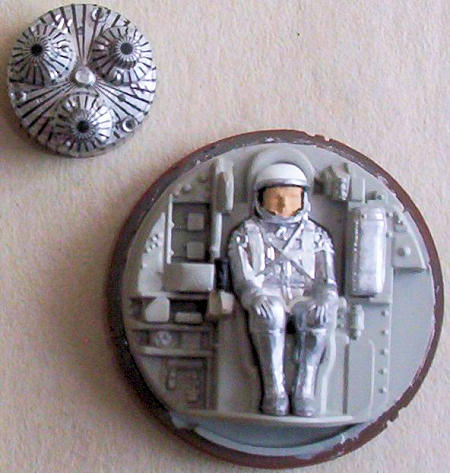
H129 Satin US Gull Grey and the instrument panel then glued in place.
The rear bulkhead was painted H129 Satin US Gull Grey with the life raft to the
left of the astronaut painted silver. As shown by Phil Smith's model, the
bulkhead is far from accurate. I did not make any attempts to correct this,
other then using the RealSpace hand controller. For the astronaut, Revell made
the trousers flare out near the shoes. I scraped away at the plastic using a
sharp knife to smooth this out. The suit was painted H11 Silver, the straps H130
Satin White and the Helmet H22 Gloss White. When I tried to glue the astronaut
in, he wouldn't fit! I found the problem to be that I had used one of the Gemini
astronauts that had come loose from the sprue, who has shorter legs than the
Mercury astronaut. The proper astronaut was then corrected, painted and glued in
place.
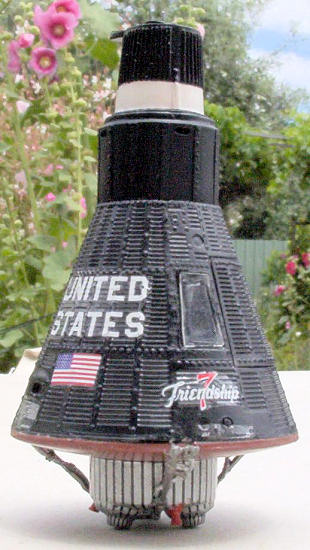
The retropack was painted silver and then covered using the New Ware decals. I
messed up the decals on one of the retro motors, but fortunately the New Ware
set had spares I could use. For the heat shield, the only reference I had to its
colour was that it was "brown". So I painted it H133 Satin Bro wn, which I later
found out was a little too light in colour. The retropack straps were painted
steel with the electrical wiring painted silver. One end of the straps that
attaches to the heat shield was missing, so I fixed this with a small piece of
plastic. The three small posigrade nozzles were attached and painted H132 Satin
Red.
wn, which I later
found out was a little too light in colour. The retropack straps were painted
steel with the electrical wiring painted silver. One end of the straps that
attaches to the heat shield was missing, so I fixed this with a small piece of
plastic. The three small posigrade nozzles were attached and painted H132 Satin
Red.
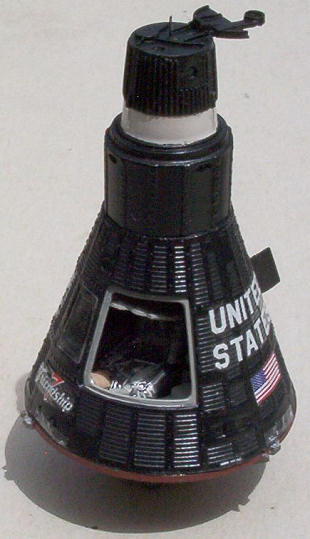
With the main body completed, I then put on the decals. However, I found the
large New Ware decals to be hard to settle and brittle, with the result that the
"UNITED STATES" and flag decals were unusable. I tried the original kit decals,
but they were even more brittle. In the end, I had to make my own ALPS decals,
although for some reason the middle red stripe in the flag is thinner than it
should be. The New Ware "Freedom 7" and stencils could be used, although they
did not settle as well as I would have liked. The brittleness of the decals may
be a result of the hot and d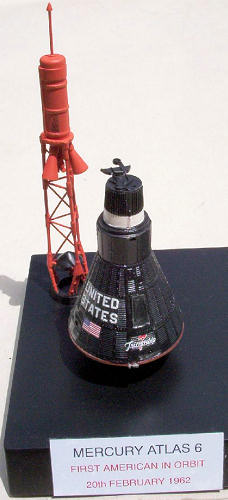 ry summers we have had, where the temperature in my
room can get over 40 C during the day.
ry summers we have had, where the temperature in my
room can get over 40 C during the day.
The last RealSpace pieces were then attached. These are the periscope and
periscope door at the back of the spacecraft and destabiliser flap at the top. A
small antenna was inserted at the top using a short piece of wire.
I wanted to display the model in a vertical position, so I did not use the stand
that is provided. I made up my own stand which is a copy of the Airfix Saturn V
stand. The stand was made using 1.5 mm thick plastic sheet, except for the
plaques where I used 0.5 mm sheet. A modification is that there are two display
plaques, one for the Mercury model and one for the yet to be completed Gemini
model. The stand was sprayed H85 Satin Black. The plaque decals were made using
my ALPS printer.
| CONCLUSIONS |
 I had a lot of fun building this kit and learning
about the Mercury spacecraft. I've read about the Mercury program since I was a
kid, but I found that it was not until I built the model did I get a true
understanding of the spacecraft. Although a small model, the kit is a challenge
to build, especially if you want to be accurate.
I had a lot of fun building this kit and learning
about the Mercury spacecraft. I've read about the Mercury program since I was a
kid, but I found that it was not until I built the model did I get a true
understanding of the spacecraft. Although a small model, the kit is a challenge
to build, especially if you want to be accurate.
| REFERENCES |
http://www.astrazoic.com/Friendship-7.html Phil
Smith's Friendship 7. A fantastic build of the Mercury spacecraft in its
recovered configuration, with a link to download the Mercury familiarisation
manual which has lots of technical drawings.
http://www.spaceinminiature.com/ref/merc/merc1.html Space in Miniature Has
lots of information on the spacecraft differences. You can also order a book
describing how to detail the model.
March 2011
If you would like your product reviewed fairly and quickly, please contact me or see other details in the Note to Contributors.