Revell 1/144 Space Station MIR
| KIT #: | 04840 |
| PRICE: | 98 Yuan here in Beijing |
| DECALS: | None |
| REVIEWER: | Richard F |
| NOTES: |
| HISTORY |
 The Mir Space Station was the world's first modular
orbital space station and the world's longest permanently inhabited space
station too. It first went up into space in 1986 and didn't come back down until
a fiery planned re-entry over the South Pacific in 2003. In that time it became
well known (amongst interested parties) for lurching from one near-disaster to
the next. But it set lots of records for long term spaceflight, including for
continuous occupation in space at only 8 days short of a decade. The
International Space Station has been occupied since 31 October 2000, but even if
astronauts and cosmonauts stay up there without a break, they won't overtake
Mir's record until 23 October 2010!
The Mir Space Station was the world's first modular
orbital space station and the world's longest permanently inhabited space
station too. It first went up into space in 1986 and didn't come back down until
a fiery planned re-entry over the South Pacific in 2003. In that time it became
well known (amongst interested parties) for lurching from one near-disaster to
the next. But it set lots of records for long term spaceflight, including for
continuous occupation in space at only 8 days short of a decade. The
International Space Station has been occupied since 31 October 2000, but even if
astronauts and cosmonauts stay up there without a break, they won't overtake
Mir's record until 23 October 2010!
You can read more about it in the preview of this kit (http://www.modelingmadness.com/reviews/misc/scifi/previews/richardfmirp.htm),
or on the internet.
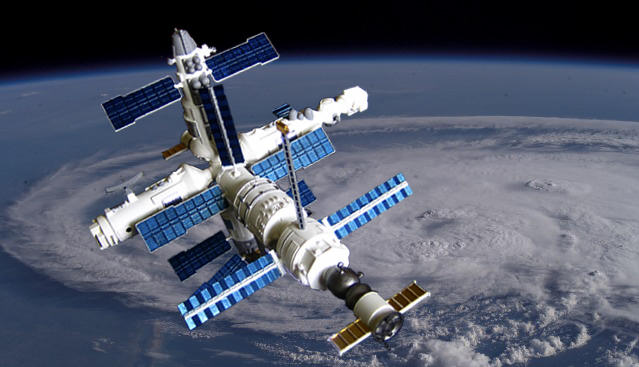
The background to the image above and the others in this review are courtesy of
the Image Science & Analysis Laboratory, NASA Johnson Space Center. The links at
the bottom include one to free this NASA imagery, where I got these images (they
ask you to say where they came from, so I did!).
| THE KIT |
 This kit seems to come from 1998 and is nicely moulded. Since I wrote the
review, and actually built the kit, I noticed that some parts have blemishes on
the mouldings. This is particularly the case on the solar panels. This
is pretty disappointing because the solar panels are such a major feature of
this (or any) space station and they are pretty hard to clean up. The solar
panels themselves are massively out of scale in thickness - the real ones are
very thin. I chose to build this out of the box, however, so I didn't explore
ways to replace them. I am sure a skilled modeller would be able to make
something very impressive.
This kit seems to come from 1998 and is nicely moulded. Since I wrote the
review, and actually built the kit, I noticed that some parts have blemishes on
the mouldings. This is particularly the case on the solar panels. This
is pretty disappointing because the solar panels are such a major feature of
this (or any) space station and they are pretty hard to clean up. The solar
panels themselves are massively out of scale in thickness - the real ones are
very thin. I chose to build this out of the box, however, so I didn't explore
ways to replace them. I am sure a skilled modeller would be able to make
something very impressive.
Surface detail is pretty minimal really, with some raised bumps and knobs and
stuff like that, nicely moulded, and some engraved lines here and there as well.
Some of the recessed windows are pretty poorly executed but then some of the
raised ones are quite nice.
| CONSTRUCTION |
Before we get into this, let me say that I built this kit as a diversion from
other non-modelling things and I did it without all my usual gear and collection
of paints. I had only two paintbrushes, a few paints, putty, one grade of
sandpaper and a knife. Add to that my pretty limited skills and you shouldn't
expect a masterpiece.
Now on to the review!
I'd say 95 per cent of reviews say "construction began in the cockpit". Not so
here - there isn't a cockpit. I guess that Mir, like other
 space stations, has
all kinds of control panels inside somewhere but even if these windows were
transparent you'd be hard pressed to see anything. So for this one, construction
starts with any of the smaller modules. You can't start with the "Core Module"
because that has to go together at the end - its two halves join together over
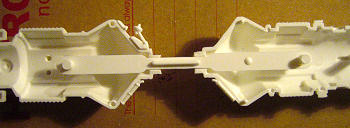
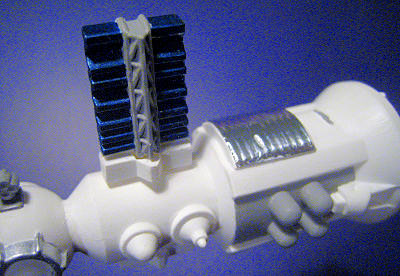
the linkage arm between the Priroda and the Kristall module. This image
shows half of the Priroda and Kristall modules with the linkage arm that holds
them together. The Core Module goes together around this arm. In reality, the
Core Module was launched first, in 1986. Kristall went up in 1990 and Priroda
didn't arrive until 1996. But structurally, it works well for the model.
space stations, has
all kinds of control panels inside somewhere but even if these windows were
transparent you'd be hard pressed to see anything. So for this one, construction
starts with any of the smaller modules. You can't start with the "Core Module"
because that has to go together at the end - its two halves join together over
the linkage arm between the Priroda and the Kristall module. This image
shows half of the Priroda and Kristall modules with the linkage arm that holds
them together. The Core Module goes together around this arm. In reality, the
Core Module was launched first, in 1986. Kristall went up in 1990 and Priroda
didn't arrive until 1996. But structurally, it works well for the model.
Before sticking your module halves together, don't forget to put the solar
panels in place. These are connected via a rod which enables you to pose the
panels at different angles.
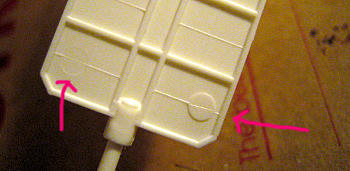
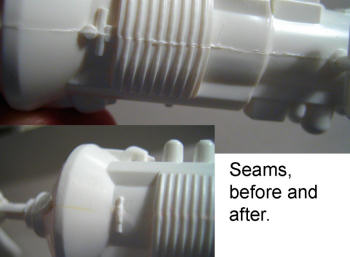
The module halves go together reasonably well but there were some obvious seam
lines that needed cleaning up. You can see the line - before and after - on the
Kristall-Priroda module assembly in this picture . The small Soyuz and
Progress spacecraft didn't fit together well at all. Look at the seam line on
the Progress remote-controlled supply ship - the vertical seam on the front (at
left) is particularly painful because the front of that spacecraft is meant to
be a smooth dome-type shape. At least you don't have to glue it though - it
snaps on tight. 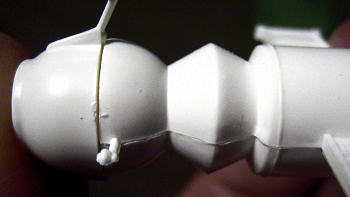 You want it to as well - your cosmonauts are going to
depend on Progress coming up regularly with supplies. You wouldn't want it
falling apart at the seams, precious chocolate bars drifting into space....oh
the humanity! I guess if that did happen, you wouldn't have to drink any more
Tang, which could be a blessing.
You want it to as well - your cosmonauts are going to
depend on Progress coming up regularly with supplies. You wouldn't want it
falling apart at the seams, precious chocolate bars drifting into space....oh
the humanity! I guess if that did happen, you wouldn't have to drink any more
Tang, which could be a blessing.
But once you tidy it up, it looks good. Here's a Soyuz above Beijing en route to
Mir, hopefully with some extra space food sticks. See that lump on the
hull just in front of the starboard solar panel? It points to my house.
Apart from the cleaning up of seams and sanding smooth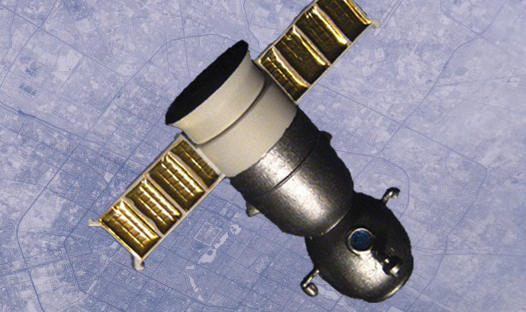 some of the smaller parts
(like the little radar dishes on each module, which I think were docking aids
when each new module came up from Earth), construction is actually really easy.
This kit was once released as a Snap-Tite kit so it's hardly going to be
complicated.
some of the smaller parts
(like the little radar dishes on each module, which I think were docking aids
when each new module came up from Earth), construction is actually really easy.
This kit was once released as a Snap-Tite kit so it's hardly going to be
complicated.
One trap for the unwary is mixing up your Kvant II and Spektr modules. Check the
instructions carefully so you don't get them attached on the wrong side. The end
of each module has a shaped plug which should fit into the matching hole on the
rest of the kit. But I still got mine back to front the first time.
At the end, you can add a few small parts - the Soyuz and Progress, an extra
solar array and some kind of boom with an instrument package on its end.
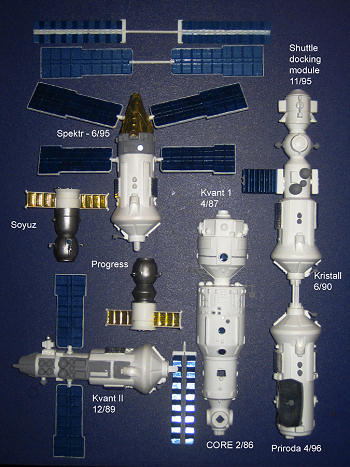
I wanted my kit to be portable - I've already moved house once with it. In its
finished state, the Mir is quite unwieldy and unlike an aeroplane, it is long,
wide and high. It won't fit into a normal kit box like most model planes will. I
decided not to glue my Core Module together, nor glue the Kvant II and Spektr
modules onto the rest of the station. I can dismantle the whole thing into its
component parts. In the image below, you can see them all laid out (minus one half of
the Core Module). This means there is a big seam line right up either side of
the Core Module. But it also means the model will survive being moved or being
stored.
| COLORS & MARKINGS |
 This is where I had the most trouble. I won't say I "screwed the pooch" a la
"The Right Stuff", but I certainly wouldn't get a construction job at NASA or
Star City in Russia. I followed the Revell painting instructions (more or less)
and painted the bulk of my Mir white. Sounds reasonable, huh? Every freaking
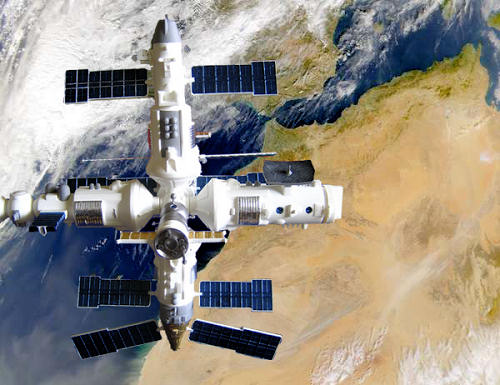
rocket and space shuttle I've ever seen pictures of was mostly white. Later (why
not earlier? why!), I searched on the web for pictures of Mir and found a great
one which showed in fact that Mir was mostly grey.
This is where I had the most trouble. I won't say I "screwed the pooch" a la
"The Right Stuff", but I certainly wouldn't get a construction job at NASA or
Star City in Russia. I followed the Revell painting instructions (more or less)
and painted the bulk of my Mir white. Sounds reasonable, huh? Every freaking
rocket and space shuttle I've ever seen pictures of was mostly white. Later (why
not earlier? why!), I searched on the web for pictures of Mir and found a great
one which showed in fact that Mir was mostly grey.
By then it had been determined that I'd be leaving town for a few months for
work. My wife (who found the model shop in Beijing where I bought this in the
first place) decided to keep the Mir somewhere visible as a reminder of me and
my "quirky" interests (presumably to keep her mind off all the handsome fellas
she'd otherwise fall for..."uh-oh, hot guy, swooning, quick, look at Mir! Look
at MIR!). She hates grey planes ("oh no, not another grey one, so boring-la!")
so I decided that this Mir was going to stay white. I used a light grey to cover
some of the surface details as you can see on the Kvant II module in (PIC 9) but
in reality much more of it should be grey and a lot less should be white.
However, it should also be noted that the apparent colour of space craft (or
anything) depends alot on the angle and amount of sunlight falling on them when
the image is made. This is why planetary probes have colour swatches on them so
that scientists can balance the real colour of the surface of Mars (for example)
by comparing the colours in the image with the known real colour of the swatch.
It's the same principle used to calibrate computer monitors in digital
photography. So - who can really say! (the last resort defence for someone who
didn't do their research)!
And, happily, I've recently seen lovely photographs in a new book on the history
of spaceflight showing Mir in glorious, all-encompassing white.
 So who knows? My theory is that the direct sunlight over all those years may
have changed the colour of the outer surface - paint fades after all, even on
Earth. Maybe a newcomer went on a spacewalk to spruce the joint up.
So who knows? My theory is that the direct sunlight over all those years may
have changed the colour of the outer surface - paint fades after all, even on
Earth. Maybe a newcomer went on a spacewalk to spruce the joint up.
How about other colours? Well the solar panels proved difficult. The
instructions call for Lufthansa Blue but even to me, that seemed silly. In the
end, I found a Tamiya paint called "Metallic Blue X-13". It has a nice middle
blue hue with a metallic sparkle and I used this to paint all the Mir solar
panels. I experimented with using silver on some panels (too obvious), the blue
mixed with silver for different hues of blue (not very effective) and plan to
try using some other colours (like Tamiya Titanium Gold) when I have a chance.
For now though, the panels stay blue. Pictures of the real thing show a darker,
almost black, appearance, with some panels looking gold. Again, depends on the
angle of the light.
I painted some areas grey, as noted, and used silver for some parts just for
some variety. The Space Shuttle Docking Adapter should be a yellow/orange colour.
I haven't painted that yet because I haven't got that colour.
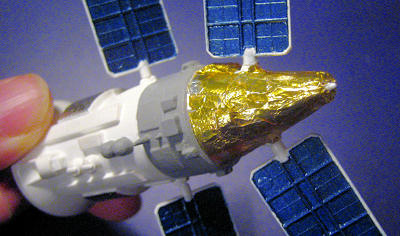
I used gold and silver foil on the model too. The gold is on the instrumentation
boom coming out of the Kvant I module, and on the base of the Spektr module . It stuck on ok, but next time I will try to cut a larger piece more
accurately to reduce the number of smaller bits I needed to stick on to cover
gaps. The silver foil went on the corrugated panels on each side of several
modules, following the instruction sheet's suggestion. Pictures show these are
actually white, too, but we've had that discussion. Standard kitchen al-foil
went on nicely here, although it keeps falling off in Beijing's dry air. I
rubbed the foil in with cotton buds to get it to hug the corrugated surface.
| CONCLUSIONS |
 A fun kit of a cool subject. I won't be building the International Space Station
any time soon - it's enormous. But the Mir is a good size and makes an
interesting shelf or desktop model. With a lot of patience and skill, a
scratchbuilder could use this as the basis for a remarkable model. But with
basic skills anyone can enjoy a straightforward build of Mir, the "little space
station that could".
A fun kit of a cool subject. I won't be building the International Space Station
any time soon - it's enormous. But the Mir is a good size and makes an
interesting shelf or desktop model. With a lot of patience and skill, a
scratchbuilder could use this as the basis for a remarkable model. But with
basic skills anyone can enjoy a straightforward build of Mir, the "little space
station that could".
| REFERENCES |
The internet, and
http://eol.jsc.nasa.gov
March 2008
Copyright ModelingMadness.com
If you would like your product reviewed fairly and quickly, please contact the editor or see other details in the Note to Contributors.