Anigrand 1/72 'MiG-31 Firefox'
|
KIT #: |
AA-6014 |
|
PRICE: |
$78,00 |
|
DECALS: |
A bunch of red stars |
|
REVIEWER: |
Peter Burstow |
|
NOTES: |
Short run resin kit
|
Co-starring
in the 1982 Clint Eastwood film 'Firefox' was the “Mig-31” stealth fighter.
Based on the novel of the same name by Craig Thomas, it is described as an
action film, but probably more a comedy, at least for an aircraft nut. The mock
up aircraft was quite impressive, obviously a lot of work went in to building
it, allegedly from a radio tower.
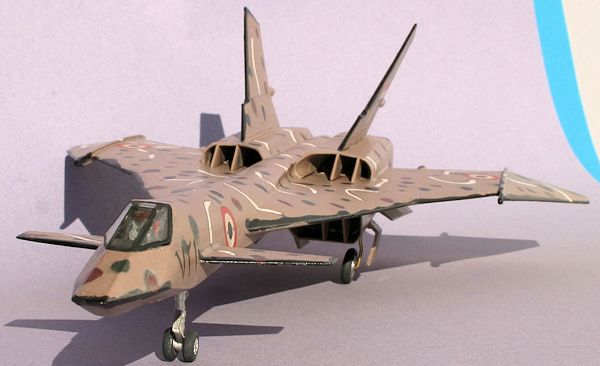
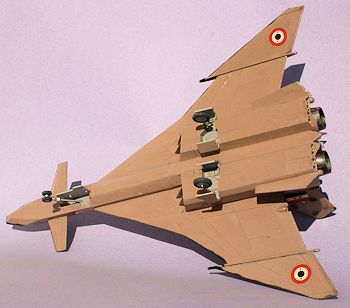
The
aircraft is delta winged, with small canard fore-planes, and truly massive twin
fins, apparently inspired by the XB-70. The nose section is faceted like a
F-117, blending smoothly into the curved main fuselage.
Being a
fan of aircraft movies, I was tempted by Anigrand's release of this kit in their
Sci-Fi Dynamics series. Definitely a potential wiffer, and a good “er.. what's
that?” for the display case.
 Coming
in Anigrand's usual top opening box, there are around 40 resin parts including a
clear resin canopy, enclosed in a segmented bag. Moulded in a custard coloured
resin, the first thing that strikes when opening the bags is the smell. There is
a lot of resin in this kit, the box being packed full. The model is not small,
the box describes the length as 10½ inches. There is a spare tailpipe included,
not sure why.
Coming
in Anigrand's usual top opening box, there are around 40 resin parts including a
clear resin canopy, enclosed in a segmented bag. Moulded in a custard coloured
resin, the first thing that strikes when opening the bags is the smell. There is
a lot of resin in this kit, the box being packed full. The model is not small,
the box describes the length as 10½ inches. There is a spare tailpipe included,
not sure why.
The
parts have a slightly rough surface finish, and there is some fine line
detailing. A small amount of flash is present, and there are a few bubbles that
need repaired.
The resin canopy, coming in a separate zip
bag, is clear and has well defined framing lines. It also has a few distortions
and ripples, but certainly is usable.
The
decal sheet has 14 white outlined red stars of various sizes, so a good addition
to the spares stash. The
instructions consist of three photos of sub-assemblies from various angles, and
a painting and decalling guide. There is no construction guide.
Oh, and
the smell, seems to me to be just like the construction adhesive 'Liquid Nails',
not much like the normal resin smell. Maybe Anigrand are tinkering with the
resin brew.
Started as usual
for resin kits, removal of pouring lugs and flash and a wash in soapy water to
remove any release agent. Next step was a dry fit of the complicated fuselage,
wing centre section and engine nacelle assembly. It was not at all clear where
the various parts went. I numbered each joint as I went, and eventually figured
it all out. The instructions were only of limited help here.
 The cockpit tub
is moulded into the top front fuselage part, and has just a seat and control
column. I left these bits for the final construction phase. There is a cavity
moulded just behind the cockpit, which I packed with lead, as this looked to be
a bad tail-sitter, with most of the wing, engine nacelles and those massive fins
behind the main gear. I also managed to cram a wheel balance weight in the
cavity between the wing leading edge and the lower fuselage. It turned out to be
enough weight as the balance point of the completed kit is about 1 cm ahead of
the main gear.
The cockpit tub
is moulded into the top front fuselage part, and has just a seat and control
column. I left these bits for the final construction phase. There is a cavity
moulded just behind the cockpit, which I packed with lead, as this looked to be
a bad tail-sitter, with most of the wing, engine nacelles and those massive fins
behind the main gear. I also managed to cram a wheel balance weight in the
cavity between the wing leading edge and the lower fuselage. It turned out to be
enough weight as the balance point of the completed kit is about 1 cm ahead of
the main gear.
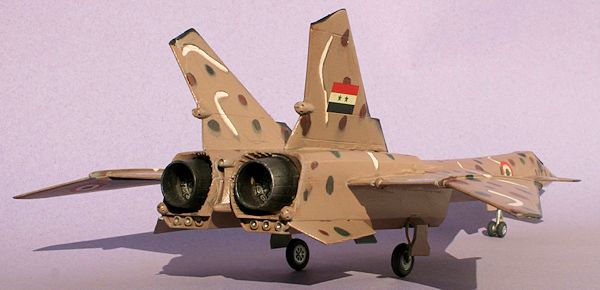
The fuselage
assembly went together well, with the only fit problem being inside the
nacelles. I had to grind out a channel for the compressor faces and the
tailpipes to get the nacelle to close up. I painted the inside of the intakes
aluminium, and the compressor faces iron, using Mr. Metal Colour, part way
through the construction as there was no way I could get at this area once it
was closed up.
At this point I had a fill and sand
session. Most joints had small gaps which were filled with superglue, and there
were some steps between parts that needed sanding flush. I then went over the
joints with Mr Surfacer, and tidied up a few places. I also repaired a few
bubbles, and a divot on the wing centre section.
Next step was adding the flying
surfaces, outer wings, fins, fore-planes and ventral fins. These all had lugs to
match moulded holes in the fuselage, not a great success, the lugs were not cast
well, and some were not aligned correctly. Still it was an attempt to improve on
the usual resin butt joint. There were some gaps that I filled with a bead of
superglue, and a small step on the wings which needed sanding. I
then added the under-fuselage cannon and cannon bay, another gap to fill and
sand, then it was ready to paint.
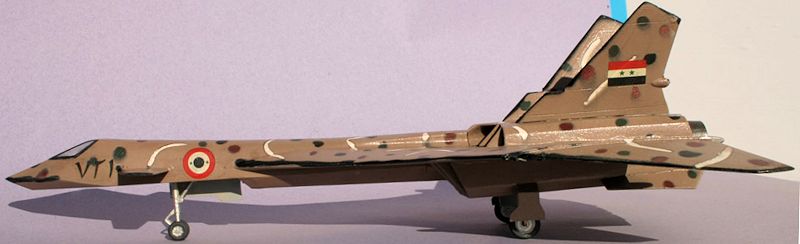
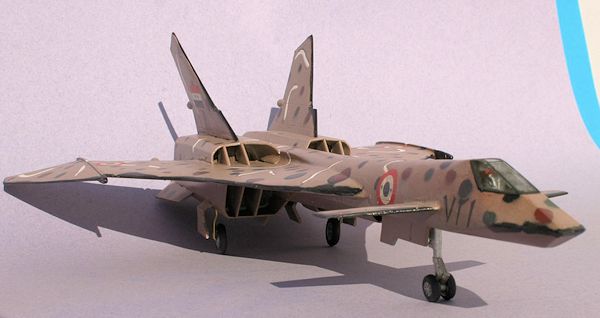
Looking through
the spare decals, I found some Syrian markings, from a Hasegawa MiG 21. The
Hasegawa instructions called them Egyptian, but they have the two green stars of
Syria. I decided on an overall tan, with random squiggles and patches of white,
green,
 red and black on the upper surfaces, picking up the colours of the
roundels and fin flash.
red and black on the upper surfaces, picking up the colours of the
roundels and fin flash.
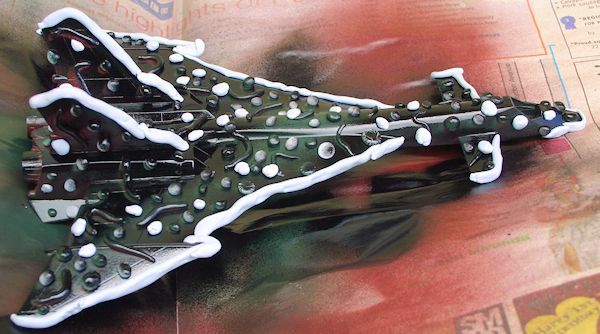
I sprayed
overall white, then added a lot of blue-tack sausages, then, red, some blue-tack
balls, then green and more balls, then black along the leading edges. I covered
the leading edges with a long ribbons of blue-tack, and added a few more balls.
Finally an overall coat of tan. I used about half a packet of blue-tack on this
model.
The
problem I have with complicated paint schemes, with days of masking and spraying
is doubts whether it will work, so it was with much anticipation I started
removing the layers of masking to reveal the final result. I then added the
Syrian roundels and fin flashes, and some Arabic numbers to the nose. Then an
overall coat of floor polish to seal the decals.
The
topcoat crackled in patches, so I took advantage and gave it a wash with a very
diluted red-brown paint, three or four drops of paint in a puddle of floor
polish, to highlight the cracks. Then a wash of light grey to dull it all down a
little. Umm... judge for yourself from the photos, it is different.
Then a coat of Mr. Hobby satin topcoat.
 Time for
the cockpit, nearly the last step. Painted it overall dark grey, then added a
seat and control stick. Picked out a few highlights in silver. The seat supplied
looked like a WW2 fighter seat, so I shoe-horned in a resin ejector seat from
the reject resin pile, it was badly bubbled and under cast. Can't see much of it
through the closed canopy. I didn't think the resin U/C would hold up the weight
for long, a few hot days (hit 47C here last summer) and it would sag, so I
replaced the main legs with brass tube, the nosewheel leg was much thicker so I
kept it. Added the canopy and wheels and it was done.
Time for
the cockpit, nearly the last step. Painted it overall dark grey, then added a
seat and control stick. Picked out a few highlights in silver. The seat supplied
looked like a WW2 fighter seat, so I shoe-horned in a resin ejector seat from
the reject resin pile, it was badly bubbled and under cast. Can't see much of it
through the closed canopy. I didn't think the resin U/C would hold up the weight
for long, a few hot days (hit 47C here last summer) and it would sag, so I
replaced the main legs with brass tube, the nosewheel leg was much thicker so I
kept it. Added the canopy and wheels and it was done.
 Something
different, a long way from my usual WW2 and earlier subjects, a bit of fun. It
was an easy build for a resin kit, needing less than usual parts clean-up, good
parts fit, and only a little filling and sanding. Still not sure about the paint
job, maybe it will grow on me, for the moment it's going to the back of the
display case.
Something
different, a long way from my usual WW2 and earlier subjects, a bit of fun. It
was an easy build for a resin kit, needing less than usual parts clean-up, good
parts fit, and only a little filling and sanding. Still not sure about the paint
job, maybe it will grow on me, for the moment it's going to the back of the
display case.
Recommended
for all but beginners, due to the lack of assembly instructions.
http://en.wikipedia.org/wiki/Firefox_%28film%29
Peter
Burstow
May 2013
If you would like your product reviewed fairly and fairly quickly, please contact the editor or see other details in the
Note to
Contributors.
Back to the Main Page
Back to the Review
Index Page