
| KIT #: | 64001 |
| PRICE: | $129.99 SRP |
| DECALS: | 7 vehicles and two personnel |
| REVIEWER: | Greg Ewald |
| NOTES: | Not an easy build, but an interesting one. Quite large, and difficult to display |
| HISTORY |
800 or so years in the future, mankind is once again at war. Jeez, now there is
a big surprise.
The human race that left the war torn and nuked planet Terra have returned to
find out that everything did much better without us, and it has turned into a
paradise. Hey, let’s blow it up again!
 The Seed Colonists have managed to make nice shelters and a decent place to
live, so of course the hideous corporations that run the outer worlds that have
been colonized decide to invade and control the planet.
The Seed Colonists have managed to make nice shelters and a decent place to
live, so of course the hideous corporations that run the outer worlds that have
been colonized decide to invade and control the planet.
Anti-gravity fighters like the Falke are fast moving attack craft that can take
out smaller mechanical units with guns, and scout out any enemy movement. Using
neurohelmet technology, the pilots can see in three dimensions, even behind a
solid steel canopy. Neato !
It seemed like a small leap to create a “Hello Kitty” squadron for me. I like pink, and I am sure some of the mercenary units even 800 years in the future would remember HK ! Hey, there are more than three different versions of this futuristic timeline, a confusing “history” for sure.
| THE KIT |
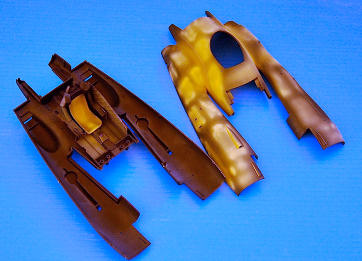
The main kit is molded in a rather thick, but well detailed, styrene. The
attachment points are extremely fat, so you will need a pair of clippers. I
broke a number 11 blade trying to cut off the main upper fuselage from the
sprue. My micro shear blades bent on some of the sprues.
The boxing is superb, as are the detailed colour profiles for the different
fighters. The instructions are so-so, reminding me of the new R.O.G. newsprint
stuff.
The decals are in perfect register, though rather thin and brittle. (For a slightly more detailed look at the kit and its parts, visit the preview. Ed).
| CONSTRUCTION |
 Much like a typical plane kit, you start with the pit. I recommend painting the
side panels and what not prior to gluing it all together, as it is rather
cramped. At this time, I also primed the entire kit in flat black.
Much like a typical plane kit, you start with the pit. I recommend painting the
side panels and what not prior to gluing it all together, as it is rather
cramped. At this time, I also primed the entire kit in flat black.
The Figures: You get a pilot and a
ground crew (Midwestern female) figure with the kit. The casting is marginal,
and each one takes quite a bit of time to assemble. Don’t use them if you aren’t
happy working
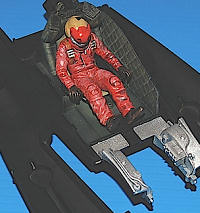 with putty ! If you are going to build them, do the pilot right
away, as you have to get the figure
in the cockpit seat prior to attaching the fuselage halves together.
with putty ! If you are going to build them, do the pilot right
away, as you have to get the figure
in the cockpit seat prior to attaching the fuselage halves together.
When it comes to painting the figures, I went with alkyd water based paints.
These dry slowly, and it is easy to blend in highlights. You can get them from
any art supply store, and are often called “water based oils”…sort of like being
called a “nazi-communist”.
I painted my two feminine warriors in a mixture of burnt sienna, pink, and of course, flesh. Once you get past the big hips and the amount of putty, they turn out rather nicely.
The Fuselage: I did all of the
interior painting in black with a drybrush of silver and light olive green prior
to putting the whole thing together. The engine is really a thing of beauty.
This will need to be completely painted
before the main halves are attached. I sprayed mine with Krylon chrome, and once
that was cured, a light wash of oil based wood stain was ragged on, giving it a
look of over-heated metal.
 Be sure to apply the decals to the dashboard before
you get all excited and put the
craft halves together. I still don’t understand why they have dials when the
pilot is wearing some sort of a neurohelmet/virtual reality thing, but the
decals are really nice. Put a drop of Future on each one for a nice “glass”
effect.
Be sure to apply the decals to the dashboard before
you get all excited and put the
craft halves together. I still don’t understand why they have dials when the
pilot is wearing some sort of a neurohelmet/virtual reality thing, but the
decals are really nice. Put a drop of Future on each one for a nice “glass”
effect.
There are a whole slew of odds and ends that get attached to upper and bottom
fuselage before you rubber band and tape them in place. Clamps won’t work too
well on the complex curves of the engines. I left off the smaller outside parts
for right now, as I could see some PSR in my future.
The fuselage halves on my sample didn’t mate up too well, sort of in an Airfix
fashion. I applied body putty to the main seams, and began the process of
sanding, drying, re-applying, etc. You know the drill.
Do not ignore the two main seamlines, they are very obvious on the
finished model if you don’t fill them completely.
The mini-gun is absolutely fantastic, I’d leave it off until you get the base
painting done, though, unless you really like masking.
With the lines all nice and smooth as a baby’s rump, let’s move on to the fun part-
| COLORS & MARKINGS |
Beautiful schematics are included for 7 different craft. I ignored them, of
course, because the “Hello Kitty” squadron wasn’t on the list. Everything that
was not to be pink was masked off with wet tissue paper, and set aside to dry
overnight. If you have ever t.p.’d a neighbor’s house as a kid, you know how
tough that stuff is when it dries. It also sticks to odd complex curves, which
this 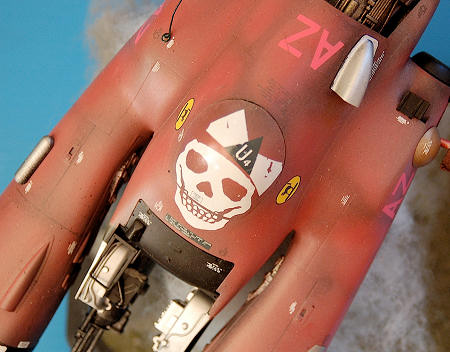 kit is full of.
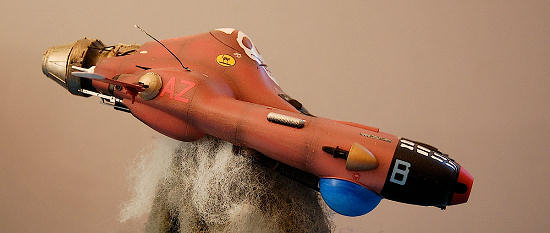
Since I had painted the whole craft black, it was easy to start building up the
layers of pink. I don’t spray just one mix of red and white, but prefer to
separate the panels with different shades. Tan makes a great addition to the
mix. I didn’t want whole ship to look like a blob of Pepto-Bismol, so some of
the additions were done in chrome and black. Shiny Hello Kitty Goodness !
The anti-gravity ping pong balls were painted bright blue, of course. I
don’t think I need to explain that one.
A clear coat of floor finish was applied, and once that was dry, the myriad
amount of decals began to go on. I used a modified design of JG’s 5 “Ghost”,
with the skull and fingers. Redoing
the white decals to make a HK “Death Princess” fighter. Hey, I figured with
Hello Kitty being the official tourism ambassador for Japan, Hasegawa wouldn’t
mind.
J
The decals are very thin and brittle. Micro-Sol ate them apart, so just make
sure you have a good base coat of clear on the Falke before you apply them. A
clear satin finish was sprayed on after they had dried, and there was absolutely
no silvering.
No whip antennae is included, so I made one out of some wire, twisting the base around a toothpick to make a nice little swirl. Just glue it over the little nipple to the starboard of the cockpit.
| FINAL CONSTRUCTION |
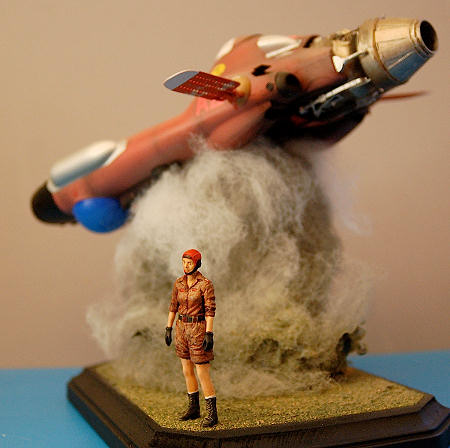
One of the biggest flaws with the
kit is the lack of any sort of base or platform to display it on. Since it is an
anti-gravity craft, there would be no landing gear, of course. For the price,
y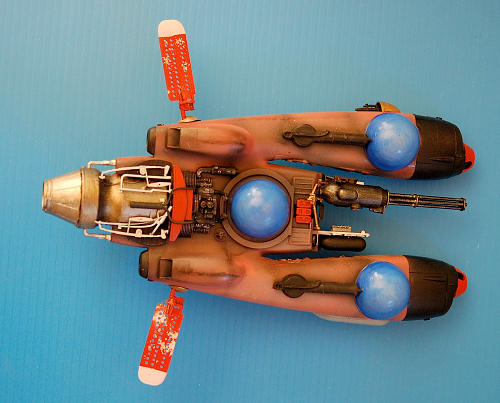 ou think they would have included an anti-gravity base.
I used a piece of abs pipe, mounted into a wooden base, that fit just around the
middle blue ball. This way, I can take the kit wherever easily, or repose it as
necessary. Aquarium filter floss
was wrapped around the pipe, and held in place with some white glue and a spritz
of my wife’s hairspray. I figured that the dust from the initial take-off would
swirl about the main AG pod. Some
Woodland Scenics railroad grass was applied to the black base, and then my
lovely assistant/ LT. was glued on, looking away as the Falke goes off on
another deadly mission.
| CONCLUSIONS |
Hasegawa’s newest sci-fi offering is
certainly interesting, and fills a gap in the Maschinen Krieger modeling
universe.
Other than the high price tag and the so-so figures, it is a great kit.
| REFERENCES |
The original kitbash:
and a wiki
article:
September 2009
Thanks to www.dragonmodelsusa.com for providing the review kit. Get yours at your local shop or on-line retailer.
If you would like your product reviewed fairly and quickly, please contact me or see other details in the Note to Contributors.