Pegasus 1/32 Hunter-Killer Aerial
| KIT #: | 9016 |
| PRICE: | $39.99 SRP |
| DECALS: | None |
| REVIEWER: | Dan Lee |
| NOTES: | This build was used as a test of Vallejuo Metal Colors. |
| HISTORY |
“Listen, and understand! That Terminator is out there! It can't be bargained with, it can't be reasoned with, it doesn't feel pity, or remorse, or fear, and it absolutely will not stop, ever, until you are dead.”
-Kyle Reese
 In 1984, the Terminator a
low budget SF movie by director James Cameron about future time travellers and
one crazed human hating computer network known as Skynet trying to change the
future by killing the past made its debut. It starred the future Cali-fonya
Governor Arnold Schwarzenegger as the Terminator (the second choice was
remorseless killer and hall of fame running back, OJ Simpson) as well as future
James Cameron ex-wife Linda Hamilton as Sarah Connor and Michael Biehn as the
quoted future soldier/love interest Kyle Reese. The story borrowed time travel
elements from two Outer Limits episodes (“Soldier” and “Demon With a Glass
Hand”) written by Harlan Ellison. It became a hit and spawned a great sequel but
then devolved into a series of increasingly worse sequels that reached its nadir
in what I can only describe as a brain damaged Benny Hill/Scooby Doo inspired
waste of time (watched mostly on fast forward) “Terminator Genisys.”
In 1984, the Terminator a
low budget SF movie by director James Cameron about future time travellers and
one crazed human hating computer network known as Skynet trying to change the
future by killing the past made its debut. It starred the future Cali-fonya
Governor Arnold Schwarzenegger as the Terminator (the second choice was
remorseless killer and hall of fame running back, OJ Simpson) as well as future
James Cameron ex-wife Linda Hamilton as Sarah Connor and Michael Biehn as the
quoted future soldier/love interest Kyle Reese. The story borrowed time travel
elements from two Outer Limits episodes (“Soldier” and “Demon With a Glass
Hand”) written by Harlan Ellison. It became a hit and spawned a great sequel but
then devolved into a series of increasingly worse sequels that reached its nadir
in what I can only describe as a brain damaged Benny Hill/Scooby Doo inspired
waste of time (watched mostly on fast forward) “Terminator Genisys.”
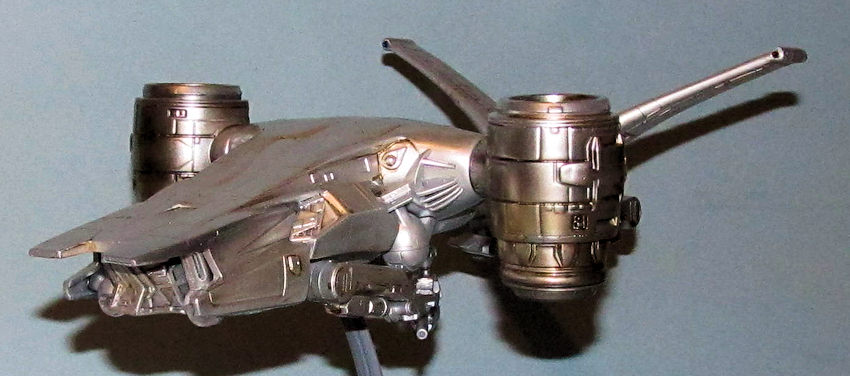
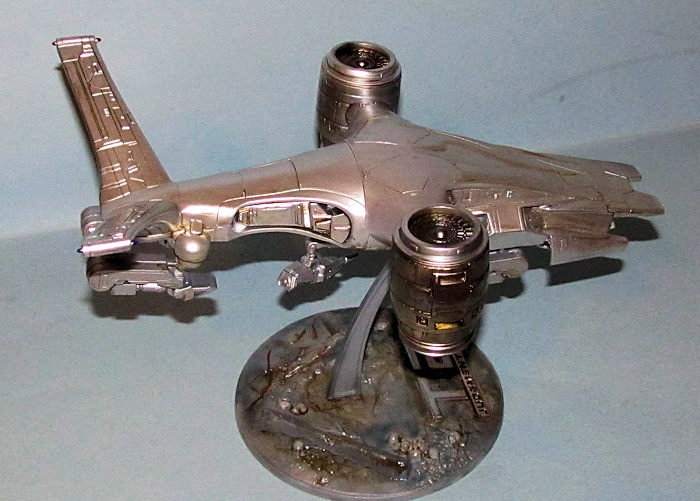
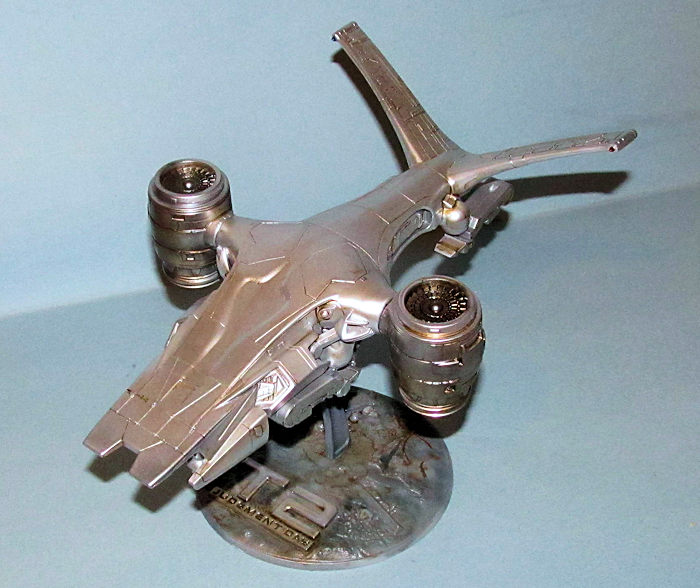
The HK (Hunter Killer) Aerial was designed by Skynet to be an AI controlled, multi sensor, nuclear powered VTOL drone capable of flying air to air and air to ground missions against mostly human targets. It is armed with a very powerful plasma cannon that can be used against both aerial and ground based targets. The HK Aerial provides Skynet with the ability to control the air and provide air to ground and air to air support for its Terminator cyborg units. This version was shown in some background scenes in T2: Judgement Day and variations of the HK Aerial appeared in later sequels.
| THE KIT |
 The Terminator didn’t
exactly capture the imagination of model companies like other SF properties. For
the longest time, the only models based on elements from the series were rather
expensive and short run garage kits.
The Terminator didn’t
exactly capture the imagination of model companies like other SF properties. For
the longest time, the only models based on elements from the series were rather
expensive and short run garage kits.
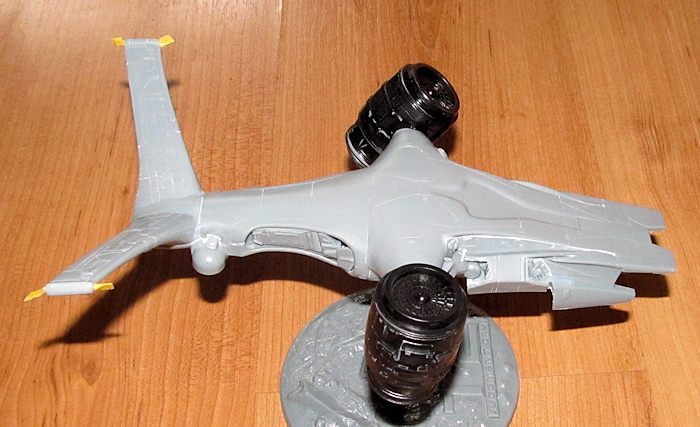
In 2013 Pegasus released three Terminator based kits including the 1/32 Terminator HK Aerial. It consists of several sprues of grey plastic parts and one clear sprue for a total of 72 parts including the stand (which is a representation of the Terminator’s bleak landscape.) The parts are free of flash and have a decent amount of detail. Like most drone kits, it is not that complicated as there is no cockpit or interior to worry about.
Also included is a nice instruction sheet and some hints and tips on how to build/finish it.
| CONSTRUCTION |
The instructions recommend that you use Tamiya Extra Thin Cement as the ABS based plastic used to make the kit parts has been noted to not respond well to other cements which is not a problem for me as I use Extra Thin Cement as my main glue.
 I followed the
instructions. The main fuselage and engine pods were put together without major
issue (although I left off the exhaust and intake parts.) The fuselage inserts
did not have the most snug fit and had gaps that required filler. I used Vallejo
plastic putty to fill those gaps without the headache of sanding. The excess was
removed with damp Q-Tips. It was at this point I left the model in the box to
allow the glue to outgas and eliminate the dreaded phantom seam.
I followed the
instructions. The main fuselage and engine pods were put together without major
issue (although I left off the exhaust and intake parts.) The fuselage inserts
did not have the most snug fit and had gaps that required filler. I used Vallejo
plastic putty to fill those gaps without the headache of sanding. The excess was
removed with damp Q-Tips. It was at this point I left the model in the box to
allow the glue to outgas and eliminate the dreaded phantom seam.
Fast forward several months later when the several gaps in the fuselage around the engine mounts and the engine pods were filled with CA glue and sanded smooth then polished with finer grades of sanding cloths (3200-8000 grit.) Any details/seams were replaced using Exacto blades and wood carving tools. Once the engine pod seams were filled, the intake and exhaust inserts were glued on.
The main plasma gun has a
lot of detail which made for some tricky seams to deal with. Instead of doing
 some really difficult filling/sanding that would have destroyed a lot of the
nice detail, I simply cut some appropriately sized 5 thou thick plastic card and
strip and glued them over the seams. Easy to do without the headache of
replacing detail. This is something I wish I had figured out sooner when I
flashback to the headaches caused by replacing sanded away detail in awkward
places. I broke the weak plastic swivel and had to drill it out. It was replaced
with a cut piece of aluminium tubing held in place with dabs of CA glue.
some really difficult filling/sanding that would have destroyed a lot of the
nice detail, I simply cut some appropriately sized 5 thou thick plastic card and
strip and glued them over the seams. Easy to do without the headache of
replacing detail. This is something I wish I had figured out sooner when I
flashback to the headaches caused by replacing sanded away detail in awkward
places. I broke the weak plastic swivel and had to drill it out. It was replaced
with a cut piece of aluminium tubing held in place with dabs of CA glue.
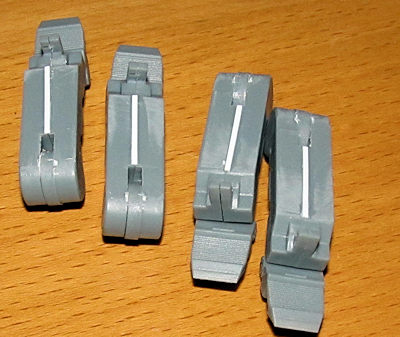
The forward landing legs didn't have the best fit because the attachment pin nearest the landing foot/pad is too long and needs to be trimmed a few millimeters so the landing legs can go together without a large seam. There were some ejection marks on the landing feet and guns that needed to be filled and sanded. Not a big deal, but annoying. I took care of the landing leg bottom seams with some CA glue and used cut plastic card and strip to deal with the rest.
Drilled out the main plasma gun barrel as well as the smaller twin rear projections (plasma guns? I have no idea) to provide some depth/detail.
| COLORS & MARKINGS |
I tried the Vallejo metal color in a small part of another build. It seemed to be okay and would try it for a much larger one.
The one thing I do not like
about this system is that the primer is not easy to polish smooth. I had let the
primer coat cure for over two days before polishing and the primer still came
off in patches and did not polish easily. I ended up having to prime it with
Tamiya Fine Grey Surface primer then prime it again with
 the Vallejo black
primer and then polish both coats smooth using various grades of fine grit
polishing cloths (3000-12000 grit.) Once cleaned off and dried, I sprayed on the
Vallejo White Aluminium which went on without any issues and looked pretty good.
Next time I am going to try Vallejo Metal Colors with an acrylic black paint I
know can be polished like Tamiya Gloss Black to see how that works out.
the Vallejo black
primer and then polish both coats smooth using various grades of fine grit
polishing cloths (3000-12000 grit.) Once cleaned off and dried, I sprayed on the
Vallejo White Aluminium which went on without any issues and looked pretty good.
Next time I am going to try Vallejo Metal Colors with an acrylic black paint I
know can be polished like Tamiya Gloss Black to see how that works out.
Aside from my own issues with the primer, I actually do like the Vallejo Metal Color and I think it is a decent alternative for those who don't want to use Enamel or Lacquer metal paints. The metal paint did polish better than the black primer did but I am not sure if it is due to the grey lacquer primer or the black primer but you still have to be gentle when polishing it or the paint will strip with too much force.
The engines were sprayed with various shades of Vallejo Metal Color and Ammo Mig Gold paint to give them a good subtle effect of heat discoloration. I used some heat ruined pots as a color guide so something good came from a former housemate's boneheaded cooking mishaps.
Decals? Ha!
I hand painted the formation lights as per the instruction color callouts.
Weathering was done with a
thin brown watercolo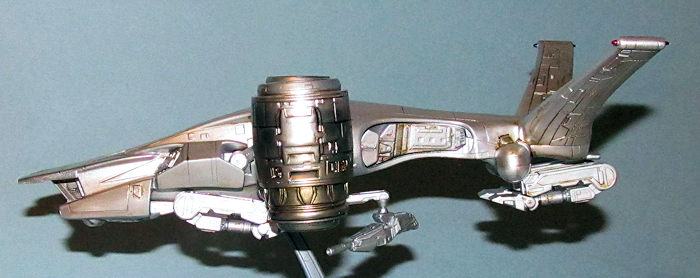 r paint with the excess wiped away using damp Q-Tips. A
final coat of Pledge aka Future was laid down to seal everything in and that was
it for painting the HK.
r paint with the excess wiped away using damp Q-Tips. A
final coat of Pledge aka Future was laid down to seal everything in and that was
it for painting the HK.
I primed the stand using Tamiya Fine Grey primer straight out of the can. The lettering was sprayed with Vallejo Black Primer. Once dry it was polished and then sprayed with Vallejo White Aluminium. I masked the lettering off and I then sprayed on various shades of grey to provide a base color.
Next I dry brushed various shades of paint to highlight the details ranging. The human skulls were brush painted with FS36622 while the cables were painted burnt sienna for the rust. I then used Tamiya Panel Wash and brown watercolor paint to provide depth to the detail and the lettering (much easier to do than try to paint it.) Everything was sealed in with a flat coat and gloss coat for the lettering.
The landing feet and main plasma gun were glued on and the engine pods were inserted into the rotating swivels. Finally the completed HK was mounted on the painted stand. That is all.
| CONCLUSIONS |
The Pegasus HK is a decent mostly vice free kit from a once decent movie franchise. It certainly looks the part of a killer drone. Makes for a nice test bed to try out NMF techniques if you have been afraid to try a NMF model.
Note: I like the moveable swivelling engines which make the kit a fun toy (shhhhh!)
26 September Copyright ModelingMadness.com If you would like your product reviewed fairly and
fairly quickly, please
contact
the editor
or see other details in the
Note to
Contributors.