Lindberg 1/200 Mars Probe
| KIT #: | 91003 |
| PRICE: | $24.95 SRP |
| DECALS: | One option |
| REVIEWER: | Dan Lee |
| NOTES: | Re-issue |
| HISTORY |
 In the
early 50s, many artists drew up what they thought a rocket should look like
based on designs from Werner Von Braun and Eugene Sanger among others.
The rockets seemed to based on the style of 50s cars,
lots of fins and curves.
As it turned out, the rocket designs of the 50s were
impractical as the large fins on rockets proved to be as useless as they were on
cars.
Still these rockets gave folks a starting point and ignited the space
bound dreams of many.
In the
early 50s, many artists drew up what they thought a rocket should look like
based on designs from Werner Von Braun and Eugene Sanger among others.
The rockets seemed to based on the style of 50s cars,
lots of fins and curves.
As it turned out, the rocket designs of the 50s were
impractical as the large fins on rockets proved to be as useless as they were on
cars.
Still these rockets gave folks a starting point and ignited the space
bound dreams of many.
In the mid 50s Lindberg put out a series of kits based on these designs. Some of those kits were reissued in the mid 70s (which is when I built a couple of them.) In late 2008, these kits were reissued by the “new” Lindberg as part of the company’s re-emergence along with several Hawk models.
| THE KIT |
This particular kit has been around for
a very long time so don’t expect 21st century quality for 50+ year old molds.
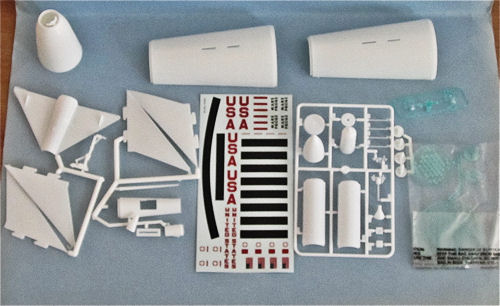
The kit comes with three sprues of parts (2 white and
one a clear green) as well as the booster stage halves and the 2nd stage piece
(under 40 pieces.)
All the parts have significant flash and need lots of
clean up.
Based on my own memories of building these kits, expect that some
of your parts will be warped and the fit will not be good (the fins and and
booster stage halves were warped in my issue of the kit.)
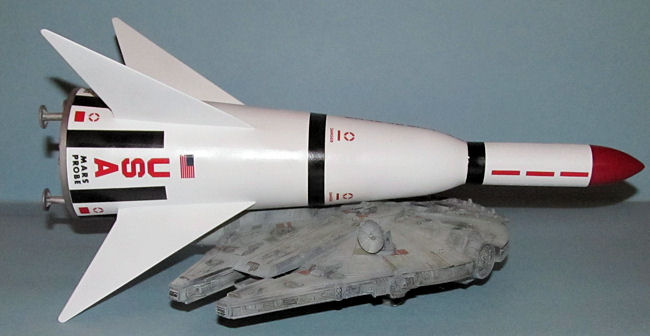
Also included is the space shuttle, but
there is no mention of these parts in the instructions.
If you are so inclined you could build it and swap it in
for the communications satellite 3rd stage.
However, it should be noted that it does not have the
best fit.
The parts all have raised detail which
looks good, but highly improbable as the rivets would be around one scale foot
in diameter (if the 1/200 scale is to be believed.)
Expect a lot of the detail to be lost in sanding.
| CONSTRUCTION |
 The
parts were washed and dried first.
Next I glued the booster and 3rd stages halves together,
but left the fins off the booster stage.
I filled the very large gaps with CA glue and Mr
Surfacer 500 and when fully cured I sanded them smooth (or so I thought) and
removed large sections of the raised detail.
I did rescribe the 3rd stage, but not the booster stage.
The
parts were washed and dried first.
Next I glued the booster and 3rd stages halves together,
but left the fins off the booster stage.
I filled the very large gaps with CA glue and Mr
Surfacer 500 and when fully cured I sanded them smooth (or so I thought) and
removed large sections of the raised detail.
I did rescribe the 3rd stage, but not the booster stage.
I had to bend and flatten out the
warped fins.
It isn’t perfect but it looks much better than the warped shape
they originally were in.
The fins were then glued in place.
I then glued together all the stages except the nose
cone and rocket nozzle plate because they were going to be different colors.
There were some obvious gaps that needed to be filled
and I used
At that time I declined to
assemble/paint the satellite or shuttle and just focus on building the rocket.
I may do so at a later date, but not right now.
| COLORS & MARKINGS |
 White
plastic is a pain in the rear to paint as I rediscovered that on this model.
I initially sprayed on Tamiya Fine White Primer from the
can and it covered up most of the sanding flaws I missed, but I could still sort
of see through the model.
When it was dry I sprayed on some flat white and gloss
white and I could still see through the model.
White
plastic is a pain in the rear to paint as I rediscovered that on this model.
I initially sprayed on Tamiya Fine White Primer from the
can and it covered up most of the sanding flaws I missed, but I could still sort
of see through the model.
When it was dry I sprayed on some flat white and gloss
white and I could still see through the model.
At this point I went to plan B and
sprayed the entire model Sky Grey.
It proved to be a solid enough color.
Unfortunately, this is when I noticed that I had a very
prominent bump/ridge along a seam on the booster stage that I needed to fix.
I carefully sanded the area till the ridge disappeared.
The area was polished and then the entire model was
sprayed again with Tamiya fine white primer.
Let it dry overnight and then sprayed on a thin coat of
gloss white paint to provide a smooth surface for the decals.
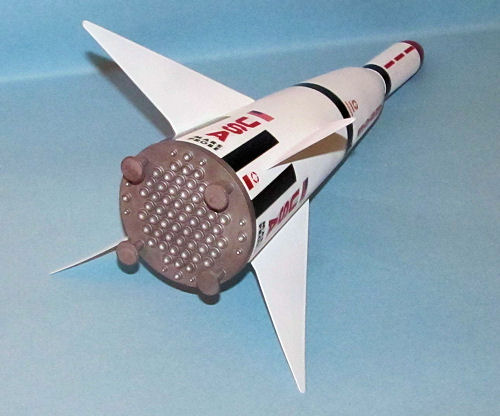
The clear booster stage rocket nozzles
and landing gear were sprayed Tamiya XF-56 metallic grey while the nose cone was
sprayed first with Tamiya Italian Red (which wasn’t a uniform color to my
dismay) and then with Gunze Insignia Red.
The decals went on without too much
trouble with the exception of the black band that was used at the top of the
booster stage.
I used some Microset to allow the decals to snuggle to the
details.
The model was wiped
down and sprayed with the last of my Xtracrylix Satin Coat.
The Mars Probe nose cone and rocket nozzle were glued onto to the rest of the model.
| CONCLUSIONS |
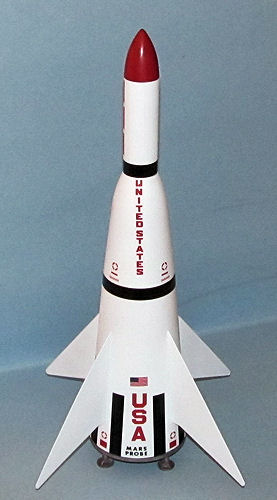
It was a fun trip down memory lane.
I really do like the early space age designs even though
they weren’t even close to the actual thing with those wild curvy designs and
big fins everywhere.
It is a very simple kit to build and worth the money.
A little bit of patience and a lot of sanding paper is
required to make a very nice model.
The one thing you have to remember about these kits is that they don’t have the greatest fit and that you are going to have to sacrifice the detail due to lots and lots of sanding/filling due to that awful fit.
October 2012
If you would like your product reviewed fairly and fairly quickly, please contact the editor or see other details in the Note to Contributors.