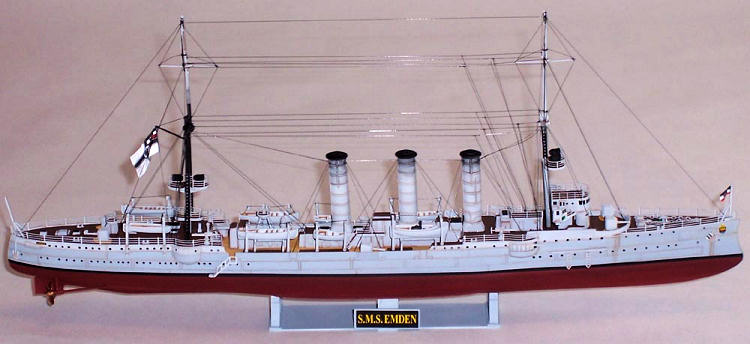
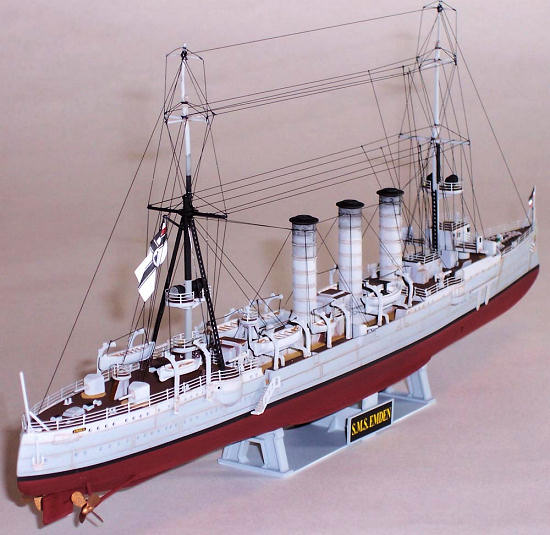
Revell 1/350 SMS Emden
|
KIT #: |
05041 |
|
PRICE: |
$12.50 MSRP |
|
DECALS: |
One
Option |
|
REVIEWER: |
Kyle Bodily |
|
NOTES: |
Deck Rails from Tom’s Model Works part #3501
3 RAIL SET |
.
To read about the history and the kit see the
in-box review
Before I begin I guess it is only fair
to tell you that the last ship that I built was a U-boat.
After seeing the movie (THE BOAT/Das Boot) in or
around 1983.
I guess that would be some 25 years ago,…..man I’m getting
old.
Anyway, I was researching the color
Silver-gray and found that the German Navy had been using Silver-gray for a long
time.
As I looked through all the reference material I could get
my hands on, I came across several ships of note.
The one that seemed to
 rise
above all the others that I read about was the S.M.S. Emden.
When I found that Revell of Germany was producing a
model of the Emden, well I just had to get it.
rise
above all the others that I read about was the S.M.S. Emden.
When I found that Revell of Germany was producing a
model of the Emden, well I just had to get it.
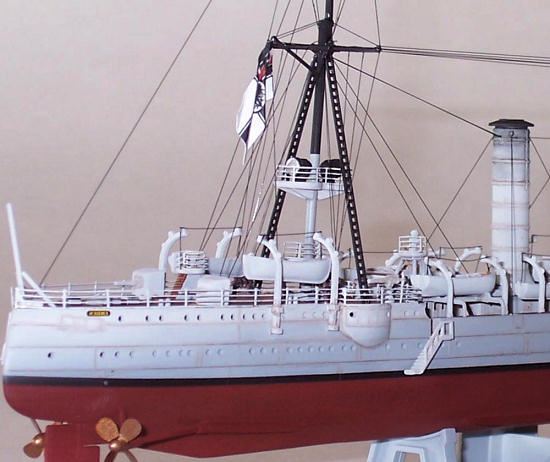
The kit is nicely detailed
and really well designed. so I built it straight out of the box.
The only thing I added was a set of deck rails from
Tom’s Model Works part #3501 3 RAIL SET.
For about $15.00 you get a lot of deck rails.
The set gives you enough photo-etched rails to do at
least three Emdens.
Well, step one starts with
building the deck and deck houses.
I painted as I went so at this point I painted the
center section tan and used oils to simulate the wood deck.
Then I painted the linoleum fore and aft decks
chocolate brown.
I masked everything that did not need to be gray and
painted all the vertical surfaces gray.
When I assembled the bridge I
cut off the molded on railings so I could put on PE railings later.
Next I assembled the deck guns and smokestacks.
The rest of the parts were cut off the trees and
cleaned up in prep for painting.
The hull is in four parts.
This was the only part that took a little time.
It went together well enough but it would have been
quicker to have the hulls in two parts as I said in the in-box review.
The kits initial release was as the Dresden and it
had four shaft turbine engines while the Emden had two shaft expansion engines.
So to do both kits, the Revell folks molded the
common parts and then mold unique parts to each individual ship.
The only exterior difference was the aft hull.
As I looked at it, there are
two ways to assemble the hull.
The first way would be to assemble the sides and
then glue them together.
The second way would be to assemble the main hull
first, then assemble the aft hull, and glue them together.
I decided to assemble the two main hull halves and
then I glued the aft hull halves together.
I let everything dry over night and in the morning I
assembled the aft hull to the main hull.
I decided to fill the two stand mounting holes at
this point.
I just didn’t like the look of a hull with holes.
These holes are important to mount the hull to the
stands so later I had to modify the stands so the ship wouldn’t roll on the
them.
 At this
point I painted everything and weathered all the parts.
At this
point I painted everything and weathered all the parts.
I wrapped the hull with parafilm so I would not
wear off the paint on the hull as I handled the model when I assembled
everything else.
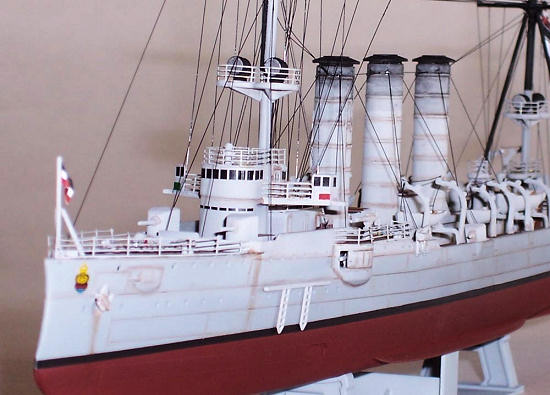
I glued the deck into the
hull and added the railing on everything that needed the railings.
I used three sizes of dowels to mold the curves and
tweezers to make corners.
Basically I used super glue to attach the railings.
I started by gluing a 6mm or ¼’’ portion of the
railing to the deck after it set I glued the next section to the deck and
something like a zipper I got the whole length of deck rail on.
It took less then one afternoon to put railings on
the entire ship and crows nests.
I assembled the masts and
along with the bridge and smokestacks glued them to the hull.
I let everything dry overnight and rigged.
Nothing special here I used 2lbs fishing line for
the rigging and anchored the line with super glue.
I used the rigging diagram in the instructions and I
got a picture of the Emden from the Internet for reference.
This process took two days not because of any other
reason but to let the super glue thoroughly dry before moving on.
I would do a few lines then do some work around the
house then do a few more lines until the ship was rigged
Now I added the deck guns,
lifeboat davits and other detail parts.
Lastly I added the lifeboats and the lines to the
davits.
All that’s left is to set it on the fireplace
mantle.
I painted the Emden in
wartime 1914 scheme.
At this time the Germans painted their ships in
Imperial German Paint scheme No.9
 Basically
the hull below the waterline was red brown a line of anthracite gray marked the
water line.
From the water line up to the main deck or weather deck was
dark gray. From the main deck to the tops of the masts was silver gray.
The top of the smokestacks and the middle of the aft
mast was jet black.
The Emden had linoleum fore and aft quarterdecks.
This was said to be a chocolate brown or red brown
color.
Any way I used the color chips to mix as close as possible
the colors to match and painted.
Basically
the hull below the waterline was red brown a line of anthracite gray marked the
water line.
From the water line up to the main deck or weather deck was
dark gray. From the main deck to the tops of the masts was silver gray.
The top of the smokestacks and the middle of the aft
mast was jet black.
The Emden had linoleum fore and aft quarterdecks.
This was said to be a chocolate brown or red brown
color.
Any way I used the color chips to mix as close as possible
the colors to match and painted.
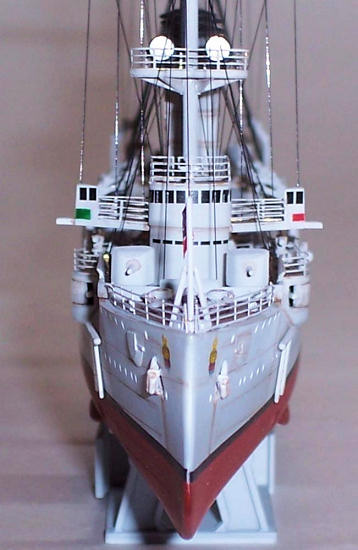
There are only four decals
for the kit. The two “City of Emden” bow crests, and on the stern two
nameplates.
Oh yea really difficult.
After the decals were on and
dried I weathered the kit.
I used the same technique that I use on airplanes
and I think it worked out well.
Basically it’s just washes of different colors of
grime, rust and soot.
I like to use a wash that is about as thin as
possible.
I add just enough color to the wash to be barely seen and
then apply it in coats.
In other words I add as many layers or coats of wash
as I need to achieve the darkness/shade of color I want
For the Imperial German Flag,
I used the paper flags, as I thought the decal flag looked a little too large to
me.
Basically I just cut it out and used white glue to glue the
two halves together.
Before it had dried I bent and folded it until I
liked the way it looked.
After it dried I glued it to the flag line with
super glue.
That is about it
While I won’t stop building Aircraft kits, I
gotta tell ya.
This kit is great, from the artwork on the box and
researching the history, right up to putting on the last lifeboat.
The quality of molding and the ease of assembly make
this kit an excellent first ship build.
 This
would be an excellent out of the box built.
This
would be an excellent out of the box built.
I used the same techniques that I’ve
always use on my World War One aircraft builds and tried a few new things.
I was a little intimidated by the deck rails but
they turned out to be much easier then I had thought.
I think I was thinking of all the things that could
go wrong and I was psyching myself out.
Surprisingly they turned out to be so easy that in
the future I won’t hesitate to use PE deck rails to add a little detail to a
ship model.
In short this built was a
sure-fire cure for builder’s block, I picked up a few new techniques and I got
to do something that was new for me.
What more can you ask for.
Two big thumbs way up for the Revell of Germany
S.M.S. EMDEN.
 (The
First World War)
by Professor Hew Strachan, now on DVD and it can
also be seen as a ten part series on the Military Channel
(The
First World War)
by Professor Hew Strachan, now on DVD and it can
also be seen as a ten part series on the Military Channel
(The Last Cruise of the
Emden)
by Edwin P. Hoyt Lyons Press
(Last Gentleman-Of-War)
by R.K. Lochner. Naval Institute Press
(The
Kaiser's Pirates)
by John Walter. Naval Institute Press
A lot of looking and searches
on the Internet.
In fact more sites then I can remember.
Kyle Bodily
September 2008
Copyright ModelingMadness.com
This build was brought to you
courtesy of my wallet
If you would like your product reviewed fairly and quickly , please
contact
the editor or see other details in the
Note to
Contributors.
Back to the Main Page
Back to the Review
Index Page