Cottage Industries 1/72 CSS Hunley
| KIT #: | ? |
| PRICE: | $26.96 |
| DECALS: | None |
| REVIEWER: | Thomas Braden |
| NOTES: | Resin kit |
| HISTORY |
The C.S.S. Hunley was built in 1863 in an ingenious attempt to break the naval blockade of Charleston. Though an amazingly modern looking and – given the possibilities of the time and the builders - sound design the Hunley experienced considerable bad luck even before being used in earnest: The boat sank twice during test runs, taking with it 13 crewmen on the whole.
 The Hunley was
somewhere at the transition point from a snorkel equipped dive boat to a
true submarine. As far as research found out up to now it was capable of
diving below the length of its stopcock-equipped snorkels for up to two
hours. Depth was measured using a simple depth gauge while air quality may
have been surveyed by burning a special lantern similar to those used in
mines. The Hunley had a crew of 9, captain and 8 seated crew manually
working a crankshaft which drove the propeller.
The Hunley was
somewhere at the transition point from a snorkel equipped dive boat to a
true submarine. As far as research found out up to now it was capable of
diving below the length of its stopcock-equipped snorkels for up to two
hours. Depth was measured using a simple depth gauge while air quality may
have been surveyed by burning a special lantern similar to those used in
mines. The Hunley had a crew of 9, captain and 8 seated crew manually
working a crankshaft which drove the propeller.
There is still some lack of clarity as to how the stern rudder was exactly operated.
The sub’s armament
consisted of a spar torpedo, a simple system based on a remote controlled
explosive charge fixed to a spearhead; the latter was carried on the tip of
a rod which protruded from the vessel’s bow. After ramming the – preferably
wooden-hulled – target vessel at full speed the sub shifted to reverse, in
the process releasing the charge which now stuck to the target by the
spearhead. The only remaining connection to the submarine was the laniard
rope which after being extended to full length ignited the charge, in the
hope of critically damaging the ship’s hull. (A similar system was already
in 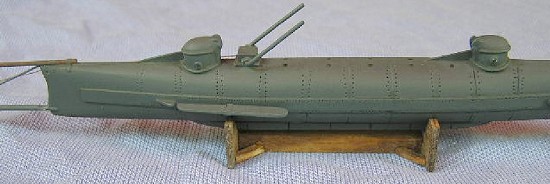 use at that time with small attack vessels that were the forerunners of
later torpedo boats). The drawbacks of this method are obvious, as the
attacker not only has to make intimate contact with the target first but
might still be uncomfortably close to the explosion when triggering the
charge.
use at that time with small attack vessels that were the forerunners of
later torpedo boats). The drawbacks of this method are obvious, as the
attacker not only has to make intimate contact with the target first but
might still be uncomfortably close to the explosion when triggering the
charge.
Eventually, the Hunley accomplished her mission on February 17, 1864 with amazing success, falling prey however herself to her somehow suicidal weapons technology. The blockading vessel U.S.S Housatonic, at that time the largest and most modern U.S ship, was sunk on this night and so was the Hunley.
Though the events that provided the background to this tragedy have now been history for roughly ten generations the underlying conflict is still capable of raising strong feelings, at least within the United States. Regardless of what one might think politically of the side the Hunley’s crew fought for one cannot but feel human respect for the audacity and courage of those 9 people who risked (and sacrificed) their lives in a visionary but untried concept.
More details and photographs can be found on these well made and very informative websites www.hunley.org, www.thehunley.com
| THE KIT |
The kit comes in a somewhat lightweight cardboard box with a nice cover picture showing the Hunley in ‘combat mode’. The instruction sheet looks a little home-made, reminding of the first resin kits of the 1980s but after a little studying it is quite clear and sufficient - for the experienced modeler, though.
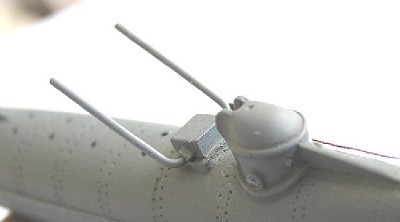
 The vessel’s body
is solid and has all major details such as the turrets cast on. The smaller
parts such as dive planes, wave breakers, propeller etc. are provided in
resin in acceptable quality. On the whole, the kit suffers from the casting
technique which is anything but up to date. Large sprue attachments need to
be sawed off from the hull while the small parts are attached to a resin
layer as thick as a plastic ruler. Brass wire and aluminum tube is
provided in a variety of diameters to manufacture the bracings. Tackling
this kit requires scratchbuilding abilities plus some “industrial strength”
tools, reminding of the Good Ol’ Days of ship modeling when kits consisted
of little more than wooden parts, wire and a paper with some flags printed
on it.
The vessel’s body
is solid and has all major details such as the turrets cast on. The smaller
parts such as dive planes, wave breakers, propeller etc. are provided in
resin in acceptable quality. On the whole, the kit suffers from the casting
technique which is anything but up to date. Large sprue attachments need to
be sawed off from the hull while the small parts are attached to a resin
layer as thick as a plastic ruler. Brass wire and aluminum tube is
provided in a variety of diameters to manufacture the bracings. Tackling
this kit requires scratchbuilding abilities plus some “industrial strength”
tools, reminding of the Good Ol’ Days of ship modeling when kits consisted
of little more than wooden parts, wire and a paper with some flags printed
on it.
In general the level of detail is alright considering how little concise details are known on the original. I found no major casting flaws except for a slightly rough surface with looked quite authentic after some light sanding.
| CONSTRUCTION |
After a lot of
heavy sawing and sanding on the hull and cleanup of the smaller parts I
decided to use only the key parts from the kit such as the drive and the
dive planes. The thick wave breakers were easily replaced by styrene sheet.
A major challenge was provided by the necessity to produce the charge-carrying spear and its bracing “scratch” from the provided wires, based only on a rough sketch giving little more than lengths (in inches, to make things worth for Continentals…).
As there is still
some discussion on the spar torpedo layout I decided to copy the design
shown on the box cover which to my mind combined efficiency with
simplicity. The braces holding the upper boom were scratchbuilt from
 quality Chinese Takeout aluminum sheet, with bolt heads made from thick
paint (PU glue would have been a viable alternative).
quality Chinese Takeout aluminum sheet, with bolt heads made from thick
paint (PU glue would have been a viable alternative).
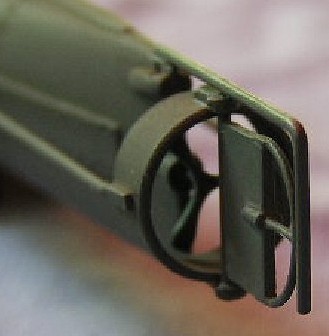
The stern rudder and propeller arrangement were built after some cursing and test fitting from the provided parts and wire using CA glue. For the snorkels I preferred brass tubing to the kit parts, which bent into proper shape with amazing ease.
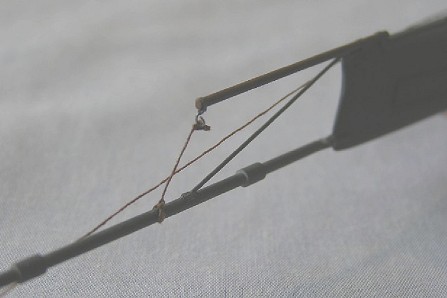
 The lanyard roll
was replaced by a scratchbuilt one as I found the kit part too much out of
center. For the rope I used brown silk sewing thread which I coated with
Liquid Decal Film to make all unruly fibers lay down, thus doing away very
nicely with the thread’s original rather “fuzzy” look.
The lanyard roll
was replaced by a scratchbuilt one as I found the kit part too much out of
center. For the rope I used brown silk sewing thread which I coated with
Liquid Decal Film to make all unruly fibers lay down, thus doing away very
nicely with the thread’s original rather “fuzzy” look.
The turret’s portholes were filled with PU glue, similar to generating headlights on vehicles.
My abilities in doing metal work certainly improved on this kit, in step with my creativity in finding makeshift ‘tools’ all over the household. On the number of expletives required to release built-up frustrations I invoke my right to remain silent….
| COLORS & MARKINGS |
There is little reference in this regard, all showing the boat in a sort of darkish “battleship” grey. I found this plausible as it would allow the vessel to blend with the waters while probably coming from readily available commercial or nautical stock.
After spraying the completed vessel with my personal mix of Humbrol dark greys (enamel) I misted on several thin layers of the same color, each differently lightened. Drybrushing with a buff color plus a careful dark wash to give some depth to the engraved details eventually resulted in a convincing look.
| CONCLUSIONS |
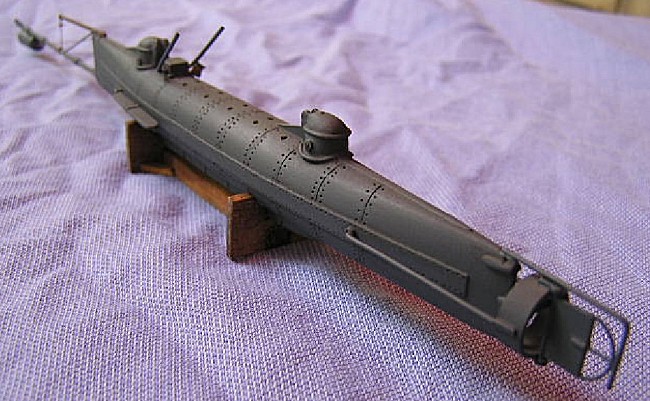
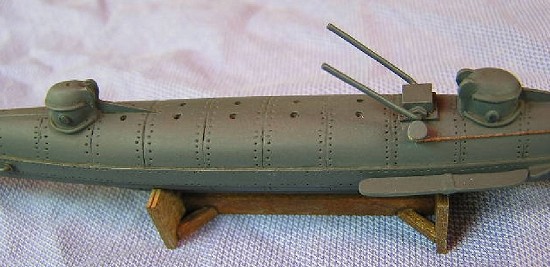 As the model does
not stand safely on its bottom I decided to place it on some kind of rack
which was duly manufactured from wood remnants and quality matches. After
painting with wood stain taken from “household stock” and coating with
Testors dullcoat the stand even looked realistic to my eyes.
As the model does
not stand safely on its bottom I decided to place it on some kind of rack
which was duly manufactured from wood remnants and quality matches. After
painting with wood stain taken from “household stock” and coating with
Testors dullcoat the stand even looked realistic to my eyes.
This is certainly not an easy kit, and it will hardly find buyers outside the range of ACW or submarine aficionados. Still, besides being the only game in town it is manufactured in reasonable (not necessarily satisfactory) quality and will not present unusual difficulties to anybody used to multimedia kits.
After having mastered some new techniques I actually enjoyed the challenge, becoming more and more proud of the results while the project evolved.
Kit courtesy of my friend Jochen who is an avid collector of ACW items but has no mind for modeling!
September 2005
Copyright ModelingMadness.com.
If you would like your product reviewed fairly and fairly quickly , please contact the editor or see other details in the Note to Contributors.